
Amazon DynamoDB Examples
The following are common use cases for Amazon DynamoDB Connector:
-
Creating an Amazon DynamoDB table
-
Deleting an Amazon DynamoDB table
-
Performing an Amazon DynamoDB table scan
Create an Amazon DynamoDB Table
This example shows how to use Amazon DynamoDB connector to create an Amazon DynamoDB table.
Flow for Creating an Amazon DynamoDB Table
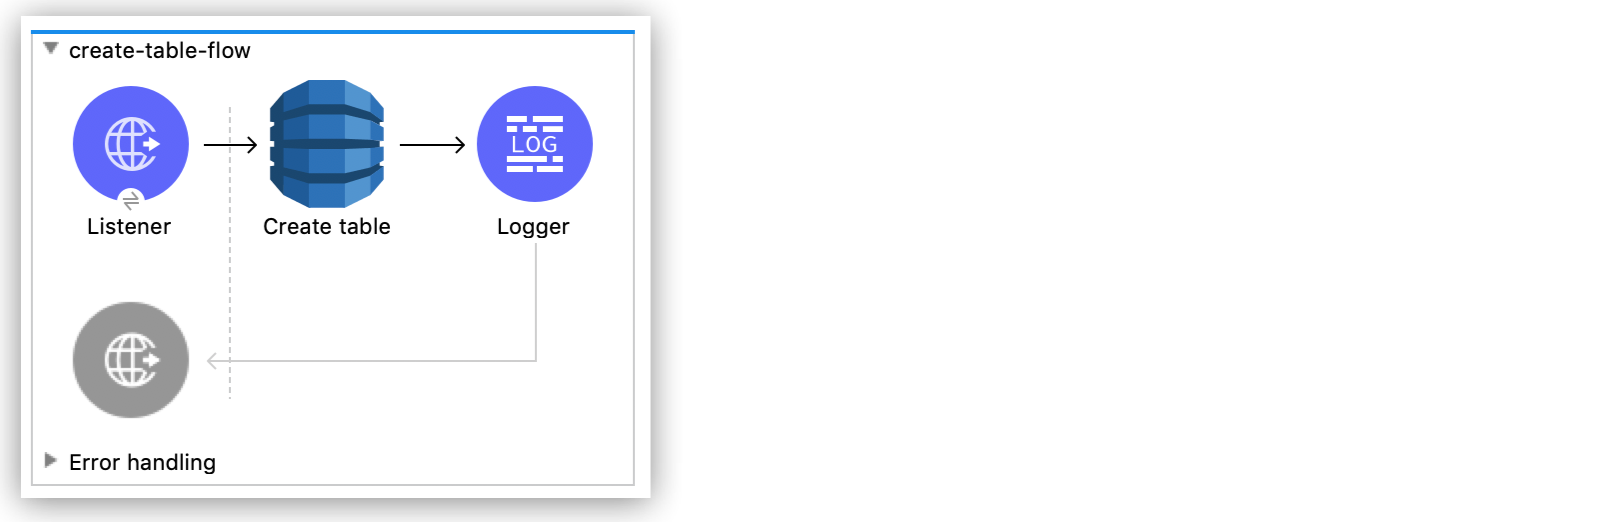
The following screenshot shows an Anypoint Studio flow for creating an Amazon DynamoDB table:
Preliminary Steps
Follow these steps to start creating an Amazon DynamoDB table:
-
Create a new Mule project in Studio.
-
Add the following properties to the
mule-artifact.propertiesfile to store your Amazon DynamoDB credentials:config.accesskey=<Access Key> config.secretkey=<Secret Key> -
Place the
mule-artifact.propertiesfile in the project’ssrc/main/resourcesdirectory.
Configure HTTP Listener
Configure HTTP Listener to listen for HTTP requests on the /createtable path:
-
In the Mule Palette view, search for
httpand select the Listener operation. -
Drag the Listener operation onto the Studio canvas.
-
On the Listener tab, click the plus sign (+) next to the Connector configuration field to access the global element configuration fields for
HTTP Listener. -
In the Host field, select
localhost: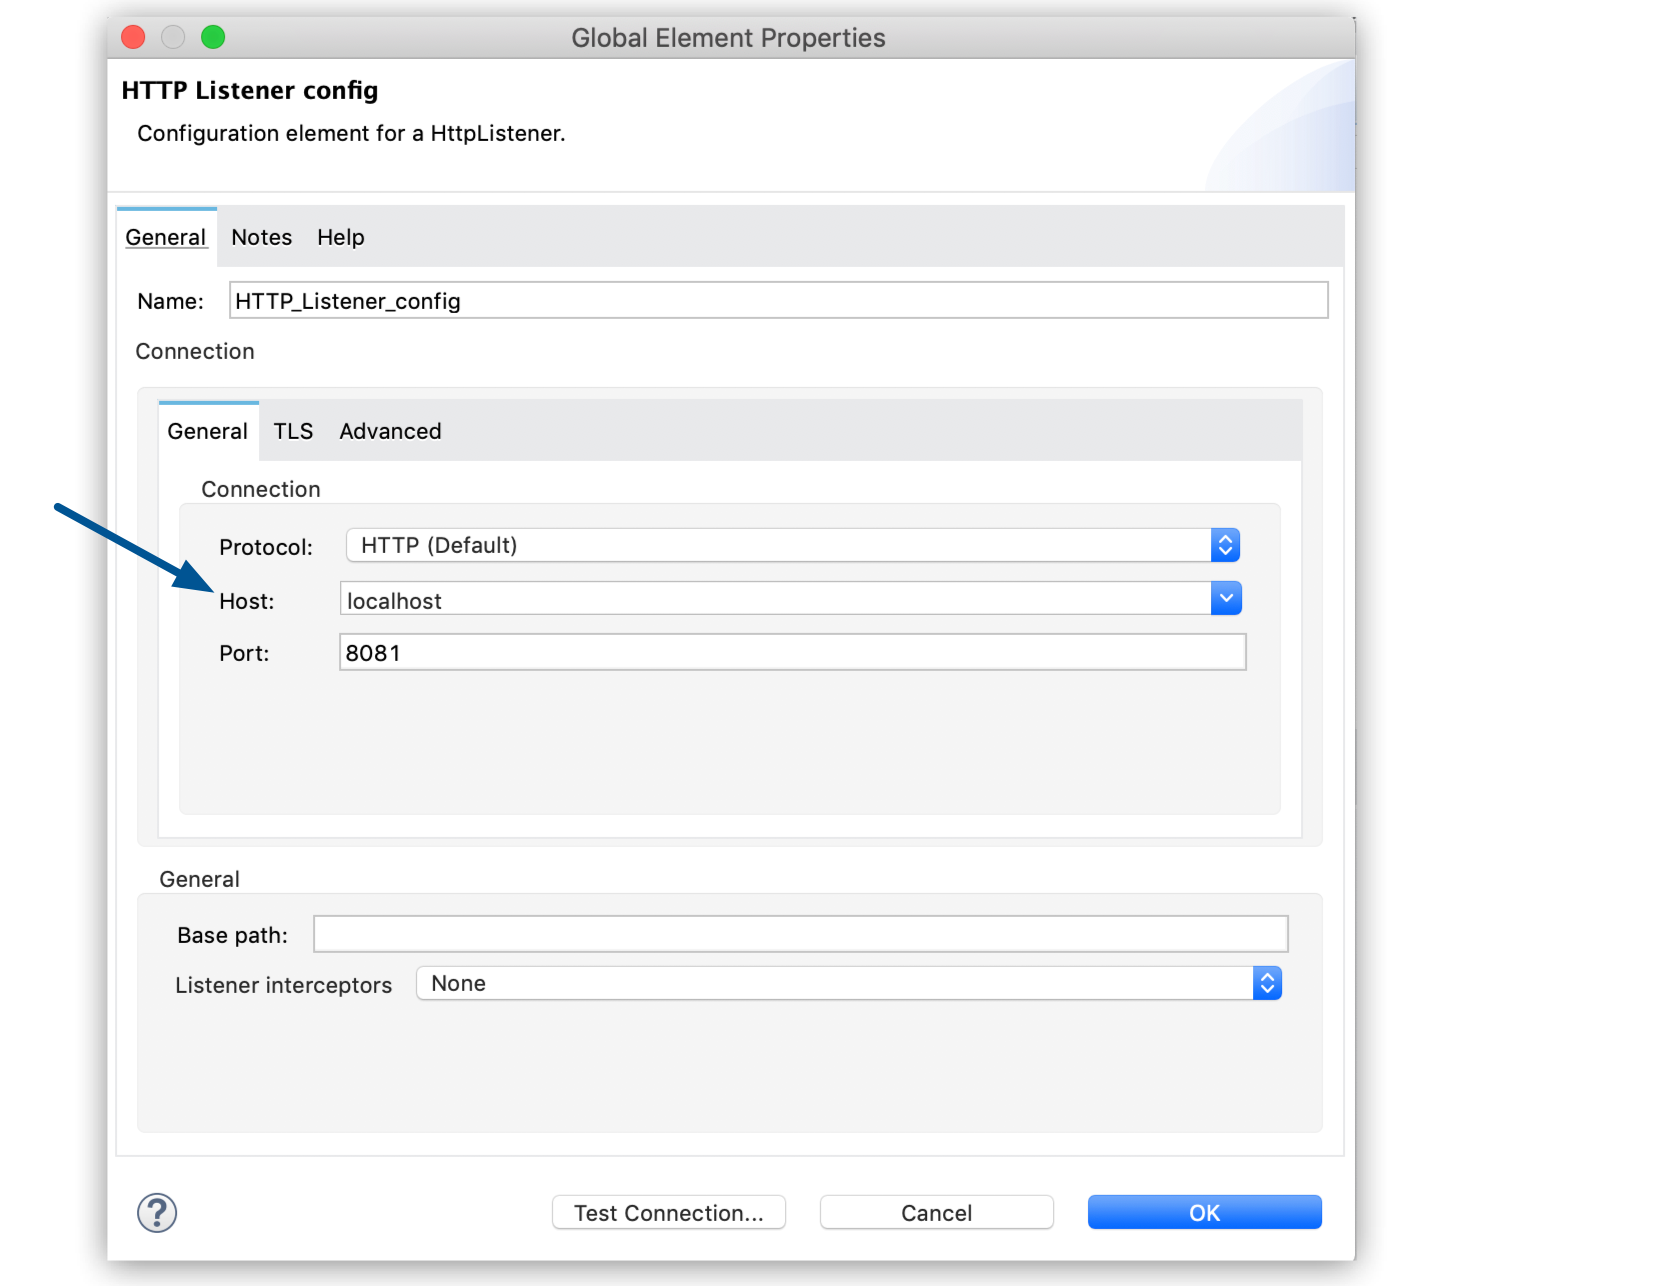 Figure 2. Select
localhostin the Host field to listen for HTTP requests on your local computer. -
Click OK.
-
In the Path field on the Listener tab, enter
/createtable: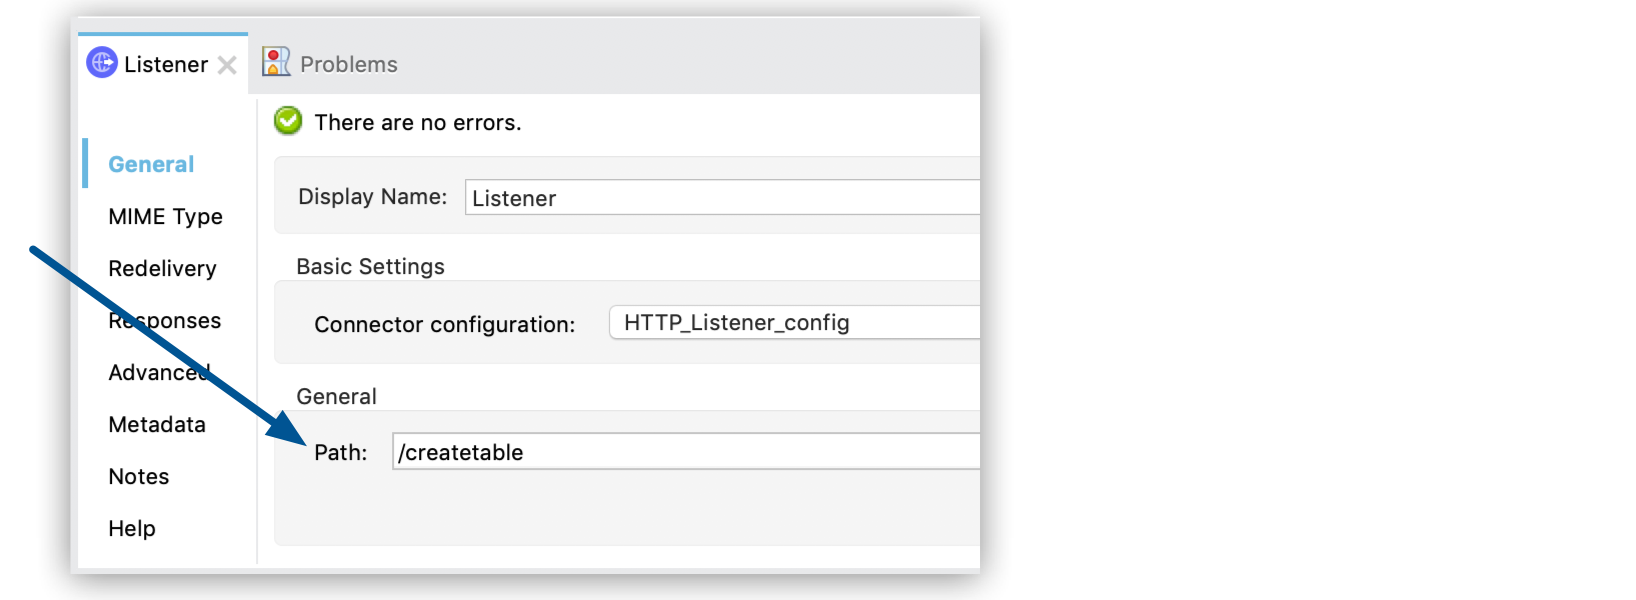 Figure 3. Enter
/createtablein the Path field to listen for HTTP requests on the/createtablepath.
Configure the Create Table Operation
Configure the Create Table operation to create a table named Issues:
-
In the Mule Palette view, click Search in Exchange and search for
amazon dynamodb. -
Select Amazon DynamoDB Connector, click Add>, and then click Finish.
-
Drag the Create Table operation to the right of Listener on the Studio canvas.
-
Click the Global Elements link below the flow.
-
Add the properties file you created earlier to the Configuration properties field, as described in Use Property Placeholders for Property Values.
-
Click Create.
-
Expand Connector Configuration.
-
Select Amazon DynamoDB Configuration and click OK.
-
Complete the following fields:
Parameter Description Value Name
Configuration name
create-table-flowAccess Key
Alphanumeric text string that uniquely identifies the user who owns the account
${config.accesskey}Secret Key
Key that acts as a password
${config.secretkey}Region Endpoint
Region for the Amazon DynamoDB client
us-east-1The following screenshot shows an example of configuring a global element for Amazon DynamoDB Connector:
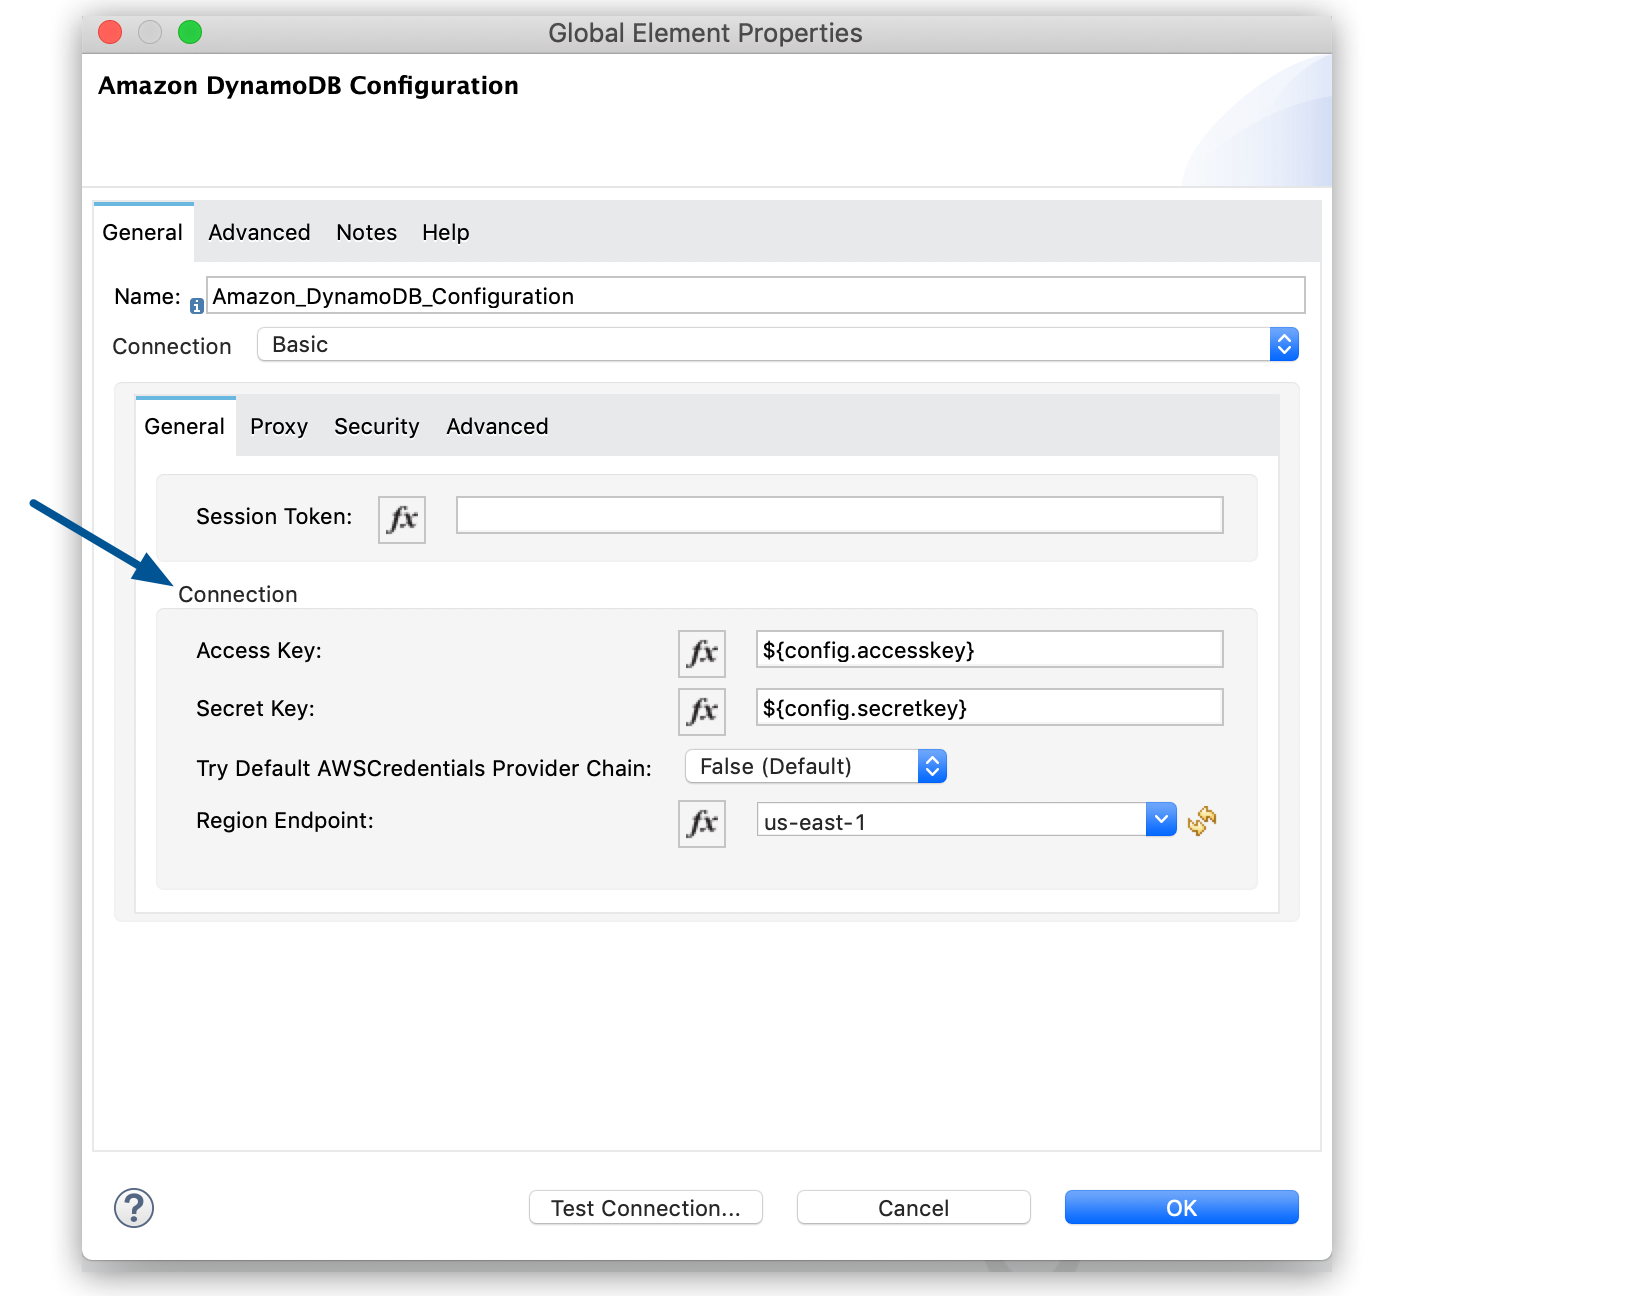 Figure 4. Configure the credentials needed to access Amazon DynamoDB in the Connection section of the global element.
 -
Click Test Connection to confirm that Mule can connect with the Amazon DynamoDB instance:
-
If the connection is successful, click OK to save the configuration.
-
If the connection is unsuccessful, review or correct any incorrect parameters, and then test again.
-
-
Click OK.
-
On the Create table tab, configure the following fields:
Field Description User Action Table name
The name of the table
Enter
Issues.Attribute definitions
An array of attributes that describe the key schema for the table and its indexes
Select
Edit inline, click the green plus sign (+), and add the following attributes:-
IssueIdas typeSTRING -
Titleas typeSTRING -
CreateDateas typeSTRING -
DueDateas typeSTRING
Key schemas
The attributes that make up the primary key for the table or one of its indexes
Select
Edit inline, click the green plus sign (+), add the following attributes:-
IssueIdas key typeHASH -
Titleas key typeRANGE
Read capacity units
The maximum number of strongly consistent reads consumed per second before Amazon DynamoDB returns a throttling exception
Enter
5.Write capacity units
The maximum number of writes consumed per second before Amazon DynamoDB returns a throttling exception
Enter
5.Global secondary indexes
An optional, additional key structure for the table
Enter
#[vars.secondary]to create a variable for the secondary index, and then add the secondary index to the XML code, as described in Add a Secondary Index to the Issues Table.The following screenshot shows an example of configuring the
Create tableoperation: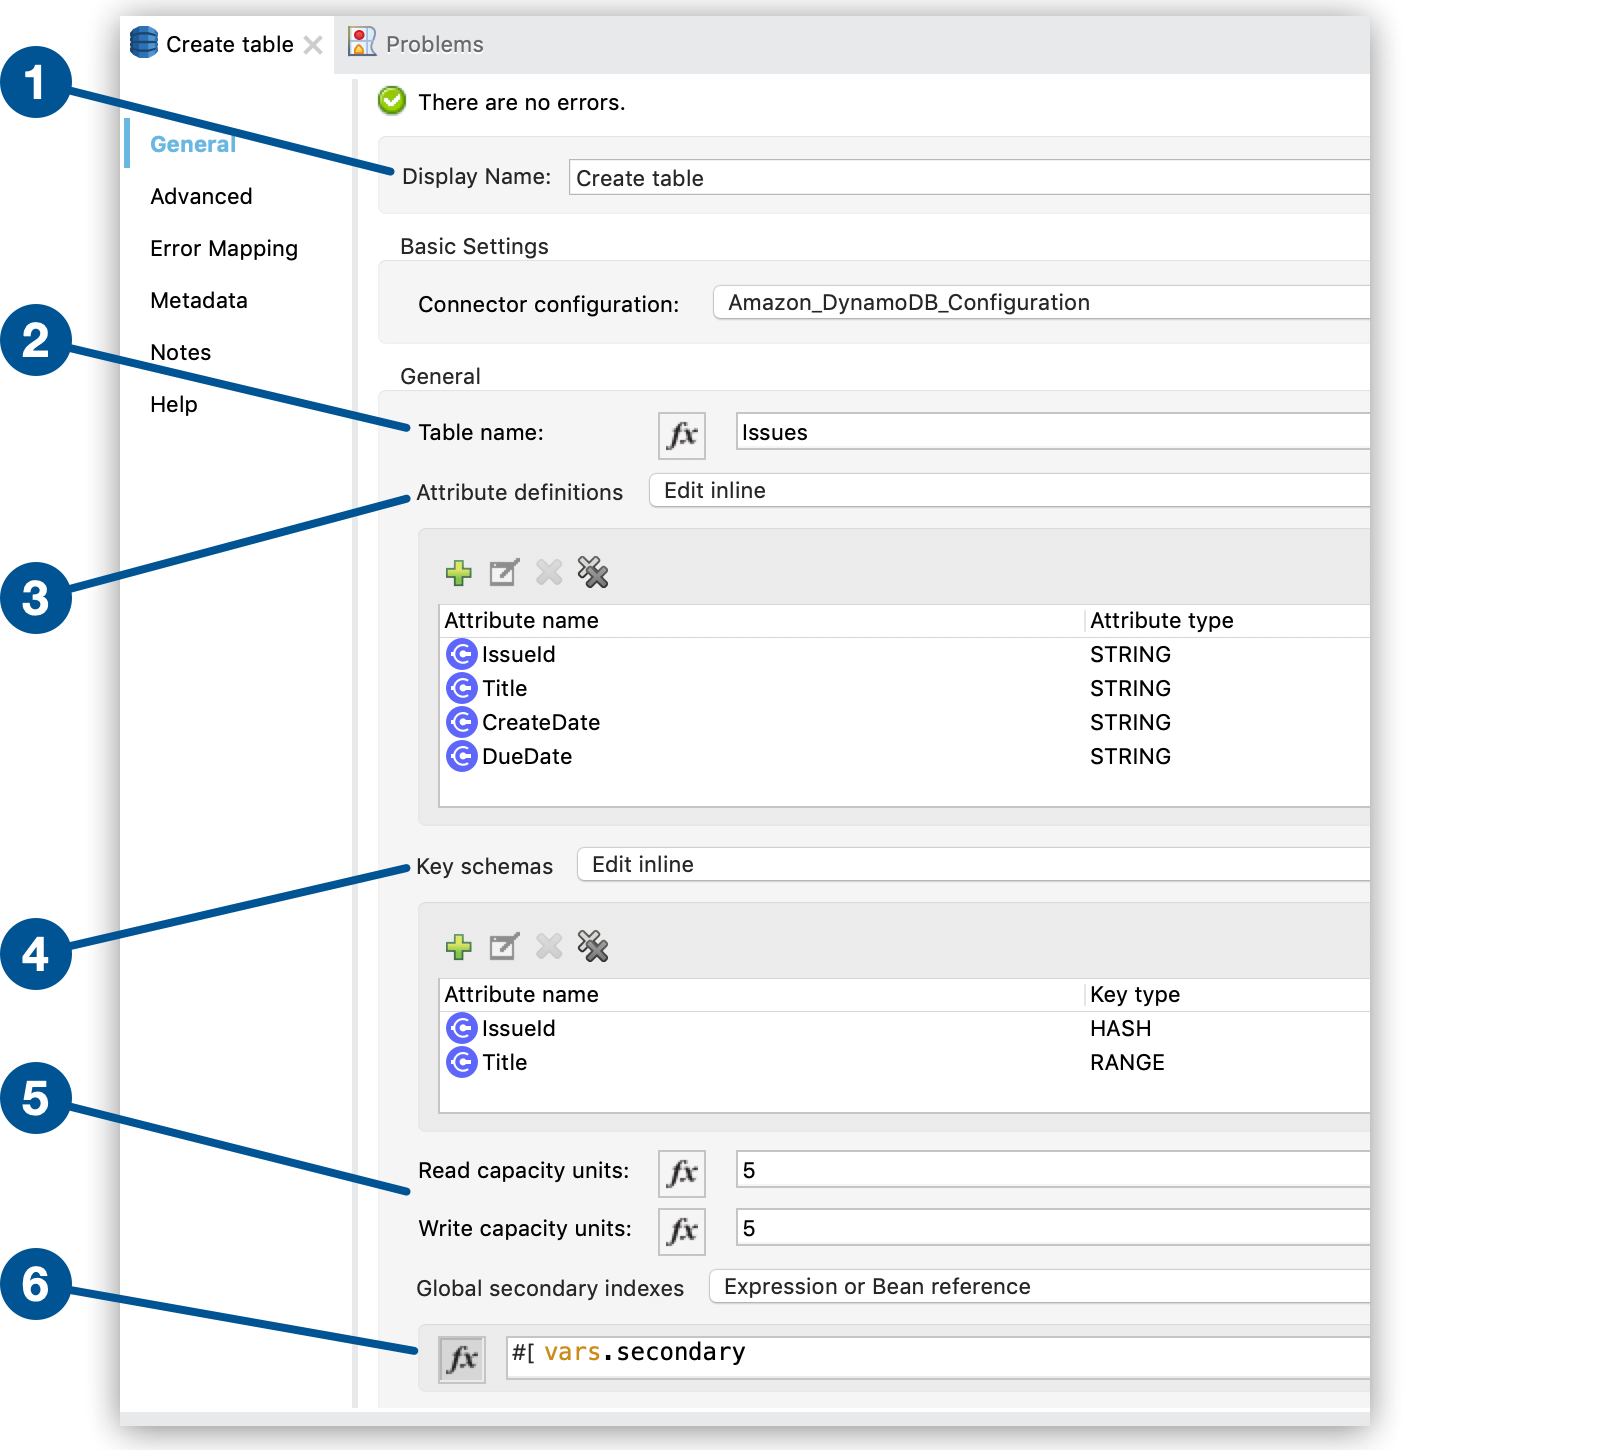 Figure 5. Enter values for the
Create tableoperation fields.In this screenshot:
-
The first item specifies the name of the component that represents the
Create tableoperation in the flow. -
The second item specifies the name of the table to create.
-
The third item defines the attributes of the new table.
-
The fourth item defines the key schemas of the new table.
-
The fifth item specifies the maximum number of strongly consistent reads consumed per second and strongly consistent writes consumed per second before Amazon DynamoDB returns a throttling exception.
-
The sixth item specifies a variable for the secondary index.
-
The XML flow for the create table example looks like this after you configure the HTTP Listener and Create table operations:
<?xml version="1.0" encoding="UTF-8"?>

<mule xmlns:http="http://www.mulesoft.org/schema/mule/http"
xmlns:dynamodb="http://www.mulesoft.org/schema/mule/dynamodb"
xmlns="http://www.mulesoft.org/schema/mule/core"
xmlns:doc="http://www.mulesoft.org/schema/mule/documentation"
xmlns:xsi="http://www.w3.org/2001/XMLSchema-instance"
xsi:schemaLocation="
http://www.mulesoft.org/schema/mule/http http://www.mulesoft.org/schema/mule/http/current/mule-http.xsd
http://www.mulesoft.org/schema/mule/core
http://www.mulesoft.org/schema/mule/core/current/mule.xsd
http://www.mulesoft.org/schema/mule/dynamodb
http://www.mulesoft.org/schema/mule/dynamodb/current/mule-dynamodb.xsd
http://www.mulesoft.org/schema/mule/http
http://www.mulesoft.org/schema/mule/http/current/mule-http.xsd">
	<dynamodb:config
		name="Amazon_DynamoDB_Configuration"
		doc:name="Amazon DynamoDB Configuration">
		<dynamodb:basic-connection
			accessKey="${config.accesskey}"
			secretKey="${config.secretkey}" />
	</dynamodb:config>
	<http:listener-config
		name="HTTP_Listener_config"
		doc:name="HTTP Listener config">
		<http:listener-connection host="localhost"
		port="8081" />
	</http:listener-config>
	<flow name="create-table-flow" >
	<http:listener doc:name="Listener" config-ref="HTTP_Listener_config" path="/createtable"/>
		<dynamodb:create-table doc:name="Create table" config-ref="Amazon_DynamoDB_Configuration" tableName="Issues" readCapacityUnits="5" writeCapacityUnits="5" globalSecondaryIndexes="#[vars.secondary]">
		<dynamodb:attribute-definitions>
			<dynamodb:attribute-definition attributeName="IssueId" attributeType="STRING" />
			<dynamodb:attribute-definition attributeName="Title" attributeType="STRING" />
			<dynamodb:attribute-definition attributeName="CreateDate" attributeType="STRING" />
			<dynamodb:attribute-definition attributeName="DueDate" attributeType="STRING" />
		</dynamodb:attribute-definitions>
		<dynamodb:key-schemas>
			<dynamodb:key-schema-element attributeName="IssueId" keyType="HASH" />
			<dynamodb:key-schema-element attributeName="Title" keyType="RANGE" />
		</dynamodb:key-schemas>
	</dynamodb:create-table>
</flow>
</mule>
Add a Secondary Index to the Issues Table
To add a global secondary index to the Issues table, add a variable before the <dynamodb:create-table> element in the XML.
The following example adds three secondary indexes to the Issues table:
-
CreateDateIndex, with theCreateDatepartition key and theIssueIdsort key -
TitleIndexwith theTitlepartition key and theIssueIdsort key -
DueDateIndexwith theDueDatepartition key
You must include these elements in the XML:
-
<Projection>, which specifies the attributes to copy from the table into the index.In this example, the value
ALLmeans that all attributes are copied.The primary key attributes and index key attributes are automatically copied, no matter what value you set for the
<Projection>element. -
ProvisionedThroughputprovisions throughput for read and write activity. -
KeySchemaspecifies the key schema for the index.
<set-variable value='#[[
            {
                "IndexName": "CreateDateIndex",
                "Projection": {
                    "ProjectionType": "ALL"
                },
                "ProvisionedThroughput": {
                    "WriteCapacityUnits": 5,
                    "ReadCapacityUnits": 5
                },
                "KeySchema": [
                    {
                        "KeyType": "HASH",
                        "AttributeName": "CreateDate"
                    },
                    {
                    	"KeyType": "RANGE",
                    	"AttributeName": "IssueId"
                    }
                ]
            } as Object {
            	class: "org.mule.extension.dynamodb.api.model.GlobalSecondaryIndex"
            },
            {
                "IndexName": "TitleIndex",
                "Projection": {
                    "ProjectionType": "ALL"
                },
                "ProvisionedThroughput": {
                    "WriteCapacityUnits": 5,
                    "ReadCapacityUnits": 5
                },
                "KeySchema": [
                    {
                        "KeyType": "HASH",
                        "AttributeName": "Title"
                    },
                    {
                    	"KeyType": "RANGE",
                    	"AttributeName": "IssueId"
                    }
                ]
            } as Object {
            	class: "org.mule.extension.dynamodb.api.model.GlobalSecondaryIndex"
            },
            {
                "IndexName": "DueDateIndex",
                "Projection": {
                    "ProjectionType": "ALL"
                },
                "ProvisionedThroughput": {
                    "WriteCapacityUnits": 5,
                    "ReadCapacityUnits": 5
                },
                "KeySchema": [
                    {
                        "KeyType": "HASH",
                        "AttributeName": "DueDate"
                    }
                ]
            } as Object {
            	class: "org.mule.extension.dynamodb.api.model.GlobalSecondaryIndex"
            }
        ]]' doc:name="Secondary" variableName="secondary"/>
Configure a Logger Component
Configure a Logger component to print to the Mule console the response generated by the Create Table operation:
-
In the Mule Palette view, search for
logger. -
Drag the Logger component to the right of Create Table on the Studio canvas.
-
Enter
#[payload]in the Message field on the Logger tab.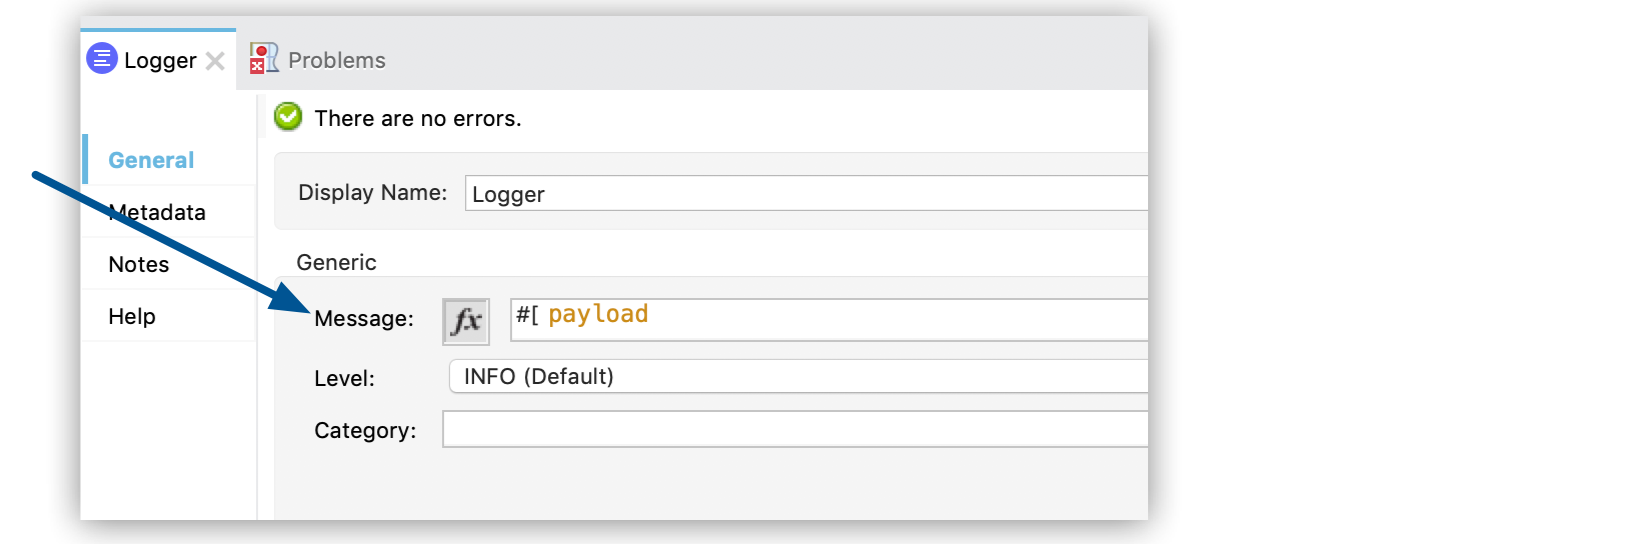 Figure 6. Enter
#[payload]in the Message field to print the operation’s response to the Mule console.
XML for the Complete Create Table Example
The XML for the complete create table example looks like this:
<?xml version="1.0" encoding="UTF-8"?>

<mule xmlns:http="http://www.mulesoft.org/schema/mule/http"
xmlns:dynamodb="http://www.mulesoft.org/schema/mule/dynamodb"
xmlns="http://www.mulesoft.org/schema/mule/core"
xmlns:doc="http://www.mulesoft.org/schema/mule/documentation"
xmlns:xsi="http://www.w3.org/2001/XMLSchema-instance"
xsi:schemaLocation="
http://www.mulesoft.org/schema/mule/http http://www.mulesoft.org/schema/mule/http/current/mule-http.xsd
http://www.mulesoft.org/schema/mule/core
http://www.mulesoft.org/schema/mule/core/current/mule.xsd
http://www.mulesoft.org/schema/mule/dynamodb
http://www.mulesoft.org/schema/mule/dynamodb/current/mule-dynamodb.xsd
http://www.mulesoft.org/schema/mule/http
http://www.mulesoft.org/schema/mule/http/current/mule-http.xsd">
	<dynamodb:config
		name="Amazon_DynamoDB_Configuration"
		doc:name="Amazon DynamoDB Configuration">
		<dynamodb:basic-connection
			accessKey="${config.accesskey}"
			secretKey="${config.secretkey}" />
	</dynamodb:config>
	<http:listener-config
		name="HTTP_Listener_config"
		doc:name="HTTP Listener config">
		<http:listener-connection host="localhost"
		port="8081" />
	</http:listener-config>
	<flow name="create-table-flow" >
	<http:listener doc:name="Listener" config-ref="HTTP_Listener_config" path="/createtable"/>

		<set-variable value='#[[
            {
                "IndexName": "CreateDateIndex",
                "Projection": {
                    "ProjectionType": "ALL"
                },
                "ProvisionedThroughput": {
                    "WriteCapacityUnits": 5,
                    "ReadCapacityUnits": 5
                },
                "KeySchema": [
                    {
                        "KeyType": "HASH",
                        "AttributeName": "CreateDate"
                    },
                    {
                    	"KeyType": "RANGE",
                    	"AttributeName": "IssueId"
                    }
                ]
            } as Object {
            	class: "org.mule.extension.dynamodb.api.model.GlobalSecondaryIndex"
            },
            {
                "IndexName": "TitleIndex",
                "Projection": {
                    "ProjectionType": "ALL"
                },
                "ProvisionedThroughput": {
                    "WriteCapacityUnits": 5,
                    "ReadCapacityUnits": 5
                },
                "KeySchema": [
                    {
                        "KeyType": "HASH",
                        "AttributeName": "Title"
                    },
                    {
                    	"KeyType": "RANGE",
                    	"AttributeName": "IssueId"
                    }
                ]
            } as Object {
            	class: "org.mule.extension.dynamodb.api.model.GlobalSecondaryIndex"
            },
            {
                "IndexName": "DueDateIndex",
                "Projection": {
                    "ProjectionType": "ALL"
                },
                "ProvisionedThroughput": {
                    "WriteCapacityUnits": 5,
                    "ReadCapacityUnits": 5
                },
                "KeySchema": [
                    {
                        "KeyType": "HASH",
                        "AttributeName": "DueDate"
                    }
                ]
            } as Object {
            	class: "org.mule.extension.dynamodb.api.model.GlobalSecondaryIndex"
            }
        ]]' doc:name="Secondary" variableName="secondary"/>

		<dynamodb:create-table doc:name="Create table" config-ref="Amazon_DynamoDB_Configuration" tableName="Issues" readCapacityUnits="5" writeCapacityUnits="5" globalSecondaryIndexes="#[vars.secondary]">
		<dynamodb:attribute-definitions>
			<dynamodb:attribute-definition attributeName="IssueId" attributeType="STRING" />
			<dynamodb:attribute-definition attributeName="Title" attributeType="STRING" />
			<dynamodb:attribute-definition attributeName="CreateDate" attributeType="STRING" />
			<dynamodb:attribute-definition attributeName="DueDate" attributeType="STRING" />
		</dynamodb:attribute-definitions>
		<dynamodb:key-schemas>
			<dynamodb:key-schema-element attributeName="IssueId" keyType="HASH" />
			<dynamodb:key-schema-element attributeName="Title" keyType="RANGE" />
		</dynamodb:key-schemas>
	</dynamodb:create-table>
		<logger level="INFO" doc:name="Logger"
    message="#[payload]"/>
</flow>
</mule>
Run the Project
Save and run the project as a Mule app:
-
In Package Explorer, right-click the project name and click Run As > Mule Application.
-
Open a browser and check the response after you enter the
http://localhost:8081/createtableURL.You see the generated response from the
Create tableoperation in the Mule console.
Delete an Amazon DynamoDB Table
This example shows how to use Amazon DynamoDB connector to delete an Amazon DynamoDB table.
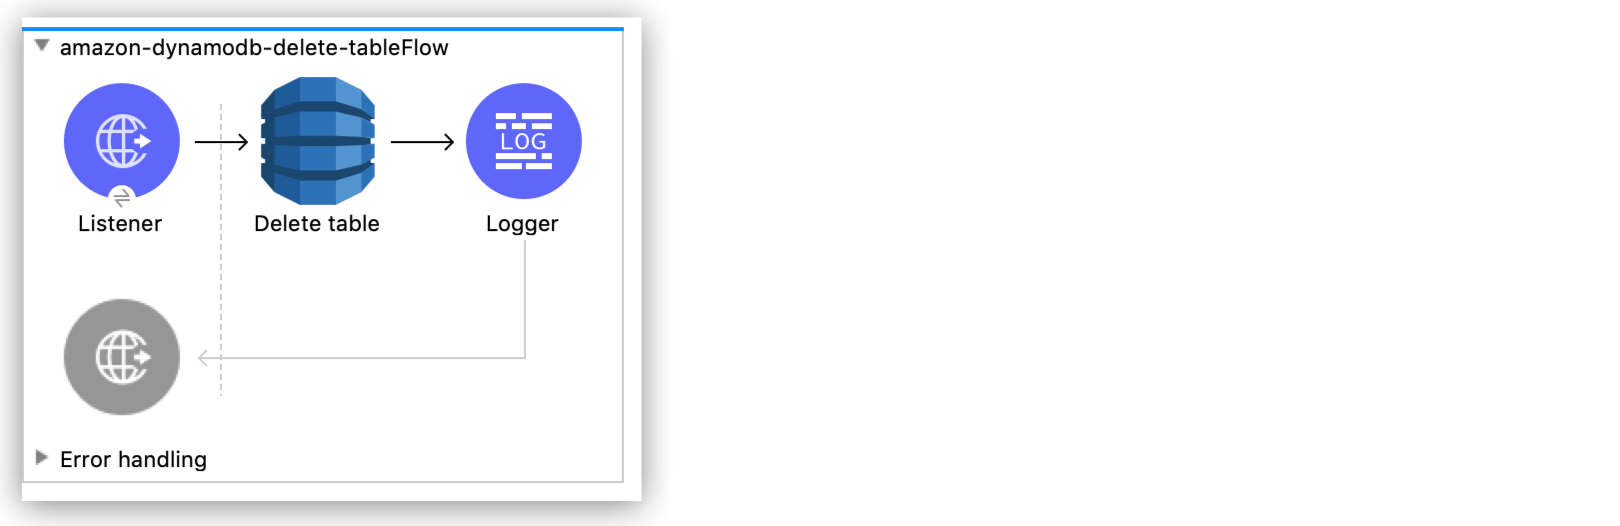
Flow for Deleting a DynamoDB Table
The following screenshot shows an Anypoint Studio flow for deleting an Amazon DynamoDB table:
Preliminary Steps
Follow these steps to start deleting an Amazon DynamoDB table:
-
Create a new Mule project in Studio.
-
Add the following properties to the
mule-artifact.propertiesfile to hold your Amazon DynamoDB credentials:config.accesskey=<Access Key> config.secretkey=<Secret Key> -
Place the
mule-artifact.propertiesfile in the project’ssrc/main/resourcesdirectory.
Configure HTTP Listener
Configure HTTP Listener to listen for HTTP requests on the /deletetable path:
-
In the Mule Palette view, search for
httpand select the Listener operation. -
Drag the Listener operation onto the Studio canvas.
-
On the Listener tab, click the plus sign (+) next to the Connector configuration field to access the global element configuration fields for
HTTP Listener. -
In the Host field, select
localhostand click OK. -
In the Path field on the Listener tab, enter
/deletetable.
Configure the Delete Table Operation
Configure the Delete table operation to delete the Issues table.
-
In the Mule Palette view, click Search in Exchange and search for
amazon dynamodb. -
Select Amazon DynamoDB Connector, click Add>, and then click Finish.
-
Drag the Delete Table operation to the right of Listener on the Studio canvas.
-
Click the Global Elements link below the flow.
-
Add the properties file you created earlier to the Configuration properties field, as described in Use Property Placeholders for Property Values.
-
Click Create.
-
Expand Connector Configuration.
-
Select Amazon DynamoDB Configuration and click OK.
-
Complete the following fields:
Parameter Description Value Name
Configuration name
delete-table-flowAccess Key
Alphanumeric text string that uniquely identifies the user who owns the account
${config.accesskey}Secret Key
Key that acts as a password
${config.secretkey}Region Endpoint
Region for the Amazon DynamoDB client
us-east-1The corresponding XML configuration looks like this:
<dynamodb:config name="Amazon_DynamoDB_Configuration1" doc:name="Amazon DynamoDB Configuration" > <dynamodb:basic-connection accessKey="${config.accesskey}" secretKey="${config.secretkey}" /> </dynamodb:config> -
Click Test Connection to confirm that Mule can connect with the Amazon DynamoDB instance:
-
If the connection is successful, click OK to save the configuration.
-
If the connection is unsuccessful, review or correct any incorrect parameters, and then test again.
-
-
Click OK.
-
On the Delete table tab, set the value of
Table nametoIssues.
Configure a Logger Component
Configure a Logger component to print to the Mule console the response generated by the Delete table operation:
-
In the Mule Palette view, search for
logger. -
Drag the Logger component to the right of Delete Table on the Studio canvas.
-
On the Logger tab, enter
#[payload]in the Message field.
XML for the Delete Table Example
The XML for the delete table example looks like this:
<?xml version="1.0" encoding="UTF-8"?>

<mule xmlns:dynamodb="http://www.mulesoft.org/schema/mule/dynamodb" xmlns:http="http://www.mulesoft.org/schema/mule/http"
	xmlns="http://www.mulesoft.org/schema/mule/core"
	xmlns:doc="http://www.mulesoft.org/schema/mule/documentation" xmlns:xsi="http://www.w3.org/2001/XMLSchema-instance" xsi:schemaLocation="http://www.mulesoft.org/schema/mule/core http://www.mulesoft.org/schema/mule/core/current/mule.xsd
http://www.mulesoft.org/schema/mule/http http://www.mulesoft.org/schema/mule/http/current/mule-http.xsd
http://www.mulesoft.org/schema/mule/dynamodb http://www.mulesoft.org/schema/mule/dynamodb/current/mule-dynamodb.xsd">
	<http:listener-config name="HTTP_Listener_config" doc:name="HTTP Listener config" >
		<http:listener-connection host="localhost" port="8081" />
	</http:listener-config>
	<dynamodb:config name="Amazon_DynamoDB_Configuration" doc:name="Amazon DynamoDB Configuration" >
		<dynamodb:basic-connection accessKey="${config.accesskey}" secretKey="${config.secretkey}" />
	</dynamodb:config>
	<flow name="delete-table-flow" >
		<http:listener doc:name="Listener" config-ref="HTTP_Listener_config" path="/deletetable"/>
		<dynamodb:delete-table doc:name="Delete table" config-ref="Amazon_DynamoDB_Configuration" tableName="Issues"/>
		<logger level="INFO" doc:name="Logger" message="#[payload]"/>
	</flow>
</mule>
Run the Project
Save and run the project as a Mule app:
-
In Package Explorer, right-click the project name and click Run As > Mule Application.
-
Open a browser and check the response after you enter the
http://localhost:8081/deletetableURL.You see the generated response from the
Delete tableoperation in the Mule console.
Scan an Amazon DynamoDB Table
This example shows how to use Amazon DynamoDB Connector to scan an Amazon DynamoDB table.
The following considerations apply to performing a scan using Amazon DynamoDB Connector:
-
The DynamoDB AWS SDK paginates results by dividing them into specific pages.
A 1-MB limit applies to returned results. When this limit is exceeded, you must perform another scan to receive the rest of the data.
-
To perform subsequent scans, apply the value of the
LastEvaluatedKeyfield in the JSON response to theExclusive start keysfield in the Studio configuration of theScanoperation.When the operation has returned all pages of data, the
LastEvaluatedKeyvalue in the JSON response is null.
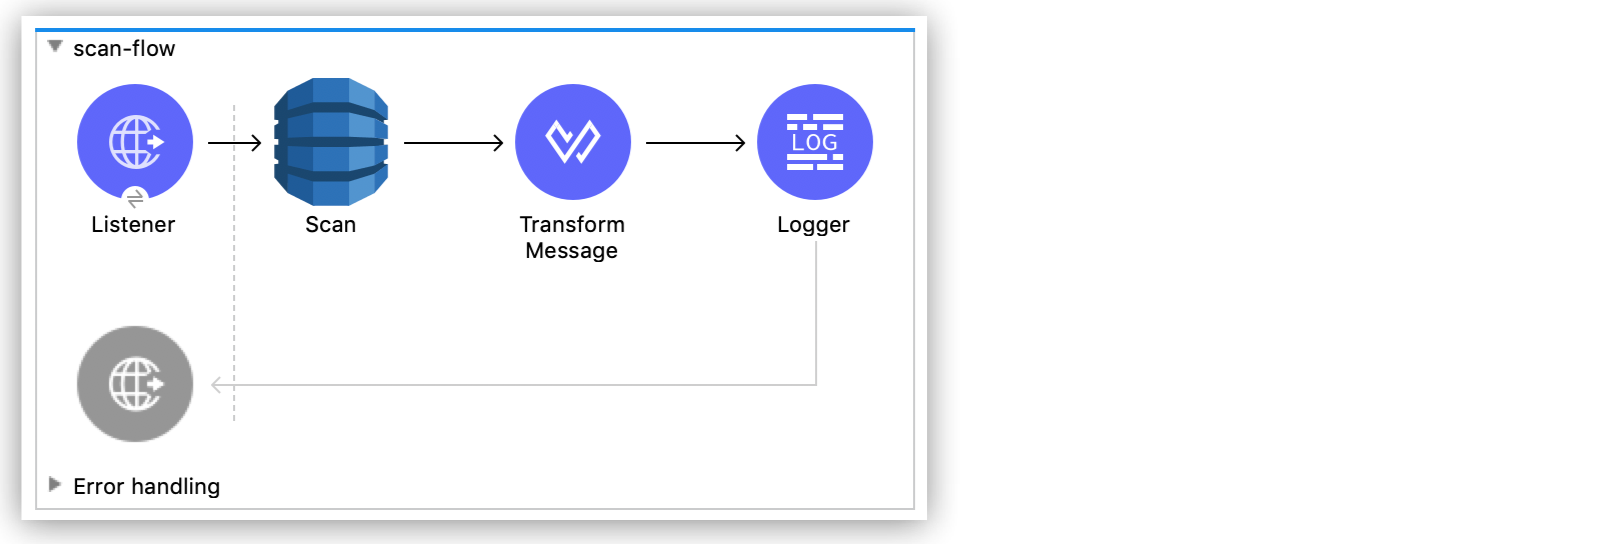
Flow for Scanning a Table
The following screenshot shows an Anypoint Studio flow for scanning an Amazon DynamoDB table:
Preliminary Steps
Follow these steps to start scanning an Amazon DynamoDB table:
-
Create a new Mule project in Studio.
-
Add the following properties to the
mule-artifact.propertiesfile to hold your Amazon DynamoDB credentials:config.accesskey=<Access Key> config.secretkey=<Secret Key> -
Place the
mule-artifact.propertiesfile in the project’ssrc/main/resourcesdirectory.
Configure HTTP Listener
Configure HTTP Listener to listen for HTTP requests on the /scantable path:
-
In the Mule Palette view, search for
httpand select the Listener operation. -
Drag the Listener operation onto the Studio canvas.
-
On the Listener tab, click the plus sign (+) next to the Connector configuration field to access the global element configuration fields for
HTTP Listener. -
In the Host field, select
localhostand click OK. -
In the Path field on the Listener tab, enter
/scantable.
Configure the Scan Operation
-
In the Mule Palette view, click Search in Exchange and search for
amazon dynamodb. -
Select Amazon DynamoDB Connector, click Add>, and then click Finish.
-
Drag the Scan operation to the right of Listener on the Studio canvas.
-
Click the Global Elements link below the flow.
-
Add the properties file you created earlier to the Configuration properties field, as described in Use Property Placeholders for Property Values.
-
Click Create.
-
Expand Connector Configuration.
-
Select Amazon DynamoDB Configuration and click OK.
-
Complete the following fields:
Parameter Description Value Name
Configuration name
scan-table-flowAccess Key
Alphanumeric text string that uniquely identifies the user who owns the account
${config.accesskey}Secret Key
Key that acts as a password
${config.secretkey}Region Endpoint
Region for the Amazon DynamoDB client
us-east-1 -
Click Test Connection to confirm that Mule can connect with the Amazon DynamoDB instance:
-
If the connection is successful, click OK to save the configuration.
-
If the connection is unsuccessful, review or correct any incorrect parameters, and then test again.
-
-
Click OK.
-
On the Scan tab, set the value of
Table nametoIssues.
Configure a Transform Message Component
Configure a Transform Message component to change the Scan operation output from Java to JSON:
-
In the Mule Palette view, search for
transform. -
Drag the Transform Message component to the right of Scan on the Studio canvas.
-
In the Output section of the Scan operation, change
output/application/javatooutput/application/json.
Configure a Logger Component
Configure a Logger component to print to the Mule console the response generated by the Scan operation:
-
In the Mule Palette view, search for
Logger. -
Drag the Logger component to the right of Transform on the Studio canvas.
-
Enter
#[payload]in the Message field on the Logger tab.
XML for the Scan Table Example
The XML for the scan table example looks like this:
<?xml version="1.0" encoding="UTF-8"?>

<mule xmlns:ee="http://www.mulesoft.org/schema/mule/ee/core" xmlns:dynamodb="http://www.mulesoft.org/schema/mule/dynamodb"
	xmlns:http="http://www.mulesoft.org/schema/mule/http"
	xmlns="http://www.mulesoft.org/schema/mule/core" xmlns:doc="http://www.mulesoft.org/schema/mule/documentation" xmlns:xsi="http://www.w3.org/2001/XMLSchema-instance" xsi:schemaLocation="http://www.mulesoft.org/schema/mule/core http://www.mulesoft.org/schema/mule/core/current/mule.xsd
http://www.mulesoft.org/schema/mule/http http://www.mulesoft.org/schema/mule/http/current/mule-http.xsd
http://www.mulesoft.org/schema/mule/dynamodb http://www.mulesoft.org/schema/mule/dynamodb/current/mule-dynamodb.xsd
http://www.mulesoft.org/schema/mule/ee/core http://www.mulesoft.org/schema/mule/ee/core/current/mule-ee.xsd">
	<http:listener-config name="HTTP_Listener_config" doc:name="HTTP Listener config" >
		<http:listener-connection host="localhost" port="8081" />
	</http:listener-config>
	<dynamodb:config name="Amazon_DynamoDB_Configuration" doc:name="Amazon DynamoDB Configuration" >
		<dynamodb:basic-connection accessKey="${config.accesskey}" secretKey="${config.secretkey}" />
	</dynamodb:config>
	<dynamodb:config name="Amazon_DynamoDB_Configuration1" doc:name="Amazon DynamoDB Configuration" >
		<dynamodb:basic-connection accessKey="${config.accesskey}" secretKey="${config.secretkey}" />
	</dynamodb:config>
	<flow name="delete-table-flow" >
		<http:listener doc:name="Listener" path="/scantable" config-ref="HTTP_Listener_config"/>
		<dynamodb:scan doc:name="Scan" config-ref="Amazon_DynamoDB_Configuration1" tableName="Issues"/>
		<ee:transform doc:name="Transform Message" >
			<ee:message >
				<ee:set-payload ><![CDATA[%dw 2.0
output application/json
---
{
}]]></ee:set-payload>
			</ee:message>
		</ee:transform>
		<logger level="INFO" doc:name="Logger" message="#[payload]"/>
	</flow>
</mule>
Response to the Scan Table Example
The response to a Scan operation might look like this (with other sections of the response omitted for brevity):
{
  "scannedCount": 2,
  "lastEvaluatedKey": null,
  "count": 2,
  "consumedCapacity": null,
  "items": [
    {
      "studentID": {
        "ss": null,
        "nullvalue": null,
        "b": null,
        "bool": null,
        "ns": null,
        "l": null,
        "m": null,
        "n": null,
        "bs": null,
        "s": "102"
      },
      ...
  ]
}
Run the Project
Save and run the project as a Mule app:
-
In Package Explorer, right-click the project name and click Run As > Mule Application.
-
Open a browser and check the response after you enter the
http://localhost:8081/scantableURL.You see the generated response from the
Scanoperation in the Mule console.