CORS
The CORS (Cross-Origin Resource Sharing) standard specifies HTTP headers for servers to describe the set of origins allowed to read data using a web browser. For HTTP methods other than GET, and POST in some cases, the specification mandates that browsers preflight the request by obtaining supported methods from the server with an HTTP OPTIONS request. Upon server approval, the browser sends the actual request with the HTTP OPTIONS request. Servers can also notify clients to send credentials, such as Cookies and HTTP Authentication tokens, with requests.
To pre-flight a request, set the response headers in the Mule application per the following CORS specification:
"User agents must filter out all response headers other than those that are a simple response header or of which the field name is an ASCII case-insensitive match for one of the values of the Access-Control-Expose-Headers headers (if any), before exposing response headers to APIs defined in CORS API specifications."
The resource indicates which methods and headers, other than simple methods and simple headers, it is willing to handle and whether it supports credentials. After making a simple-request, the headers that your application set, apart from the simple-request headers, are returned. If you haven’t set any headers in the Mule application, none are returned. Adding the headers in the CORS policy is equivalent to allowlisting the headers you are able to return.
Applying a CORS Policy
To apply a CORS policy:
-
Click the version number of an API.
-
On the API dashboard, click Policies.
The list of any applied policies appears.
-
In Apply New Policy.
-
In Select Policy, choose Cross-Origin Resource Sharing, and click Configure Policy.
-
If this is a public resource, click Apply. If not, uncheck Public Resource.
You can’t specify a new group until you specify the Default group. The Default group is not a fallback in the normal sense of a default. In this case, it is only the first group you configure for CORs.
-
To make a credentialed request, click Support credentials. For more information, see Mozilla’s Request with credentials article, and specify the group.
-
For the Default group, in Origins, specify one or more domain names, such as mulesoft.com. Separate multiple names with commas.
-
If needed, change Access Control Max Age to specify how long a preflight request can be cached.
-
In Methods, select Methods to govern with the policy.
-
In Headers, optionally list headers allowed by the API in the client request.
-
In Exposed Headers, optionally list response headers the client can access.
-
-
Click Apply.
Editing a CORS Policy
After creating a CORS policy, on the API dashboard, click Actions > Edit to edit the policy.
-
Change values as needed.
-
Click Apply.
Troubleshooting CORS Policy
If you cannot implement CORS for your API, another possible solution to an unreachable API is to disable the same-origin restrictions in your browser.
Disable Same-Origin Restrictions in your Browser
Each browser handles these restrictions in a unique way and tips, tricks, and plugins are available on the internet.
Make sure you understand the potential security implications of changing browser security settings. You should only use these options for testing on your own web pages because the browser can become vulnerable to malicious scripts and other potential threats.
Google Chrome for Mac OS X
-
Open a new Terminal window, paste the following line, and then press Enter:
open -a Google\ Chrome --args --disable-web-security.
Google Chrome for Windows
-
Open a new Command Prompt window, navigate to the location of the Chrome executable (Chrome.exe), paste the following line, and then press Enter:
chrome.exe --disable-web-security.
Internet Explorer
Enable the option to access data sources across domains. In some versions of Internet Explorer, this option is in Internet Properties > Security tab > Custom Level in Security Level for this Zone > Miscellaneous > Enable Access to Data Sources Across Domains.
Bypass the Proxy
If you use the Anypoint Platform tools in an environment that blocks inbound requests using a firewall, bypass the proxy as described in this section.
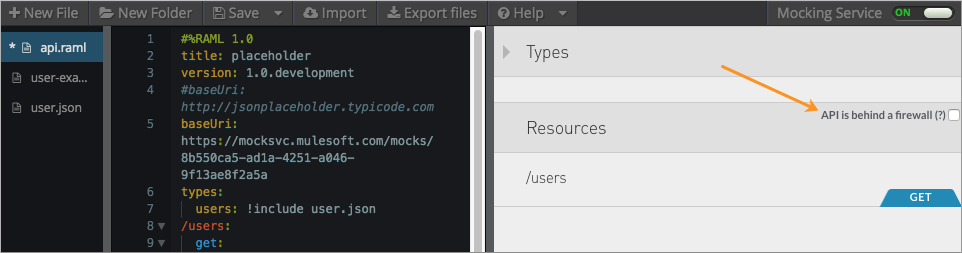
Bypassing the Proxy for the API Console and API Designer
Go to the API Designer for your API. On the right pane, check that the API is behind a firewall, which bypasses the proxy.
Bypassing the Proxy for the API Notebook
Go to the API Notebook for your API. In the initial code cell that creates a client, create a new code cell with the following code to set a new proxy configuration on the client:
API.set(client, 'proxy', false);
In the line above, client represents the name of your client that you used when you called API.createClient(). For example:
API.createClient(<name of client>, …);
Combining these two lines together, the following example creates a new client and then bypass the default proxy:
API.createClient('myClient', '+http://api-portal.anypoint.mulesoft.com/my-client/api/test-api/test.raml+');
API.set(myClient, 'proxy', false);