Creating a Custom Policy
To create a custom policy, you need to be assigned to the Organization Administrators Role.
Creating the Configuration File
This procedure describes how to create a custom policy configuration file. At the end of this procedure, you can download the complete file.
-
Open a new text file, and create policy, before, and pointcut elements.
-
Create policy, ID, and policyName elements to track the policy for analytics.
<policy xmlns="http://www.mulesoft.org/schema/mule/policy" id="{{policyId}}" policyName="Regex Filter"xml -
Add a
beforesection to execute on every request to the API before the actual API services are called. Theaftersection is not needed; return results need no processing. -
Include a filter element in the before section that references an element named Expression. This filter element has a name property that matches the referenced element.
The expression parameter specifies the filtering conditions and the targeted element to filter. The YAML file defines these parameters, which are wrapped in
{{curly brackets}}in the XML configuration file: {{regexFilter}} is used as the filtering condition.{{queryParamm}}is used to construct expression that references the desired query parameter. -
Include a message filter, which is a standard Mule element, to filter the incoming request. This element does not actually define the filter logic, but references the Expression element that specifies the filter’s behavior.
-
Add an onUnaccepted property in the opening tag of the filter element in the before section references the policyViolation element.
... <!-- This executes right after the inbound endpoint of the application --> <before> <mule:message-filter xmlns:mule="http://www.mulesoft.org/schema/mule/core" onUnaccepted="policyViolation"> <mule:filter ref="Expression"/> </mule:message-filter> </before>xmlWhen the criteria specified by the filter is not matched, this property calls and executes the referenced element.
-
Save the file using a .xml extension.
Creating the Definition File
In this procedure, you create a YAML file that contains the policy definition file. Next, to filter calls to the API, the policy definition includes a query parameter and a regular expression to filter the query parameter. Unmatched requests are rejected. Properties map to the elements in the UI when you apply the policy. At the end of this procedure, you can download the complete file.
-
Open a new text file, and define the required properties for a policy in Anypoint Platform.
-
Add the
resourceLevelSupported: trueproperty if you run Mule 3.8.1 or later. This property supports resource level policies.id: query-param-filter name: Query Param Filter description: Filters query parameters category: Security type: custom standalone: true requiresConnectivity: false resourceLevelSupported: true providedCharacteristics: [] requiredCharacteristics: []yaml -
Add a configuration element and two propertyName fields having the values regexFilter and queryParam.
-
Add properties to define the regular expression to filter the parameter and to name and define the query parameter that must be evaluated.
id: query-param-filter name: Query Param Filter description: Filters query parameters category: Security type: custom standalone: true requiresConnectivity: false resourceLevelSupported: true providedCharacteristics: [] requiredCharacteristics: [] configuration: - propertyName: regexFilter name: Regex Filter description: A regular expression to filter a query parameter. Rejects unmatched requests. type: string defaultValue: optional: true sensitive: false allowMultiple: false - propertyName: queryParam name: Query Parameter description: Name of a query parameter to filter by a regular expression. type: string defaultValue: optional: false sensitive: false allowMultiple: falseyaml -
Save the file using a
.yamlextension. For example, save the file asmypolicy.yaml.
Defining the Before and After Exception Blocks
Enclosed within the main element of the configuration file are two fundamental structures you can add: <before></before> and <after></after> tags. Both are optional, but your policy must have at least one of them if you want it to perform any action at all.
The following versions support the custom policy exception blocks:
Mule Gateway/Mule Runtimes:
-
v3.8.4 >= version < v4.0.0
-
v2.2.1 >= version < v3.8.0
-
v2.1.2 >= version < v2.2.0
As shown in the following flow, content between the before tags executes every time there’s an incoming request to your API, as soon as the request reaches the inbound endpoint, and before your API executes any of the remaining message processors in your flows. Content between the after tags likewise executes every time there’s a request to your API, right before reaching the outbound endpoint in your API, and after having executed every other one of the message processors in your flows.
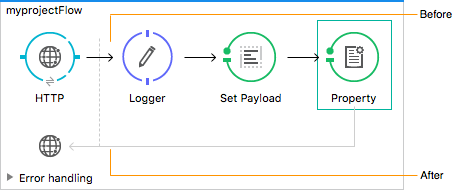
In addition to the <before></before> and <after></after> tags, you can also add <mule:processor-chain></mule:processor-chain> tags as additional flows where you can perform more procedures. These flows don’t execute on their own, they must be referenced one way or another by either the before or the after sections of your policy. When writing a policy, unlike when writing a Mule application, you must add a mule: suffix to the name of the element.
<policy>
<before>
<!-- Elements automatically executed at the start -->
</before>
<after>
<!-- Elements automatically executed at the end -->
</after>
<mule:processor-chain name="chain1">
<!-- This flow may be called to be executed by the others -->
</mule:processor-chain>
<mule:processor-chain name="chain2">
<!-- This flow may be called to be executed by the others -->
</mule:processor-chain>
</policy>xmlThe DataWeave component is supported for use within Custom Policies on Mule Runtime 3.8.5 and later.
Before and After Tags Enhancing Exception Blocks
You can define before and after exception blocks in custom policy definitions to enhance the catch exception strategy of a flow without the need to modify it.
The following diagram shows the default path Before > Flow > After and the error path Before Exception > Exception Strategy > After Exception.
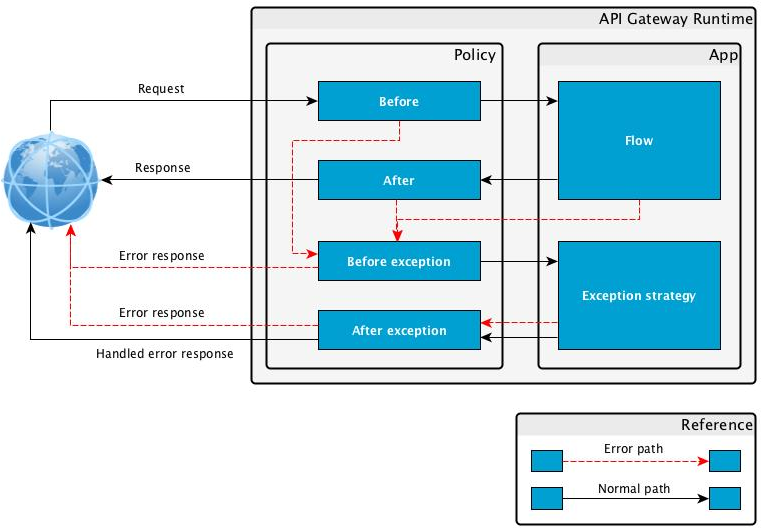
Any exception in any part of the default path stops the execution of that path and triggers the execution of the error path. Any exception in either the before-exception or after-exception stops the execution of the error path. If the error is raised in the exception strategy, the after-exception is executed.
The following example custom policy shows how to implement before and after exception blocks:
<?xml version="1.0" encoding="UTF-8"?>
<policy id="1"
policyName="first"
xmlns="http://www.mulesoft.org/schema/mule/policy"
xmlns:api-platform-gw="http://www.mulesoft.org/schema/mule/api-platform-gw"
xmlns:mule="http://www.mulesoft.org/schema/mule/core"
xmlns:xsi="http://www.w3.org/2001/XMLSchema-instance"
xsi:schemaLocation="http://www.mulesoft.org/schema/mule/policy http://www.mulesoft.org/schema/mule/policy/current/mule-policy.xsd
http://www.mulesoft.org/schema/mule/api-platform-gw http://www.mulesoft.org/schema/mule/api-platform-gw/current/mule-api-platform-gw.xsd
http://www.mulesoft.org/schema/mule/core http://www.mulesoft.org/schema/mule/core/current/mule.xsd">
<before>
<mule:logger level="INFO" message="The before block" />
</before>
<after>
<mule:logger level="INFO" message="The after block" />
</after>
<before-exception>
<mule:logger level="INFO" message="The before exception block" />
</before-exception>
<after-exception>
<mule:logger level="INFO" message="The after exception block" />
</after-exception>
<pointcut>
<api-platform-gw:api-pointcut apiName="{{ apiName }}" apiVersion="{{ apiVersionName }}"/>
</pointcut>
</policy>xmlAdding the Custom Policy to API Manager
-
In API Manager, go to Custom Policies, and click Add Custom Policy.
-
Select the Policy for Runtimes olden than Mule 4.
-
In the Name field, type the name of your new policy version.
-
Upload your YAML and XML files for your custom policy’s new version.

-
Click Add.