Configuring Mule Gateway API Autodiscovery in a Mule 4 Application
To configure API Autodiscovery in your Mule 4.x application, you must meet the following requirements:
Making your API Available in API Manager
The API to which you want to pair your Mule application must be available in API Manager.
You can either:
-
Publish your API in Exchange and import it from there to API Manager.
See To Manage an API from Exchange. -
Import it directly from your machine.
See To Import an API Instance for more details.
API Manager generates an "API ID" identifier for every imported API:

This API ID is required by the Autodiscovery element to identify the API to which you want to pair your application.
Configuring API Manager
This step is necessary to instruct API Manager to use your deployed Mule application as the API proxy itself.
-
For Managing type, select Basic Endpoint.
-
Add the Implementation URI that points to the deployed Mule application.
-
Select the checkmark
Check this box if you are managing this API in Mule 4 or above.
Configuring Anypoint Platform Organization Credentials in Mule Runtime
To use Autodiscovery in a Mule application, Mule runtime engine must start with Anypoint Platform credentials already configured. Learn how to configure your organization credentials based on your deployment target in Configuring Organization Credentials in Mule Runtime 4.
Configuring the Autodiscovery Element in Your Mule Application
Within the code of your Mule application, you must configure the api-gateway:Autodiscovery element.
The Autodiscovery element points to the specific API in API Manager to which you want to pair.
| If you configured a proxy endpoint for your API, your autogenerated proxy will already be correctly configured with the Autodiscovery element. |
<api-gateway:autodiscovery
  apiId="${apiId}" (1)
flowRef="myFlow" /> (2)| 1 | Configure the apiId with the API ID that API Manager assigned to your API. |
| 2 | Set the flowRef element to point to the flow that you want to pair to the API in API Manager. |
You can either replace ${apiId} with your specific value, or you can create a config.properties file where you define it in a key-value fashion: apiId=[your-specific-value] and reference it as ${apiId} in this configuration.
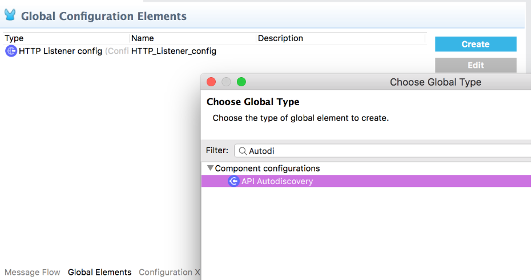
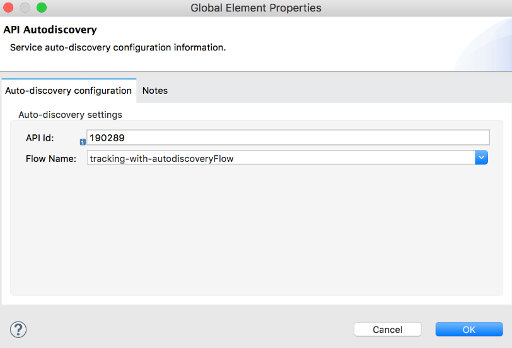
You can also configure this using Anypoint Studio’s UI:
-
In your existing flow, select the Global Elements tab in your Mule Configuration File editor.
-
Click the Create button, and look for the API Autodiscovery global element.

-
Set the API ID and Flow Reference.

You can also choose to use the
${apiId}value and reference it from aconfig.propertiesfile.
After the element is defined in the application, and the runtime is configured with your Anypoint Platform credentials, Mule Runtime will automatically track and keep up to date with the API configuration. defined in API Manager.
Changes from Mule 3.x Configuration
API Autodiscovery element has syntactically changed from Mule 3.x but its purpose remains the same. The element in a Mule application has the following format:
| Mule 3.x XML element | Mule 4.x XML element |
|---|---|
<api-platform-gw:api (…)/>. |
<api-gateway:autodiscovery (…)/>. |
In Mule 4, the API is identified by the API Id and a reference to a Flow where the HTTP listener is defined. Mule 4’s apiId replaces the apiName and apiVersion used to specify the Autodiscovery element in Mule 3.x and prior.


