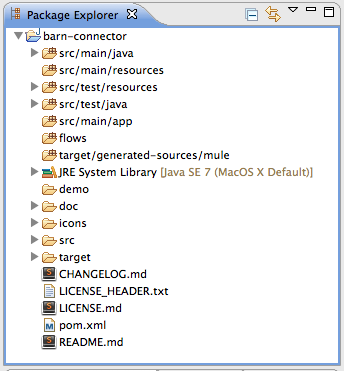
Connector Project Structure
| DevKit is compatible only with Studio 6 and Mule 3. To build Mule 4 connectors, see the Mule SDK documentation. |
This document describes the folder structure and files generated for you after creating an Anypoint Connector project.
Prerequisites
This document assumes that you created a new connector project, and in Eclipse or Anypoint Studio your connector project directory looks similar to:
Source Folder
The Source Folder gathers all of the inputs necessary to eventually build the target folder. The first Maven command you ran used the Mule connector archetype to generate a skeleton in the source folder which includes the four paths described in the following table.
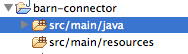
| Folder | Description |
|---|---|
|
Contains the source Java files for your connector, including the skeleton Java files for operations and connection configuration respectively. Additional supporting classes should be stored here as well. |
|
Contains non-code resources accessed by your connector. This folder is empty when you initially create the project. |
|
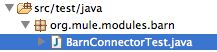
Contains the Java source for the test files for your connector, including the skeleton JUnit test case. |
|
Contains non-code resources accessed by your tests. This folder contains a skeleton Mule configuration file for running tests. |
Connector Class
Open the src/main/java/org/mule/modules/barn/BarnConnector.java file. This class defines the main class for the connector and includes the important @Connector annotation.

Notice that DevKit has already created a class and a couple of methods, and marked them with annotations. The annotations tell Mule how to call and treat your classes, methods or parameters in specific, predefined ways. They are the only point of contact with Mule that you need to manage.
@Connector
The top-level annotation for the connector, applied to the connector class itself, is @Connector. The annotation informs DevKit that a Java class is intended to function as a connector. Since DevKit 3.6, connections are no longer supported at the @Connector level. Find out more below about the Configuration class.
/**
 * Anypoint Connector
 *
 * @author MuleSoft, Inc.
 */
@Connector(name="barn", schemaVersion="1.0", friendlyName="Barn", minMuleVersion="3.5")
public class BarnConnector
{
    /**
     * Configurable
     */
    @Configurable
    private String myProperty;
    ...
}
The @Connector annotation includes several parameters, some of which were automatically generated by the archetype, such as the name and schemaVersion. You can define other parameters as described in the table below.
@Connector(name="barn", schemaVersion="1.0", friendlyName="Barn", minMuleVersion="3.5")
public class BarnConnector| Annotation Type Element | Description | Required? | Default Value |
|---|---|---|---|
|
The name of the connector. This value must be a simple string, with no spaces. |
✓ |
|
|
The version of the schema as generated by the DevKit. |
|
|
|
This is the human-readable name of the connector. This name can contain spaces. Mule uses it only to label the connector in the Studio Palette. |
✓ |
|
|
A longer string describing the connector and its operation. Anypoint Studio displays the description as a tool tip. |
||
|
The namespace of the connector. |
|
|
|
The location of the schema file that writes to the |
|
|
|
The minimum Mule version with which the connector can be used. Mule checks the version at runtime and throws an error if versions are incompatible. |
Latest stable Mule runtime release |
The following restrictions apply to the @Connector annotation.
-
@Connectorcannot be applied to interfaces -
@Connectorcannot be applied to final classes -
@Connectorcannot be applied to parametrized classes -
@Connectorcannot be applied to non-public classes -
A class with
@Connectormust contain exactly one method annotated with@Connect -
A class with
@Connectormust contain exactly one method annotated with@Disconnect
Configuration Class
In DevKit 3.7 and later, you have to define connections to the external service in a separate class considered the "configuration" class.
Inject the configuration into the connector code by annotating a field in the @Connector class with the @Config annotation. For details on defining the connections see Connector Connection Strategies.
Connector Tests
Open the src/test/java/org/mule/modules/barn/BarnConnectorTest.java file.
Notice that DevKit has created a class, a couple of methods, and a configurable property, and marked them all with annotations. Within the methods of this class, you can write your own tests tailored to your testing needs. These tests are evaluated every time you compile your code. You can also run these tests without building your connector by running the following Maven command from the console.
mvn testFor more details on developing tests for your connector, see Developing DevKit Connector Tests.
POM File
Based on the archetype used to create the project, Maven generates the project object model (POM) file. Maven uses the pom.xml file to keep track of all dependencies needed to build a project, including the dependencies' version number and location. You may have to add items to the POM file during the connector development process in order to pull in additional libraries and add steps to the build process.

For more details on the role of the POM file, see the POM Reference at maven.apache.org.
Icons Folder
The icons folder contains the visuals that Mule Studio uses to represent your connector both on the palette and on the canvas. You can easily swap these files with others of your choice. You can also modify the folder from which Mule fetches them.
License and README Files
Should you decide to share your connector with the Mule Community, your project includes a basic license agreement, which you are free to change. Use the README file to provide users with initial information about the connector. It is recommended that you also create a CHANGELOG.md file to expose release notes. These files are written in Github-Flavored Markdown format (.md).

Target Folder
When the build process completes successfully, and if all the tests defined in the test folder pass, the Maven build process creates several artifacts in the target folder.

If you ran a build process and don’t see this folder in the Package Explorer, right-click the project name, then select Refresh to view the following new elements:
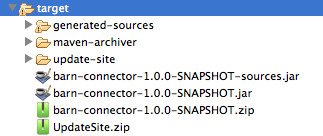
-
barn-connector-1.0-SNAPSHOT.jar- The connector JAR -
barn-connector-1.0-SNAPSHOT.zip- The Mule plugin which you can drop into thepluginsdirectory in Mule standalone -
UpdateSite.zip- The file that you (or anyone who wants to use the connector) can import into Anypoint Studio to install or update the connector.
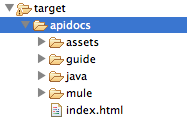
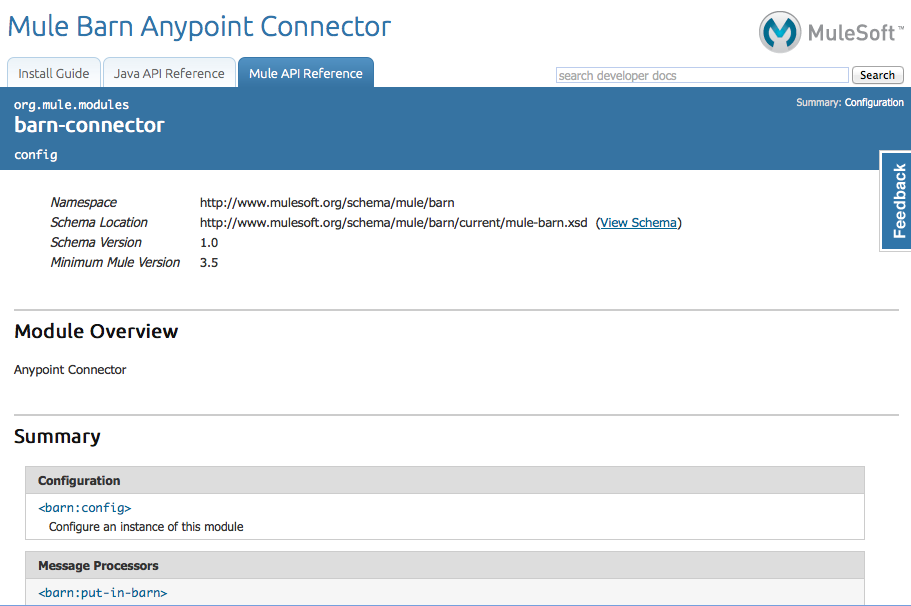
You can also generate the documentation by right-clicking the project, then selecting Anypoint Connector > Preview Documentation. If you do so, the target folder also contains apidocs, which contains auto-generated installation instructions, Javadoc, and Mule API docs for your connector.
Reference Documentation
The build also auto-generates Javadocs for your connector. The skeleton files that Maven generates already include placeholder comments (enclosed between / and /) which you can update further. As you add functionality to your connector, be sure to rigorously add JavaDoc annotations to your code as Mule automatically incorporates the annotations into the auto-generated documentation during the build process.
/**
 * Custom processor that places an animal in the barn.
 *
 * {@sample.xml ../../../doc/barn-connector.xml.sample barn:putInBarn}
 *
 * @param animal Name of the animal to be place in the barn
 * @return returns processed message
 */
@Processor
public String putInBarn(String animal) {
    return animal + " has been placed in the barn";
}
To preview this documentation, open target/apidocs/index.html in your web browser.
Documentation Best Practices
DevKit enforces commenting your code. For every method you write, add a corresponding comment section so that your connector’s functionality is documented as soon as you build it. In these comment sections, list every parameter and every output of the method with the annotations @param and @return.
Notice, in the example below, that DevKit pulled the @param and @return content from the example code above into the Javadoc, automatically organizing it, formatting it, and including additional standard content.

See Also
NEXT: Continue on to choose and implement an Authentication[Choose and Implement your Authentication] method for your connector.