Send Emails with Email Connector Examples
Use Anypoint Connector for Email (Email Connector) to send messages over SMTP and SMTPS servers by using the Send operation. These examples show how to configure Email Connector to send emails and attachments.
-
Understanding Attachments and the Attachments Map
Understand when to use fixed or dynamic attachments, what the Attachments parameter expects (DataWeave expression returning a map), and how content types work. -
Send Emails
Configure the Email Connector Send operation to send emails over an SMTPS server. -
Configure TLS: Truststore and Keystore
Configure truststore and keystore files for SMTPS -
Send an Attachment
Configure the File Connector Read operation to read a JSON file and the Email Connector Send operation to send the file as an attachment over an SMTP server. -
Send Multiple Attachments
Configure Set Variable components to define multiple media type attachments, and send these attachments using the Email Connector Send operation. Then log the result message using a Logger component. -
Send Attachments Received from a REST API
Accept a PDF, MS Word document, and JSON file (for example, an incident report) via multipart REST API, and forward them to a support function by email. -
Send Files from an SFTP Server by Email
Poll or list files on an SFTP server and send them as email attachments to a function or mailbox.
Understand Attachments
This section explains when to use fixed vs dynamic attachments, and what the Attachments parameter expects.
Using Fixed vs Dynamic Attachments
-
Fixed attachments
These are useful when the same file is always sent with certain emails, for example:-
A legal disclaimer or terms document (PDF) attached to every outgoing contract email
-
A cover letter or template (for example, a Word or PDF) that is the same for a batch of notifications
-
A static report template or form that recipients always need
In these cases you typically read the file once (for example, from classpath or a fixed path) or set it in a variable, then reference it in the Attachments map.
-
-
Dynamic attachments
These are built from runtime data: payload from a flow (File read, HTTP multipart, SFTP read), variables set earlier in the flow, or DataWeave expressions that produce binary or string content. The examples in this page show both patterns.
Understanding Attachments Expectations
The Attachments parameter of the Send operation expects a DataWeave expression that evaluates to an object (a map). It isn’t a Java type nor raw JSON configured in the UI; you write a DataWeave expression (for example, in the XML email:attachments element or in the Studio Attachments field) that produces the map.
-
Map structure: Each key is the attachment filename (as shown in the email client). Each value is the attachment content (Binary, String, or a stream).
-
Content type: The map itself does not have a single content type. Each value is the raw content; the connector uses the content as-is. When the value comes from a Mule message (for example,
payloadorvars.x) that has a MIME type (for example, from an HTTP multipart part or a File read), that type is used for the attachment. For inline DataWeave content, you can control the type by usingread()with a MIME type or by ensuring the value is the correct type (for example,output application/octet-streamfor binary). -
Example:
{ 'report.pdf' : payload }uses the current payload as the content ofreport.pdf; ifpayloadwas read from a file or HTTP part, its existing MIME type is used.
Understanding Binary Attachments
Files such as Portable Document Format (PDF), Portable Network Graphics (PNG), Word documents, or any non-text binary must be sent as binary content in the attachments map. SMTP transports text; binary data is encoded for transport (for example, Base64).
-
Pass the file content as binary. Do not convert binary data to String (for example, don’t use a string representation or a character encoding like UTF-8 for the bytes); that can corrupt the file. When you use the File Connector Read operation, HTTP Listener multipart parts, or SFTP Read, the payload (or part content) is already binary and has the appropriate MIME type (for example,
application/pdf,image/png). Use that value directly in the attachments map. -
Email Connector encodes non-text attachments for transport. The default is Base64, which is appropriate for PDF, PNG, and other binary formats. You don’t need to Base64-encode the value yourself; the connector applies the encoding. To use a different encoding (for example, QUOTED-PRINTABLE, 8BIT, 7BIT, or BINARY), configure the Content Transfer Encoding parameter on the Send operation.
-
If you build the attachment from a path or classpath resource, use DataWeave
read()with the correct MIME type so the value stays Binary and the attachment is sent with the right type. For example:{ 'disclaimer.pdf' : read('classpath://disclaimer.pdf', 'application/pdf'), 'logo.png' : read('classpath://logo.png', 'image/png') }This keeps the content as binary and sets the MIME type for each attachment. The connector then applies Content-Transfer-Encoding (default Base64) when sending.
Send Emails
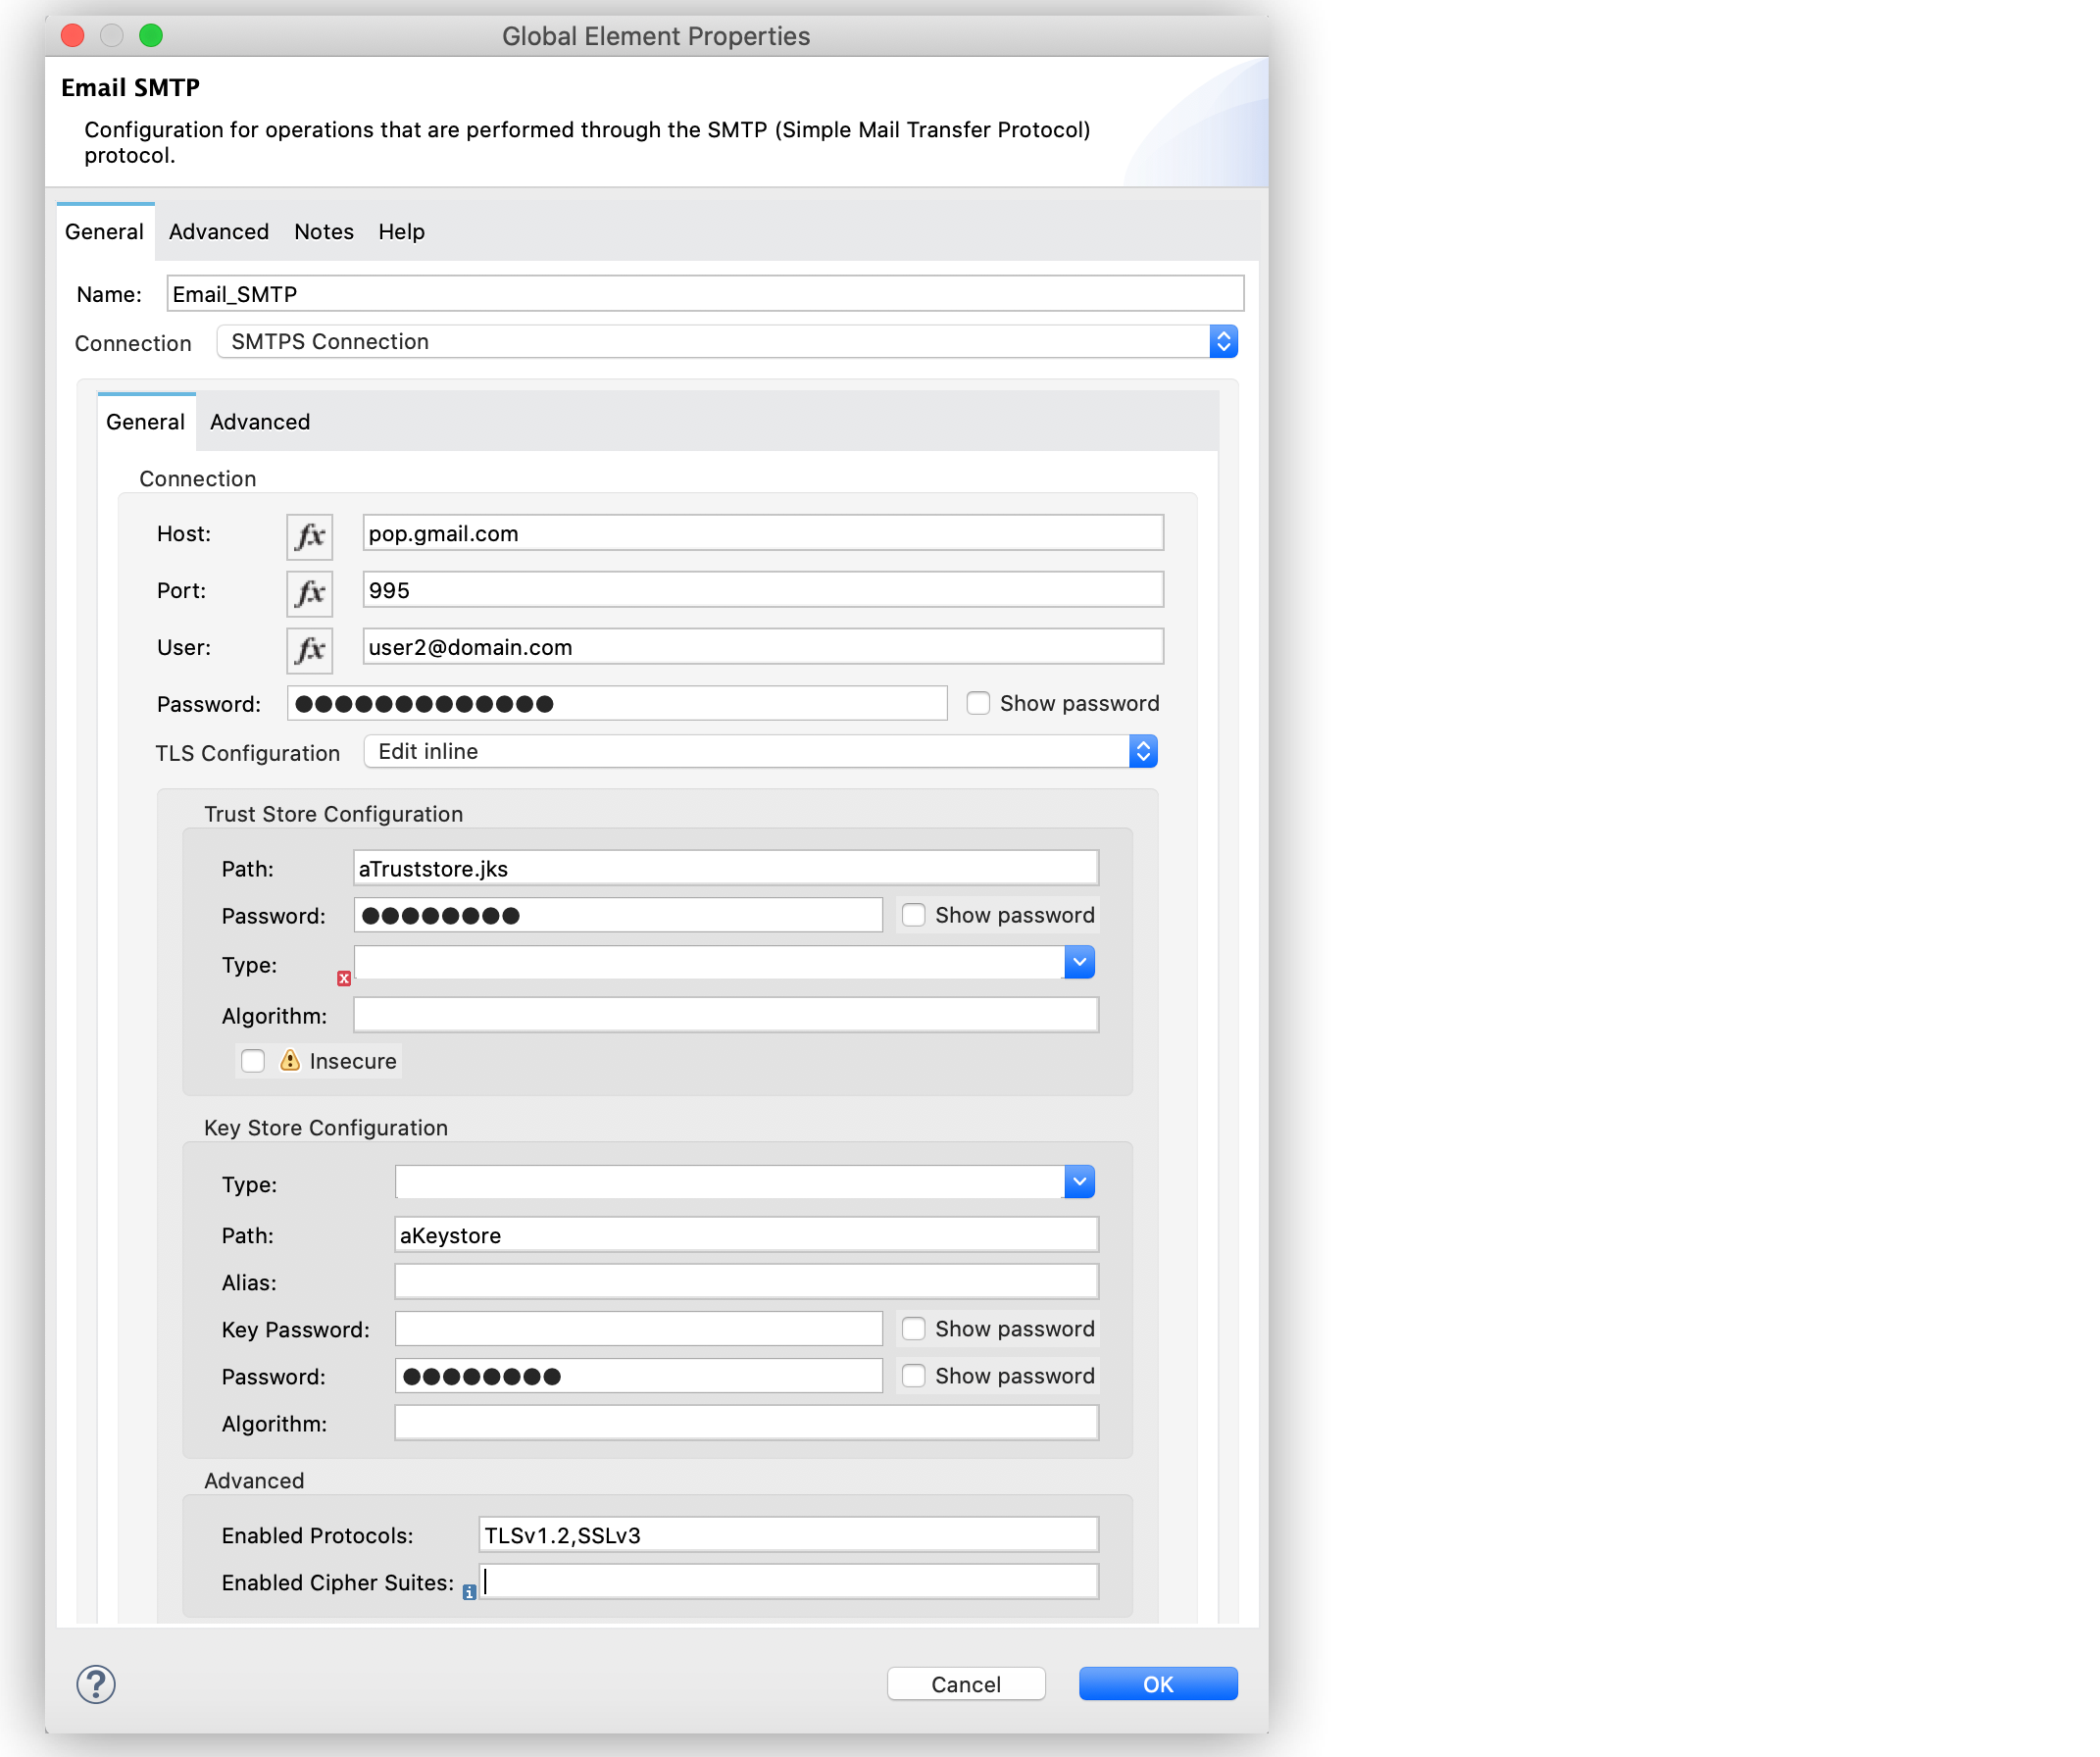
This example illustrates how to send emails over the SMTPS server. The flow initiates with a Scheduler component, and then the Send operation sends the email. The SMTPS connection type enables SSL or TLS encryption and sends encrypted messages over the secured version of the SMTP server.
This screenshot shows the app flow for this example:

To create the flow:
-
Create a new Mule project in Studio.
-
In the Mule Palette view, select the Scheduler component and drag it onto the canvas.
This source initiates a flow when a time-based condition is met. -
Drag the Email Send operation to the right of the Scheduler source.
-
On the Send configuration screen, click the plus sign (+) next to the Connector configuration field to configure a global element for the operation.
-
For Connection, select SMTPS Connection.
-
In the General tab, enter the following values:
-
Host
pop.gmail.com -
Port
995 -
User
user3@domain.com -
Password
passwordconnection
-
-
In the TLS Configuration section, select Edit inline.
-
In the Trust Store Configuration section, complete these fields:
-
Path
truststore path -
Password
passwordtrust
-
-
In the Key Store Configuration section, enter the following values:
-
Path
aKeystore -
Password
passwordkey
-
-
In the Advanced section, set Enabled Protocols to
TLSv1.2,SSLv3. -
Click OK.
-
In the Send operation configuration screen, set the following values:
-
From address
user1@domain.com -
To addresses
Edit inline
-
-
Click the plus sign (+) to add new emails.
-
Set Value to
user2@domain.com. -
Repeat the previous two actions and add another email as
user3@domain.com. -
Set Subject to
IMPORTANT!. -
Set Content to
"<h1>Hello this is an important message</h1>"and ContentType totext/html.
If Content is not empty, the content of the message payload is used by default. If that payload is nottext, the operation fails with anEMAIL:SENDerror. -
Save and run the app.
XML for Sending Emails
Paste this code into the Studio XML editor to quickly load the flow for this example into your Mule app:
<?xml version="1.0" encoding="UTF-8"?>

<mule xmlns:tls="http://www.mulesoft.org/schema/mule/tls" xmlns:email="http://www.mulesoft.org/schema/mule/email"
	xmlns="http://www.mulesoft.org/schema/mule/core"
	xmlns:doc="http://www.mulesoft.org/schema/mule/documentation" xmlns:xsi="http://www.w3.org/2001/XMLSchema-instance" xsi:schemaLocation="http://www.mulesoft.org/schema/mule/core http://www.mulesoft.org/schema/mule/core/current/mule.xsd
http://www.mulesoft.org/schema/mule/email http://www.mulesoft.org/schema/mule/email/current/mule-email.xsd
http://www.mulesoft.org/schema/mule/tls http://www.mulesoft.org/schema/mule/tls/current/mule-tls.xsd">
	<email:smtp-config name="Email_SMTP" >
		<email:smtps-connection host="pop.gmail.com" port="995" user="user1@domain.com" password="passwordvalue" >
			<tls:context enabledProtocols="TLSv1.2,SSLv3" >
				<tls:trust-store path="truststore path" password="changeit" />
				<tls:key-store path="aKeystore" password="password" />
			</tls:context>
		</email:smtps-connection>
	</email:smtp-config>
	<flow name="emailconnectorFlow">
		<scheduler>
			<scheduling-strategy >
				<fixed-frequency />
			</scheduling-strategy>
		</scheduler>
		<email:send config-ref="Email_SMTP" fromAddress="user1@domain.com" subject="IMPORTANT!">
			<email:to-addresses >
				<email:to-address value="user3@domain.com" />
        <email:to-address value="user2@domain.com" />
			</email:to-addresses>
			<email:body contentType="text/html" >
				<email:content ><![CDATA["<h1>Hello this is an important message</h1>"]]></email:content>
			</email:body>
		</email:send>
	</flow>
</mule>
Configuring TLS: Truststore and Keystore
When you use SMTPS Connection, you must configure Transport Layer Security (TLS) encryption. The Trust Store and optionally Key Store settings tell the connector which certificates to use.
Locating the Path
The Path in Trust Store and Key Store setting is resolved relative to (in order):
-
The current classpath (for example, files under
src/main/resourcesin your project) -
The file system (relative to the app runtime or absolute path)
Typical locations:
-
Project resource:
src/main/resources/truststore.jks— use pathtruststore.jksorclasspath:truststore.jks -
Absolute path:
/etc/mule/truststore.jks(ensure the runtime has read access)
Configuring Trust Store
The Trust Store holds certificates of servers (or CAs) that your app trusts. For SMTPS, the client uses it to verify the mail server’s certificate.
For SMTPS you almost always need a truststore so the connector can validate the server’s certificate (unless you use Insecure for development only).
-
If your server uses a public CA (for example Gmail, Office 365): You can use the JVM’s default truststore (often not required to set one) or export it and point Path to that file. Some setups use a custom truststore that contains only the CA or server cert they need.
-
Creating or updating a truststore with keytool (Java’s
keytoolis usually underJAVA_HOME/bin): -
Import a CA or server certificate into a new truststore:
keytool -importcert -alias smtpserver -file server.cer -keystore truststore.jks -storepass changeit -noprompt -
Replace
server.cerwith the path to the server’s certificate or the CA certificate, andtruststore.jkswith the path where you want the truststore file. Use a strong password in production instead ofchangeit. -
In the Email Connector TLS configuration, set Path to the path of this trust store and Password to the truststore password.
Configuring Keystore
The Key Store holds your app’s private key and certificate (client identity). Use it when the SMTPS server requires client certificate authentication (mutual TLS).
Use it only if the mail server is configured to require a client certificate. Many SMTPS servers (for example, Gmail with user or password) don’t require a keystore; they only need the truststore to verify the server.
-
Creating a keystore with keytool (for testing or when you need to generate a key and self-signed cert):
keytool -genkeypair -alias muleclient -keyalg RSA -keysize 2048 -keystore keystore.jks -storepass changeit -validity 365 -dname "CN=MyApp, OU=IT, O=MyOrg, L=City, ST=State, C=US" -
For production you typically import an existing key and certificate (for example, from your PKI) into a keystore; use
keytool -importcertor import a PKCS12 file. -
In the Email Connector TLS configuration, set Path to the keystore file, Password to the keystore password, and Key Password if the private key has a different password. Use Alias if the keystore contains multiple keys.
Summary
Purpose |
Store |
When to use |
Trust the mail server’s certificate |
Truststore |
Required for SMTPS (unless using insecure mode) |
Prove client identity to the server |
Keystore |
Only when the server requires client certificate authentication |
For full parameter details (Path, Password, Type, Algorithm, Insecure), see the Truststore and Keystore sections in the Email Connector Reference.
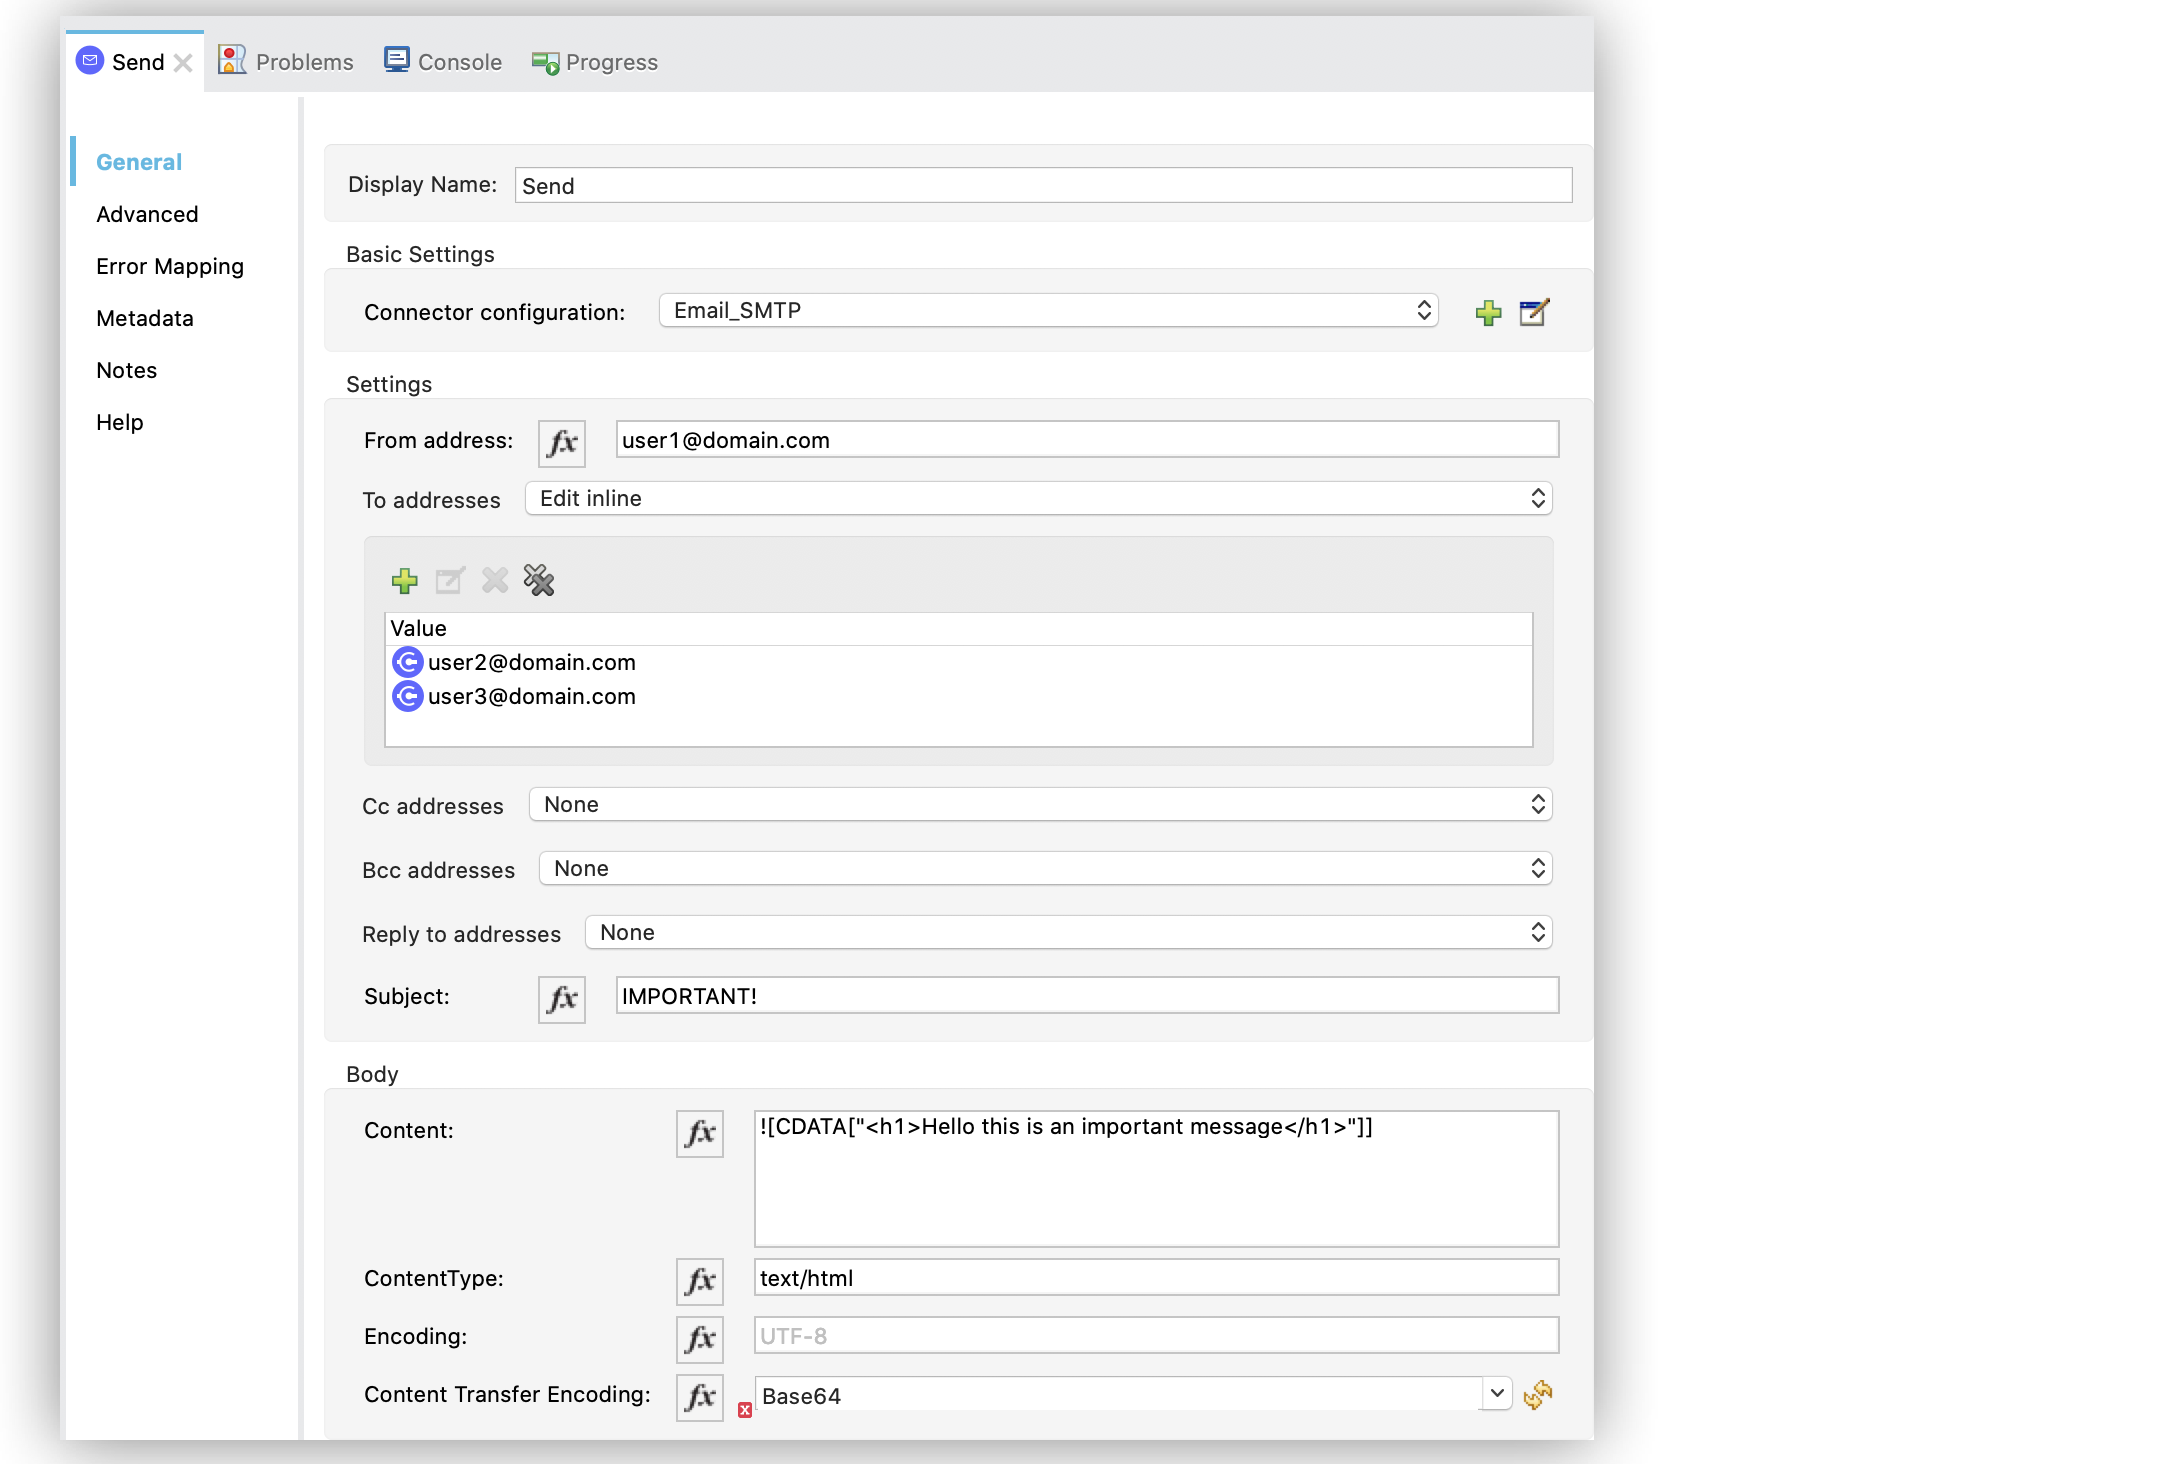
Send an Attachment
This example illustrates how to send emails and attachments over the SMTP server. Use DataWeave to manage the attachments. The flow reads a JSON file using the File Connector Read operation and then uses the Email Connector Send operation to send the content of the file as an attachment:
The following screenshot shows the Anypoint Studio app flow for this example:

To create the flow:
-
Create a new Mule project in Studio.
-
In the Mule Palette view, select the Scheduler component and drag it onto the canvas.
The source initiates a flow when a time-based condition is met. -
Drag the File Connector Read operation to the right of the Scheduler component.
-
Set File Path to
file.json. -
Drag the Send operation to the right of the Read operation.
-
On the Send configuration screen, click the plus sign (+) next to the Connector configuration field to configure a global element for the operation.
-
For Connection, select SMTP Connection.
-
In the General tab, enter the following values:
-
Host
pop.gmail.com -
Port
995 -
User
user1@domain.com -
Password
password
-
-
Click OK.
-
In the Send operation configuration screen, set the To addresses field to
Edit inline. -
Click the plus sign (+) to add a new email Value as
example@domain.com. -
Set Subject to
Attachment test. -
Set Content to
"<h1>Hello this is an important message</h1>". -
In the Attachments field, enter the following DataWeave expression as a new attachment element:
{
  'json-attachment' : payload
}
Note that
payloadis the content of the JSON file read by the File Connector Read operation. -
Save and run the app.
XML for Sending Attachments
Paste this code into the Studio XML editor to quickly load the flow for this example into your Mule app:
<?xml version="1.0" encoding="UTF-8"?>

<mule xmlns:email="http://www.mulesoft.org/schema/mule/email" xmlns:file="http://www.mulesoft.org/schema/mule/file"
	xmlns="http://www.mulesoft.org/schema/mule/core"
	xmlns:doc="http://www.mulesoft.org/schema/mule/documentation" xmlns:xsi="http://www.w3.org/2001/XMLSchema-instance" xsi:schemaLocation="http://www.mulesoft.org/schema/mule/core http://www.mulesoft.org/schema/mule/core/current/mule.xsd
http://www.mulesoft.org/schema/mule/file http://www.mulesoft.org/schema/mule/file/current/mule-file.xsd
http://www.mulesoft.org/schema/mule/email http://www.mulesoft.org/schema/mule/email/current/mule-email.xsd">
	<email:smtp-config name="Email_SMTP">
		<email:smtp-connection host="pop.gmail.com" port="995" user="user1@domain.com" password="password" />
	</email:smtp-config>
	<flow name="emailattachment">
		<scheduler doc:name="Scheduler">
			<scheduling-strategy >
				<fixed-frequency />
			</scheduling-strategy>
		</scheduler>
		<file:read path="/file.json"/>
		<email:send config-ref="config" subject="Attachment test">
            <email:to-addresses >
                <email:to-address value="example@domain.com" />
            </email:to-addresses>
            <email:body >
                <email:content ><![CDATA[#["<h1>Hello this is an important message</h1>"]]]></email:content>
            </email:body>
            <email:attachments >#[{
          'json-attachment' : payload
        }]</email:attachments>
        </email:send>
	</flow>
</mule>
Send Multiple Attachments
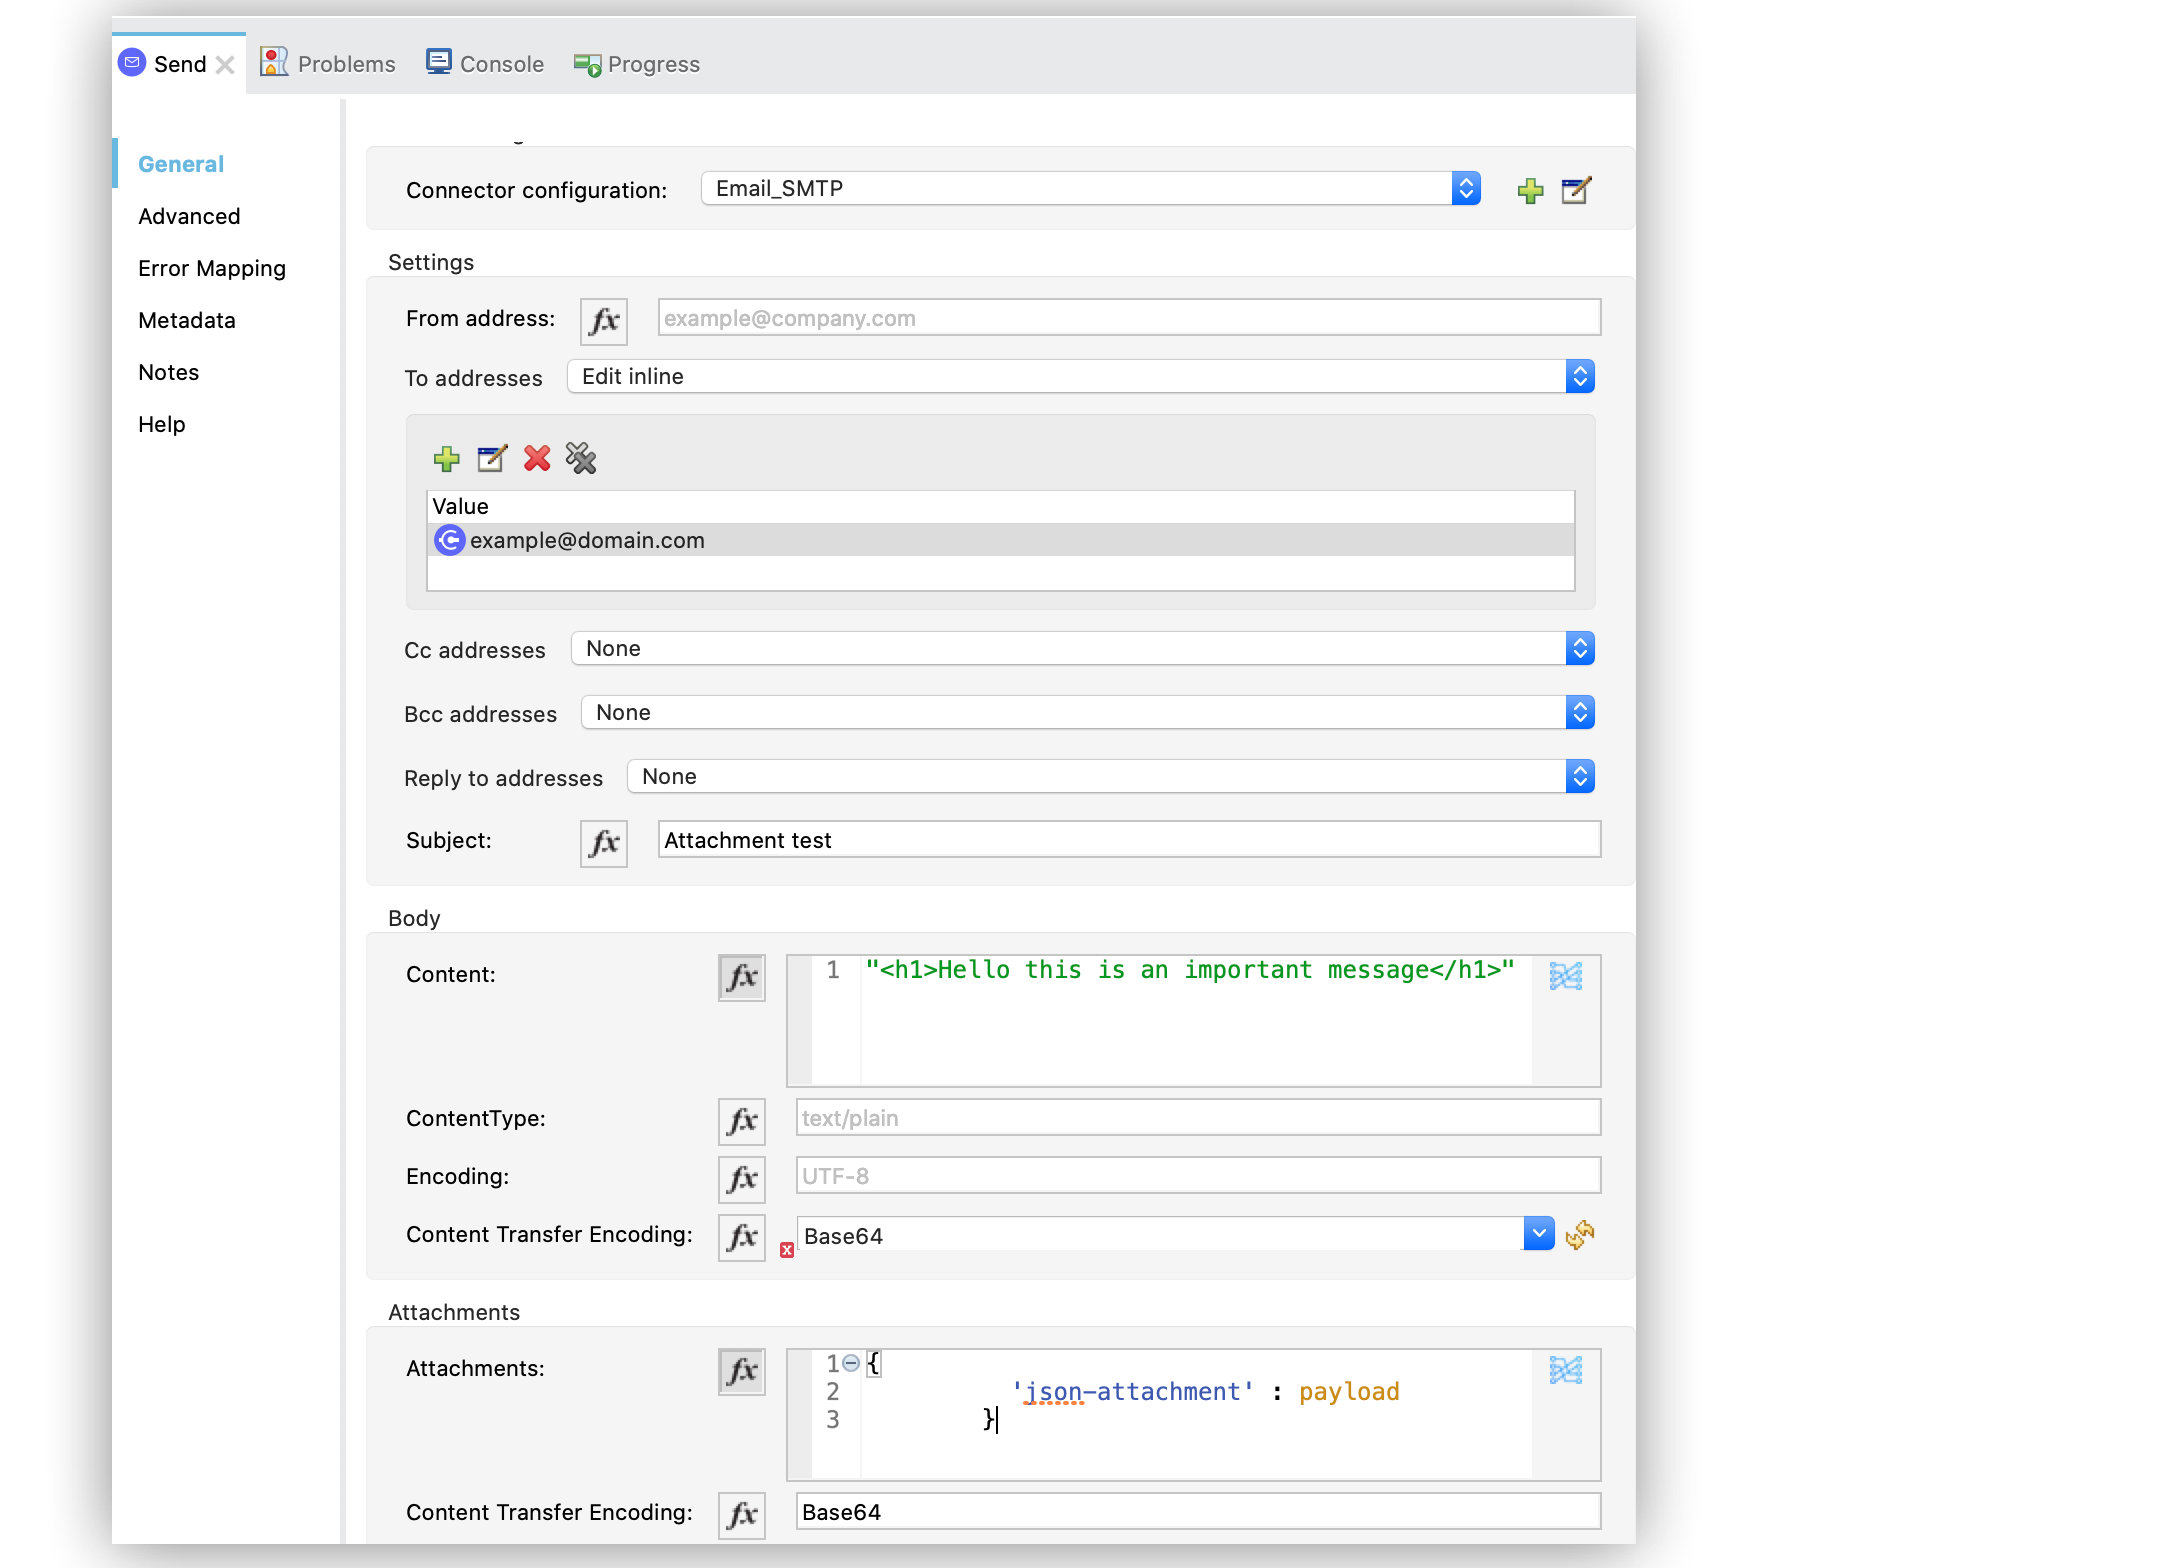
This example illustrates how to send emails and multiple attachments over the SMTP server. The flow initiates with a Scheduler component. Then, Set Variable components define each attachment media type JSON, text and file. Subsequently, the Email Connector Send operation sends the attachments in the email, after which you the result message using a Logger component.
This screenshot shows the Anypoint Studio app flow for this example:

To create the flow:
-
Create a new Mule project in Studio.
-
In the Mule Palette view, select the Scheduler component and drag it onto the canvas.
The source initiates a flow when a time-based condition is met and sends the emails. -
Drag a Set Variable component to the right of the Scheduler component.
-
In the Set Variable configuration screen, set the following parameters:
-
Name
json -
Value
output application/json --- {address: '221B Baker Street'} -
MIME Type
application/json
-
-
Drag another Set Variable component to the right of the first Set Variable component, and set the following parameters:
-
Name
textPlain -
Value
This is the email text attachment for John Watson -
MIME Type
text/plain
-
-
Drag another Set Variable component to the right of the second Set Variable component, and set the following parameters:
-
Name
octectStream -
Value
vars.textPlain -
MIME Type
application/octet-stream
-
-
Drag the Email Send operation to the right of the third Set Variable component.
-
On the Send configuration screen, click the plus sign (+) next to the Connector configuration field to configure a global element for the operation.
-
For Connection, select SMTP Connection.
-
In the General tab, enter the following values:
-
Host
pop.gmail.com -
Port
995 -
User
user1@domain.com -
Password
password
-
-
Click OK.
-
In the Send operation configuration screen, set the To addresses field to
Edit inline -
Click the plus sign (+) to add a new email Value as
user4@domain.com. -
Set the Content field to
Email Contentand the ContentType field totext/plain. -
In the Attachments field, enter the following DataWeave expression:
{ 'text-attachment' : vars.textPlain, 'json-attachment' : vars.json, 'stream-attachment' : vars.octetStream } -
Save and run the app.
XML for Sending Multiple Attachments
Paste this code into the Studio XML editor to quickly load the flow for this example into your Mule app:
<?xml version="1.0" encoding="UTF-8"?>

<mule xmlns:email="http://www.mulesoft.org/schema/mule/email"
	xmlns="http://www.mulesoft.org/schema/mule/core" xmlns:doc="http://www.mulesoft.org/schema/mule/documentation"
	xmlns:xsi="http://www.w3.org/2001/XMLSchema-instance"
	xsi:schemaLocation="
http://www.mulesoft.org/schema/mule/email http://www.mulesoft.org/schema/mule/email/current/mule-email.xsd http://www.mulesoft.org/schema/mule/core http://www.mulesoft.org/schema/mule/core/current/mule.xsd">
	<email:smtp-config name="Email_SMTP">
		<email:smtp-connection host="pop.gmail.com" port="995" user="user1@domain.com" password="password" />
	</email:smtp-config>
	<flow name="emailattachFlow">
		<scheduler>
			<scheduling-strategy >
				<fixed-frequency />
			</scheduling-strategy>
		</scheduler>
		<set-variable value="#[output application/json --- {address: '221B Baker Street'}]" variableName="json" mimeType="application/json"/>
        <set-variable value="This is the email text attachment for John Watson" variableName="textPlain" mimeType="text/plain"/>
        <set-variable value="#[vars.textPlain]" variableName="octetStream" mimeType="application/octet-stream"/>
        <email:send config-ref="config">
            <email:to-addresses >
                <email:to-address value="user4@domain.com" />
            </email:to-addresses>
            <email:body contentType="text/plain" >
                <email:content>Email Content</email:content>
            </email:body>
            <email:attachments>#[{
                'text-attachment' : vars.textPlain,
                'json-attachment' : vars.json,
                'stream-attachment' : vars.octetStream
            }]</email:attachments>
        </email:send>
		<logger level="INFO" doc:name="Logger" message="#['Message Id ' ++ correlationId as String]"/>
	</flow>

</mule>
Send Attachments Received from a REST API
A common use case is accepting files (for example, a PDF, an MS Word document, and a JSON file describing an incident) through a REST API and forwarding them to a support function by email. The client sends a multipart/form-data POST request; each part is a file or a field (for example, an incident description as JSON).
-
Flow outline
An HTTP Listener (path for example,/api/support/ticket) receives the multipart request. The payload is a multipart message; usepayload.parts.<name>to access each part. Build an attachments map from the parts (using each part’s content and optionally filename fromContent-Disposition), then call Email Send with that map and the desired To address (for example, support@company.com). -
Attachments map from multipart
Each part’s content is available aspayload.parts.<partName>.content. The filename (if present) is inpayload.parts.<partName>.headers.'Content-Disposition'.filename. Use a DataWeave expression to build a map: keys = attachment names (for example, original filename or a fixed name), values = part content. The connector uses the part’s content type when available. Binary parts (PDF, PNG, Word, and so on) are already Binary; the connector applies Content-Transfer-Encoding (default Base64) for transport, so you do not need to encode them yourself.
Example: PDF, Word, and JSON Incident to Support
Assume the API expects three parts: documentPdf, documentWord, and incidentJson. This example flow receives the request and sends the three as email attachments to support.
<?xml version="1.0" encoding="UTF-8"?>
<mule xmlns:email="http://www.mulesoft.org/schema/mule/email"
	xmlns:http="http://www.mulesoft.org/schema/mule/http"
	xmlns="http://www.mulesoft.org/schema/mule/core"
	xmlns:xsi="http://www.w3.org/2001/XMLSchema-instance"
	xsi:schemaLocation="
		http://www.mulesoft.org/schema/mule/core http://www.mulesoft.org/schema/mule/core/current/mule.xsd
		http://www.mulesoft.org/schema/mule/email http://www.mulesoft.org/schema/mule/email/current/mule-email.xsd
		http://www.mulesoft.org/schema/mule/http http://www.mulesoft.org/schema/mule/http/current/mule-http.xsd">
	<email:smtp-config name="Email_SMTP">
		<email:smtp-connection host="smtp.example.com" port="587" user="noreply@example.com" password="${smtp.password}" />
	</email:smtp-config>
	<http:listener-config name="HTTP_Listener_config">
		<http:listener-connection host="0.0.0.0" port="8081" />
	</http:listener-config>
	<flow name="support-ticket-api">
		<http:listener path="/api/support/ticket" config-ref="HTTP_Listener_config" allowedMethods="POST" />
		<email:send config-ref="Email_SMTP" fromAddress="noreply@example.com" subject="Support ticket: incident report">
			<email:to-addresses>
				<email:to-address value="support@example.com" />
			</email:to-addresses>
			<email:body contentType="text/plain">
				<email:content><![CDATA[#["Incident report received. See attachments: PDF, Word document, and JSON details."]]]></email:content>
			</email:body>
			<email:attachments><![CDATA[#[
				{
					(payload.parts.documentPdf.headers.'Content-Disposition'.filename default 'document.pdf') : payload.parts.documentPdf.content,
					(payload.parts.documentWord.headers.'Content-Disposition'.filename default 'document.docx') : payload.parts.documentWord.content,
					(payload.parts.incidentJson.headers.'Content-Disposition'.filename default 'incident.json') : payload.parts.incidentJson.content
				}
			]]]></email:attachments>
		</email:send>
		<set-payload value="#['Ticket received']" />
	</flow>
</mule>
The client must POST to /api/support/ticket with Content-Type: multipart/form-data and three parts named documentPdf, documentWord, and incidentJson. Each part’s content type (for example, application/pdf, application/vnd.openxmlformats-officedocument.wordprocessingml.document, application/json) is preserved from the request and used for the corresponding email attachment.
Send Files from an SFTP Server by Email
You may need to scan an SFTP directory and send the found files as email attachments to a function or mailbox (for example a shared inbox or a processing service). There are two common patterns you can follow:
-
Use an On New or Updated File (SFTP Connector) to trigger a flow when a new or updated file appears; read that file and send it (or a batch) by email.
-
Use a Scheduler and SFTP List to poll a directory, then for each file (or for the whole list), read the file(s) and send one or more emails with attachments.
In both cases, build the Attachments map from the file content. For a single file, the map can be { filename : payload } after an SFTP Read. For multiple files, collect them (for example, in a For Each with Set Variable or a DataWeave transform) into a map of filename and content and pass that map to Attachments.
Example: Poll SFTP Directory and Email Files as Attachments
This example uses a Scheduler and SFTP List to list a directory, then a For Each to process each item. For each file (non-directory), it reads the file and sends one email with that file as a single attachment. The attachment name is taken from the file path (or attributes).
<?xml version="1.0" encoding="UTF-8"?>
<mule xmlns:email="http://www.mulesoft.org/schema/mule/email"
	xmlns:sftp="http://www.mulesoft.org/schema/mule/sftp"
	xmlns="http://www.mulesoft.org/schema/mule/core"
	xmlns:xsi="http://www.w3.org/2001/XMLSchema-instance"
	xsi:schemaLocation="
		http://www.mulesoft.org/schema/mule/core http://www.mulesoft.org/schema/mule/core/current/mule.xsd
		http://www.mulesoft.org/schema/mule/email http://www.mulesoft.org/schema/mule/email/current/mule-email.xsd
		http://www.mulesoft.org/schema/mule/sftp http://www.mulesoft.org/schema/mule/sftp/current/mule-sftp.xsd">
	<email:smtp-config name="Email_SMTP">
		<email:smtp-connection host="smtp.example.com" port="587" user="noreply@example.com" password="${smtp.password}" />
	</email:smtp-config>
	<sftp:config name="SFTP_Config">
		<sftp:connection host="${sftp.host}" port="${sftp.port}" username="${sftp.user}" password="${sftp.password}" />
	</sftp:config>
	<flow name="sftp-to-email-flow">
		<scheduler>
			<scheduling-strategy><fixed-frequency frequency="60" timeUnit="SECONDS" /></scheduling-strategy>
		</scheduler>
		<sftp:list config-ref="SFTP_Config" directoryPath="${sftp.directoryPath}" />
		<foreach>
			<choice>
				<when expression="#[!attributes.directory]">
					<set-variable variableName="filePath" value="#[payload]" />
					<sftp:read config-ref="SFTP_Config" path="#[payload]" />
					<email:send config-ref="Email_SMTP" fromAddress="noreply@example.com" subject="File from SFTP: #[vars.filePath]">
						<email:to-addresses>
							<email:to-address value="${email.recipient}" />
						</email:to-addresses>
						<email:body contentType="text/plain">
							<email:content><![CDATA[#["File received from SFTP: " ++ vars.filePath]]]></email:content>
						</email:body>
						<email:attachments><![CDATA[#[( (vars.filePath splitBy "/")[-1] default 'attachment' ) : payload]]]></email:attachments>
					</email:send>
				</when>
			</choice>
		</foreach>
	</flow>
</mule>
To send all listed files in a single email, first iterate to read each file and collect the name and content into a variable (for example, using Set Variable with a DataWeave expression that merges the current map with the new attachment), then call Send once with that variable as the attachments map. The previous pattern sends one email per file for simplicity.