Microsoft Dynamics 365 - Studio Configuration
To configure a connector in Anypoint Studio:
-
Install the connector
-
Configure the connector
-
Configure an input source for the connector
Add the Connector to Your Project
Anypoint Studio provides two ways to add the connector to your Studio project: from the Exchange button in the taskbar or from the Mule Palette.
Add the Connector Using Exchange
-
In Studio, create a Mule Project.
-
Click the Exchange (X) icon in the upper left of the Studio task bar.
-
In Exchange, click Login and supply your Anypoint Platform username and password.
-
In Exchange, search for Microsoft Dynamics 365.
-
Select the connector, click Add to project.
-
Follow the prompts to install the Microsoft Dynamics 365 Connector.
Configure an Input Source
Configure an input source trigger for the connector using On modified object or On new object. When a new or modified object occurs in the Microsoft Dynamics 365 operation, an input source is sent to the connector app.
See Trigger Required Fields to configure the input source operations.
Alternatively, you can also trigger a connector app by listening for HTTP requests or at timed intervals using Scheduler.
Configure the Connector
Create a new Mule project using the Anypoint Studio visual editor:
-
In Anypoint Studio, click File > New > Mule Project.
-
Specify a Project Name and click Finish.
-
Search for "http" and drag the HTTP connector to the canvas.
-
Click the green plus sign (+) next to Connector Configuration, and click OK in the menu to accept the default values.
-
Search for "365" and drag the Microsoft Dynamics 365 connector to the canvas. Click the green plus sign (+) next to Connector Configuration and specify your access credentials.
-
Click a connection strategy for authentication:
-
Microsoft Dynamics 365 OAuth 2.0 Connection
-
Microsoft Dynamics 365 OAuth 2.0 Username-Password
-
Configure OAuth 2.0 Authentication
OAuth 2.0 authentication is implemented and managed by Mule runtime engine rather than by the connector itself.
To configure OAuth 2.0 authentication:
-
Enter the following required information on the General tab of the Global Element Properties screen to configure Connection authentication:
-
Resource
Resource URL for accessing the Microsoft Dynamics 365 instance -
Consumer Key
OAuth consumer key registered with the service provider -
Consumer Secret
OAuth consumer secret registered with the service provider -
Listener Config
A reference to the listener that receives the access token callback endpoint -
Callback Path
The path of the access token callback endpoint -
Authorize Path
The path of the local HTTP endpoint that triggers the OAuth danceThe following image shows an example OAuth Connection configuration using property placeholder values:
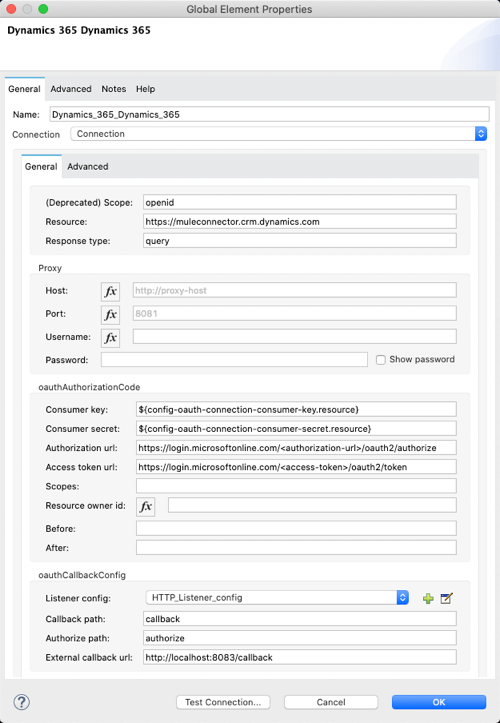
For the Authorization url and Access token url, replace the variables
<authorization-url>and<access-token>with your own authorization and access URL tokens.
-
-
Call the
/authorizepath by pasting it into a web page. -
On the returned web page, perform the authorization steps by providing your credentials, and so on.
After you complete the proper authorization steps, the web page is automatically redirected to the path you configured inside the Callback Path field, for example, /oauth2callback. This redirect contains additional properties, including an access code for the connector to use.
Once the app is authorized, the connector refreshes the token automatically. However, in the event of a restart, you must call the /authorize path again and perform the authorization steps.
Configure OAuth 2.0 Username-Password Authentication
To configure OAuth 2.0 Username-Password authentication, follow these steps:
-
Click the green plus sign (+) to the right of Connector Configuration.
-
Provide the following credentials to enable access to your Microsoft Dynamics 365 server:
-
General tab:
Field Description Client ID
The application ID assigned to your app when you registered it with Azure Active Directory. You can find this in the Azure Portal. Click Active Directory, click the directory, choose the application, and click Configure.
Client Secret
The application secret that you created in the app registration portal for your app. This should not be used in a native app, because client secrets cannot be reliably stored on devices. This is required for web apps and web APIs, which have the ability to store the client secret securely on the server side.
Username
User name used to initialize the session
Password
Password used to authenticate the user
Resource
The application ID URI of the web API (secured resource). This must be the root URI, without specifing the CRM version: for example,
https://YOUR_ORG.crm.dynamics.com/.Token Request Endpoint
The token endpoint that is called to get the access token: for example,
https://login.windows.net/TENANT_ID/oauth2/token, where TENANT_ID is the Azure Active Directory ID. -
Advanced tab:
Field Description Read Timeout
The duration in milliseconds that the consumer waits for a response before timing out. Zero (0) means wait forever.
Connection Timeout
The duration in milliseconds that the consumer tries to establish a connection before timing out. Zero (0) means wait forever.
-
-
Click Test Connection to ensure that your credentials are accepted at the server endpoint.
-
If present, click Enable DataSense to let your application acquire metadata from the server.
Run a Flow
-
In Package Explorer, right-click your project’s name and click Run As > Mule Application.
-
Check the console to see when the application starts. You should see messages such as these if no errors occur:
************************************************************
INFO  2019-10-14 22:12:42,003 [main] org.mule.module.launcher.DeploymentDirectoryWatcher:
++++++++++++++++++++++++++++++++++++++++++++++++++++++++++++
+ Mule is up and kicking (every 5000ms)                    +
++++++++++++++++++++++++++++++++++++++++++++++++++++++++++++
INFO  2019-10-14 22:12:42,006 [main] org.mule.module.launcher.StartupSummaryDeploymentListener:
**********************************************************
*  - - + DOMAIN + - -               * - - + STATUS + - - *
**********************************************************
* default                           * DEPLOYED           *
**********************************************************

************************************************************************
* - - + APPLICATION + - -   * - - + DOMAIN + - -  * - - + STATUS + - - *
************************************************************************
* myapp                     * default             * DEPLOYED           *
************************************************************************
Next Step
After configuring the Microsoft Dynamics 365 Connector for use in Studio, see the Examples topic for more configuration information.