MSMQ Connector Overview
Anypoint Connector for MSMQ (MSMQ Connector) enables you to send and receive data from MSMQ queues via the Anypoint Gateway for Windows.
Before You Begin
-
Install the Windows Gateway Services before installing and configuring MSMQ Connector.
Installation and Configuration
Installing the MSMQ Connector in Anypoint Studio
-
In Anypoint Studio, click the Exchange icon in the Studio taskbar.
-
Click Login in Anypoint Exchange.
-
Search for the connector and click Install.
-
Follow the prompts to install the connector.
When Studio has an update, a message displays in the lower right corner, which you can click to install the update.
Load-Balanced Configuration
The Windows Gateway Services supports running in a load-balanced configuration to allow for fault tolerance. Visit the Windows Gateway Services documentation for more details.
Namespace and Schema Location
The namespace and schema location for the MSMQ connector should be included in your Mule application Configuration XML file automatically when you use Studio Visual Editor to design your app. Otherwise, include these manually, as shown in the example <mule> block.
Namespace:
xmlns:msmq="http://www.mulesoft.org/schema/mule/msmq"
Schema Location
http://www.mulesoft.org/schema/mule/msmq/current/mule-msmq.xsd
<mule xmlns:msmq="http://www.mulesoft.org/schema/mule/msmq" xmlns="http://www.mulesoft.org/schema/mule/core" xmlns:doc="http://www.mulesoft.org/schema/mule/documentation"
	xmlns:spring="http://www.springframework.org/schema/beans"
	xmlns:xsi="http://www.w3.org/2001/XMLSchema-instance"
	xsi:schemaLocation="http://www.springframework.org/schema/beans http://www.springframework.org/schema/beans/spring-beans-current.xsd
http://www.mulesoft.org/schema/mule/core http://www.mulesoft.org/schema/mule/core/current/mule.xsd
http://www.mulesoft.org/schema/mule/msmq http://www.mulesoft.org/schema/mule/msmq/current/mule-msmq.xsd">
MSMQ Connector Example
This example requires some basic familiarity with MSMQ and with Mule. The following documentation describes the Mule features in this example:
Set Up Demo Queue in MSMQ
Step 1: Create Queue
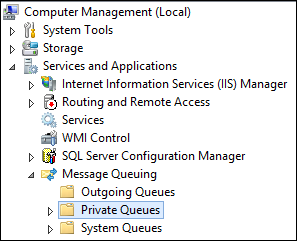
-
Open the Computer Management console on the server where MSMQ is running.
-
Expand Services and Applications.
-
Expand Message Queuing.
-
Right-click Private Queues, click New, and Private Queue.
-
Name the new queue msmq-demo, and click OK.
Step 2: Grant Permissions
Set the appropriate permissions for the identity that the MSMQ Connector uses to interact with the queue.
-
Right click the msmq-demo queue and click Properties.
-
Click the Security Tab. For this demo, make sure that Everyone has permissions to the following:
-
Receive Message
-
Peek Message
-
Get Properties
-
Get Permissions
-
Send Message
-

Using MSMQ Connector in a Mule Application
Step 1: Create a New Mule Project
After Anypoint Studio launches, create a new project:
-
Go to File > New > Mule Project.
-
In the New Mule Project configuration menu, provide a name for this project:
msmq-demo. -
Click Finish.
Step 2: Create a MSMQ Global Element
-
Click the Global Elements tab.
-
Click Create to display the Global Type dialog box.
-
Search for msmq.
-
Select MSMQ from Cloud Connectors section and click OK.
-
Fill in Gateway Service Address using the format machinename/ip address:port. (For example, localhost:9333). Don’t use URLs as they are not supported.
-
Fill in Gateway Access Token. You can find the configured token in the Windows Service configuration file (
C:\Program Files(x86)\Anypoint Gateway for Windows\Mule.SelfHost.exe.config) under the mule-auth-token appSetting key. -
Fill in the Queue name using the supported syntax by MSMQ. For example,
.\private$\msmq-demofor the private queue created above. Because the required permissions have been granted to Everyone, you do not need to specify a UserName and Password for this demo. -
If you are using a self-signed SSL certificate such as the one included out of the box, make sure Ignore SSL Warnings is checked.
-
Click Test Connection to make sure everything was set up correctly.
-
Click OK.

Building Flows
The sample flows send and receive messages from an existing queue. Transformers put the necessary information on the Mule Message for subsequent operations to consume. The end result looks like this:
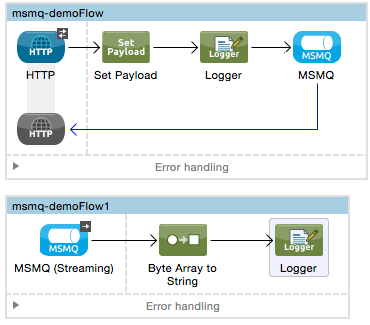
Step 1: Building the Send Flow
-
Search for http, and drag and drop an HTTP connector to the canvas. This creates a new flow
msmq-demoFlow. -
Search for payload, and drag a Set Payload Transformer next to the HTTP connector.
-
Search for logger, and drag a Logger component next to the Set Payload.
-
Search for msmq, and drag a MSMQ connector next to the Logger.
-
Double-click HTTP . After its properties dialog displays, select one-way from the Exchange Patterns group. Make sure Host is set to localhost and the Port is set to 9333. S ave the changes.
-
Double-click Set Payload Transformer . After its properties dialog displays, set Value to
#[header:INBOUND:http.relative.path], and save the changes. -
Double-click Logger Component . After its properties dialog displays, set Message to
Sending message: #[payload], and save the changes. -
Double-click MSMQ Connector . After its properties dialog displays, select the Config Reference named MSMQ . Leave the rest of the fields with the default values, and save the changes.
Step 2: Building the Receive Flow
-
Search for msmq and drag a MSMQ Connector to the canvas, outside of the existing flow msmq-demoFlow. This creates a new flow
msmq-demoFlow1. -
Search for byte and drag a Byte Array To String Transformer next to the MSMQ Connector.
-
Search for logger and place a Logger Component next to the Byte Array To String Transformer.
-
Double-click MSMQ Connector . After its properties dialog displays, select the Config Reference named MSMQ , and leave the rest of the properties with the default values. Save the changes.
-
Double-click the Logger Component. After its properties dialog displays, set Message to
Received from queue: #[payload], and save the changes.
Step 3: Running the Flows
-
Right-click
msmq-demo.mflowand click Run As > Mule Application. -
Check the console to see when the application starts. You should see a message
Started app 'msmq-demo'message if no errors occurred.++++++++++++++++++++++++++++++++++++++++++++++++++++++++++++ + Started app 'msmq-demo' + ++++++++++++++++++++++++++++++++++++++++++++++++++++++++++++ -
Access the endpoint at
http://localhost:9333/Hello-Worldand check the operation payload. -
The following messages should display in the console.
INFO  XXXX-XX-XX XX:XX:XX,XXX [[msmq-demo].msmq-demoFlow.stage1.02] org.mule.api.processor.LoggerMessageProcessor: Sending message: Hello-World
INFO  XXXX-XX-XX XX:XX:XX,XXX [[msmq-demo].msmq-demoFlow1.stage1.02] org.mule.api.processor.LoggerMessageProcessor: Received from queue: Hello-World
INFO  XXXX-XX-XX XX:XX:XX,XXX [[msmq-demo].msmq-demoFlow.stage1.02] org.mule.api.processor.LoggerMessageProcessor: Sending message: Hello-World
INFO  XXXX-XX-XX XX:XX:XX,XXX [[msmq-demo].msmq-demoFlow1.stage1.02] org.mule.api.processor.LoggerMessageProcessor: Received from queue: Hello-World
See Also
-
MSMQ Connector for more information about this connector.
-
Read the FAQs about the MSMQ Connector.