Invoke Component Reference
The Invoke component invokes a method of an object defined in a Spring bean. You can provide an array of argument expressions to map the message to the method arguments. Mule determines which method to use via the method name, along with the number of argument expressions provided. Mule automatically transforms the results of the argument expressions to match the method argument type, where possible.
Note: Mule does not support multiple methods with the same name and same number of arguments.
Configuring the Java Class
Use the Invoke component when you have an existing method defined in custom Java code that you wish to use in processing a message:
-
Create a new Mule project. Click File > New > Mule Project and name the project
demo. -
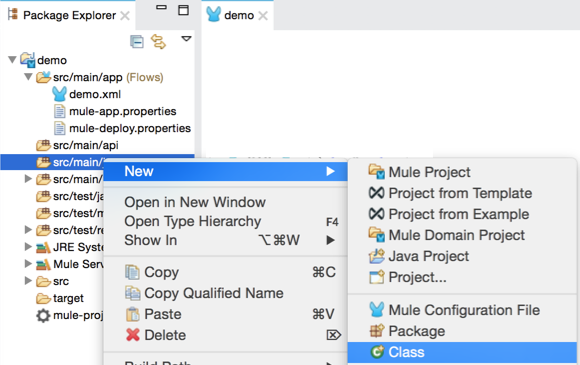
Create a new Java class. In Package Explorer, right-click
src/main/javaand click New > Class.
-
Name the class
GreetingService.
The GreetingService.java file opens in Studio.
-
For this example, ensure that your completed class has this code:
package demo; public class GreetingService { public String sayHello(String name) { return String.format("Hello %s!", name); } public String sayGoodbye(String name) { return String.format("Goodbye %s!", name); } }javaThe package is the name of your application. The GreetingService class contains two methods:
-
sayHello - Displays "Hello <name>"
-
sayGoodbye - Displays "Goodbye <name>"
-
Configure Your Application
Studio Visual Editor
-
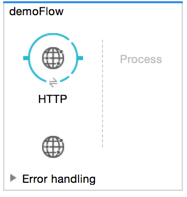
In Studio, search for "http" and place an HTTP Connector on the canvas.
-
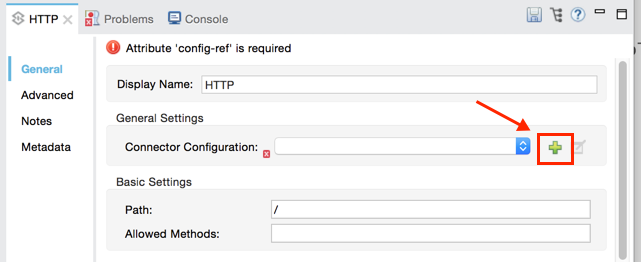
Click the HTTP Connector to display its properties menu. Click the green plus sign to the right of Connector Configuration.
In the Global Element Properties window, set the host to
localhostand the port to 8081. Leave all other settings the same and click OK.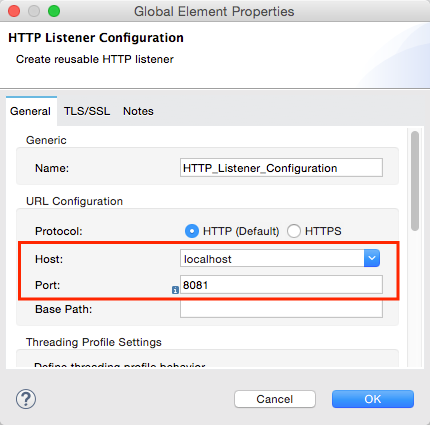
-
In the HTTP Connector’s property editor, set Path to
/greeting: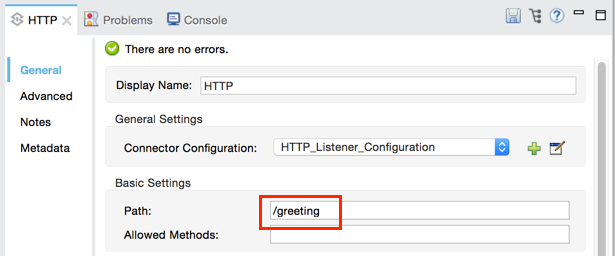
-
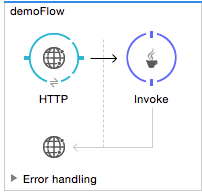
Search for "invoke" and drag the Invoke Component to the canvas:
-
Click the Invoke icon to open the property editor:
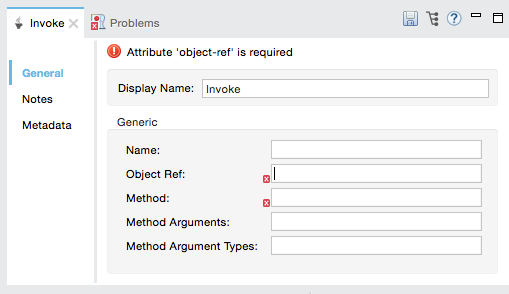
The possible values in the property editor are:
Attribute Description Display Name
Customize to display a unique name for the component in your application. Not required for Mule Standalone. The default is
Invoke.Name
The name of the message processor for logging purposes, for example,
someName.Object Ref
(Required) Reference to the object containing the method to be invoked. In the example, use
GreetingService.Method
(Required) The name of the method to be invoked. In the example, use
sayHello.Method Arguments
Comma-separated list of Mule expressions that, when evaluated, provide the arguments for the method invocation. For example,
[1], #[2]. In the example, we use[message.inboundProperties.'http.query.params'.name]Method Argument Types
Comma-separated list of argument types for the method invocation. Use when you have more than one method with the same name in your class. For example,
java.lang.Float, java.lang.String -
Set Object Ref to the object containing the method to be invoked, in this case,
GreetingService. -
Set Method to the method to invoke, in this case,
sayHello. -
Set Method Arguments to
#[message.inboundProperties.'http.query.params'.name].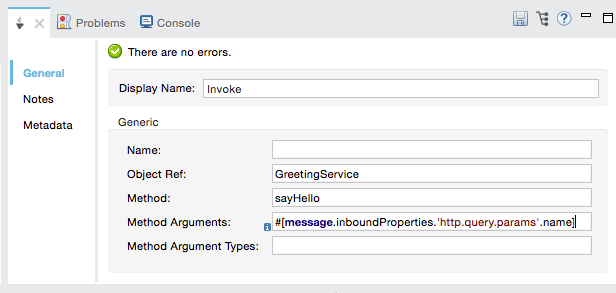
XML Editor or Standalone
Include the invoke method in your flow, and define a Spring bean as a global element with the reference to the object containing the method.
<spring:beans>
<spring:bean name="beanName" class="invoke.GreetingService"/>
</spring:beans>
<flow
...
<invoke object-ref="GreetingService" method="sayHello" methodArguments="#[1], #[2]" methodArgumentTypes="java.lang.Float, java.lang.Float" name="someName" doc:name="Invoke"/>
...
</flow>xml| Element | Description |
|---|---|
|
Invokes a method in a specified object using method arguments determined by Mule expressions. |
Attributes:
| Field | Description | Example XML |
|---|---|---|
|
Customize to display a unique name for the component in your application. |
|
|
The name of the message processor for logging purposes. |
|
|
(Required) Reference to the class or object containing the method to be invoked. |
object-ref="GreetingService"` |
|
(Required) The name of the method to be invoked. |
|
|
Comma-separated list of Mule expressions that, when evaluated, are the arguments for the method invocation. |
|
|
Comma-separated list of argument types for the method invocation. Use when you have more than one method with the same name in your class. |
`methodArgumentTypes="java.lang.Float, java.lang.Float" ` |
Create Your Spring Bean
To reference your Java, Mule requires a Spring bean to declare the class path.
Studio Visual Editor
-
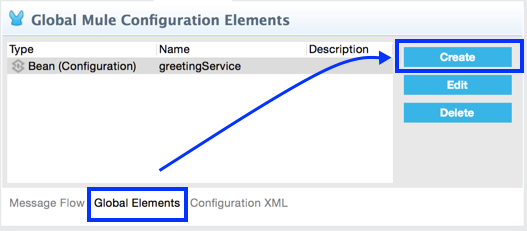
In Anypoint Studio, click Global Element at the bottom of the Canvas.
-
In the Global Mule Configuration Elements screen, click Create.
-
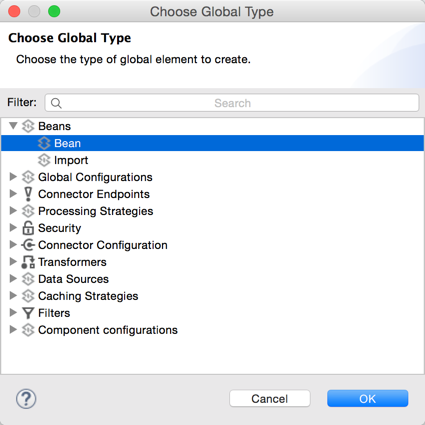
In the Choose Global Type screen, expand Beans, select Bean, and click OK.
-
In the Global Element Properties menu, enter the class name.
XML Editor or Standalone
Add this Spring bean to your code after the <mule element:
<spring:beans>
<spring:bean name="greetingService" class="invoke.GreetingService"/>
</spring:beans>xmlThe complete source is:
<?xml version="1.0" encoding="UTF-8"?>
<mule xmlns:http="http://www.mulesoft.org/schema/mule/http" xmlns="http://www.mulesoft.org/schema/mule/core" xmlns:doc="http://www.mulesoft.org/schema/mule/documentation"
xmlns:spring="http://www.springframework.org/schema/beans"
xmlns:xsi="http://www.w3.org/2001/XMLSchema-instance"
xsi:schemaLocation="http://www.springframework.org/schema/beans http://www.springframework.org/schema/beans/spring-beans-current.xsd
http://www.mulesoft.org/schema/mule/core http://www.mulesoft.org/schema/mule/core/current/mule.xsd
http://www.mulesoft.org/schema/mule/http http://www.mulesoft.org/schema/mule/http/current/mule-http.xsd">
<spring:beans>
<spring:bean name="greetingService" class="org.mule.invoke.GreetingService"/>
</spring:beans>
<http:listener-config name="HTTP_Listener_Configuration" host="localhost" port="8081" doc:name="HTTP Listener Configuration"/>
<flow name="demoFlow">
<http:listener config-ref="HTTP_Listener_Configuration" path="/greeting" doc:name="HTTP"/>
<invoke object-ref="GreetingService" method="sayHello" doc:name="Invoke"/>
</flow>
</mule>xmlRun and Test Your Project
To run and test your project from within Anypoint Studio:
-
Click Run > Run As > Mule Application.
-
Browse to
http://localhost:8081/greeting?name=Mulewhich returns "Hello, Mule!" - You can change the name at the end of the URL in your browser to greet other people. You can also change the method in your setup to be sayGoodbye and the program then says goodbye to the name you specify. -
The browser appears like this:
See Also
-
Learn more about other components available in Mule.


