Consume Data from an API
After you build your application, you can start consuming data from an API. Review the following processes to consume data from a SOAP or REST API.
Consume Data from a SOAP API
To consume data from a SOAP API that does not have its own Anypoint Connector, configure Anypoint Connector for Web Service Consumer (Web Service Consumer Connector).
Using the host, port, and address metadata retrieved from the API’s WSDL file, the connector provides the connection configuration you need for consuming a service from within your Mule application:
See Web Service Consumer Connector for details.
Consume Data from a REST API
The following process focuses on configuring the HTTP Request Connector to call the REST API. It helps you to understand the basic anatomy of how a Mule application consumes a REST API, the minimum configuration required, how to consume examples, how to configure dynamic requests, how to manage HTTP Content-Type and encoding, and how to work with custom headers and security requirements.
To consume data from a REST API from within a Mule application, you can configure Anypoint Connector for HTTP Request (HTTP Request Connector).
If you connect to the same REST API many times or work with an API that has complex authentication protocols, consider developing your own connector using the Mule SDK. Check whether a connector already exists in Anypoint Exchange for the API you want to connect to. You can search in Exchange through Anypoint Studio’s Mule Palette.
Basic Anatomy
A Mule application consuming a REST API consists of the following:
-
One or more message processors configured to build your request
-
An HTTP request operation configured to call the REST API
-
One or more message processors configured to accept and process the response
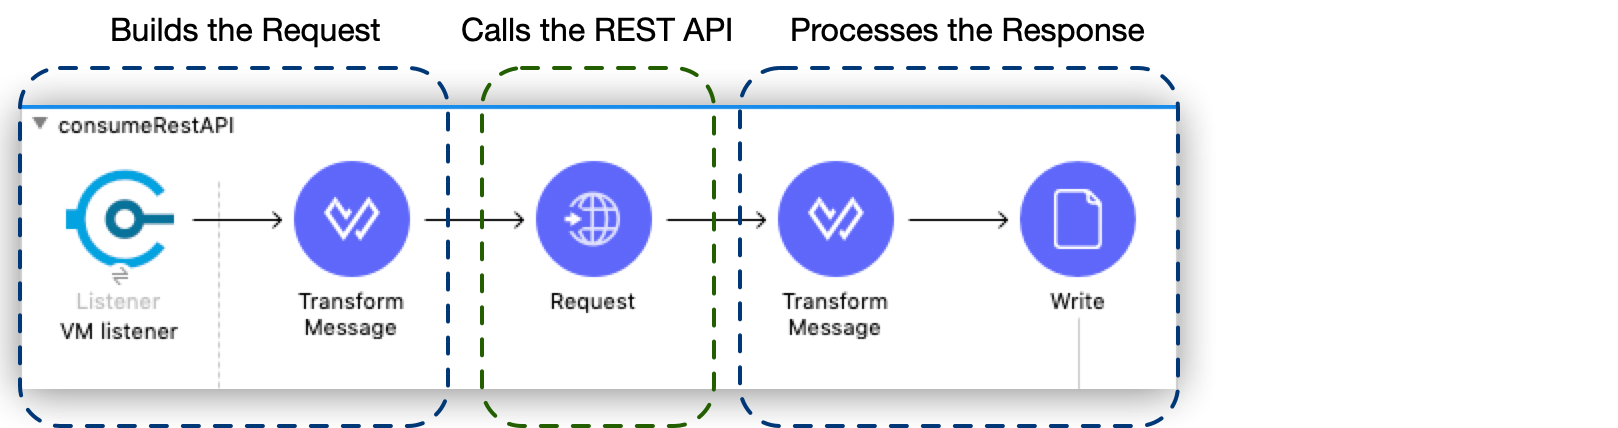
You configure the portions of the application that build the request and process the response.
Minimum Configuration
The REST API you are consuming must have a RAML file that describes the API, so that the HTTP connector proactively presents you with smart suggestions.
In the RAML file, you define the following:
-
Authentication
-
A base URI for configuring the outbound HTTP endpoint
-
Scope
Based on authentication credentials, the application can limit calls to only GET requests on certain resources, for example, or otherwise limit access to a resource.
-
Resources
You must configure the path of the resources for the outbound HTTP endpoint.
-
Methods
You can accept POST as the default method for the HTTP outbound endpoint, or you can change this default to the method supported by your resource.
-
Input validation
For POST and PUT calls, the API almost always requires that the input format, such as JSON or XML, match its schema.
In Mule runtime engine, you can define or configure the following:
-
Output format
After the HTTP request operation, your flow must include message processors to accept the response from the API and translate the response into a useable format.
-
Redirects
If the API uses redirects, enable redirects in your HTTP request operation.
-
Timeout
-
Headers for methods
POST, PUT, and DELETE requests almost always require headers.
-
URI and Query Parameters
-
Error handling
See HTTP Connector documentation for more information about how to configure the request operation.
Consume REST API Example
The following example consumes the JSONPlaceholder API. The example shows only the configuration of the HTTP Request Connector, and to make it work, you must configure at least one Mule event source to trigger a message in the flow and at least one message processor to accept the response. See REST API Examples documentation for more information.
In this API example:
-
The API doesn’t require authentication.
-
The base URL is
jsonplaceholder.typicode.com. -
The API is a mock API for development purposes.
-
The sample API requests show that to get information about user with
id=1the request must be:
https://jsonplaceholder.typicode.com/users/1
The parts of the URL are as follows:
-
Protocol:
http -
API Base URL:
jsonplaceholder.typicode.com -
Resource path:
/users/1 -
Query Parameters: None, in this case.
To implement this call in your Mule application, configure your HTTP request operation.
Configure HTTP Request Operation in Anypoint Studio
-
From the Mule Palette in Studio, add an HTTP Request Connector to your application.
-
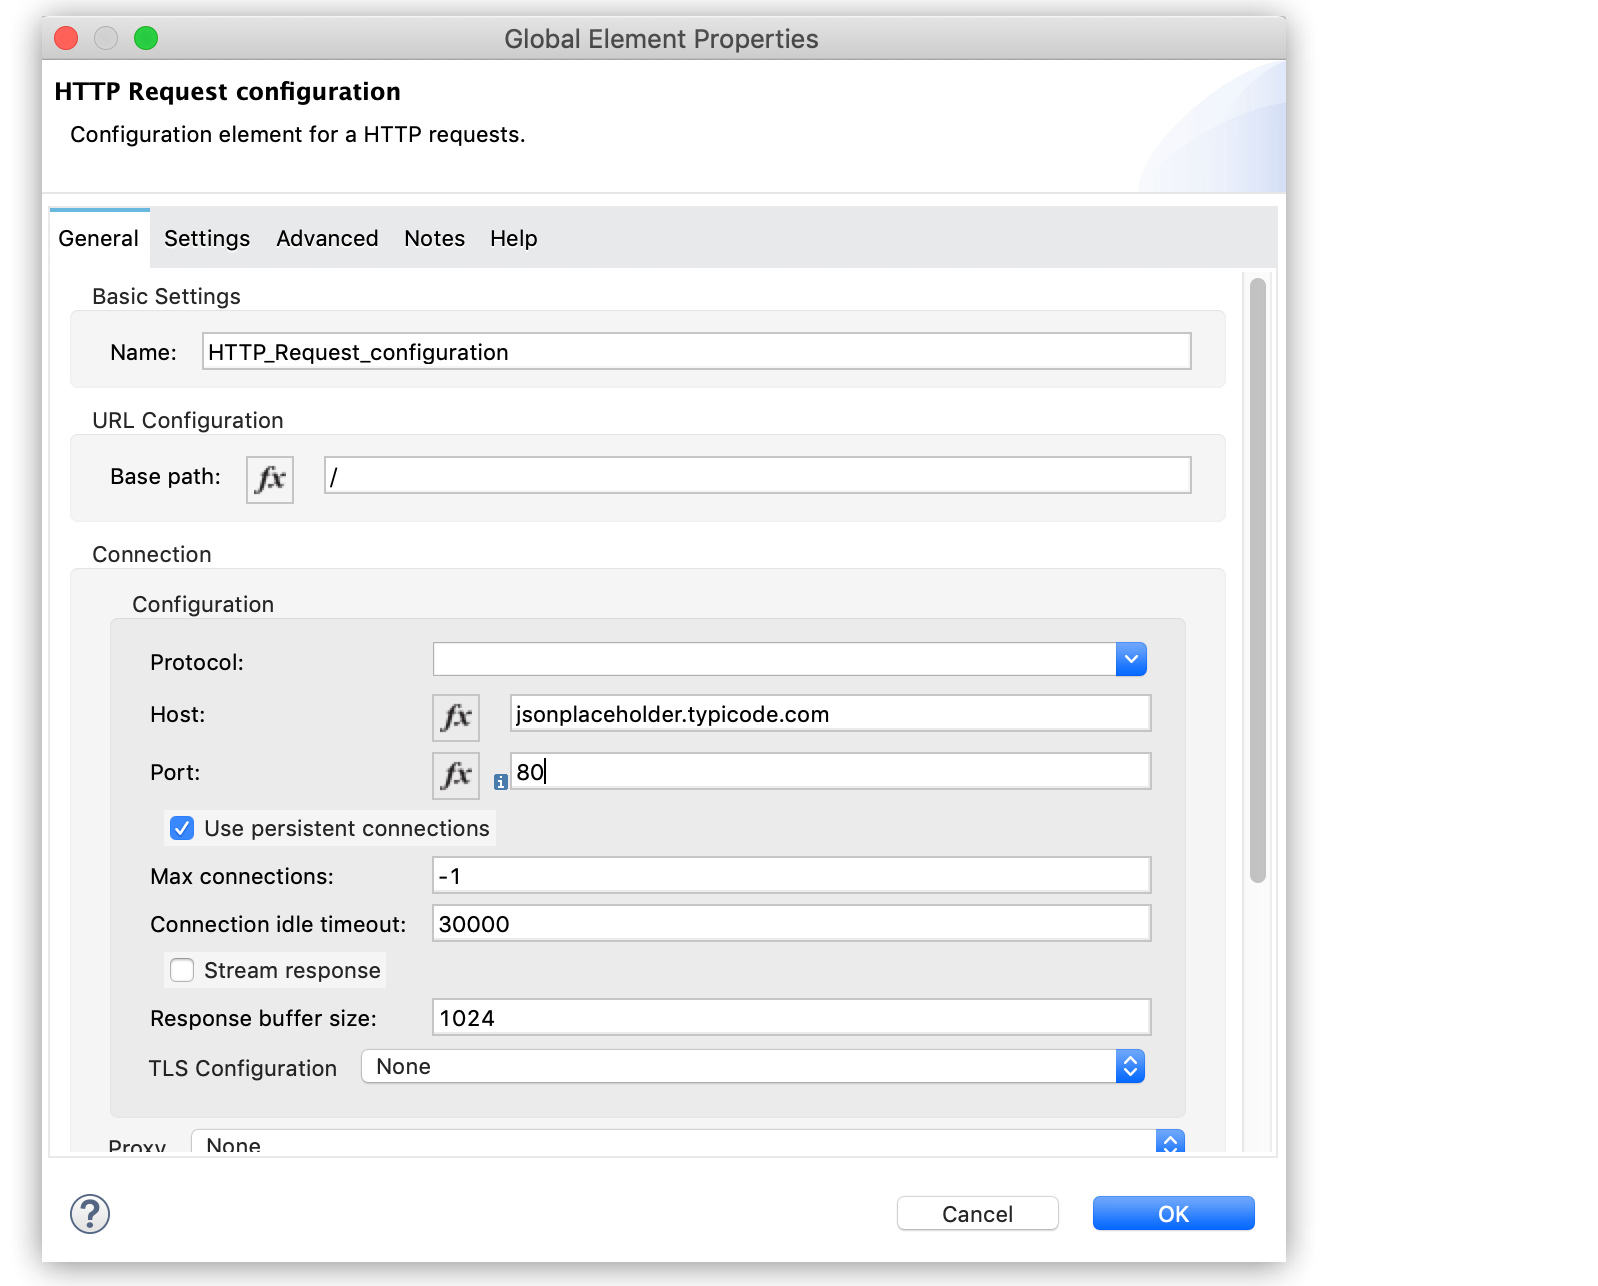
In the HTTP Request Configuration window, provide
jsonplaceholder.typicode.comas the value for Host. -
Set the Port value to 80.
-
Click OK:
-
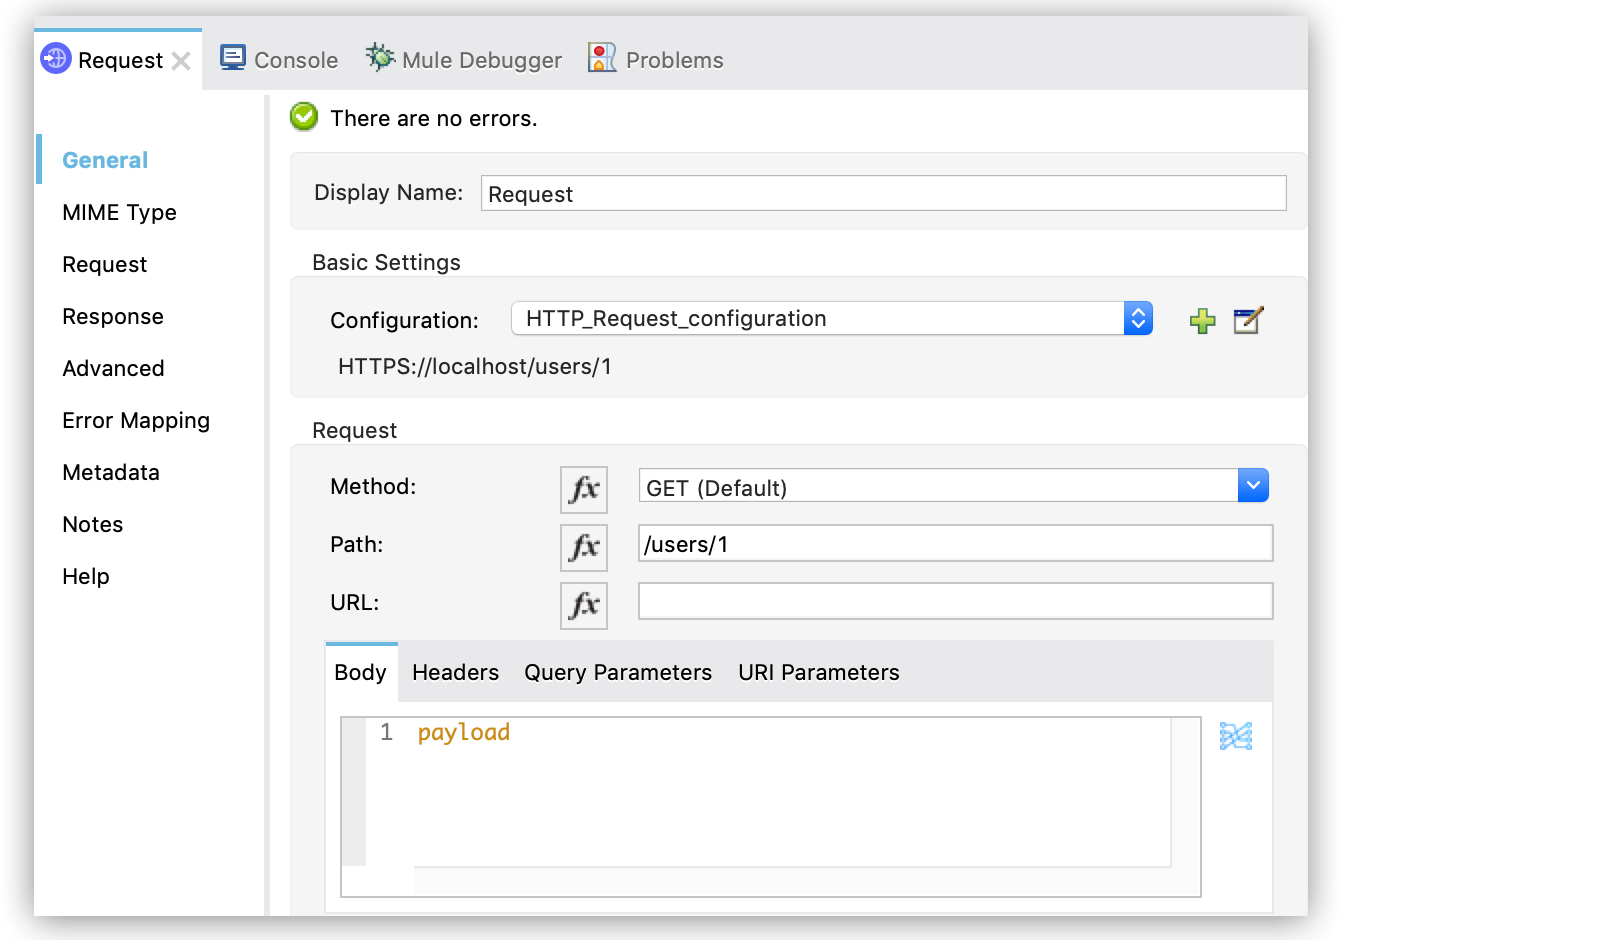
Navigate to the Request section from the HTTP Request operation’s properties editor > General tab and add
/users/1in the Path field.
Specifying this path completes the URL that you began to identify by specifying the host in the first step.
-
Select a method from the Method drop-down list (in this example,
GET). -
Save your application.
Configure HTTP Request Operation in XML
The following XML code shows the configuration of the HTTP Request operation for the example:
<http:request-config name="HTTP_Request_configuration">
    <http:request-connection host="jsonplaceholder.typicode.com" />
  </http:request-config>

<flow name="basic_tutorialFlow1">

    <...>

    <http:request method="GET" doc:name="Request" config-ref="HTTP_Request_configuration" path="/users/1"/>
</flow>
Example JSON Response
For the JSONPlaceholder API example, the JSON response has the following structure:
{
  "userId": 1,
  "id": 3,
  "title": "fugiat veniam minus",
  "completed": false
}
You can transform the data in the Advanced tab of the HTTP Request operation. You can also define the target variable, which by default is the Payload.
If this API has an associated RAML file, you can reference it in the configuration element of the connector. With that in place, after you select the verb and asset to call, Studio exposes the metadata corresponding to the output. Integration with other elements in a flow is simplified.
Configure Dynamic Requests with DataWeave Expressions
Most use cases require that you change the call to the API change dynamically based on data in the message. You can configure these dynamic requests by using DataWeave expressions.
In the configuration examples documented in "Consume REST API Example", the request was hardcoded in the URL:
https://jsonplaceholder.typicode.com/users/1
In the following GET request example, the call instructs Mule runtime engine to extract the user ID from the payload of the message, using the DataWeave expression #[payload.user_id].
https://jsonplaceholder.typicode.com/users/#[payload.user_id]
Configure Dynamic Requests in Anypoint Studio
To perform the same operation by using Anypoint Studio, modify the path configuration with the desired DataWeave expression: in this case #['/users/' ++ payload.user_id].
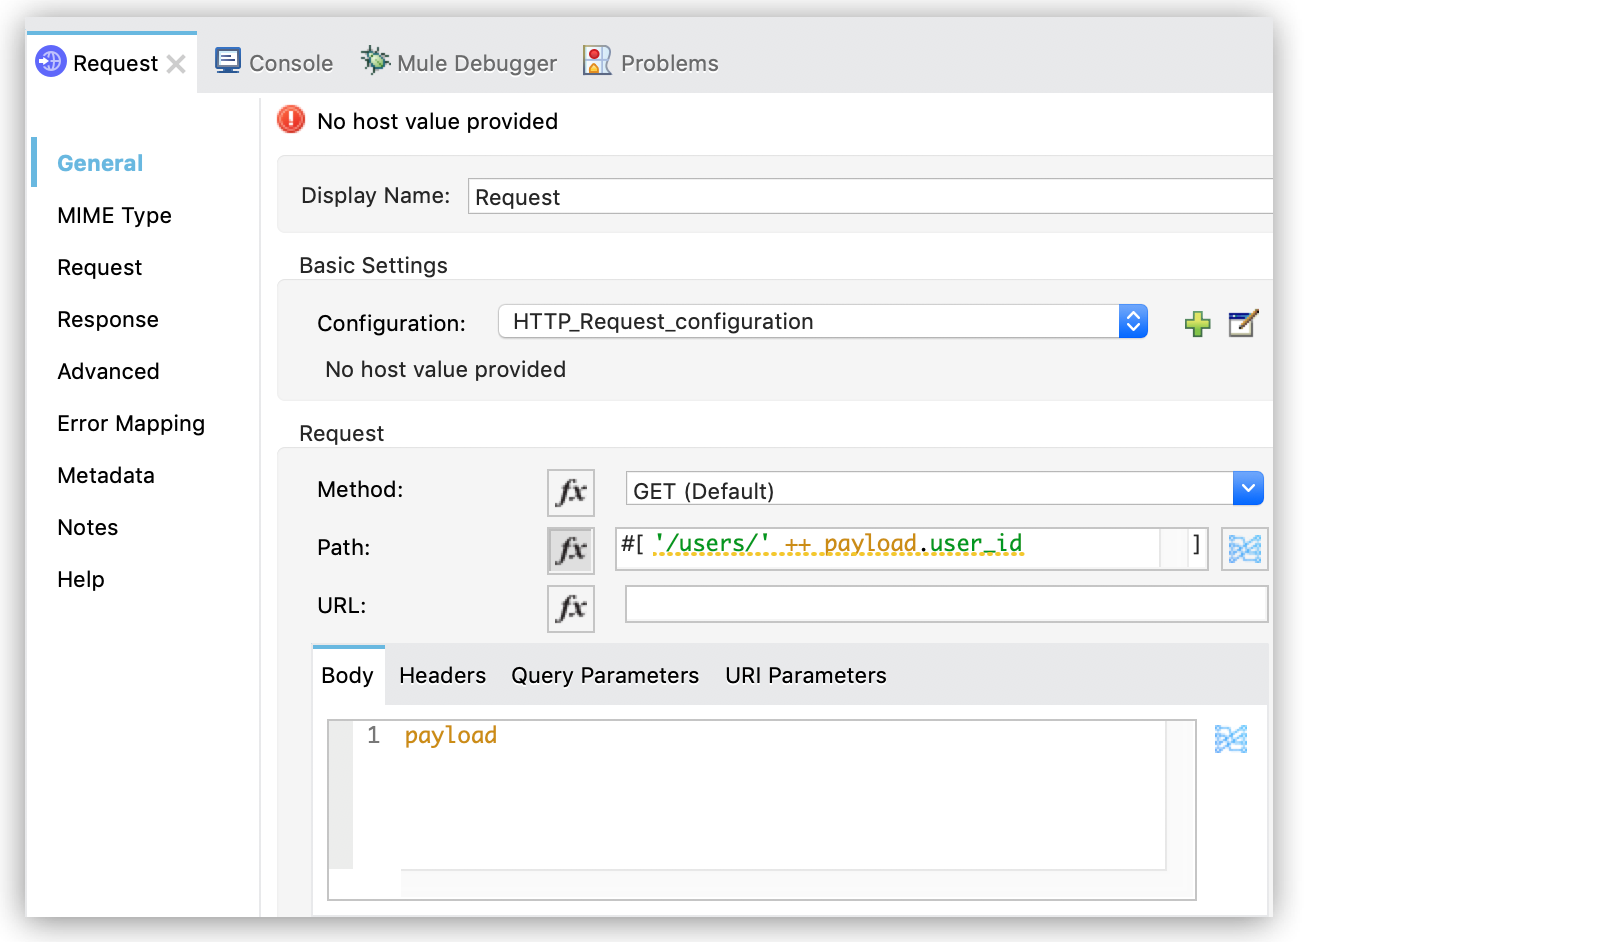
You can also configure dynamic requests for the query or URI parameters, or for the HTTP method. Additionally, you can use Configuration Properties to set any of these dynamic requests.
Configure Dynamic Requests in XML
The following example code in XML, shows the configuration of dynamic requests:
  <http:request-config name="HTTP_Request_configuration">
    <http:request-connection host="jsonplaceholder.typicode.com" />
  </http:request-config>
  <flow name="basic_tutorialFlow1">
    <...>
    <set-payload value='#[{user_id: "10"}]'/>
    <http:request method="GET" config-ref="HTTP_Request_configuration" path="#['/users/' ++ payload.user_id]"/>
  </flow>
HTTP Content-Type and Encoding
When you send a POST request, Mule runtime engine adheres to the following rules regarding Content-Type and encoding of the body.
Content |
Rules |
For a |
* If the endpoint has explicitly set encoding, Mule runtime engine uses that encoding.
* If the endpoint does not have explicitly set encoding, Mule runtime engine determines the encoding from the message property |
For binary content |
Encoding is not relevant. Mule runtime engine sets
|
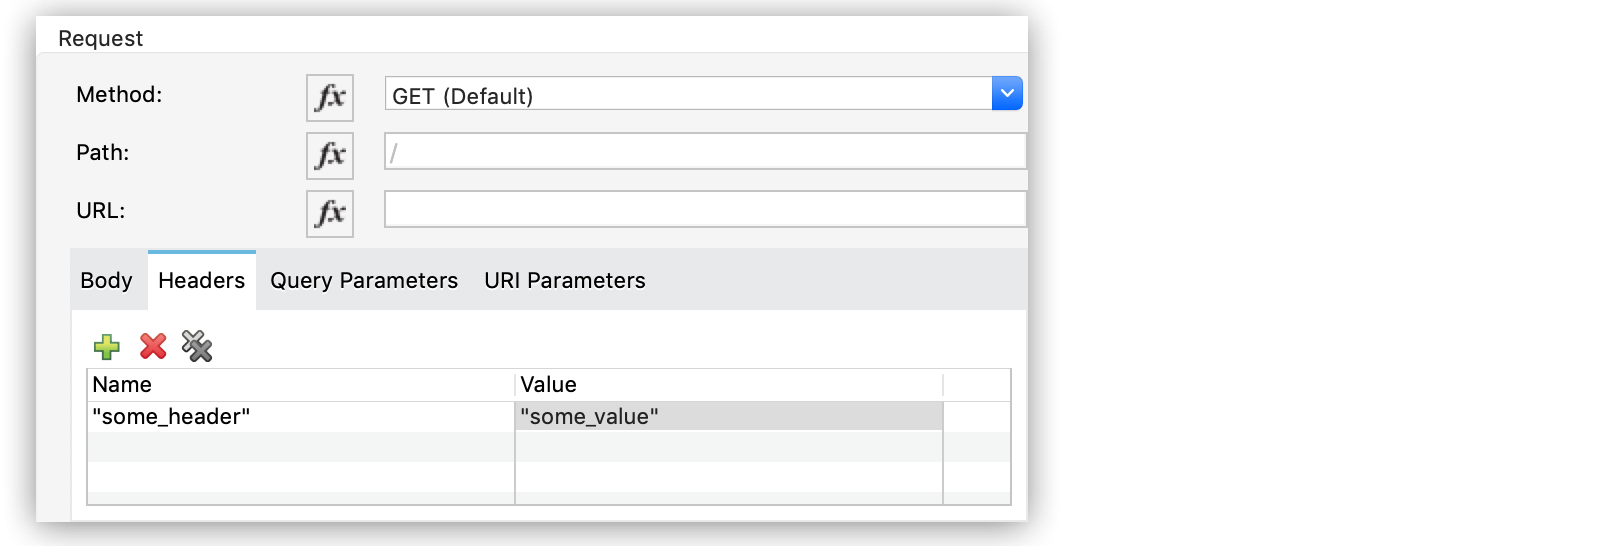
Custom Headers
Some APIs require that you pass custom headers, such as your developer key, along with your requests. As with the query parameters, you can also add headers to your request on the HTTP Connector.
For example, if the API you are consuming requires a developer key, then specify that key as a header on your requests by using the header name accessKey.
You can add a property to set custom headers by using Anypoint Studio.
Custom Headers in Anypoint Studio
To set custom headers in Studio, review the following steps:
-
In the HTTP Request operation’s properties editor, select the Headers tab.
-
Click Add.
-
Define Name and Value. Both can be defined using expressions or properties placeholders.
Security Requirements
If the API that you are calling requires complex authentication protocols, you can build your own connector to consume it. Otherwise, you can meet API security requirements by setting basic authentication credentials or configuring a global HTTPS connector.
Basic Authentication
If the REST API that you are consuming requires you to supply basic authentication credentials, you can provide them within the outbound HTTP endpoint configuration:
-
In Studio, go to the HTTP Request configuration window.
-
In Authentication, select Basic Authentication.
-
Type your username and password. These can also be set as properties placeholders.
-
Click OK.
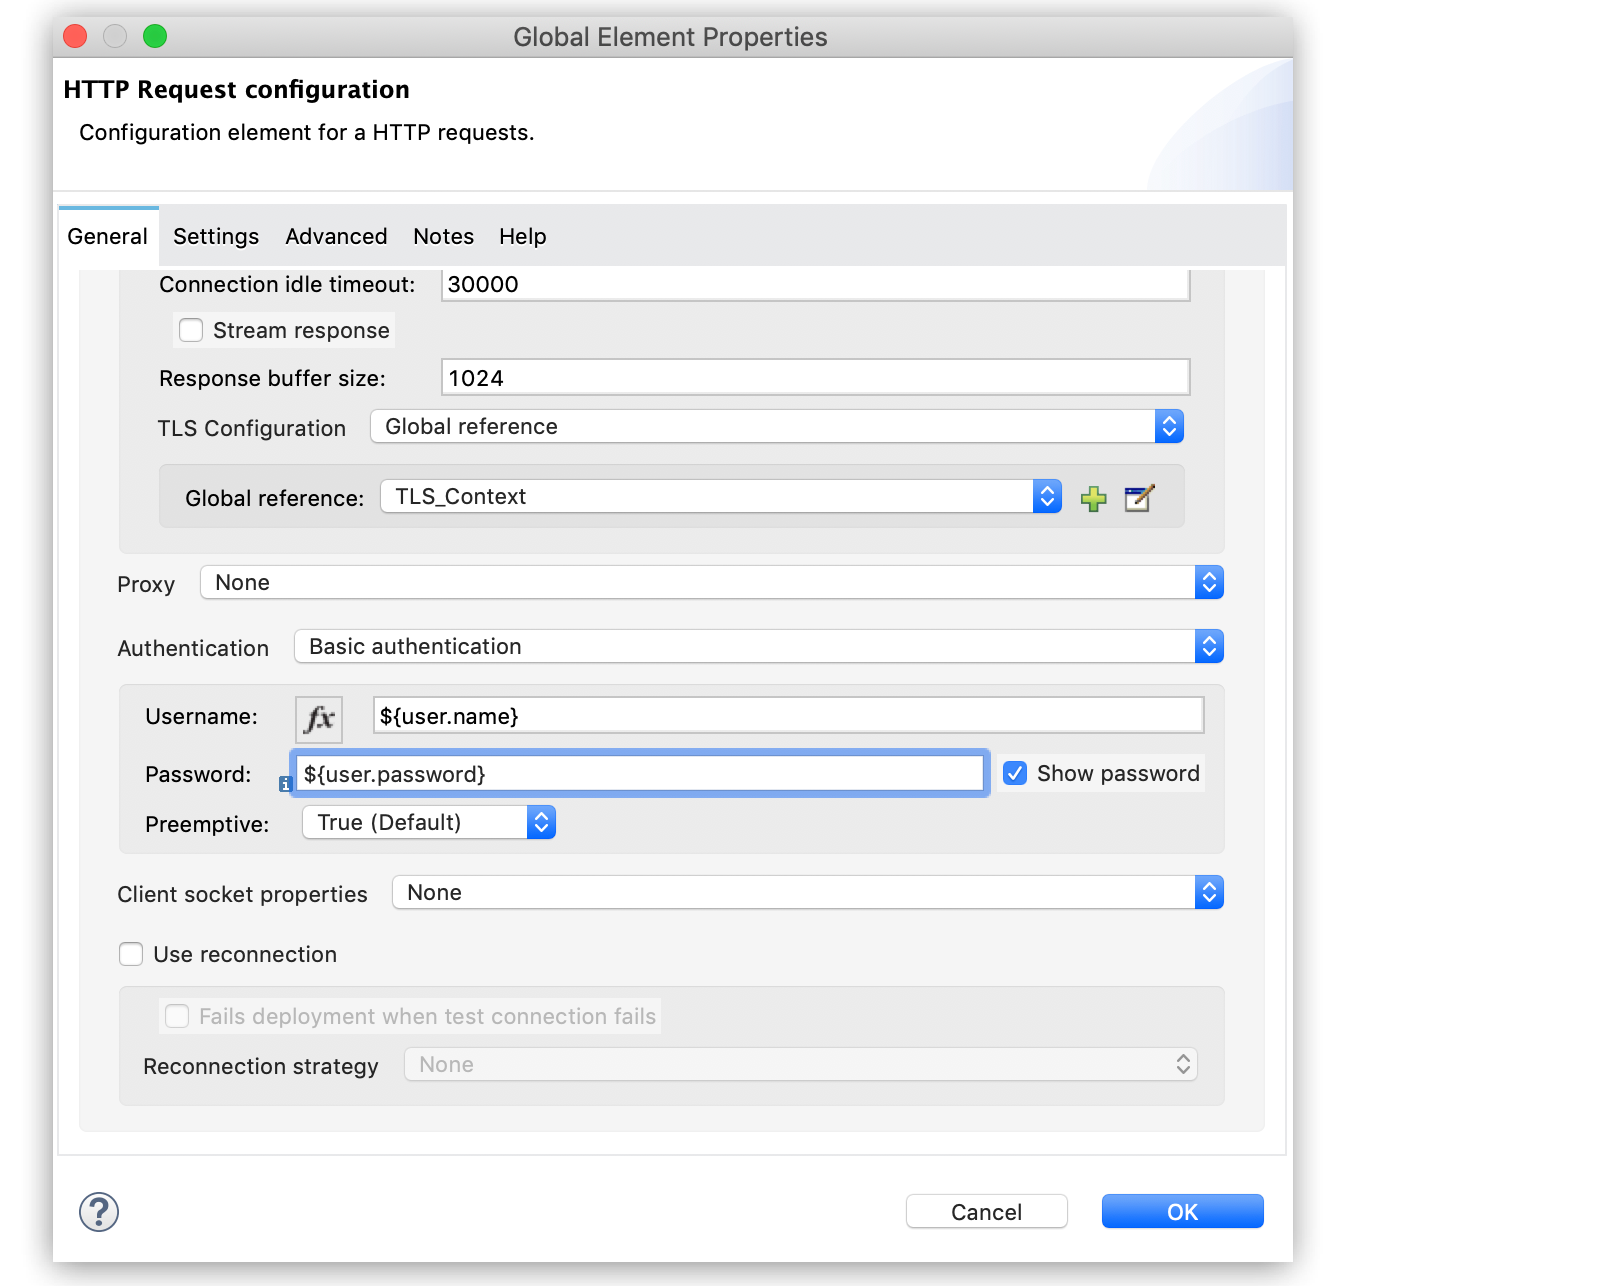
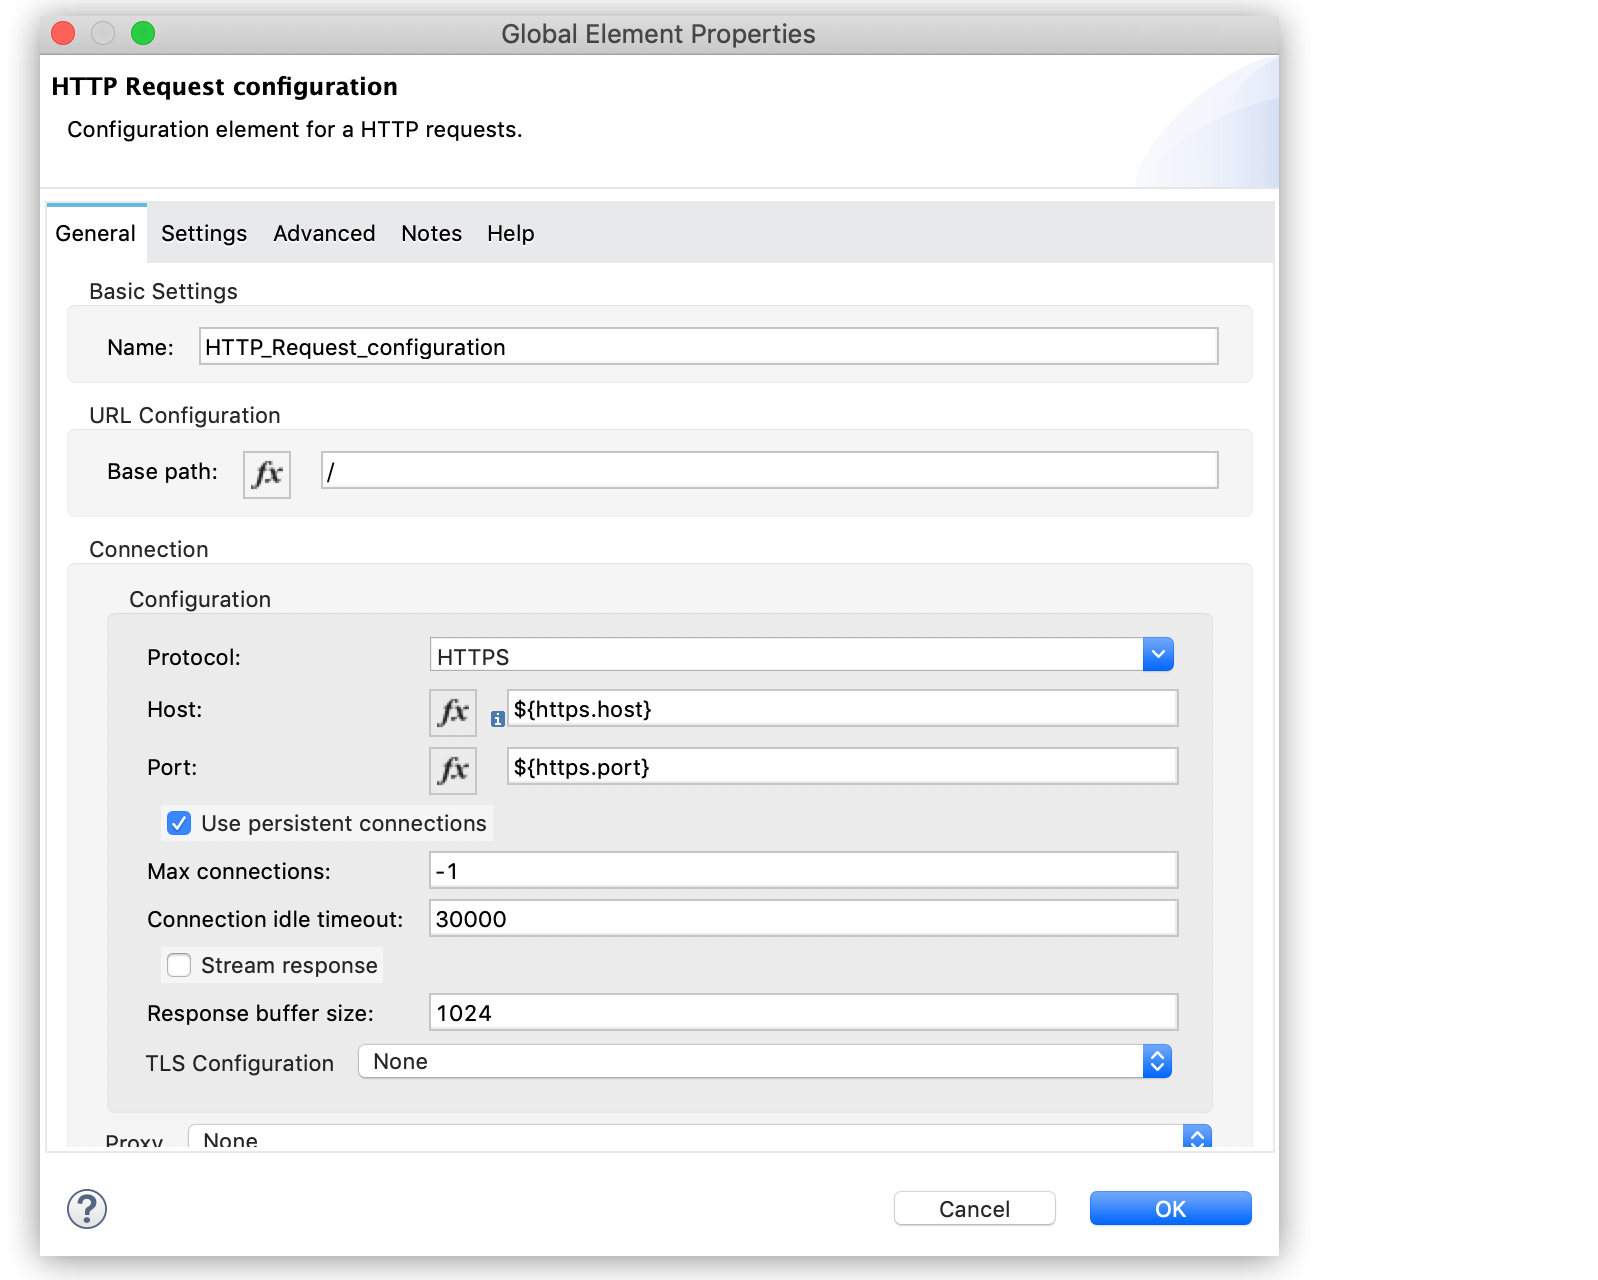
HTTPS Configuration
If you are consuming a REST API that requires that incoming requests arrive via HTTPS, you can configure a global HTTPS Request connector in your Mule application, then reference the connector in your request operation.
In the following example, you configure the HTTPS Request connector, create a Java keystore file (JKS) and configure TLS.
Configure the HTTP Request Connector for HTTPS
-
In the HTTP Request Configuration window, navigate to General tab > Connection Configuration section.
-
Select HTTPS for the Protocol.
-
Click OK.
Create a Keystore File
Using the Java keytool in the bin directory of the Java installation, create a keystore file to certify the communication:
-
Using the command line, navigate to the Java installation directory on your machine.
-
Execute the following command:
keytool -genkey -alias mule -keyalg RSA -keystore keystore.jks
-
When prompted, create two passwords and remember them for later use.
This action creates ajksfile in the local directory calledkeystore.jks. -
Place your
keystore.jksfile:-
If you use Studio, place the
keystore.jksfile into theappname/src/main/resourcesdirectory in Studio Package Explorer. -
If you use XML in Mule runtime engine and want to use the file across multiple applications, place the file in the
MULE_HOME/confdirectory. -
If you use XML in Mule runtime engine and want to use the file within this application, place the file in the
yourappname/src/main/resourcesdirectory.
-
-
Reference the keystore in a global HTTPS Request connector.
This connector is then referenced by the HTTP outbound endpoint within your flow.
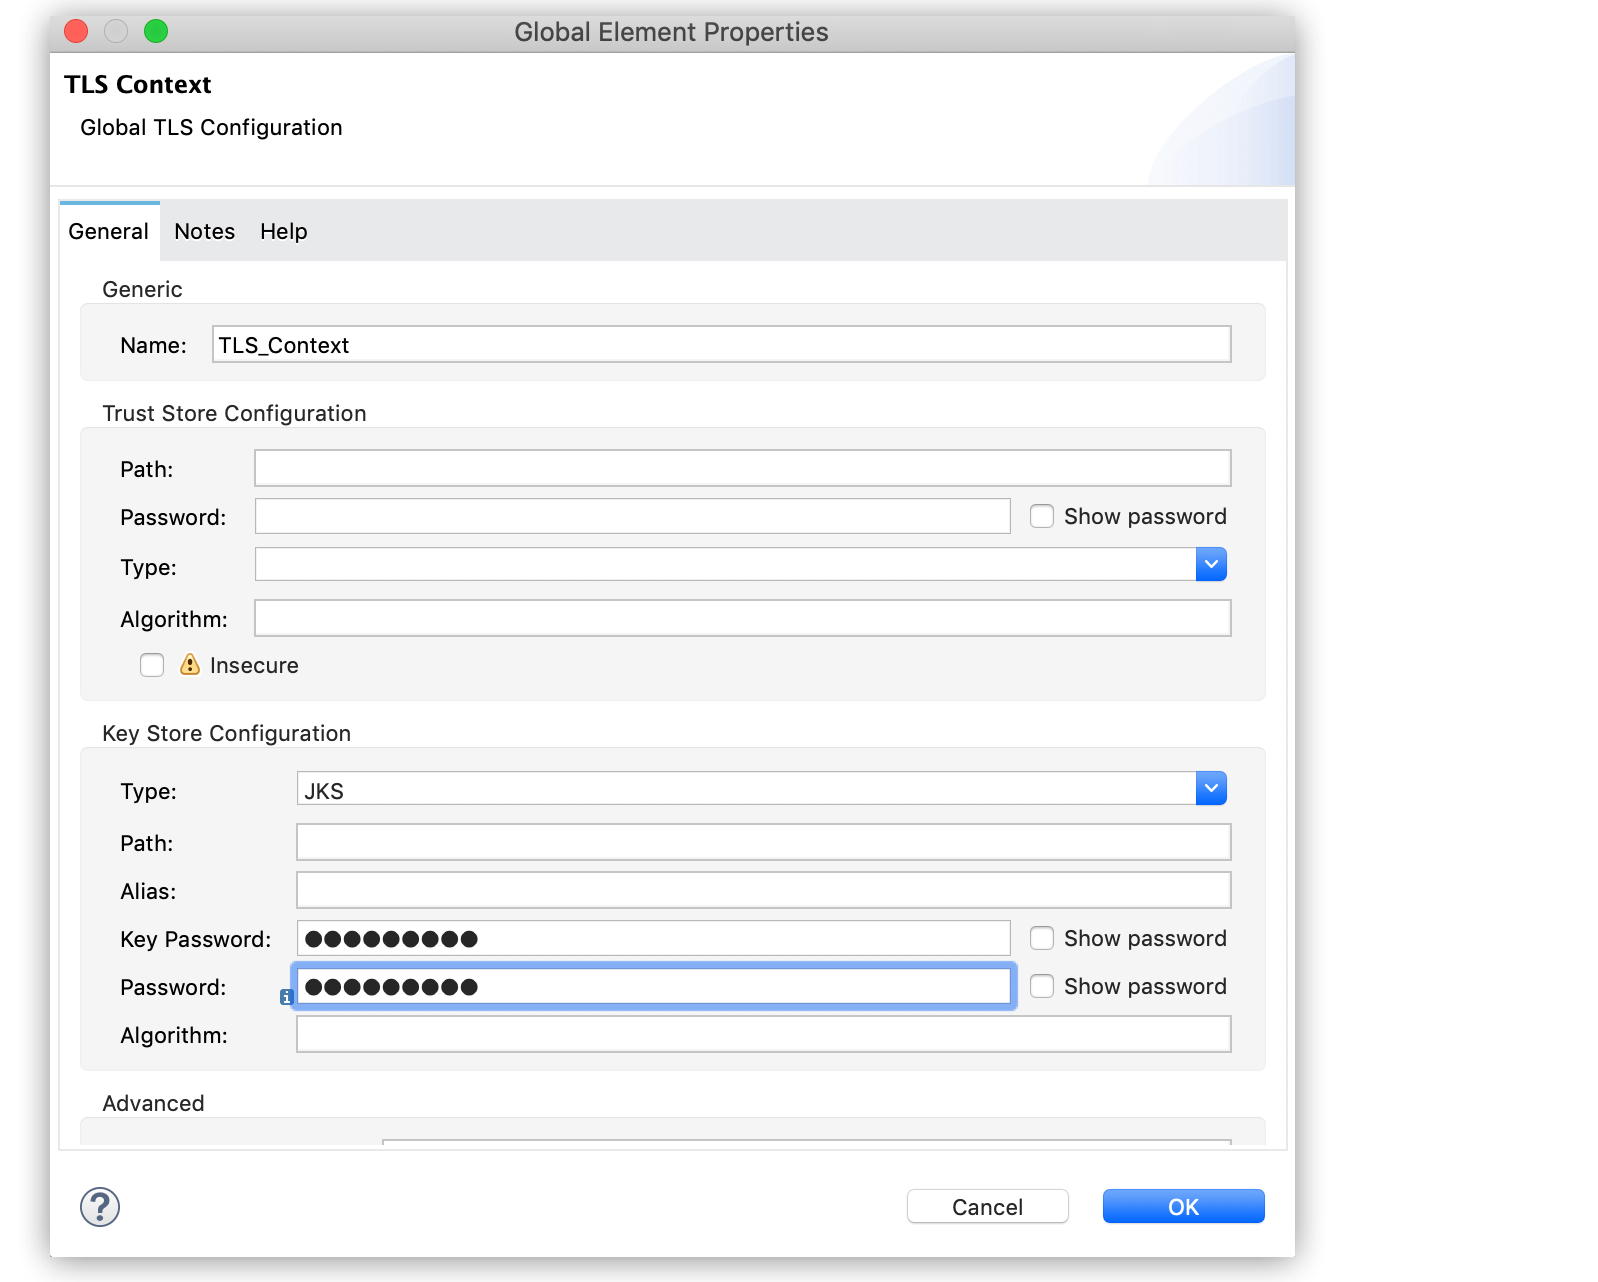
Configure TLS
Follow these steps to configure TLS:
-
In Studio, go to the Global Elements view.
-
Select Create and search for "TLS Context".
-
In the Key Store Configuration section, select a type of keystore configuration from the drop-down menu: for example, JKS (Java Key Store) which is the default type.
-
For Path, specify the name of the keystore if you placed your keystore in the
appname/src/main/resourcesdirectory; otherwise, specify"/keystore.jks". -
For Key Password, and Password, enter the passwords that you created when creating your keystore file.
-
Click OK.
-
Go to the HTTP Request configuration window.
-
In TLS Configuration, select Global Reference and the TLS context value that you created earlier.
You can also create the TLS context inline.
