NetSuite Connector 11.11 Examples
The following examples show how to perform searches in Anypoint Connector for NetSuite (NetSuite Connector):
-
Account Basic Search Filtering by an Integer Field
Obtain the Account records with internal IDs that are less than the value of the
internalIdquery parameter. -
Employee Basic Search Filtering by the Boolean and String Fields
Obtain the inactive Employee records that have last names beginning with a specified letter.
-
Customer Advanced Search Filtering by the Date and Array Fields
Obtain the customer records that were created after 2015 and that are in the LEAD stage.
The following example shows how to add a file in NetSuite Connector:
-
Add a file using the Add operation.
The following example shows how to use custom fields and records in NetSuite Connector:
-
Add a custom record with custom fields.
-
Get a custom record with custom fields.
-
Delete a custom record with custom fields.
Account Basic Search Filtering by an Integer Field
This example shows how to use the NetSuite Connector Search operation to obtain the Account records with internal IDs that are less than the value provided.
This example requires that at least one basic account meets the search condition in the NetSuite instance.
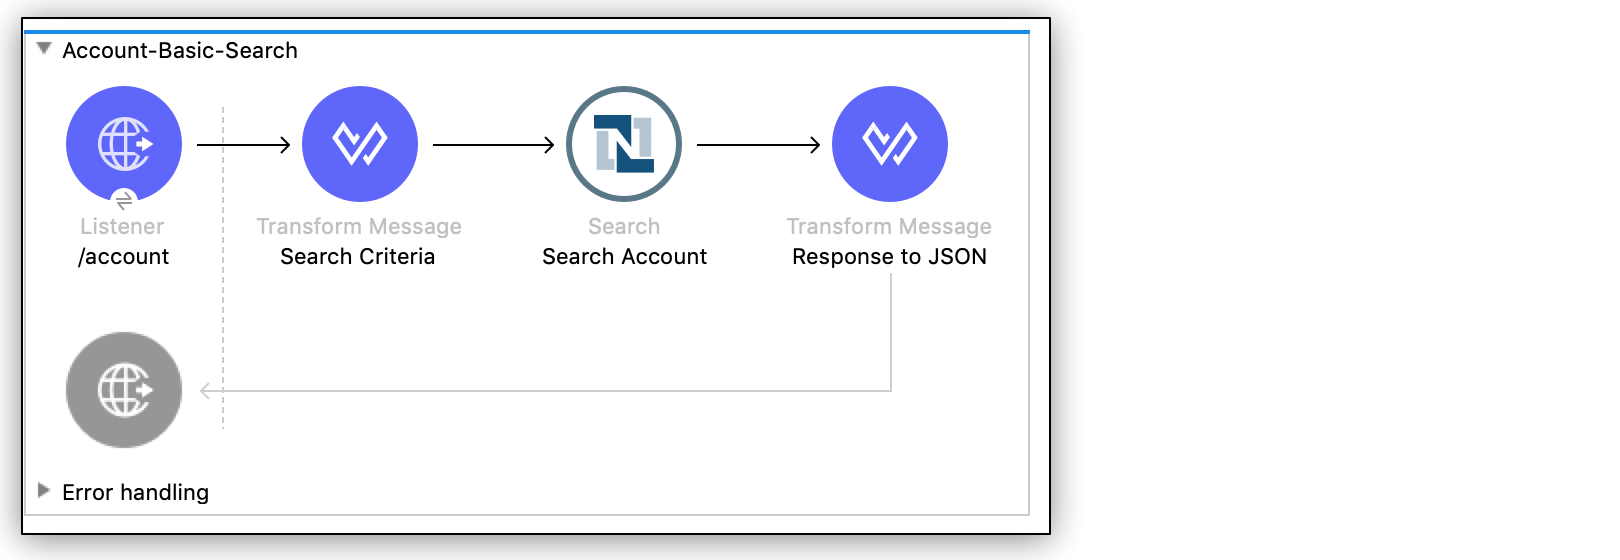
The following screenshot shows the Studio app flow for this example:

Creating this example involves creating a new Mule project and configuring HTTP Listener, the NetSuite Connector Search operation, one For Each component, and two Transform Message components.
Configure HTTP Listener
Configure HTTP Listener to initiate a Mule flow when a call is made to the /account path on localhost port 8081:
-
Create a new Mule project in Studio.
-
In Studio, click HTTP and drag the Listener operation to the canvas.
-
Change the display name of the Listener operation to
/account. -
On the Listener properties window, click + next to the Connector configuration field to add a global element.
-
Accept the defaults.
-
On the Listener properties window, set the Path field value to
/account.
Add the first Transform Message Component
This Transform Message component contains the search criteria for the flow:
-
From the Mule Palette view, drag a Transform Message component to the right of Listener.
-
Change the name of the Transform Message component to
Search Criteria. -
Click the Transform Message component.
The Output column displays the metadata of the AccountSearchBasic object. You can build up the criteria from there, or copy the criteria shown below.
Setting the searchValue field to
attributes.queryParams["internalId"]directs the connector to use the value through the query parameter.The DataWeave code should look like this:
%dw 2.0
output application/xml
ns ns0  urn:messages_2020_2.platform.webservices.netsuite.com
ns ns01 urn:common_2020_2.platform.webservices.netsuite.com
ns ns02 urn:core_2020_2.platform.webservices.netsuite.com
ns xsi http://www.w3.org/2001/XMLSchema-instance
---
{
	ns0#search: {
		ns0#searchRecord @("xmlns:ns01": ns01, xsi#"type": "ns01:AccountSearchBasic"): {
			ns01#internalIdNumber @(operator: "lessThan"): {
				ns02#searchValue: attributes.queryParams["internalId"]
			}
		}
	}
}
Add the NetSuite Connector Search Operation
-
From the Mule Palette view, select NetSuite and drag the Search operation to the right of Search Criteria.
-
Change the display name of the Search operation to
Search Account. -
Select an existing global element or create a new one for the Search operation.
-
On the Search properties window:
-
In the Key field, select
AccountSearchBasic. -
Set the Page Size field value to an integer value between
10and1000.
-
Add the For Each Component
From the Mule Palette view, select Core and drag the For Each component to the right of Search Account.
Add the Second Transform Message Component
This Transform Message component converts the response to JSON format:
-
From the Mule Palette view, drag a Transform Message component inside the For Each component.
-
Change the name of the Transform Message component to
Response to JSON. -
Click the Transform Message component and set the output to
application/json.%dw 2.0 output application/json ns ns0 urn:core_2020_2.platform.webservices.netsuite.com --- payload.ns0#record -
Drag and drop a Logger component from the Mule Palette view to the right of Response to JSON. Leave the message as
#[payload]
Run the App
To run the app:
-
Start the Mule app.
-
Call
http://localhost:8081/account?internalId=5to retrieve theAccountrecords with internal IDs that are less than 5. -
You will only be able to see the output from the Mule App console.
XML for Account Basic Search Flow
Paste this code into a new Mule app in Studio to quickly load the flow for the Account basic search example. If needed, change the values to reflect your environment.
<?xml version="1.0" encoding="UTF-8"?>

<mule
    xmlns:ee="http://www.mulesoft.org/schema/mule/ee/core"
	xmlns:http="http://www.mulesoft.org/schema/mule/http"
    xmlns:netsuite="http://www.mulesoft.org/schema/mule/netsuite" xmlns="http://www.mulesoft.org/schema/mule/core" xmlns:doc="http://www.mulesoft.org/schema/mule/documentation" xmlns:xsi="http://www.w3.org/2001/XMLSchema-instance" xsi:schemaLocation="http://www.mulesoft.org/schema/mule/core http://www.mulesoft.org/schema/mule/core/current/mule.xsd
http://www.mulesoft.org/schema/mule/netsuite http://www.mulesoft.org/schema/mule/netsuite/current/mule-netsuite.xsd
http://www.mulesoft.org/schema/mule/http http://www.mulesoft.org/schema/mule/http/current/mule-http.xsd
http://www.mulesoft.org/schema/mule/ee/core http://www.mulesoft.org/schema/mule/ee/core/current/mule-ee.xsd">


	<http:listener-config name="HTTP_Listener_config" doc:name="HTTP Listener config">
		<http:listener-connection host="0.0.0.0" port="8081" />
	</http:listener-config>
	<netsuite:config name="tokenConfig" doc:name="NetSuite SOAP Config">
		<netsuite:token-based-authentication-connection consumerKey="${netsuite.consumerKey}" consumerSecret="${netsuite.consumerSecret}" tokenId="${netsuite.tokenId}" tokenSecret="${netsuite.tokenSecret}" account="${netsuite.account}"/>
	</netsuite:config>
	<flow name="account-basic-search-flow">
		<http:listener doc:name="Listener" config-ref="HTTP_Listener_config" path="account">
			<http:response statusCode="200" />
		</http:listener>
		<ee:transform doc:name="Search Criteria">
			<ee:message >
				<ee:set-payload ><![CDATA[%dw 2.0
output application/xml
ns ns0  urn:messages_2020_2.platform.webservices.netsuite.com
ns ns01 urn:common_2020_2.platform.webservices.netsuite.com
ns ns02 urn:core_2020_2.platform.webservices.netsuite.com
ns xsi http://www.w3.org/2001/XMLSchema-instance
---
{
	ns0#search: {
		ns0#searchRecord @("xmlns:ns01": ns01, xsi#"type": "ns01:AccountSearchBasic"): {
			ns01#internalIdNumber @(operator: "lessThan"): {
				ns02#searchValue: attributes.queryParams["internalId"]
			}
		}
	}
}]]></ee:set-payload>
			</ee:message>
		</ee:transform>
		<netsuite:search doc:name="Search Account" config-ref="tokenConfig" key="AccountSearchBasic">
		</netsuite:search>
		<foreach doc:name="For Each">
			<ee:transform doc:name="Transform to JSON">
				<ee:message>
					<ee:set-payload><![CDATA[%dw 2.0
output application/json
ns ns0 urn:core_2020_2.platform.webservices.netsuite.com
---
payload.ns0#record
]]></ee:set-payload>
				</ee:message>
			</ee:transform>
			<logger level="INFO" doc:name="Logger" message="#[payload]"/>
		</foreach>
	</flow>
</mule>
Employee Basic Search Filtering by the Boolean and String Fields
This example shows how to use the Search operation to obtain the inactive Employee records that have last names beginning with a specified letter.
This example requires that at least one employee record in the NetSuite instance meets the search conditions.
The following screenshot shows the Studio app flow for the Employee basic search example:

Creating this example involves creating a new Mule project and configuring HTTP Listener, the NetSuite Connector Search operation, one For Each component, and two Transform Message components.
Configure HTTP Listener
Configure HTTP Listener to initiate a Mule flow when a call is made to the /employee path on localhost port 8081:
-
In Studio, click HTTP and drag the Listener operation to the canvas.
-
Change the display name of the Listener operation to
/employee. -
Either select an existing global element or create a new one for HTTP Listener and keep the defaults.
-
On the Listener properties window, set the Path field value to
/employee.
Add the First Transform Message Component
This Transform Message component contains the search criteria for the flow:
-
From the Mule Palette view, drag the Transform Message component to the right of Listener.
-
Change the name of the Transform Message component to
Search Criteria. -
Click the Transform Message component.
The Output column displays the metadata of the AccountSearchBasic object. You can build up the criteria from there, or copy the criteria below.
The value
attributes.queryParams["isInactive"]directs the connector to search for inactive employee accounts, and the valueattributes.queryParams["lastName"]directs the connector to search employee which last names start with the value provided.
The DataWeave code should look like this:
%dw 2.0
output application/xml
ns ns0  urn:messages_2020_2.platform.webservices.netsuite.com
ns ns01 urn:common_2020_2.platform.webservices.netsuite.com
ns ns02 urn:core_2020_2.platform.webservices.netsuite.com
ns xsi http://www.w3.org/2001/XMLSchema-instance
---
{
	ns0#search: {
		ns0#searchRecord @("xmlns:ns01": ns01, xsi#"type": "ns01:EmployeeSearchBasic"): {
			ns01#lastName @(operator: "startsWith"): {
				ns02#searchValue: attributes.queryParams["lastName"]
			},
			ns01#isInactive: {
				ns02#searchValue: attributes.queryParams["isInactive"]
			}
		}
	}
}
Add the NetSuite Connector Search Operation
-
From the Mule Palette view, select NetSuite and drag the Search operation to the right of Search Criteria.
-
Change the display name of the Search operation to
Search Employee. -
Select an existing global element or create a new one for the Search operation.
-
On the Search properties window:
-
In the Key field, select
EmployeeSearchBasic. -
Set the Page Size field value to an integer value between
10and1000.
-
Add the For Each Component
From the Mule Palette view, select Core and drag the For Each component to the right of Search Employee.
Add the Second Transform Message Component
This Transform Message component converts the response to JSON format:
-
From the Mule Palette view, drag a Transform Message component inside the For Each component.
-
Change the name of the Transform Message component to
Response to JSON. -
Click the Transform Message component and set the output to
application/json.%dw 2.0 output application/json ns ns0 urn:core_2020_2.platform.webservices.netsuite.com --- payload.ns0#record -
Finally, drag and drop a Logger component from the Mule Palette view, to the right of Response to JSON. the message should be
#[payload]
Run the App
-
Start the Mule app.
-
Call
http://localhost:8081/employee?isInactive=true&lastName=Cto retrieve the inactiveEmployeerecords that have last names beginning withC. -
You will ONLY be able to see the output from the Mule App console.
XML for Employee Basic Search Flow
Paste this code into a new Mule app in Studio to quickly load the flow for the Employee basic search example. If needed, change the values to reflect your environment.
<?xml version="1.0" encoding="UTF-8"?>

<mule
    xmlns:ee="http://www.mulesoft.org/schema/mule/ee/core"
	xmlns:http="http://www.mulesoft.org/schema/mule/http"
    xmlns:netsuite="http://www.mulesoft.org/schema/mule/netsuite" xmlns="http://www.mulesoft.org/schema/mule/core" xmlns:doc="http://www.mulesoft.org/schema/mule/documentation" xmlns:xsi="http://www.w3.org/2001/XMLSchema-instance" xsi:schemaLocation="http://www.mulesoft.org/schema/mule/core http://www.mulesoft.org/schema/mule/core/current/mule.xsd
http://www.mulesoft.org/schema/mule/netsuite http://www.mulesoft.org/schema/mule/netsuite/current/mule-netsuite.xsd
http://www.mulesoft.org/schema/mule/http http://www.mulesoft.org/schema/mule/http/current/mule-http.xsd
http://www.mulesoft.org/schema/mule/ee/core http://www.mulesoft.org/schema/mule/ee/core/current/mule-ee.xsd">


	<http:listener-config name="HTTP_Listener_config" doc:name="HTTP Listener config">
		<http:listener-connection host="0.0.0.0" port="8081" />
	</http:listener-config>
	<netsuite:config name="tokenConfig" doc:name="NetSuite SOAP Config">
		<netsuite:token-based-authentication-connection consumerKey="${netsuite.consumerKey}" consumerSecret="${netsuite.consumerSecret}" tokenId="${netsuite.tokenId}" tokenSecret="${netsuite.tokenSecret}" account="${netsuite.account}"/>
	</netsuite:config>

    <flow name="employee-basic-search-flow">
		<http:listener doc:name="Listener" config-ref="HTTP_Listener_config" path="employee"/>
		<ee:transform doc:name="Search Criteria">
			<ee:message >
				<ee:set-payload ><![CDATA[%dw 2.0
output application/xml
ns ns0  urn:messages_2020_2.platform.webservices.netsuite.com
ns ns01 urn:common_2020_2.platform.webservices.netsuite.com
ns ns02 urn:core_2020_2.platform.webservices.netsuite.com
ns xsi http://www.w3.org/2001/XMLSchema-instance
---
{
	ns0#search: {
		ns0#searchRecord @("xmlns:ns01": ns01, xsi#"type": "ns01:EmployeeSearchBasic"): {
			ns01#lastName @(operator: "startsWith"): {
				ns02#searchValue: attributes.queryParams["lastName"]
			},
			ns01#isInactive: {
				ns02#searchValue: attributes.queryParams["isInactive"]
			}
		}
	}
}
]]></ee:set-payload>
			</ee:message>
		</ee:transform>
		<netsuite:search doc:name="Search Employee" config-ref="tokenConfig" key="EmployeeSearchBasic"/>
		<foreach doc:name="For Each">
			<ee:transform doc:name="Transform to JSON">
				<ee:message >
					<ee:set-payload ><![CDATA[%dw 2.0
output application/json
ns ns0 urn:core_2020_2.platform.webservices.netsuite.com
---
payload.ns0#record
]]></ee:set-payload>
				</ee:message>
			</ee:transform>
			<logger level="INFO" doc:name="Logger" message="#[payload]" />
		</foreach>
	</flow>
</mule>
Customer Advanced Search Filtering by Stage field and Date Created field
This example shows how to use the Search operation to obtain the customer records that were created after 2015 and that are in the LEAD stage.
This examples requires that at least one customer record meets the search conditions in the NetSuite instance.
The following screenshot shows the Studio app flow for this example:

Creating this example involves creating a new Mule project and configuring HTTP Listener, the NetSuite Search operation, two Transform Message components, and a For-Each component.
Configure HTTP Listener
Configure HTTP Listener to initiate a Mule flow when a call is made to the /customer path on localhost port 8081:
-
In Studio, click HTTP and drag the Listener operation to the canvas.
-
Change the display name of the Listener operation to
/customer. -
Select an existing global element or create a new one for the Listener operation.
-
On the Listener properties window, set the path field value to
/customer.
Add the First Transform Message Component
This Transform Message component specifies the search criteria for the flow:
-
From the Mule Palette view, drag the Transform Message component to the right of Listener.
-
Change the name of the Transform Message component to
Search Criteria. -
Click the Transform Message component.
The Output column displays the metadata of the CustomerSearchAdvanced object. You can build up the criteria from there, or copy the criteria below.
Setting the searchValue of
stagetoattributes.queryParams["stage"]directs the connector to use the value of thestagequery parameter.
The DataWeave code should look like this:
%dw 2.0
output application/xml
ns ns0 urn:messages_2020_2.platform.webservices.netsuite.com
ns ns01 urn:common_2020_2.platform.webservices.netsuite.com
ns ns02 urn:core_2020_2.platform.webservices.netsuite.com
ns ns03 urn:relationships_2020_2.lists.webservices.netsuite.com
ns xsi http://www.w3.org/2001/XMLSchema-instance
---
{
	ns0#search: {
		ns0#searchRecord @("xmlns:ns03": ns03, xsi#"type": "ns03:CustomerSearchAdvanced"): {
			ns03#criteria: {
				ns03#basic: {
					ns01#stage @(operator: "anyOf"): {
						ns02#searchValue: [attributes.queryParams["stage"]]
					},
					ns01#dateCreated @(operator: "after"): {
						ns02#searchValue: "2015-01-01T00:00:00.000-08:00"
					}
				}
			}
		}
	}
}
Add the NetSuite Connector Search Operation
-
From the Mule Palette view, select NetSuite and drag the Search operation to the right of Search Criteria.
-
Change the display name of the Search operation to
Search Customer Advanced. -
Select an existing global element or create a new one for the Search operation.
-
On the Search properties window:
-
In the Key field, select
CustomerSearchAdvanced. -
Set the Page Size field value to an integer value between
10and1000. -
Click on Search Preferences and select
falseonReturn search columns
-
Add a For-Each Component
A For-Each component processes each record on the list returned by the Search operation individually so that the records can be displayed on the console.
-
From the Mule Palette view, drag a For-Each component to the right of Search.
-
Drag a Transform Message component inside the For Each box, rename the component to
Response to JSON, and replace the DataWeave code with this code:%dw 2.0 output application/json ns ns0 urn:core_2020_2.platform.webservices.netsuite.com --- payload.ns0#record -
Drag a Logger component from the Mule Palette view to the right of Transform, inside the For Each box.
-
On the Logger properties window, set the Message field value to
#[payload].
Run the App
-
Start the Mule app.
-
Call
http://localhost:8081/customer?stage=LEAD. -
You will ONLY be able to see the output from the Mule App console.
XML for the Customer Advanced Search Flow
Paste this code into a new Mule app in Studio to quickly load the flow for the Customer Advanced Search example. If needed, change the values to reflect your environment.
<?xml version="1.0" encoding="UTF-8"?>

<mule
    xmlns:ee="http://www.mulesoft.org/schema/mule/ee/core"
	xmlns:http="http://www.mulesoft.org/schema/mule/http"
    xmlns:netsuite="http://www.mulesoft.org/schema/mule/netsuite" xmlns="http://www.mulesoft.org/schema/mule/core" xmlns:doc="http://www.mulesoft.org/schema/mule/documentation" xmlns:xsi="http://www.w3.org/2001/XMLSchema-instance" xsi:schemaLocation="http://www.mulesoft.org/schema/mule/core http://www.mulesoft.org/schema/mule/core/current/mule.xsd
http://www.mulesoft.org/schema/mule/netsuite http://www.mulesoft.org/schema/mule/netsuite/current/mule-netsuite.xsd
http://www.mulesoft.org/schema/mule/http http://www.mulesoft.org/schema/mule/http/current/mule-http.xsd
http://www.mulesoft.org/schema/mule/ee/core http://www.mulesoft.org/schema/mule/ee/core/current/mule-ee.xsd">


	<http:listener-config name="HTTP_Listener_config" doc:name="HTTP Listener config">
		<http:listener-connection host="0.0.0.0" port="8081" />
	</http:listener-config>
	<netsuite:config name="tokenConfig" doc:name="NetSuite SOAP Config">
		<netsuite:token-based-authentication-connection consumerKey="${netsuite.consumerKey}" consumerSecret="${netsuite.consumerSecret}" tokenId="${netsuite.tokenId}" tokenSecret="${netsuite.tokenSecret}" account="${netsuite.account}"/>
	</netsuite:config>

    <flow name="customer-advanced-search-flow">
		<http:listener doc:name="Listener" config-ref="HTTP_Listener_config" path="customer" />
		<ee:transform doc:name="Search Criteria">
			<ee:message >
				<ee:set-payload ><![CDATA[%dw 2.0
output application/xml
ns ns0 urn:messages_2020_2.platform.webservices.netsuite.com
ns ns01 urn:common_2020_2.platform.webservices.netsuite.com
ns ns02 urn:core_2020_2.platform.webservices.netsuite.com
ns ns03 urn:relationships_2020_2.lists.webservices.netsuite.com
ns xsi http://www.w3.org/2001/XMLSchema-instance
---
{
	ns0#search: {
		ns0#searchRecord @("xmlns:ns03": ns03, xsi#"type": "ns03:CustomerSearchAdvanced"): {
			ns03#criteria: {
				ns03#basic: {
					ns01#stage @(operator: "anyOf"): {
						ns02#searchValue: [attributes.queryParams["stage"]]
					},
					ns01#dateCreated @(operator: "after"): {
						ns02#searchValue: "2015-01-01T00:00:00.000-08:00"
					}
				}
			}
		}
	}
}]]></ee:set-payload>
			</ee:message>
		</ee:transform>
		<netsuite:search doc:name="Search Customer Advanced" config-ref="tokenConfig" returnSearchColumns="false" key="CustomerSearchAdvanced"/>
		<foreach doc:name="For Each">
			<ee:transform doc:name="Transform to JSON">
			<ee:message>
				<ee:set-payload><![CDATA[%dw 2.0
output application/json
ns ns0 urn:core_2020_2.platform.webservices.netsuite.com
---
payload.ns0#record
]]></ee:set-payload>
			</ee:message>
		</ee:transform>
			<logger level="INFO" doc:name="Logger" message="#[payload]" />
		</foreach>
	</flow>
</mule>
Add a File
This example shows how to use the Add operation to add a file using NetSuite Connector.
The following screenshot shows the Studio app flow for this example:
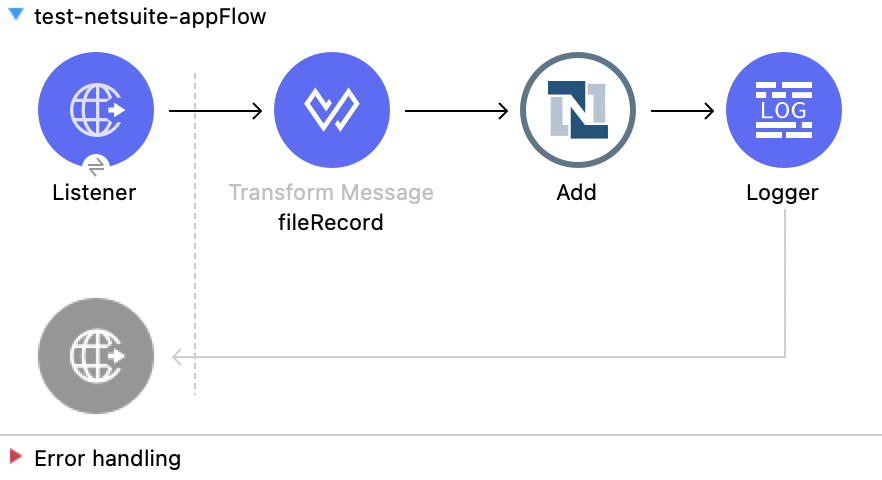
Creating this example involves creating a new Mule project and configuring a Listener component, Transform Message component, Add operation, and Logger component.
Configure HTTP Listener
Configure HTTP Listener to initiate a Mule flow when a call is made to the /upload path:
-
Create a new Mule project in Studio.
-
In Studio, click HTTP and drag the Listener component to the canvas.
-
In the Listener properties window, click + next to the Connector configuration field to add a global element.
-
Accept the defaults.
-
In the Listener properties window, set the Path field value to
/upload.
Add the Transform Message Component
Add the Transform Message component to convert the values from the HTTP input to XML format so they can be used as input for the Add operation:
-
From the Mule Palette view, select Core and drag a Transform Message component to the right of Listener.
-
In the properties window, overlay the brackets in the Output section with this DataWeave code:
%dw 2.0
output application/xml
ns ns0 urn:messages_2020_2.platform.webservices.netsuite.com
ns ns01 urn:filecabinet_2020_2.documents.webservices.netsuite.com
ns xsi http://www.w3.org/2001/XMLSchema-instance
ns ns02 urn:core_2020_2.platform.webservices.netsuite.com
---
{
	ns0#add: {
		ns0#record @("xmlns:ns01": ns01, xsi#"type": "ns01:File"): {
			ns01#name: "test.csv",
			ns01#content: "Here is the content of file",
			ns01#folder @(internalId: 826997 , xsi#"type": "ns01:RecordRef"): {
				ns02#name: null
			}
		}
	}
}
Add the Add Operation
Add the Add operation to add a file using the values passed by the Transform Message component:
-
From the Mule Palette view, select NetSuite and drag the Add operation to the right of Transform Message.
-
In the properties window, click + next to the Connector configuration field to add a global element.
-
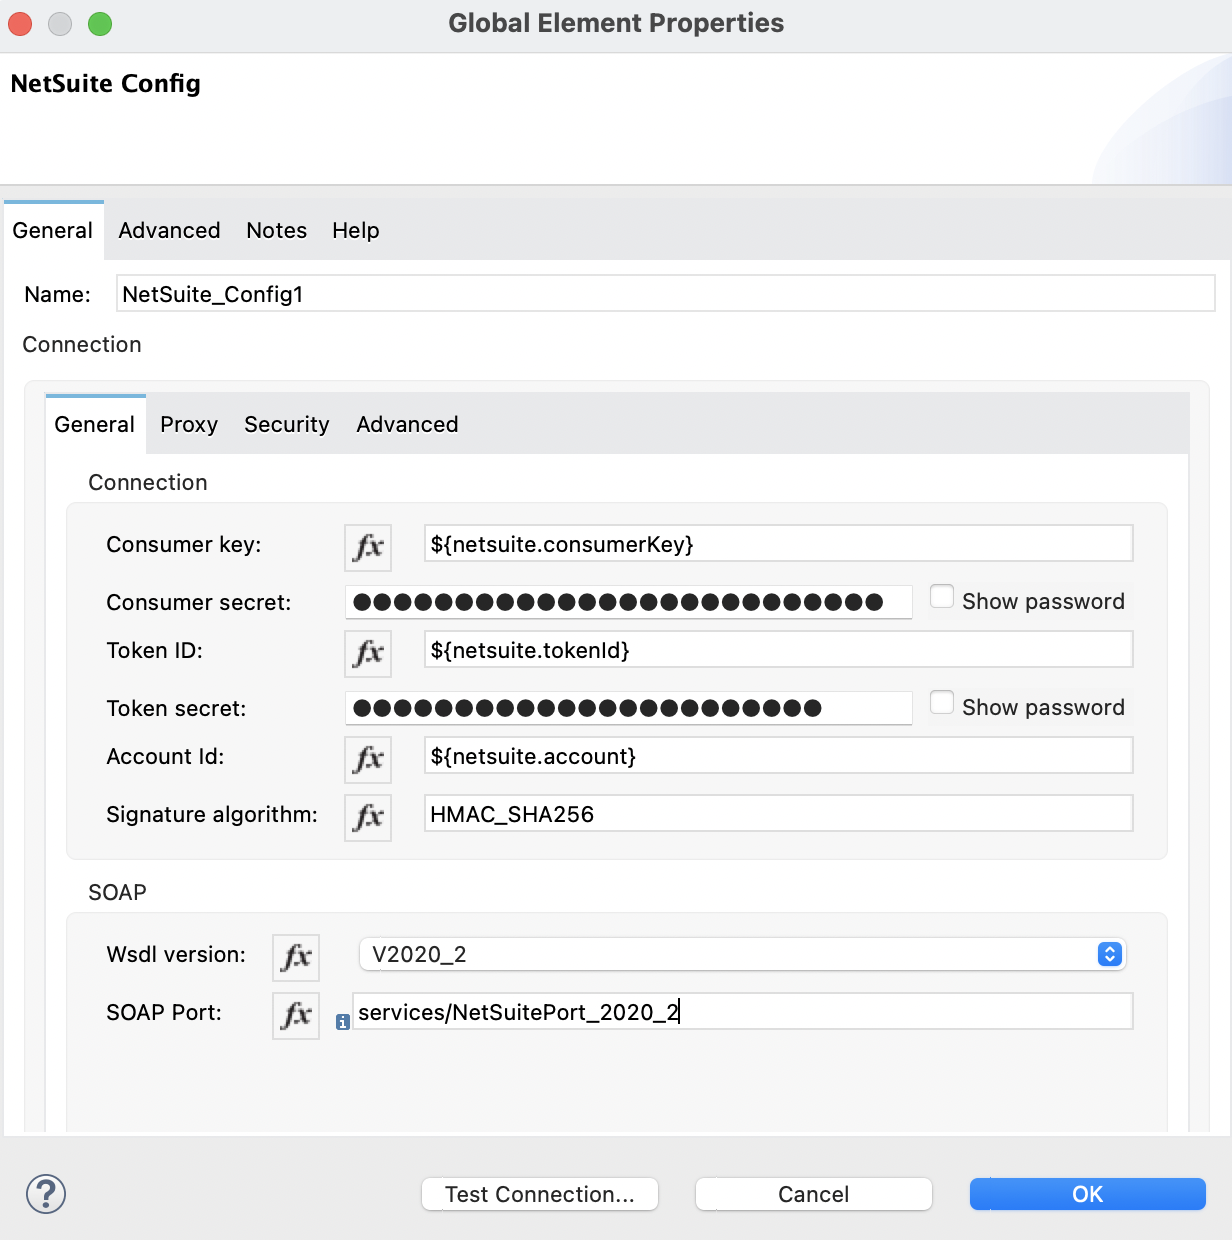
Configure the global element depending on the connection, for example:
Field Value Consumer key
${netsuite.consumerKey}Consumer secret
${netsuite.consumerSecret}Token ID
${netsuite.tokenId}Token secret
${netsuite.tokenSecret}Account Id
${netsuite.account}Signature algorithm
HMAC_SHA256Wsdl version
V2020_2SOAP Port
services/NetSuitePort_2020_2The following image shows an example of the Add configuration of the global element:
-
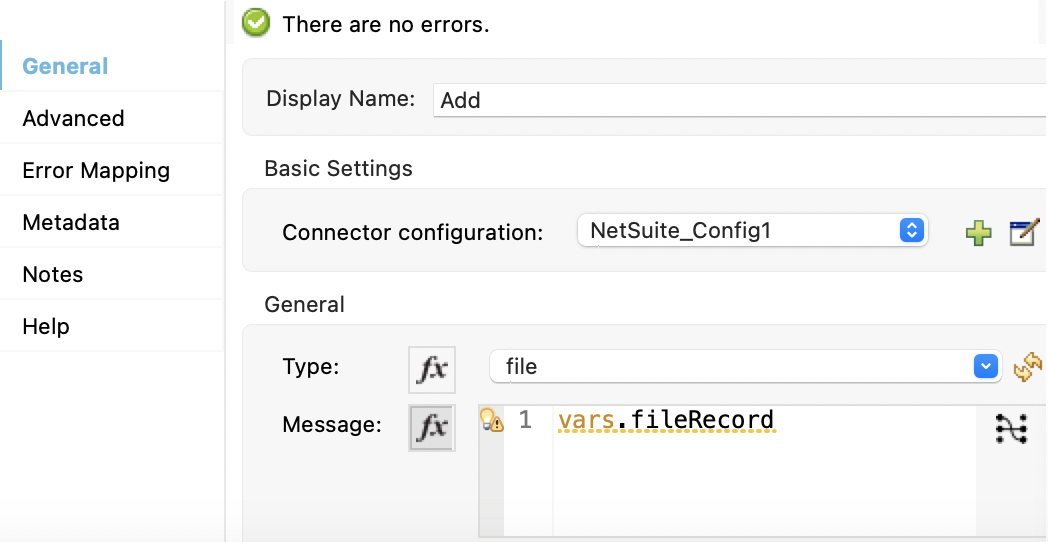
In the properties window, configure the following fields:
Field Value Display Name
Name for the connector operation.
Connector configuration
Global configuration you just created.
Type
fileMessage
vars.fileRecordThe following image shows an example of the Add configuration in the properties window:
Add the Logger Component
Add the Logger component to display the response in the Mule console:
-
From the Mule Palette view, select Core and drag a Logger component to the right of Add.
-
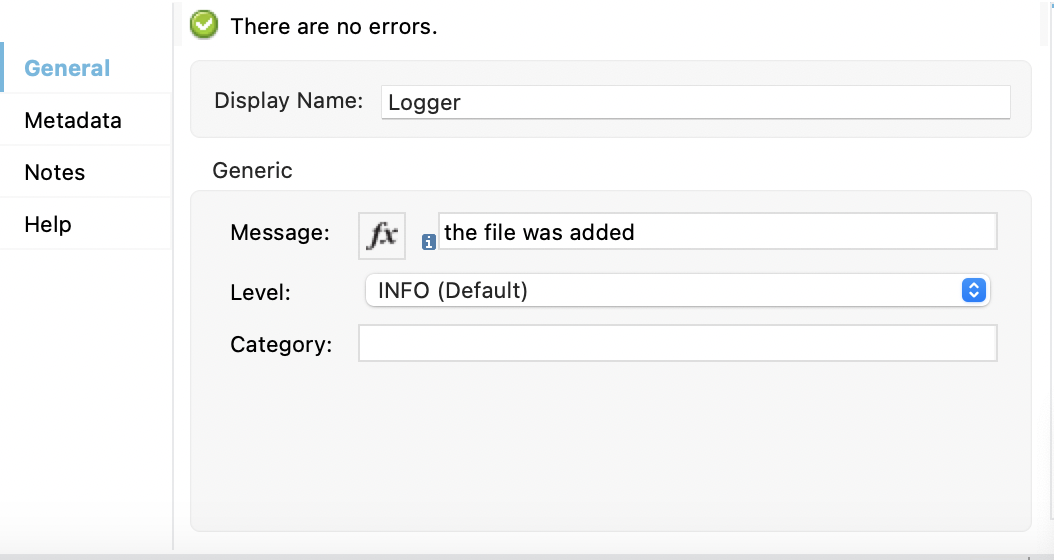
In the properties window, configure the following fields:
Field Value Display Name
Name for the logger, such as
Logger.Message
The file was addedLevel
INFO (Default)
The following image shows an example of the Logger configuration in the properties window:
XML for the Add File Flow
Paste this code into a new Mule app in Studio to quickly load the flow for the Add File example. If needed, change the values to reflect your environment.
<?xml version="1.0" encoding="UTF-8"?>
<mule xmlns:http="http://www.mulesoft.org/schema/mule/http"
xmlns:file="http://www.mulesoft.org/schema/mule/file"
xmlns:netsuite="http://www.mulesoft.org/schema/mule/netsuite"
xmlns:ee="http://www.mulesoft.org/schema/mule/ee/core"
xmlns="http://www.mulesoft.org/schema/mule/core"
xmlns:doc="http://www.mulesoft.org/schema/mule/documentation" xmlns:xsi="http://www.w3.org/2001/XMLSchema-instance" xsi:schemaLocation="http://www.mulesoft.org/schema/mule/core http://www.mulesoft.org/schema/mule/core/current/mule.xsd
http://www.mulesoft.org/schema/mule/ee/core http://www.mulesoft.org/schema/mule/ee/core/current/mule-ee.xsd
http://www.mulesoft.org/schema/mule/netsuite http://www.mulesoft.org/schema/mule/netsuite/current/mule-netsuite.xsd
http://www.mulesoft.org/schema/mule/file http://www.mulesoft.org/schema/mule/file/current/mule-file.xsd
http://www.mulesoft.org/schema/mule/http http://www.mulesoft.org/schema/mule/http/current/mule-http.xsd">
<netsuite:config name="NetSuite_Config1" doc:name="NetSuite Config"
doc:id="510151ba-ce6a-4401-8901-4269280d09d1" > <netsuite:token-based-authentication-connection
consumerKey="${netsuite.consumerKey}" consumerSecret="${netsuite.consumerSecret}"
tokenId="${netsuite.tokenId}" tokenSecret="${netsuite.tokenSecret}" account="${netsuite.account}"
soapPort="services/NetSuitePort_2020_2" wsdlVersion="V2020_2"> </netsuite:token-based-authentication-connection> </netsuite:config>
<configuration-properties
doc:name="Configuration properties"
doc:id="b2a18b7c-9a82-41d3-828e-7bdd488ddf13" file="config.yaml" />
<http:listener-config name="HTTP_Listener_config" doc:name="HTTP Listener config" doc:id="f5d39893-7a0e-42fb-9272-953b705adafa" >
<http:listener-connection host="0.0.0.0" port="8081" />
</http:listener-config>
<flow name="test-netsuite-appFlow"
doc:id="07490264-2157-4937-922b-d58199505338">
<http:listener doc:name="Listener" doc:id="4fbbf511-2f66-44a3-bcf5-05094e2b92e7" config-ref="HTTP_Listener_config" path="/upload"/>
<ee:transform doc:name="fileRecord" doc:id="50c11321-c8a9-47ba-a06e-7a26b0aefcfb" >
<ee:message >
</ee:message>
<ee:variables >
<ee:set-variable variableName="fileRecord" ><![CDATA[%dw 2.0
output application/xml
ns ns0 urn:messages_2020_2.platform.webservices.netsuite.com
ns ns01 urn:filecabinet_2020_2.documents.webservices.netsuite.com
ns xsi http://www.w3.org/2001/XMLSchema-instance
ns ns02 urn:core_2020_2.platform.webservices.netsuite.com
---
{
ns0#add: {
ns0#record @("xmlns:ns01": ns01, xsi#"type": "ns01:File"): {
ns01#name: "test.csv",
ns01#content: "Here is the content of file",
ns01#folder @(internalId: 826997 , xsi#"type": "ns01:RecordRef"): {
ns02#name: null
}
}
}
}]]></ee:set-variable>
</ee:variables>
</ee:transform>
<netsuite:add doc:name="Add" doc:id="ddc65bfd-73b5-4a8f-9bd7-bafe4e479db7" config-ref="NetSuite_Config1" type="file">
<netsuite:message ><![CDATA[#[vars.fileRecord]]]></netsuite:message>
</netsuite:add>
<logger level="INFO" doc:name="Logger"
doc:id="1f48613a-8a9e-4baa-8787-c4531a8e620e" message="The file was added"/>
</flow>
</mule>Custom Records and Fields
The following example shows how to add, get, and delete custom records with custom fields using DataWeave. Use DataSense, which imports metadata from NetSuite Connector, to simplify application design.
The following screenshot shows the Studio app flow for this example:

Creating this example involves adding the Add operation, Set Variable component, Get operation, and Delete operation.
Add a Custom Record
Add a custom record with custom fields using the Add operation.
Include the following attributes to add a custom record:
-
separators
Specifies a separator character. The separator in the following example is
__. -
recordType
References the custom record type. The recordType in the following example is
customRecordType. -
scriptId
References the script ID of the record. The scriptId in the following example is
customrecord_2663_bank_details. -
internalId
References the internal ID of the record. The internalId in the following example is
374. -
XSI type
Specify the XSI type as CustomRecordRef to add a custom record.
The following DataWeave script adds a custom record with custom fields:
%dw 2.0
output application/xml
ns ns0 urn:messages_2020_2.platform.webservices.netsuite.com
ns ns01 urn:customization_2020_2.setup.webservices.netsuite.com
ns ns02 urn:core_2020_2.platform.webservices.netsuite.com
ns xsi http://www.w3.org/2001/XMLSchema-instance
---
{
	ns0#add: {
		ns0#record @("xmlns:ns01": ns01, xsi#"type": "ns01:CustomRecord"): {
			ns01#customFieldList: {
				StringCustomFieldRef__custrecord_2663_legal_name__3878: {
					ns02#value: "test"
				},
				LongCustomFieldRef__custrecord_2663_eft_file_cabinet_id__3874: {
					ns02#value: 1234
				},
				BooleanCustomFieldRef__custrecord_2663_dd_batch__3864: {
					ns02#value: true
				}
			}
		}
	}
}
The customFieldList contains the customFields for the entity you use.
The example above shows StringCustomFieldRef__custrecord_2663_legal_name__3878, BooleanCustomFieldRef__custrecord_2663_dd_batch__3864 and
LongCustomFieldRef__custrecord_2663_eft_file_cabinet_id__3874. The field names consist of a
scriptId, internalId, and CustomRecordRef type.
StringCustomFieldRef__custrecord_2663_legal_name__3878 has a specified value
ns02#value: "test", LongCustomFieldRef__custrecord_2663_eft_file_cabinet_id__3874 has a specified
value ns02#value: 1234, and BooleanCustomFieldRef__custrecord_2663_dd_batch__3864 has a specified value ns02#value: true.
Get Custom Record
Get a custom record with custom fields using the Get operation.
Include the following attributes to get a custom record:
-
typeId
References the custom record type Id. The typeId in the following example is
374. -
internalId
References the internalId of the record. The internalId in the following example is
vars.responseInternalId. -
XSI type
Specify the XSI type as CustomRecordRef to retrieve a custom record.
The following DataWeave script gets a custom record with custom fields:
%dw 2.0
output application/xml
ns ns0 urn:messages_2020_2.platform.webservices.netsuite.com
ns ns01 urn:core_2020_2.platform.webservices.netsuite.com
ns xsi http://www.w3.org/2001/XMLSchema-instance
---
{
	ns0#get: {
		ns01#baseRef @(internalId: vars.responseInternalId , "typeId": "374", xsi#"type": "ns01:CustomRecordRef"): null
	}
}
Delete Custom Record
Delete a custom record with custom fields using the Delete operation.
Include the following attributes to delete a custom record:
-
typeId
References the custom record type Id. The typeId in the following example is
374. -
internalId
References the internalId of the record. The internalId in the following example is
vars.responseInternalId. -
XSI type
Specify the XSI type as CustomRecordRef to delete a custom record.
The following DataWeave script deletes a custom record with custom fields:
%dw 2.0
output application/xml
ns ns0 urn:messages_2020_2.platform.webservices.netsuite.com
ns ns01 urn:core_2020_2.platform.webservices.netsuite.com
ns xsi http://www.w3.org/2001/XMLSchema-instance
---
{
	ns0#delete: {
		ns01#baseRef @(internalId: vars.responseInternalId , "typeId": "374", xsi#"type": "ns01:CustomRecordRef"): null
	}
}
XML for Custom Records
Paste this code into a new Mule app in Studio to quickly load the flow for the custom records example. If needed, change the values to reflect your environment.
<?xml version="1.0" encoding="UTF-8"?>
<mule xmlns:netsuite="http://www.mulesoft.org/schema/mule/netsuite"
xmlns:ee="http://www.mulesoft.org/schema/mule/ee/core"
xmlns:xsi="http://www.w3.org/2001/XMLSchema-instance"
xmlns="http://www.mulesoft.org/schema/mule/core"
xmlns:doc="http://www.mulesoft.org/schema/mule/documentation"
xsi:schemaLocation="
http://www.mulesoft.org/schema/mule/core http://www.mulesoft.org/schema/mule/core/current/mule.xsd
http://www.mulesoft.org/schema/mule/netsuite http://www.mulesoft.org/schema/mule/netsuite/current/mule-netsuite.xsd
http://www.mulesoft.org/schema/mule/ee/core http://www.mulesoft.org/schema/mule/ee/core/current/mule-ee.xsd">
<flow name="recordWithCustomFields">
<netsuite:add doc:name="Add"
doc:id="e8643704-bba5-4156-83b7-73650b2661ac"
config-ref="tokenConfig" type="__customRecordType__customrecord_2663_bank_details__374">
<netsuite:message><![CDATA[#[%dw 2.0
output application/xml
ns ns0 urn:messages_2020_2.platform.webservices.netsuite.com
ns ns01 urn:customization_2020_2.setup.webservices.netsuite.com
ns ns02 urn:core_2020_2.platform.webservices.netsuite.com
ns xsi http://www.w3.org/2001/XMLSchema-instance
---
{
ns0#add: {
ns0#record @("xmlns:ns01": ns01, xsi#"type": "ns01:CustomRecord"): {
ns01#customFieldList: {
StringCustomFieldRef__custrecord_2663_legal_name__3878: {
ns02#value: "test"
},
LongCustomFieldRef__custrecord_2663_eft_file_cabinet_id__3874: {
ns02#value: 1234
},
BooleanCustomFieldRef__custrecord_2663_dd_batch__3864: {
ns02#value: true
}
}
}
}
}]]]></netsuite:message>
</netsuite:add>
<set-variable
value="#[%dw 2.0 output application/java ns ns0 http://schemas.xmlsoap.org/soap/envelope/ ns ns01 urn:messages_2020_2.platform.webservices.netsuite.com --- payload.ns01#addResponse.ns01#writeResponse.ns01#baseRef.@internalId]"
doc:name="Set Variable" doc:id="0fc988de-84a2-45f1-a991-e01328d38d7f"
variableName="responseInternalId" />
<netsuite:get doc:name="Get record"
doc:id="b4904b67-0fd9-468e-a649-b8d6bd54e2c4"
config-ref="tokenConfig" refType="CustomRecordRef" type="__customRecordType__customrecord_2663_bank_details__374">
<netsuite:message><![CDATA[#[%dw 2.0
output application/xml
ns ns0 urn:messages_2020_2.platform.webservices.netsuite.com
ns ns01 urn:core_2020_2.platform.webservices.netsuite.com
ns xsi http://www.w3.org/2001/XMLSchema-instance
---
{
ns0#get: {
ns01#baseRef @(internalId: vars.responseInternalId , "typeId": "374", xsi#"type": "ns01:CustomRecordRef"): null
}
}]]]></netsuite:message>
</netsuite:get>
<netsuite:delete doc:name="Delete record"
doc:id="fd4d9343-759b-4c08-a74d-a66f04c5c513"
config-ref="tokenConfig" type="__customRecordType__customrecord_2663_bank_details__374" refType="CustomRecordRef">
<netsuite:message><![CDATA[#[%dw 2.0
output application/xml
ns ns0 urn:messages_2020_2.platform.webservices.netsuite.com
ns ns01 urn:core_2020_2.platform.webservices.netsuite.com
ns xsi http://www.w3.org/2001/XMLSchema-instance
---
{
ns0#delete: {
ns01#baseRef @(internalId: vars.responseInternalId , "typeId": "374", xsi#"type": "ns01:CustomRecordRef"): null
}
}]]]></netsuite:message>
</netsuite:delete>
</flow>
</mule>


