Oracle PeopleSoft Connector User Guide
|
Where possible, we changed noninclusive terms to align with our company value of Equality. We maintained certain terms to avoid any effect on customer implementations. |
The PeopleSoft Connector is a closed source connector that uses the Component Interface (CI) to communicate in real-time with the service. This is a component provided by Oracle’s People Tools.
Read more about Oracle’s PeopleTools.
Component Interfaces (CI)
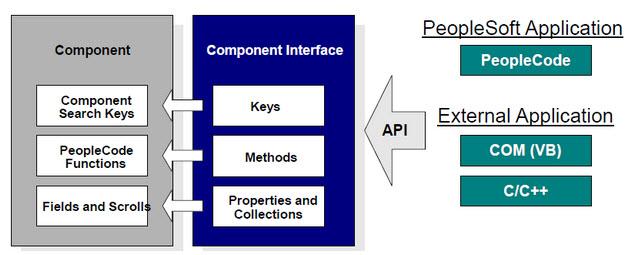
PeopleSoft’s Component Interfaces are a “one-way”, real-time interface for your PeopleSoft database instance. A component in PeopleSoft is a logical grouping of PeopleSoft pages representing a complete business transaction, such as Employee Onboarding. Component Interfaces expose the underlying APIs used by PeopleSoft Components and, therefore, ensure that validations, defaults, and business logic are preserved from the original definition of those components.
The Component Interfaces allow you to query PeopleSoft for specific records, update data, and create new instances of the records.
Attributes and Architecture
A component interface has the following four main attributes:
-
Component Interface Name: each component interface requires a unique name. The programs calling a component use the name of the component interface to access properties and methods.
-
Keys (Get keys, Create keys, and Find keys): keys are special properties containing values that retrieve an instance (get keys) or a list of instances (find keys) of the component interface. You can add, remove, or change keys in PeopleSoft Application Designer. Keys are created automatically when you create a component interface.
-
Get keys: map to fields marked as search keys in the Components Search record.
-
Create keys: generated in CI when the Use tab on the Component Properties dialog allows the Add action.
-
Find keys: map to fields marked as both Alternate Search keys and Search Key in the Component Search Record.
-
-
Properties and Collections (Fields and Records): properties provide access to both component data and component interface settings. A property can correspond to a field or a scroll (collection). A component interface collection is a special type of property that corresponds to a scroll and contains fields and subordinate scrolls as defined in its underlying component. There are two types of properties:
-
Standard properties are assigned automatically when a component interface is created.
-
User-defined properties map to record fields on the PeopleSoft component and are displayed in the PeopleSoft Application Designer.
-
-
Methods: a method is a function that performs a specific task on a component interface at run time. There are two main types of methods: standard and user-defined.
-
Standard methods are those that are available for all component interfaces. The following are the standard methods that the connector supports:
Method Description Create
Add a new instance of the Component Interface to the PeopleSoft database. This is similar to clicking Add and entering the relevant keys through the PeopleSoft Web UI.
Cancel
Cancel an instance of the Component Interface. This is equivalent of the Cancel operation in the Web UI when working on a particular component.
Find
Search for any instances of the component that match the provided Search Keys. This returns a list of possible matches.
Get
Retrieve instances that match the specific keys you provide. This returns a single record or none at all.
Save
Save changes made to the component, new, or existing.
The Save operation tries to update an existing record before creating a new one. For new records, the connector automatically populates the keys with default values provided by the PeopleSoft instance, thereby reducing the need for the user to provide the default key/values pairs.
-
User-defined methods are created in PeopleSoft Application Designer to provide added functionality to the component interface.
Read more about Oracle’s Component Interfaces.
Before You Begin
Because of how closely the connector is coupled with PeopleSoft, this document assumes you have:
-
A working knowledge of PeopleSoft.
-
Read the relevant documentation on Component Interfaces and Integration Scenarios for your PeopleTools version.
The definition and detailed explanation of the PeopleSoft terms and concepts used here are freely available in the PeopleBooks documentation set of your PeopleSoft installation.
This document assumes you are familiar with Mule, Anypoint Connectors, and Anypoint Studio.
To use the PeopleSoft connector, you must have the following:
-
Anypoint Studio: if you don’t use Anypoint Studio for development, follow the instructions to install the PeopleSoft Maven dependencies into your pom.xml file .
-
Java 7: PeopleSoft connector does not work unless you are using JRE 1.7. Download JRE 1.7.
-
Component Interface: at least one Component Interface must be created and exposed within the PeopleSoft instance using the Application Designer.
-
PeopleSoft Java Object Adapter JAR File: the
psjoa.jarlibrary is compiled and provided by a PeopleSoft administrator, and is unique to each installation of PeopleSoft.
Hardware and Software Requirements
For hardware and software requirements, visit the Hardware and Software Requirements page.
Compatibility
The PeopleSoft connector requires the following dependencies:
| Application/Service | Version |
|---|---|
Mule Runtime |
3.6.x or higher |
Java |
7 |
PeopleSoft |
9.2 |
PeopleTools |
8.53.02 |
PeopleSoft 9.2 includes several modules, such as: Human Capital Management (HCM), Financial Management (FM), Enterprise Services Automation (ESA), Supplier Relationship Management (SRM), Customer Relationship Management (CRM) and Campus Solution (CS).
To Install this Connector
-
In Anypoint Studio, click the Exchange icon in the Studio taskbar.
-
Click Login in Anypoint Exchange.
-
Search for the connector and click Install.
-
Follow the prompts to install the connector.
When Studio has an update, a message displays in the lower right corner, which you can click to install the update.
Migrating From 1.x.x to 2.0.0
Inside your flow, identify the peoplesoft:invoke-operation tag. It should look similar to the following snippet:
xml
<peoplesoft:invoke-operation config-ref="PeopleSoft" doc:name="Find" type="CI_PERSONAL_DATA##Find"/>-
Replace the parameter type with key.
-
Replace the operation symbol
##(double hash) with||(double pipe).
The final result should look like the following snippet:
xml
<peoplesoft:invoke-operation config-ref="PeopleSoft" doc:name="Find" key="CI_PERSONAL_DATA||Find"/>
Configuring the Connector Global Element
To use the PeopleSoft connector in your Mule application, configure a global PeopleSoft element that can be used by the PeopleSoft connector. The PeopleSoft connector offers one global configuration, requiring the following credentials:
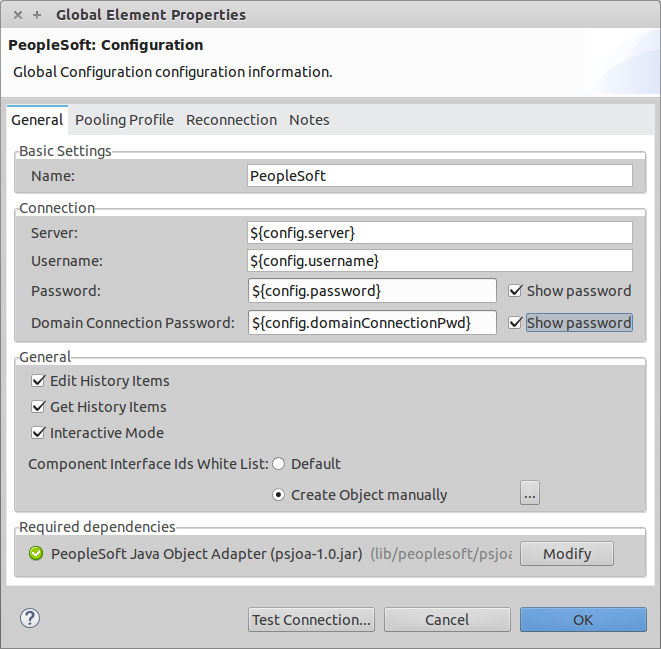
| Field | Description |
|---|---|
Name |
Enter a name for the configuration with which it can be referenced later. |
Server |
Enter the URL of the server from where to access the services. It must comply with the form of HOST:PORT. For example: |
Username |
Enter a username to log into the PeopleSoft instance. |
Password |
Enter the corresponding password. |
Domain Connection Password |
Optional. If configured in the PeoplSoft instance, enter the domain connection password. |
Required dependencies |
Click Add File to attach the psjoa.jar file that is compiled from your PeopleSoft instance to your project’s Build path. Learn how to compile the psjoa.jar file. |
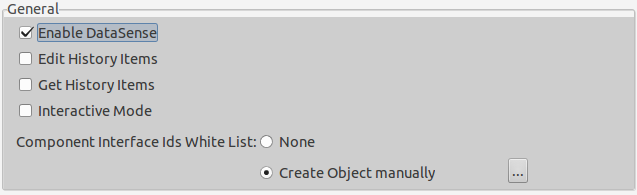
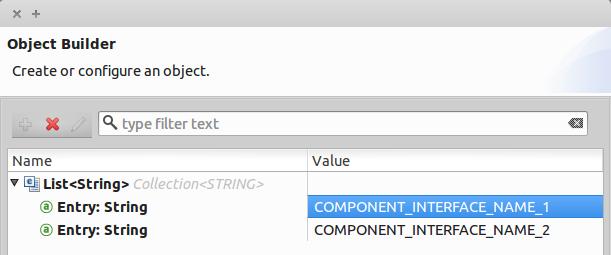
Component Interface White List |
|
The psjoa.jar file is unique to each installation of PeopleSoft. It is compiled and provided by your PeopleSoft administrator. If the psjoa.jar isn’t provided to you, follow the steps below to build the component interface bindings:
-
Start PeopleSoft Application Designer and open any Component Interface definition.
-
Select Build > PeopleSoft APIs to launch the Build PeopleSoft API Bindings dialog box.
-
Under the Java Classes group box, select the Build check box. Specify the target directory in which you want the Java class source files to be created.
-
Click OK to build the selected bindings. The files that constitute the bindings are built in the location that you specify. If the operation is successful, a Done message appears in the PeopleSoft Application Designer Build window.
-
Compile the generated APIs using the following commands:
For Windows:
cd %PS_HOME%\class\PeopleSoft\Generated\CompIntfc
javac −classpath %PS_HOME%\class\psjoa.jar *.java

cd c:\pt8\class\PeopleSoft\ Generated\ PeopleSoft
javac −classpath %PS_HOME%\class\psjoa.jar *.java
For Mac/Linux:
cd $PS_HOME/class/PeopleSoft/Generated/CompIntfc
javac classpath $PS_HOME/class/psjoa.jar *.java

cd $PS_HOME/class/PeopleSoft/Generated/PeopleSoft
javac classpath $PS_HOME/class/psjoa.jar *.java
Read more about compiling the PeopleSoft API in Building APIs in Java.
Using the Connector
For additional technical details regarding PeopleSoft Connector configuration, visit the APIdoc technical reference and example apps.
Connector Namespace and Schema
When designing your application in Studio, the act of dragging the connector from the palette onto the Anypoint Studio canvas should automatically populate the XML code with the connector namespace and schema location.
If you are manually coding the Mule application in Studio’s XML editor or other text editor, define the namespace and schema location in the header of your Configuration XML, inside the <mule> tag.
<mule xmlns="http://www.mulesoft.org/schema/mule/core"
      xmlns:xsi="http://www.w3.org/2001/XMLSchema-instance"
      xmlns:peoplesoft="http://www.mulesoft.org/schema/mule/peoplesoft"
      xsi:schemaLocation="
               http://www.mulesoft.org/schema/mule/core
               http://www.mulesoft.org/schema/mule/core/current/mule.xsd
               http://www.mulesoft.org/schema/mule/peoplesoft
               http://www.mulesoft.org/schema/mule/peoplesoft/current/mule-peoplesoft.xsd">

      <!-- put your global configuration elements and flows here -->

</mule>
Using the Connector in a Mavenized Mule App
If you are coding a Mavenized Mule application, this XML snippet must be included in your pom.xml file.
<dependency>
  <groupId>org.mule.modules</groupId>
  <artifactId>mule-module-peoplesoft</artifactId>
  <version>x.x.x</version>
</dependency>
Replace x.x.x with the version that corresponds to the connector you are using.
To obtain the most up-to-date pom.xml file information, access the connector in Anypoint Exchange and click Dependency Snippets.
Demo Mule Applications Using Connector
You can download a fully functional example from this link.
Example Use Case
PeopleSoft connector is an operation-based connector, which means that, when adding the connector to a flow, you need to configure a specific operation, Invoke Component Interface, for the connector to execute.
After calling the operation, you select a particular Component Interface name and an Operation in the Component Name field to specify the method to execute.
The PeopleSoft connector allows you to perform five standard operations (Create, Find, Get, Save, Cancel) on each Component Interface (if available in your PeopleSoft instance), along with any CI-specific custom operations.
Listed below are some common use cases:
| Use Case | Description |
|---|---|
Find Employees |
Retrieves one or more Employee records by invoking the Find operation of CI_PERSONAL_DATA |
Get Employee |
Retrieves the complete information of a single Employee Personal Data record by invoking the Get operation of CI_PERSONAL_DATA. |
Save Employee |
Updates the fields of a single Employee Personal Data record by invoking the Save operation of CI_PERSONAL_DATA Component Interface. |
Save Employee From CSV File |
Updates a single Employee Personal Data record by invoking the Save operation of CI_PERSONAL_DATA Component Interface. |
Save Position From CSV File |
Updates a single Position Data record by invoking the Save operation of CI_POSITION_DATA Component Interface. |
Retrieve a Collection of Employee Records

-
Create a new Mule Project in Anypoint Studio.
-
Fill in the credentials in
src/main/resources/mule-app.properties.config.server=<HOST:PORT> config.username=<USERNAME> config.password=<PASSWORD> config.domainConnectionPwd=<DOMAIN_CONNECTION_PASSWORD> -
Drag a HTTP endpoint onto the canvas and configure the following parameters:
Parameter Value Display Name
HTTP
Connector Configuration
If no HTTP element has been created yet, click the plus sign to add a new HTTP Listener Configuration and click OK (leave the values to its defaults).
Path
/find
-
Drag the PeopleSoft connector next to the HTTP endpoint component and configure it according to the steps below:
-
Add a new PeopleSoft Global Element by clicking the plus sign
 next to the Connector Configuration field.
 -
Configure the global element according to the table below:
Parameter Description Value
Name
The name for the connection configuration.
PeopleSoft
Server
The URL of the PeopleSoft instance
${config.server}Username
The username credential to log into the PeopleSoft instance
${config.username}Password
The password credential to log into the PeopleSoft instance
${config.password}Domain Connection Password
Optionally, if configured in PeopleSoft sandbox, provide the domain connection password credential
${config.domainConnectionPwd}Required dependencies
Click Add File to attach the psjoa.jar file that is compiled from your PeopleSoft instance to your project’s Build path. Learn how to compile the psjoa.jar file.
Server, Username and Password use property placeholder syntax to load the credentials in a simple and reusable way.
-
-
Click Test Connection to confirm that Mule can connect with the PeopleSoft instance. If the connection is successful, click OK to save the configurations. Otherwise, review or correct any incorrect parameters, then test again.
-
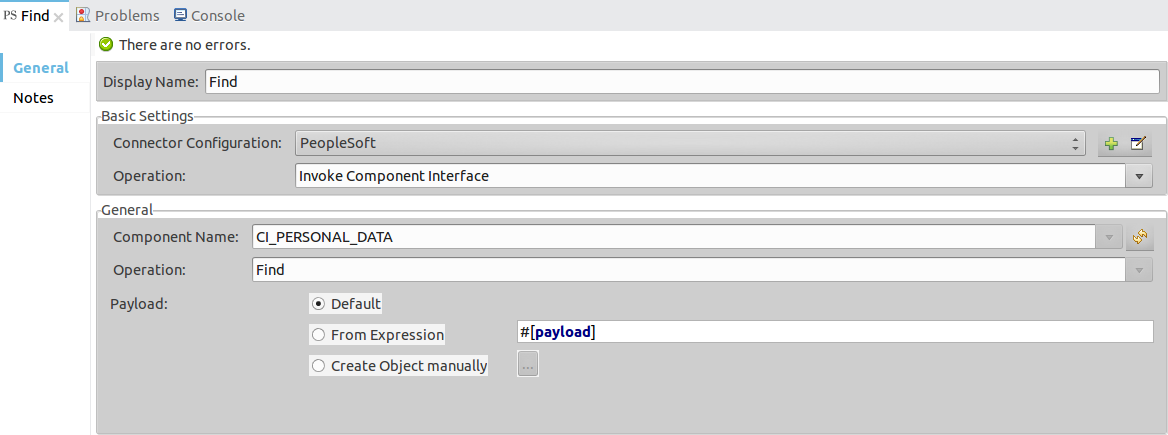
Back in the properties editor of the PeopleSoft connector, configure the remaining parameters:
Parameter Value Display Name
Find Employees
Connector Configuration
PeopleSoft (the reference name to the global element you have created).
Operation
Invoke Component Interface
Component Name
CI_PERSONAL_DATA (the component interface name that holds the employee data).
Operation
Find
The connector settings should look like the image below:
-
Add a Transform Message (DataWeave) element between the HTTP endpoint and the PeopleSoft endpoint to provide the input parameters required by the FIND method. If DataSense is enabled, the input fields should be automatically populated:

Inside the DataWeave code, use a MEL expression to define a HTTP Query Param for all the fields. This way, each value can be dynamically set from the URL.
%dw 1.0 %output application/java --- { KEYPROP_EMPLID: inboundProperties['http.query.params'].id, PROP_NAME: inboundProperties['http.query.params'].name, PROP_LAST_NAME_SRCH: inboundProperties['http.query.params'].lastname, PROP_NAME_AC: inboundProperties['http.query.params'].nameac } -
Add an Object to JSON transformer after the PeopleSoft element to display the response in the browser.
-
Add a Logger scope after the JSON transformer to print the data that is being passed to the PeopleSoft connector in the Mule Console. Configure the Logger according to the table below. .
-
Save and Run as Mule Application. Then, open a web browser and check the response after entering the URL
http://localhost:8081/find?id=MULE&name=&last_name=&name_ac=. If there are records in your PeopleSoft database whose KEYPROP_EMPLID contains the value "MULE", you should get a JSON collection with those records. Otherwise, you receive an empty collection.
[
    {
    "KEYPROP_EMPLID": "MULE0001",
    "PROP_NAME": "Muley",
    "PROP_LAST_NAME_SRCH": "The Mule",
    "PROP_NAME_AC": ""
    },
    {
    "KEYPROP_EMPLID": "MULE0002",
    "PROP_NAME": "Second Muley",
    "PROP_LAST_NAME_SRCH": "The Backup Mule",
    "PROP_NAME_AC": ""
    },
    ...
]
In this example, all input parameters for the FIND operation are optional. If none of them defined (http://localhost:8081/find?id=&name=&last_name=&name_ac=), then PeopleSoft will retrieve the first 300 records available (the maximum limited by the server).
|
Example Use Case - XML
Paste this code into your XML Editor to quickly load the flow for this example use case into your Mule application.
<?xml version="1.0" encoding="UTF-8"?>
<mule xmlns:dw="http://www.mulesoft.org/schema/mule/ee/dw" xmlns:context="http://www.springframework.org/schema/context"
      xmlns:http="http://www.mulesoft.org/schema/mule/http"
      xmlns:json="http://www.mulesoft.org/schema/mule/json"
      xmlns:file="http://www.mulesoft.org/schema/mule/file"
      xmlns:peoplesoft="http://www.mulesoft.org/schema/mule/peoplesoft"
      xmlns:doc="http://www.mulesoft.org/schema/mule/documentation"
      xmlns:xsi="http://www.w3.org/2001/XMLSchema-instance"
      xmlns="http://www.mulesoft.org/schema/mule/core"
      xsi:schemaLocation="
        http://www.springframework.org/schema/context
        http://www.springframework.org/schema/context/spring-context-current.xsd
        http://www.mulesoft.org/schema/mule/core
        http://www.mulesoft.org/schema/mule/core/current/mule.xsd
        http://www.mulesoft.org/schema/mule/peoplesoft
        http://www.mulesoft.org/schema/mule/peoplesoft/current/mule-peoplesoft.xsd
        http://www.mulesoft.org/schema/mule/file
        http://www.mulesoft.org/schema/mule/file/current/mule-file.xsd
        http://www.mulesoft.org/schema/mule/json
        http://www.mulesoft.org/schema/mule/json/current/mule-json.xsd
        http://www.mulesoft.org/schema/mule/http
        http://www.mulesoft.org/schema/mule/http/current/mule-http.xsd
        http://www.mulesoft.org/schema/mule/ee/dw
        http://www.mulesoft.org/schema/mule/ee/dw/current/dw.xsd">

    <peoplesoft:config name="PeopleSoft"
        server="${config.server}"
        username="${config.username}"
        password="${config.password}"
        domainConnectionPwd="${config.domainConnectionPwd}"
        doc:name="PeopleSoft">
        <peoplesoft:component-interface-ids-white-list>
            <peoplesoft:component-interface-ids-white-list>
                CI_PERSONAL_DATA
            </peoplesoft:component-interface-ids-white-list>
        </peoplesoft:component-interface-ids-white-list>
    </peoplesoft:config>

    <http:listener-config name="HTTP_Listener"
        host="0.0.0.0" port="8081" doc:name="HTTP Listener Configuration"/>

    <flow name="Find_Employee_Flow">
        <http:listener config-ref="HTTP_Listener" path="/find" doc:name="HTTP"/>
        <dw:transform-message doc:name="Map To CI_PERSONAL_DATA">
            <dw:set-payload><![CDATA[%dw 1.0
                %output application/java
                ---
                {
                    KEYPROP_EMPLID: inboundProperties['http.query.params'].id,
                    PROP_NAME: inboundProperties['http.query.params'].name,
                    PROP_LAST_NAME_SRCH: inboundProperties['http.query.params'].lastname,
                    PROP_NAME_AC: inboundProperties['http.query.params'].nameac
                }]]></dw:set-payload>
        </dw:transform-message>
        <peoplesoft:invoke-operation config-ref="PeopleSoft"
            key="CI_PERSONAL_DATA||Find" doc:name="PeopleSoft"/>
        <json:object-to-json-transformer doc:name="CI To JSON"/>
        <logger level="INFO" doc:name="Employee List" message="#[payload]"/>
    </flow>
</mule>
Connector Performance
To define the pooling profile for the connector manually, access the Pooling Profile tab in the applicable global element for the connector.
For background information on pooling, see Tuning Performance.
Tips
Test the Connection
Use the Test Connection feature to validate not only the connection to the PeopleSoft instance, but also the Component Interfaces defined in the allowlist.
-
Open the PeopleSoft Global Element Configuration.
-
Click the Test Connection button.
-
If one ore more Component Interfaces names are invalid, you will get an error message.
-
Click the […] button next to the Create Object manually option and provide the correct name for the Component.
-
If the error message is
Unsupported major/minor version 51.0, you are running with a 1.6 JRE. To resolve this, ensure that you are running with Java 1.7 and restart Studio. -
If the error message is
java.lang.NoClassDefFoundError: psft/pt8/joa/ISession and java.lang.ClassNotFoundException: psft.pt8.joa.ISessio, you haven’t installed the psjoa.jar file. -
To access PeopleSoft Component Interface in your Mule flows, you must add the PeopleSoft Component Interface API to the project. Go back to the Required dependencies panel and select the corresponding JAR file.
-
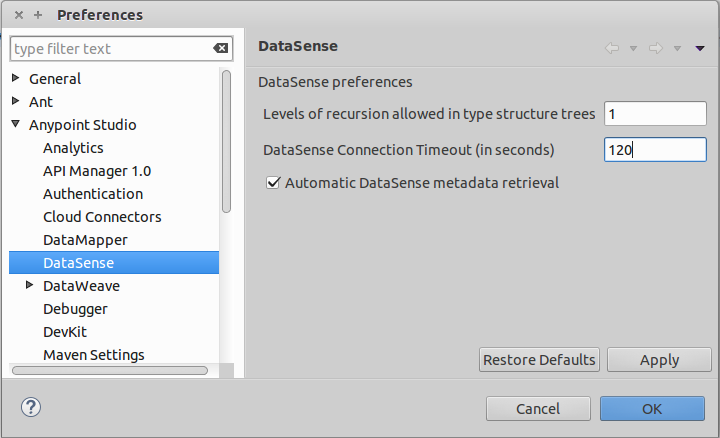
Avoid DataSense Timeout
The metadata retrieval for the Save operation takes longer than the rest of the operations. Therefore, Studio might throw a timeout exception with the message:
"Problem while fetching metadata. The operation timed out and was not successful. You can configure this timeout in the Studio Preferences dialog."
-
Go to Windows > Preferences.
-
Expand the Anypoint Studio menu and select DataSense.
-
Set the option DataSense Connection Timeout (in seconds) to 120 (or higher).
-
Click Apply.
-
Click OK.
| If you click the Refresh metadata link in your flow settings and wait a few moments, the metadata for the Save operation should now be correctly populated. |
