Redis Connector
Select
Introduction
Redis is an open source, advanced key-value store. It is often referred to as a data structure server since keys can contain strings, hashes, lists, sets and sorted sets.
The Anypoint Connector for Redis offers complete support for its CRUD API.
Read through this user guide to understand how to set up and configure a basic flow using the connector. Track feature additions, compatibility, limitations and API version updates with each release of the connector using the Redis Release Notes. Review the connector operations and functionality using the Technical Reference alongside the demo applications.
MuleSoft maintains this connector under the Select support policy.
Before You Begin
Have a basic familiarity with Anypoint Connectors, and Anypoint Studio Essentials. To increase your familiarity with Studio, consider completing a Anypoint Studio Tutorial. This page requires some basic knowledge of Mule Concepts, Elements in a Mule Flow, and Global Elements.
Requirements
For hardware and software requirements, please visit the Hardware and Software Requirements page.
Namespace and Schema
When designing your application in Studio, the act of dragging the connector from the palette onto the Anypoint Studio canvas should automatically populate the XML code with the connector namespace and schema location.
If you are manually coding the Mule application in Studio’s XML editor or other text editor, paste these into the header of your Configuration XML, inside the <mule> tag.
|
<mule xmlns:redis="http://www.mulesoft.org/schema/mule/redis"
  ...
  xsi:schemaLocation="http://www.mulesoft.org/schema/mule/redis http://www.mulesoft.org/schema/mule/connector/current/mule-redis.xsd">
  ...
  <flow name="yourFlow">
  ...
  </flow>
</mule>
Using the Connector in a Mavenized Mule App
If you are coding a Mavenized Mule application, this XML snippet must be included in your pom.xml file.
<dependency>
  <groupId>org.mule.modules</groupId>
  <artifactId>mule-module-redis</artifactId>
  <version>x.x.x</version>
</dependency>
Replace x.x.x with the version that corresponds to the connector you are using.
To obtain the most up-to-date pom.xml file information, access the connector in Anypoint Exchange and click Dependency Snippets.
Installing
You can install a connector in Anypoint Studio using the instructions in To Import an Asset from Exchange.
Configuring
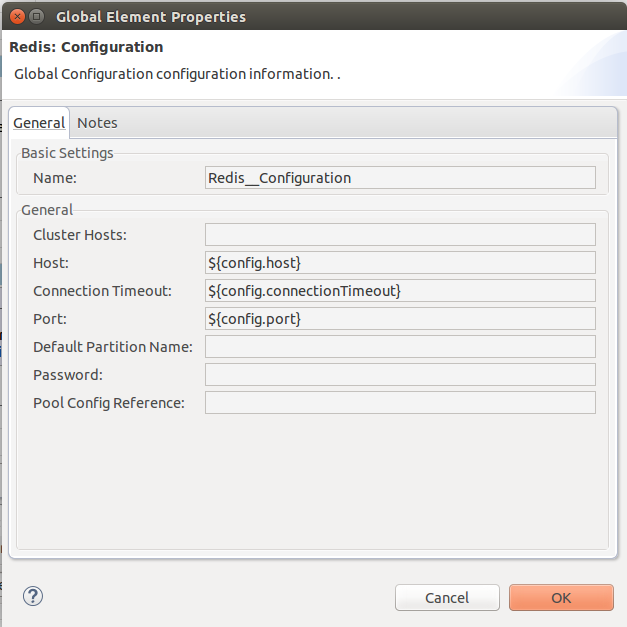
To use Redis connector in your Mule application, you must configure a global Redis element that can be used by all the connectors in the application (read more about global elements).
Below are the properties that you must provide to configure the global element:
| In the image above, the placeholder values refer to a configuration file placed in the src folder of your project (Learn how to configure properties). You can either hardcode your credentials into the global configuration properties, or reference a configuration file that contains these values. For simpler maintenance and better re-usability of your project, Mule recommends that you use a configuration file. Keeping these values in a separate file is useful if you need to deploy to different environments, such as production, development, and QA, where your access credentials differ. See Deploying to Multiple Environments for instructions on how to manage this. |
| Field | Description |
|---|---|
Name |
Enter a name for this configuration to reference it later. |
Cluster Hosts |
Redis cluster hosts, separated by comma and with the format host:port. Use this field when you want to access you Redis cluster through the connector. |
Host |
Redis host. Use this field when you want to access you Redis server that is not part of a cluster through the connector. |
Connection Timeout |
Connection timeout in milliseconds. |
Port |
Redis port. The port on which your non cluster server is running. |
Default Partition Name |
The partition name to use in case that the connector is used as a partitionable object store. |
Password |
Redis password. Set this in case that the server requires authentication. |
Pool Config Reference |
Object pool configuration. Reference to a bean of type |
Upgrading from an Older Version
If you’re currently using an older version of the connector, a small popup appears in the bottom right corner of Anypoint Studio with an "Updates Available" message.
-
Click the popup and check for available updates.
-
Click the Connector version checkbox and click Next and follow the instructions provided by the user interface.
-
Restart Studio when prompted.
-
After restarting, when creating a flow and using the Object Store Connector, if you have several versions of the connector installed, you may be asked which version you would like to use. Pick one of these.
We recommend that you keep Studio up to date with the connector’s latest version.
Using This Connector
You can use this connector as an inbound endpoint for consuming messages from a channel. You can subscribe to one of these channels through the connector or as an outbound connector for sending commands to the Redis server.
| See the full list of operations for the latest version of the connector here. |
Managing the Connection Pool
To define the pooling profile for the connector manually, access the Pooling Profile tab in the applicable global element for the connector.
For background information on pooling, see Tuning Performance.
Example Use Case
Save a value for a key into Redis server
This use case describes how to use the connector for assigning a value to a key into the Redis server.
-
Create a new Mule Project by clicking File > New > Mule Project.

-
In the new project dialog box, the only thing you are required to enter is a name for your new project. Click on Finish.

-
Navigate through the project’s structure and double-click on src/main/app/project-name.xml to open it. The steps below are all performed on this file:
-
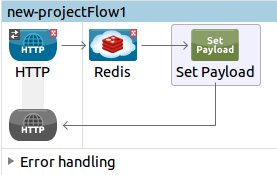
Go to the palette and search for "Http", then drag and drop a new Http Connector on canvas. This element shall be the entry point for the flow and will provide the key and value to be set for that key.
-
Go to the palette and search for "Redis", then drag and drop a new Redis connector after "Http" connector. This element is going to send data to the Redis server.
-
Go to the palette and search for "Set Payload", then drag and drop a new Set Payload element after the "Redis" connector. This element shall create the response for the incoming HTTP request.
-
Double click on the flow’s top margin to open its properties, and change the name of the flow to "set-flow".

-
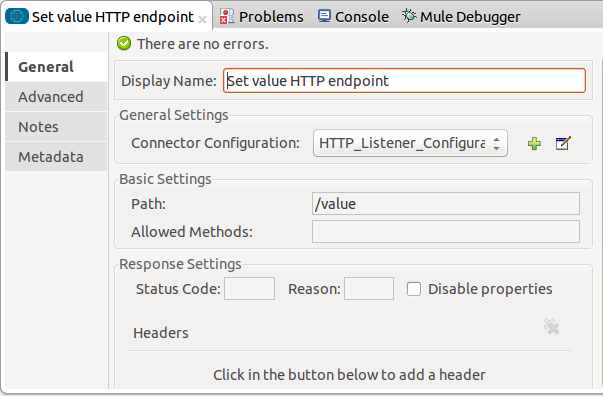
Double click on the HTTP Connector to open its properties.
-
Click on the green plus sign along side the "Connector Configuration" drop down menu.
-
A pop-up will appear, leave the default configurations and click ok.
-
Set Path to "/value".
-
Set Display Name to "Set value HTTP endpoint".
-
-
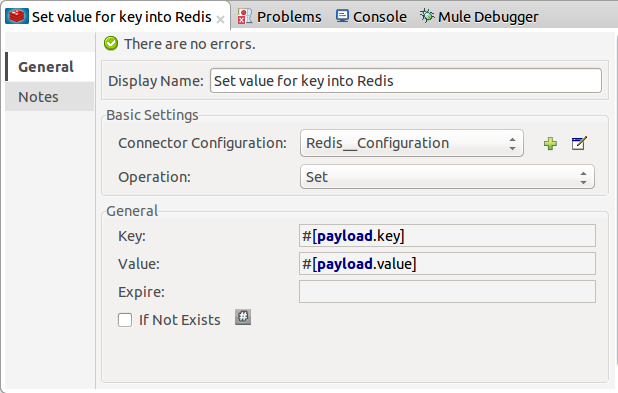
Double click on Redis and set its properties as below:
-
Set Display Name to "Set value for key into Redis".
-
Choose from the Consumer Configuration drop down "Redis__Configuration" (the default name of a configuration, or any other configuration that you configured as explained in the Configuring section)
-
Choose from Operation drop down "Set".
-
Set Key to "#[payload.key]".
-
Set Value to "#[payload.value]".
-
-
Double click on Set Payload and set its properties as below.
-
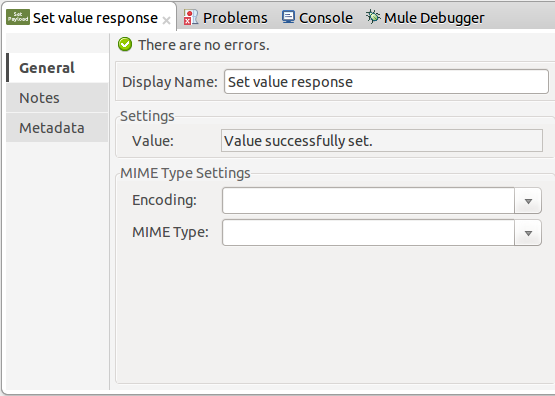
Set Display Name to "Set value response".
-
Set Value to "Value successfully set.".
-
-
If you configured Redis global element with placeholder values ( as explained within Configuring section) you must now provide values for these placeholders. Open /src/main/app/mule-app.properties and provide values for following properties: config.host, config.port and config.connectionTimeout
-
Deploy the app.
-
Once the app is running, send an HTTP request to it to trigger it’s flow. To do this, use the CURL command line utility or an HTTP client app (such as Postman) to send a POST request with content-type
application/x-www-form-urlencodedand a body in urlencoded format tolocalhost:8081/value. The request’s body should contain a key and a value. For this you can use the following CURL command: curl -X POST -d "key=test-key" -d "value=test-value" localhost:8081/value. -
Congratulations! You have just set a value for a key into the redis server.
Save a value for a key into Redis server code
-
Add the redis namespace to the mule element as follows:
xmlns:redis="http://www.mulesoft.org/schema/mule/redis" -
Add the location of the redis schema referred to by the "redis" namespace:
http://www.mulesoft.org/schema/mule/redis http://www.mulesoft.org/schema/mule/sfdc-composite/current/mule-redis.xsd -
Add the HTTP namespace to the mule element as follows:
xmlns:http="http://www.mulesoft.org/schema/mule/http" -
Add the location of the HTTP schema referred to by the HTTP namespace:
http://www.mulesoft.org/schema/mule/http http://www.mulesoft.org/schema/mule/http/current/mule-http.xsd -
Add a redis:config element to your project, then configure its attributes as follows:
<redis:config name="Redis__Configuration" host="${config.host}" connectionTimeout="${config.connectionTimeout}" port="${config.port}" doc:name="Redis: Configuration"/> -
Add a
http:listener-configelement to your project, then configure its attributes as follows:<http:listener-config name="HTTP_Listener_Configuration" host="0.0.0.0" port="8081" doc:name="HTTP Listener Configuration"/> -
Add an empty flow element to your project as follows:
<flow name="set-flow"> </flow> -
Within the flow element add an
http:listenerelement as follows:<http:listener config-ref="HTTP_Listener_Configuration" path="/value" doc:name="Set value HTTP endpoint"/> -
Within the flow element add a
redis:setafter thehttp:listeneras follows:<redis:set config-ref="Redis__Configuration" key="#[payload.key]" value="#[payload.value]" doc:name="Set value for key into Redis"/> -
Within the flow element add a
set-payloadelement afterredis:setas follows:<set-payload value="Value successfully set." doc:name="Set value response"/> -
When you’re done, the XML file should look like this:
<?xml version="1.0" encoding="UTF-8"?>

<mule xmlns:redis="http://www.mulesoft.org/schema/mule/redis" xmlns:tracking="http://www.mulesoft.org/schema/mule/ee/tracking" xmlns:http="http://www.mulesoft.org/schema/mule/http" xmlns:apachekafka="http://www.mulesoft.org/schema/mule/apachekafka" xmlns="http://www.mulesoft.org/schema/mule/core" xmlns:doc="http://www.mulesoft.org/schema/mule/documentation"
	xmlns:spring="http://www.springframework.org/schema/beans"
	xmlns:xsi="http://www.w3.org/2001/XMLSchema-instance"
	xsi:schemaLocation="http://www.springframework.org/schema/beans http://www.springframework.org/schema/beans/spring-beans-current.xsd
http://www.mulesoft.org/schema/mule/core http://www.mulesoft.org/schema/mule/core/current/mule.xsd
http://www.mulesoft.org/schema/mule/apachekafka http://www.mulesoft.org/schema/mule/apachekafka/current/mule-apachekafka.xsd
http://www.mulesoft.org/schema/mule/http http://www.mulesoft.org/schema/mule/http/current/mule-http.xsd
http://www.mulesoft.org/schema/mule/ee/tracking http://www.mulesoft.org/schema/mule/ee/tracking/current/mule-tracking-ee.xsd
http://www.mulesoft.org/schema/mule/redis http://www.mulesoft.org/schema/mule/redis/current/mule-redis.xsd">
    <redis:config name="Redis__Configuration" host="${config.host}" connectionTimeout="${config.connectionTimeout}" port="${config.port}" doc:name="Redis: Configuration"/>
    <http:listener-config name="HTTP_Listener_Configuration" host="0.0.0.0" port="8081" doc:name="HTTP Listener Configuration"/>
    <flow name="set-flow">
        <http:listener config-ref="HTTP_Listener_Configuration" path="/value" doc:name="Set value HTTP endpoint"/>
        <redis:set config-ref="Redis__Configuration" key="#[payload.key]" value="#[payload.value]" doc:name="Set value for key into Redis"/>
        <set-payload value="Successfully set value: #[payload.value] to key: #[payload.key]" doc:name="Set value response"/>
    </flow>
</mule>
Demos
The above explained example use case can be found within the common-commands-demo demo. Other operation examples also exist.
See Also
-
Access the Redis Connector Release Notes.
-
Read more about Anypoint Connectors.