
Salesforce Connector 12.0 Examples
These examples show several Mule flows for Salesforce Connector:
Accept and Transform Data
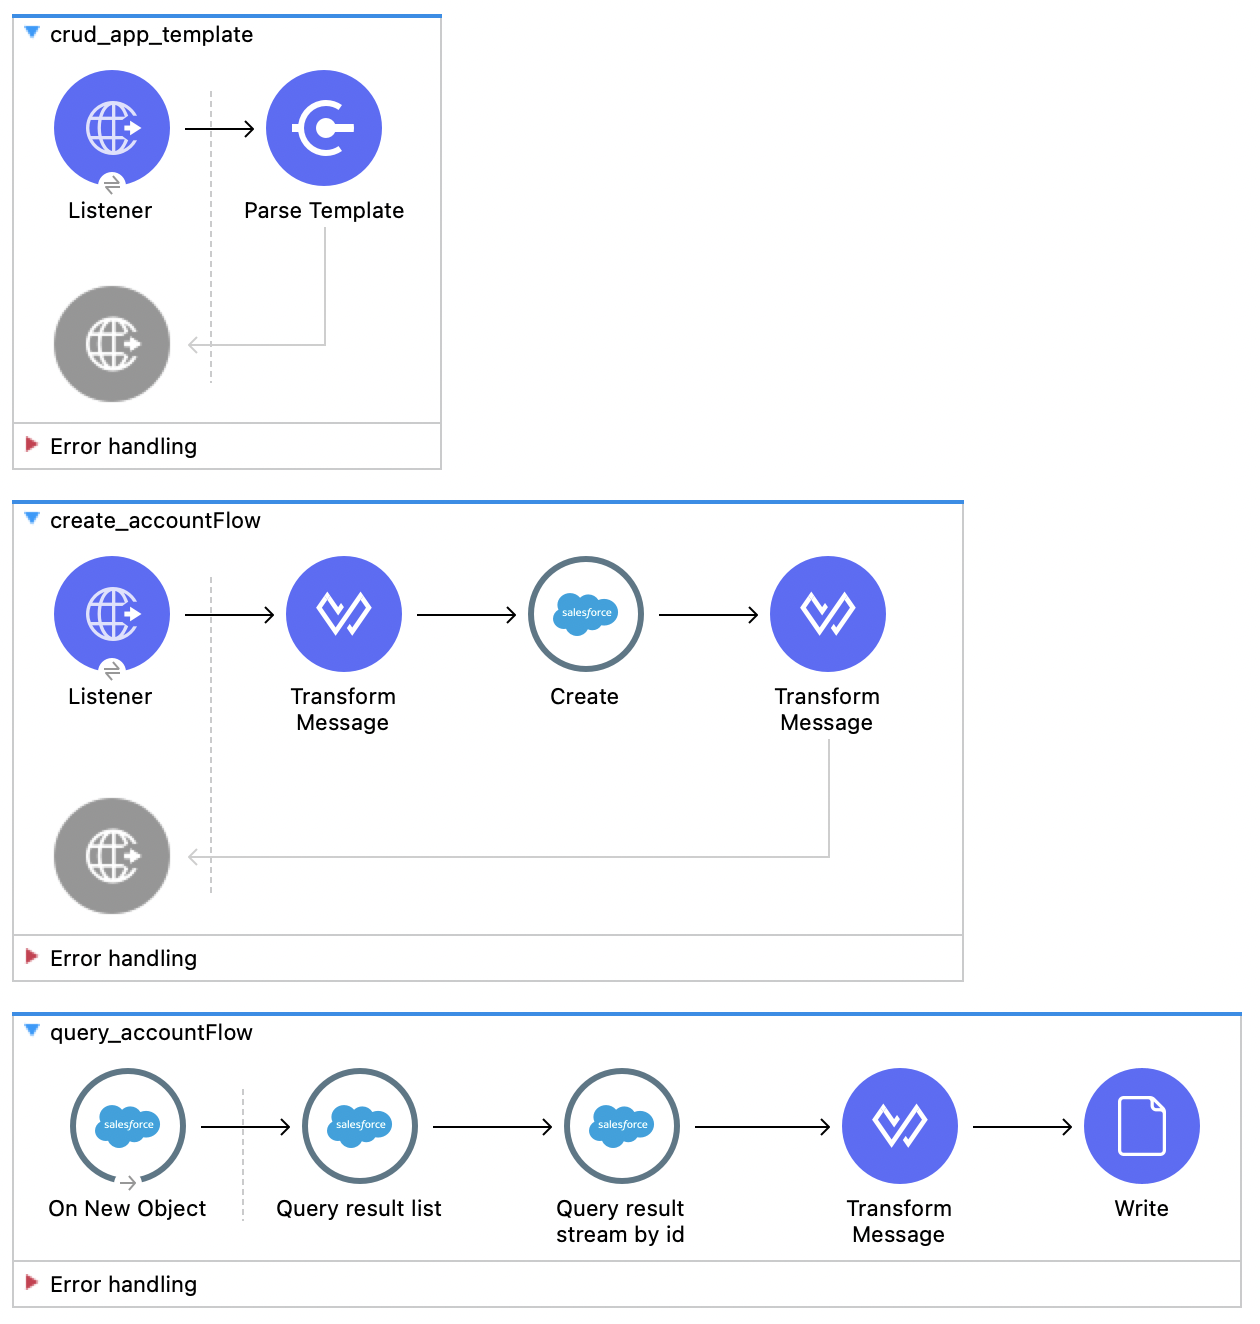
This example shows how to configure Salesforce Connector to create a new Salesforce account and query new accounts, and to use File Connector to write the new account data to a file. The example contains three flows:
-
The first flow configures a template for the HTML input form used to provide data for the new account.
-
The second flow creates a new Salesforce account based on information in the HTML input form.
-
The third flow queries new accounts by name and writes new account data to a CSV file.
Configure the First Flow
Configure the first flow that configures an HTML template that provides the data used to create a new account. Creating the first flow involves configuring a Listener component and a Parse Template component.
Configure the HTTP Listener
Configure the Listener component to initiate a Mule flow when a call is made to the /account path:
-
Create a new Mule project in Studio.
-
From the Mule Palette view, select HTTP and drag the Listener component to the canvas.
-
In the properties window, click + next to the Connector configuration field to add a global element.
-
Accept the defaults.
-
In the properties window, set the Path field value to
/account.
Add the Parse Template Component
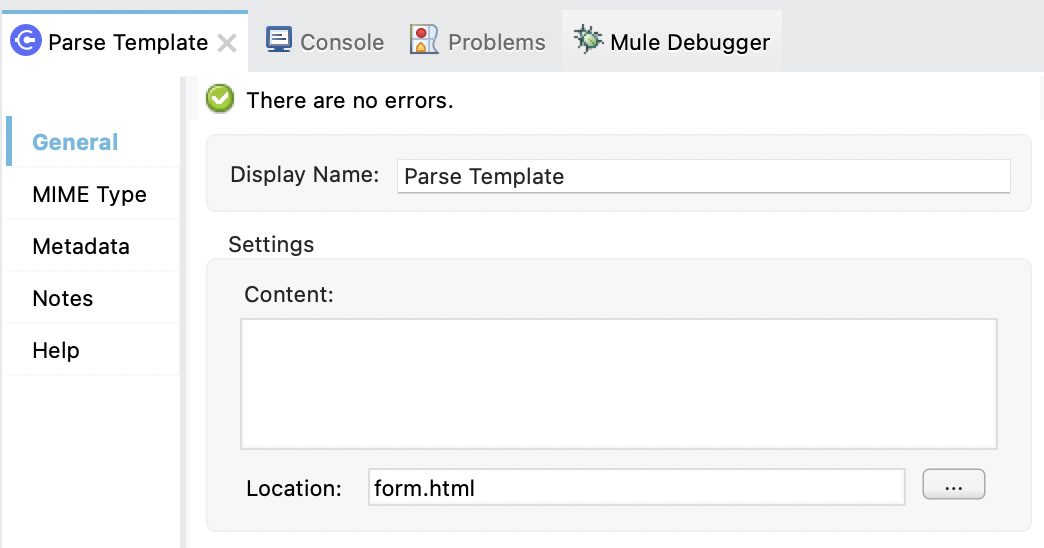
Add the Parse Template component to create a template for an HTML form (form.html), which is located in the main resources folder and is used to convey information for creating a new account:
-
From the Mule Palette view, select Core and drag a Parse Template component to the right of Listener.
-
In the properties window, configure the following fields:
Field Value Display Name
Name for the component, such as
Parse Template.Location
form.htmlThe following image shows an example of the Parse Template configuration in the properties window:
Configure the Second Flow
Configure the second flow that creates a new Salesforce account based on the data in the HTTP input form. Creating the second flow involves configuring a Listener component, a Transform Message component, a Create operation, and a second Transform Message component.
Configure the HTTP Listener
Configure the Listener component to initiate a Mule flow when a call is made to the /createAccount path:
-
From the Mule Palette view, select HTTP and drag the Listener component to the canvas.
-
In the properties window, click + next to the Connector configuration field to add a global element.
-
Accept the defaults.
-
In the properties window, set the Path field value to
/createAccount.
Add the First Transform Message Component
Add the first Transform Message component to convert the values from the HTTP input form to Java format so they can be used as input to the Create operation:
-
From the Mule Palette view, select Core and drag a Transform Message component to the right of Listener.
-
In the properties window, overlay the brackets in the Output section with this DataWeave code:
%dw 2.0
output application/java
---
[{

  Name: payload.Name,
  AccountNumber: payload.AccountNumber,
  BillingCity: payload.BillingCity
}]
Add the Create Operation
Add the Create operation to create a new Salesforce account using the field values passed by the Transform Message component:
-
From the Mule Palette view, select Salesforce and drag the Create operation to the right of Transform Message.
-
In the properties window, click + next to the Connector configuration field to add a global element.
-
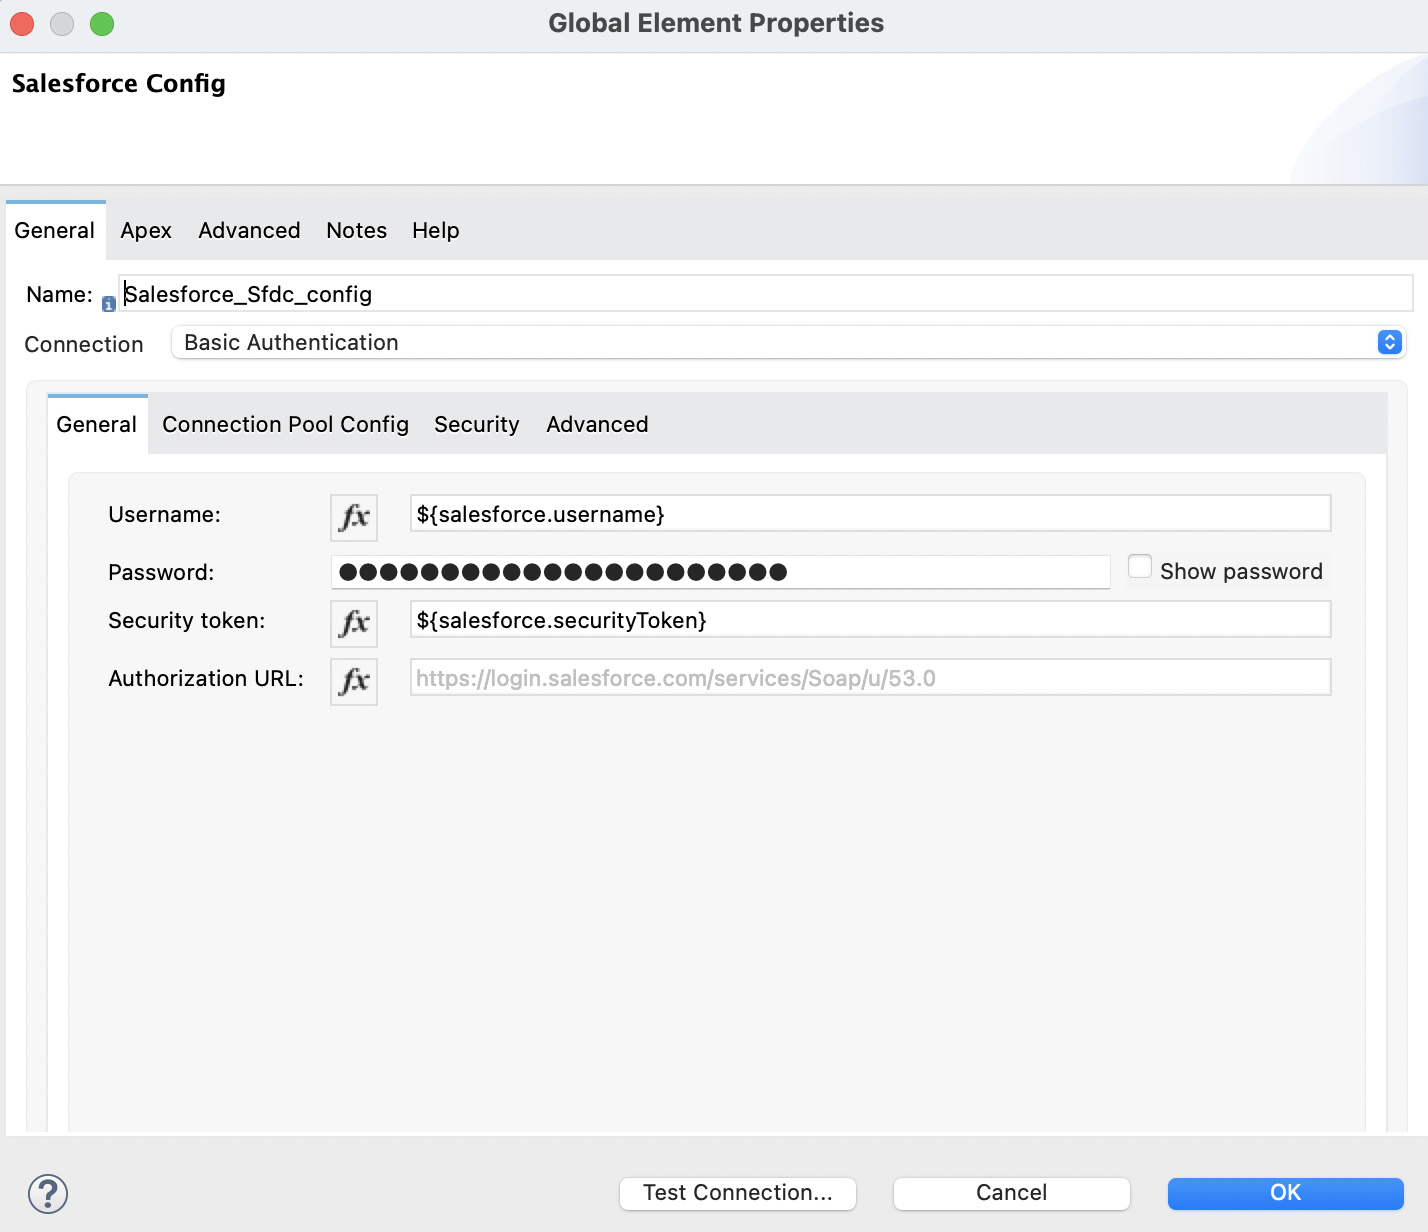
Configure the global element depending on the connection, for example:
Field Value Username
${salesforce.username}Password
${salesforce.password}Security
${salesforce.securityToken}Authorization URL
https://login.salesforce.com/services/Soap/u/53.0The following image shows an example of the Create configuration of the global element:
-
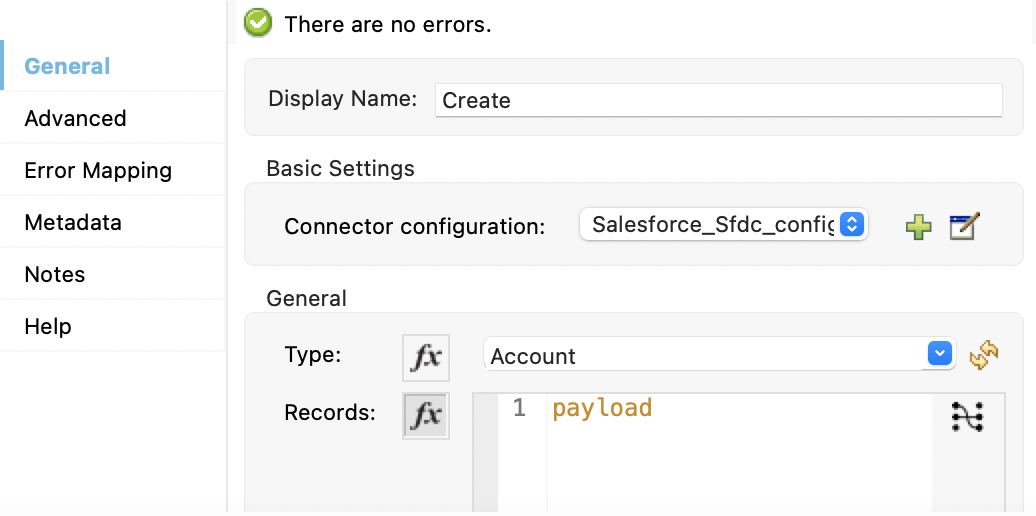
In the properties window, configure the following fields:
Field Value Display Name
Name for the connector operation.
Connector configuration
Global configuration you just created.
Type
AccountYou can successfully pass a variable into Type, but there could be an issue when displaying the input metadata if the runtime fails to properly resolve the value of that variable.
Records
payloadThe following image shows an example of the Create configuration in the properties window:
Add the Second Transform Message Component
Add the second Transform Message component to convert the field values to JSON format so the values can be used with File Connector:
-
From the Mule Palette view, select Core and drag a Transform Message component to the right of Create.
-
In the properties window, overlay the brackets in the Output section with this DataWeave code:
%dw 2.0
output application/json
---
payload map {
  id:$.id,
  errors:$.errors,
  success:$.success

}
Configure the Third Flow
Configure the third flow that queries new Salesforce accounts by name and writes the matching accounts data to a Java file. Creating the third flow involves configuring an On New Object source, a Query result list operation, a Query result stream by id operation, a Transform Message component, and a Write operation.
Configure the On New Object Source
Configure the On New Object source to initiate a Mule flow when a new account is created on the /account path:
-
From the Mule Palette view, select Salesforce and drag the On New Object source to the canvas.
-
In the properties window, configure the following fields:
Field Value Display Name
Name for the connector operation.
Connector configuration
Global configuration you just created.
Type
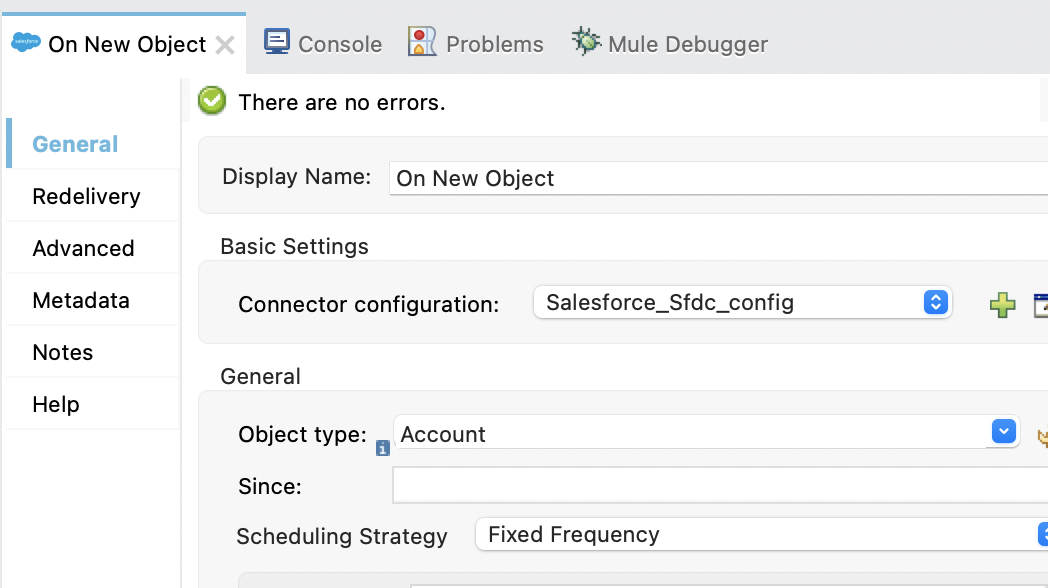
AccountThe following image shows an example of the On New Object configuration in the properties window:
Add the Query Result List Operation
Add the Query result list operation to return a list of result IDs:
-
From the Mule Palette view, select Salesforce and drag the Query result list operation to the right of On New Object.
-
In the properties window, click + next to the Connector configuration field to add a global element.
-
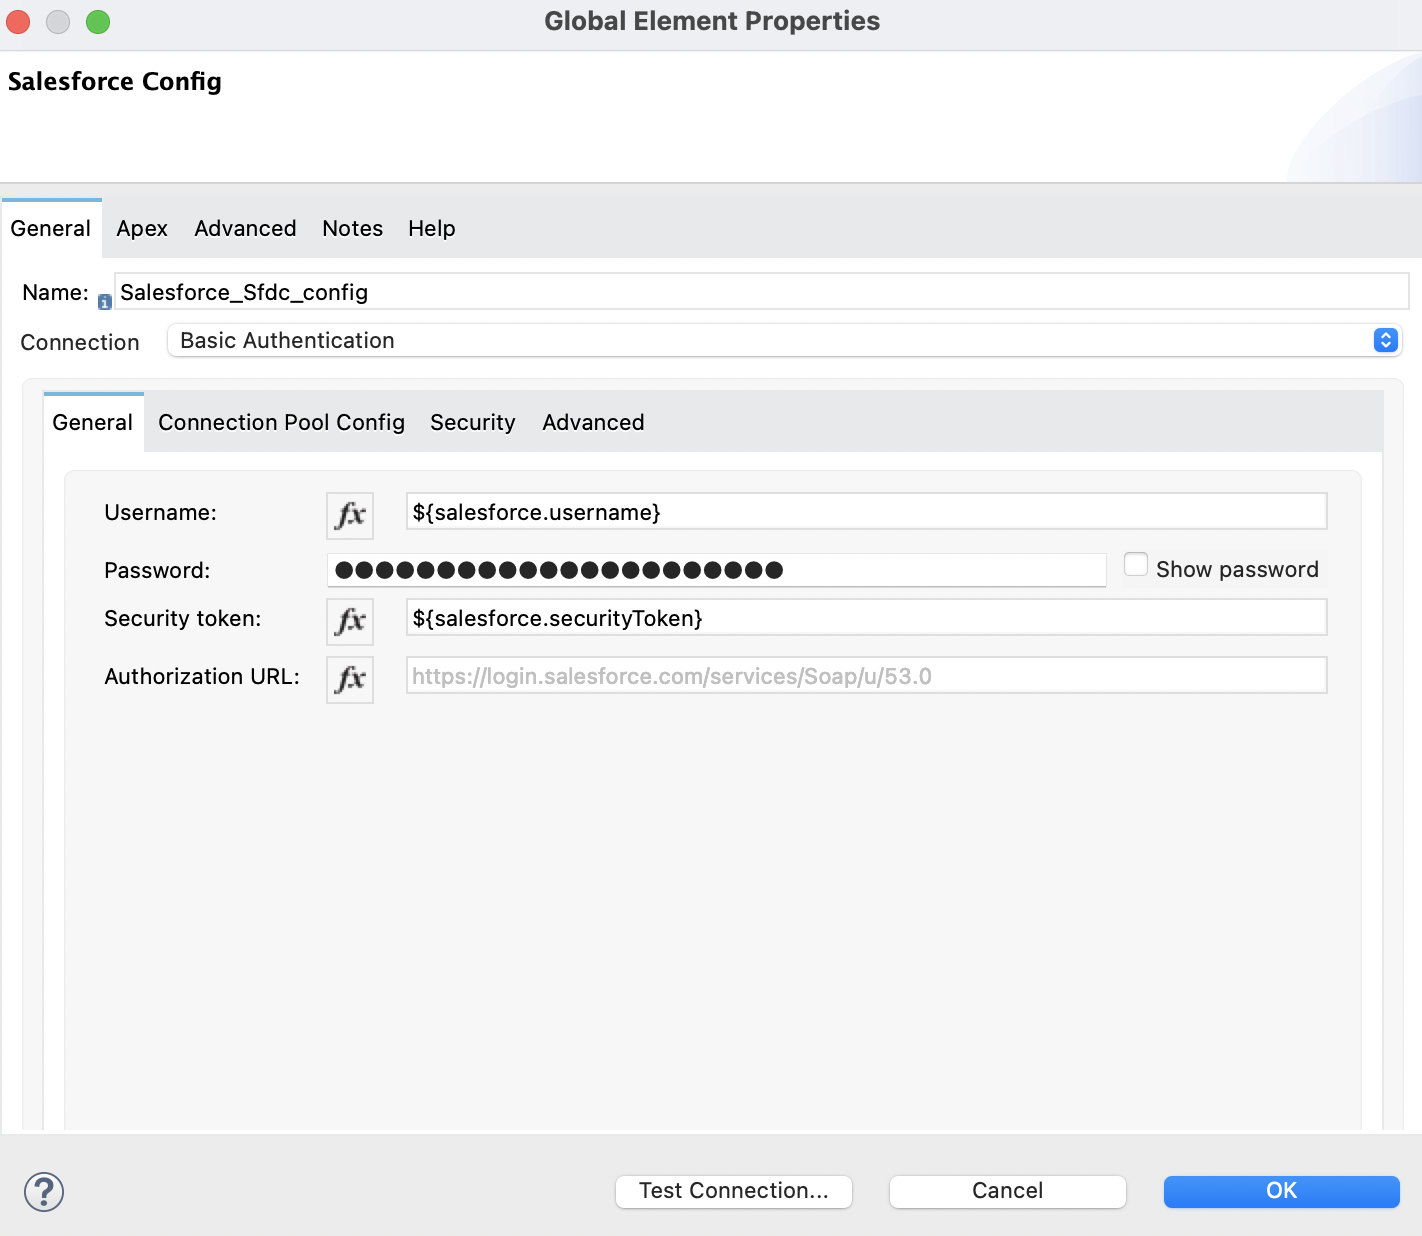
Configure the global element depending on the connection, for example:
Field Value Username
${salesforce.username}Password
${salesforce.password}Security
${salesforce.securityToken}Authorization URL
https://login.salesforce.com/services/Soap/u/53.0The following image shows an example of the Query result list configuration of the global element:
-
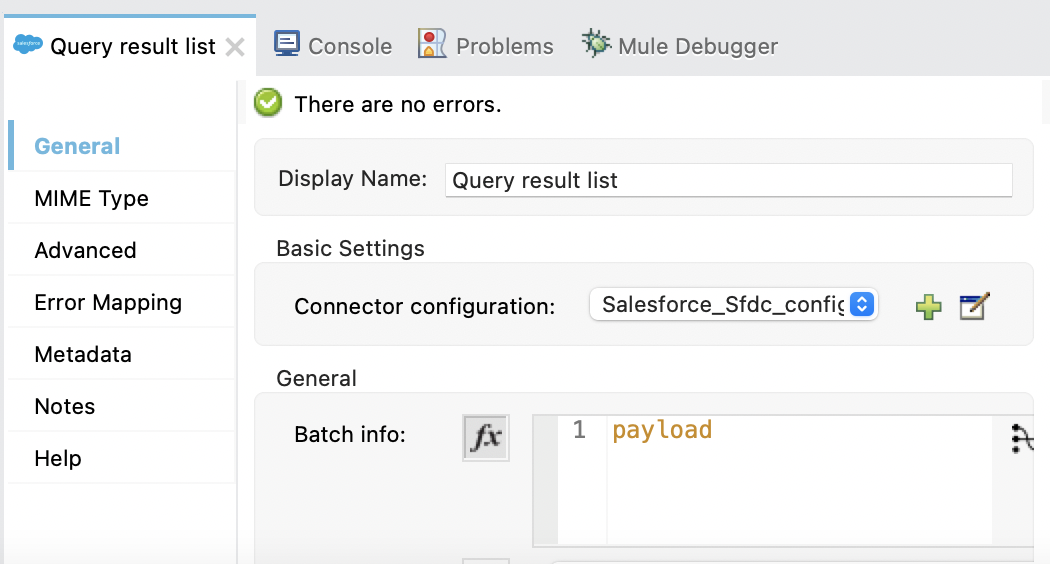
In the properties window, configure the following fields:
Field Value Display Name
Name for the connector operation.
Connector configuration
Global configuration you just created.
Batch info
payloadThe following image shows an example of the Query result list configuration in the properties window:
Add the Query Result Stream by Id Operation
Add the Query result stream by id operation to obtain the final query results:
-
From the Mule Palette view, select Salesforce and drag the Query result stream by id operation to the right of Query result list.
-
In the properties window, click + next to the Connector configuration field to add a global element.
-
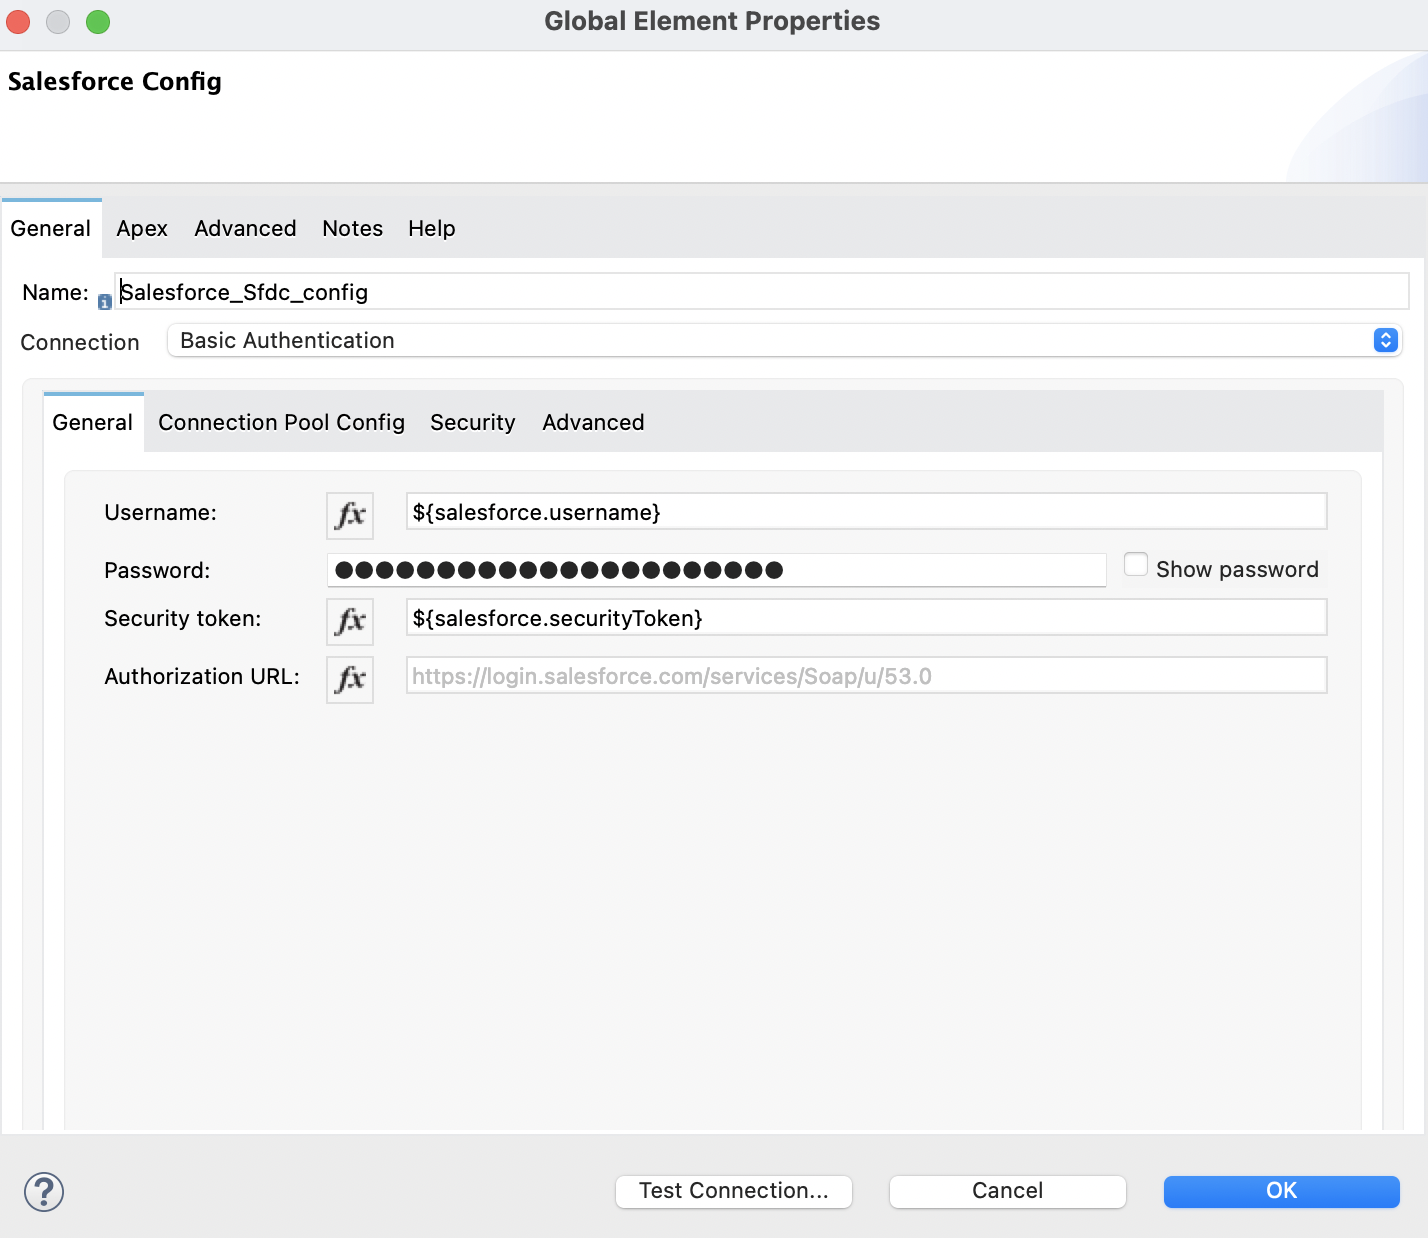
Configure the global element depending on the connection, for example:
Field Value Username
${salesforce.username}Password
${salesforce.password}Security
${salesforce.securityToken}Authorization URL
https://login.salesforce.com/services/Soap/u/53.0The following image shows an example of the Query result stream by id configuration of the global element:
-
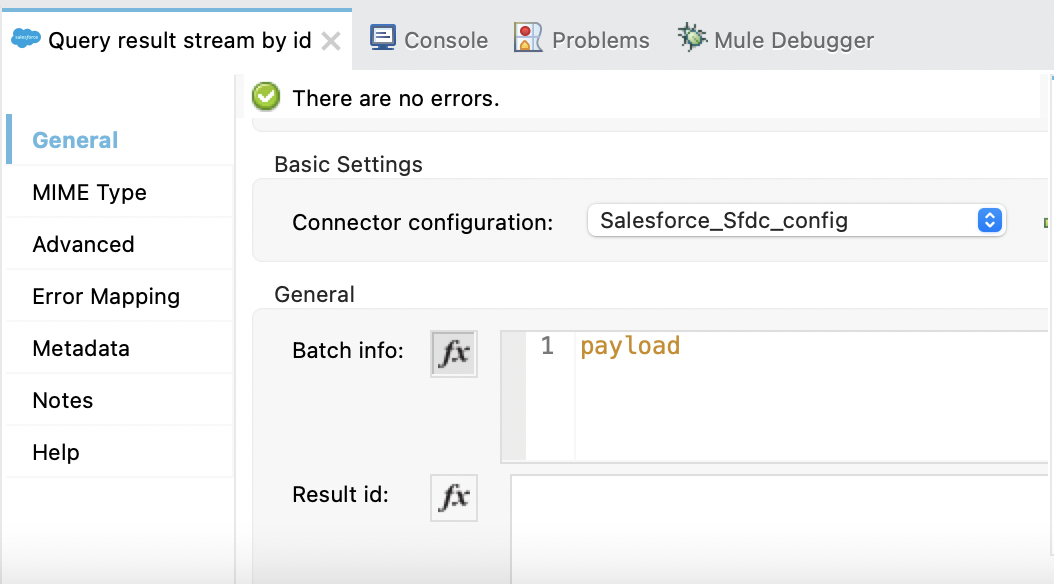
In the properties window, configure the following fields:
Field Value Display Name
Name for the connector operation.
Connector configuration
Global configuration you just created.
Batch info
payloadThe following image shows an example of the Query result stream by id configuration in the properties window:
Add the Transform Message Component
Add the Transform Message component to convert the field values to JSON format so the values can be used with File Connector:
-
From the Mule Palette view, select Core and drag a Transform Message component to the right of Query result stream by id.
-
In the properties window, overlay the brackets in the Output section with this DataWeave code:
%dw 2.0
output application/json
---
payload map {
    AccountNumber:$.AccountNumber,
    BillingAddress:$.BillingAddress,
    Id:$.Id,
    Name:$.Name
}
Add the Write Operation
Add the Write operation to write the new account data to a CSV file:
-
From the Mule Palette view, select File and drag the Write operation to the right of Transform Message.
-
In the properties window, click + next to the Connector configuration field to add a global element.
-
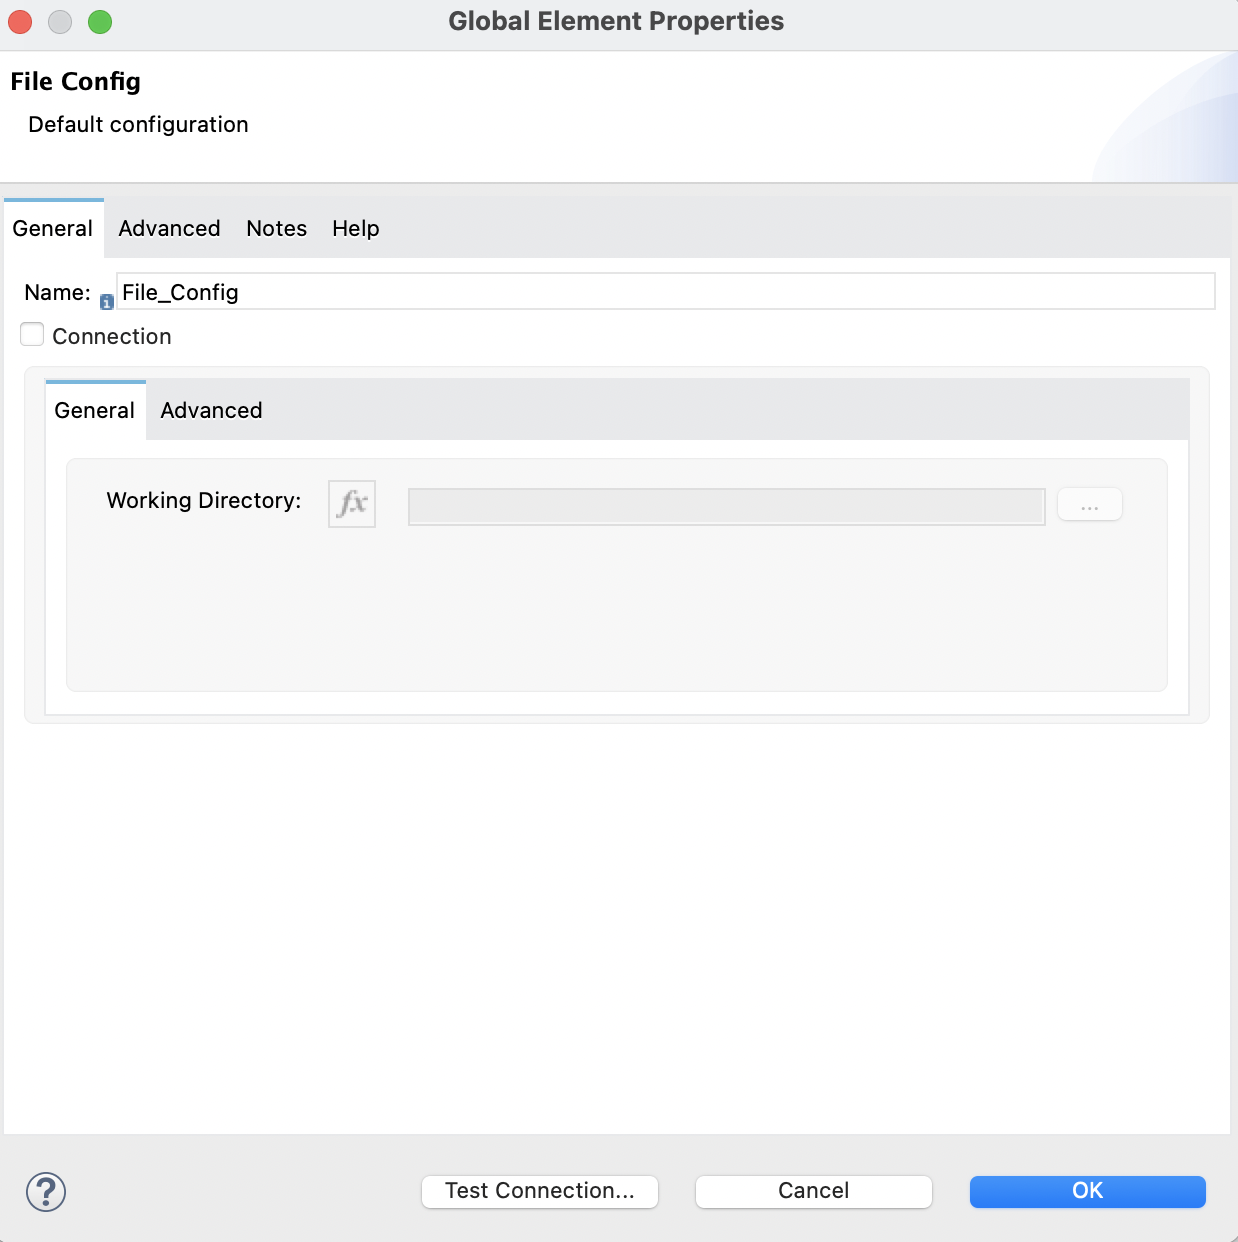
Configure the global element depending on the connection, for example:
Field Value Working Directory
If Connection is selected, the directory to consider the root of every relative path used with this connector. If not provided, it defaults to the value of the
user.homesystem property. If that system property is not set, then the connector fails to initialize.The following image shows an example of the Write configuration of the global element:
-
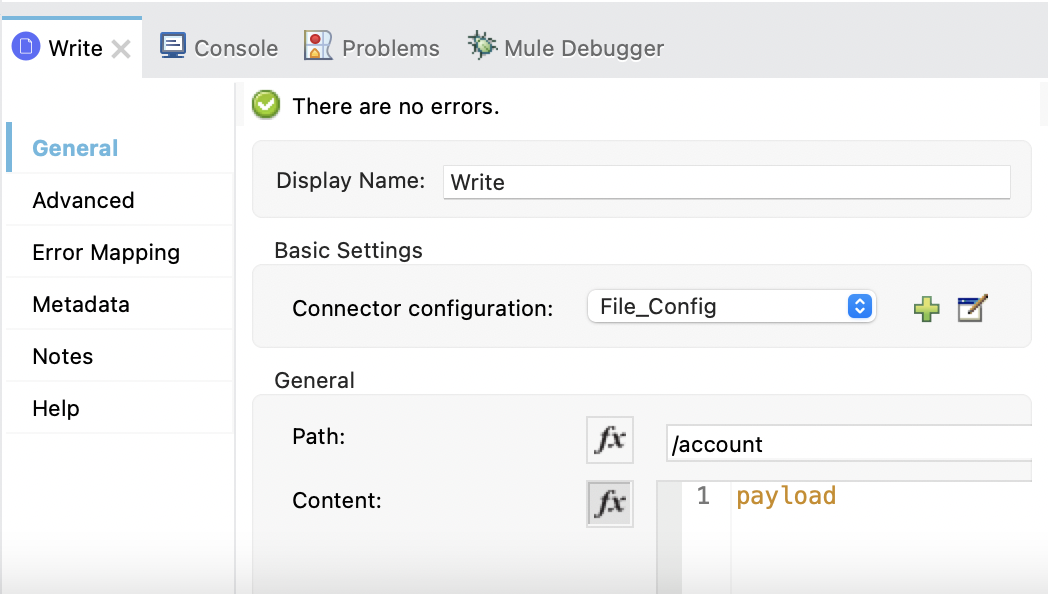
In the properties window, configure the following fields:
Field Value Display Name
Name for the connector operation.
Connector configuration
Global configuration you just created.
Path
/accountContent
payloadThe following image shows an example of the Write configuration in the properties window:
XML for This Example
Paste this code into the Studio XML editor to quickly load the flow for this example into your Mule app:
<?xml version="1.0" encoding="UTF-8"?>

<mule xmlns:file="http://www.mulesoft.org/schema/mule/file"
  xmlns:salesforce="http://www.mulesoft.org/schema/mule/salesforce"
  xmlns:ee="http://www.mulesoft.org/schema/mule/ee/core"
  xmlns:http="http://www.mulesoft.org/schema/mule/http"
  xmlns="http://www.mulesoft.org/schema/mule/core"
  xmlns:doc="http://www.mulesoft.org/schema/mule/documentation"
  xmlns:xsi="http://www.w3.org/2001/XMLSchema-instance"
  xsi:schemaLocation="
http://www.mulesoft.org/schema/mule/http http://www.mulesoft.org/schema/mule/http/current/mule-http.xsd
http://www.mulesoft.org/schema/mule/ee/core http://www.mulesoft.org/schema/mule/ee/core/current/mule-ee.xsd http://www.mulesoft.org/schema/mule/core
  http://www.mulesoft.org/schema/mule/core/current/mule.xsd
  http://www.mulesoft.org/schema/mule/http
  http://www.mulesoft.org/schema/mule/http/current/mule-http.xsd
  http://www.mulesoft.org/schema/mule/ee/core
  http://www.mulesoft.org/schema/mule/ee/core/current/mule-ee.xsd
  http://www.mulesoft.org/schema/mule/salesforce
  http://www.mulesoft.org/schema/mule/salesforce/current/mule-salesforce.xsd
  http://www.mulesoft.org/schema/mule/file
  http://www.mulesoft.org/schema/mule/file/current/mule-file.xsd">
  <configuration-properties file="mule-app.properties"/>
  <http:listener-config name="HTTP_Listener_config"
   doc:name="HTTP Listener config" >
  <http:listener-connection host="localhost" port="8081" />
  </http:listener-config>
  <salesforce:sfdc-config name="Salesforce_Sfdc_config"
   doc:name="Salesforce SFDC config">
    <salesforce:basic-connection
    username="${salesforce.username}"
    password="${salesforce.password}"
    securityToken="${salesforce.securityToken}" />
  </salesforce:sfdc-config>
  <file:config name="File_Config" doc:name="File Config" doc:id="a62aaa19-2bab-4717-8758-ec09caec2a51" >
		<file:connection />
	</file:config>
	<flow name="crud_app_template">
    <http:listener config-ref="HTTP_Listener_config"
     path="/" doc:name="Listener" />
    <parse-template location="form.html" doc:name="Parse Template"  />
  </flow>
  <flow name="create_accountFlow" >
    <http:listener config-ref="HTTP_Listener_config"
     path="/createAccount" doc:name="Listener"  />
    <ee:transform doc:name="Transform Message" >
      <ee:message >
        <ee:set-payload ><![CDATA[%dw 2.0
output application/java
---
[{

  Name: payload.Name,
  AccountNumber: payload.AccountNumber,
  BillingCity: payload.BillingCity
}]]]></ee:set-payload>
      </ee:message>
    </ee:transform>
    <salesforce:create doc:name="Create" type="Account"
     config-ref="Salesforce_Sfdc_config"/>
    <ee:transform doc:name="Transform Message" >
      <ee:message >
        <ee:set-payload ><![CDATA[%dw 2.0
output application/json
---
payload map {
  id:$.id,
  errors:$.errors,
  success:$.success

}]]></ee:set-payload>
      </ee:message>
    </ee:transform>
  </flow>
  <flow name="query_accountFlow" >
    <salesforce:new-object-listener objectType="Account" doc:name="On New Object" doc:id="8b5dec5e-31a2-4b78-9188-b681891898be" config-ref="Salesforce_Sfdc_config">
			<scheduling-strategy >
				<fixed-frequency />
			</scheduling-strategy>
		</salesforce:new-object-listener>
		<salesforce:query-result-list doc:name="Query result list" doc:id="79da7485-339c-4ab6-956a-0684210b2ded" config-ref="Salesforce_Sfdc_config"/>
		<salesforce:query-result-stream-by-id doc:name="Query result stream by id" doc:id="bdf16fc8-017f-439b-b1fc-3bff23d881d8" config-ref="Salesforce_Sfdc_config"/>
    <ee:transform doc:name="Transform Message"  >
      <ee:message >
        <ee:set-payload ><![CDATA[%dw 2.0
output application/json
---
payload map {
    AccountNumber:$.AccountNumber,
    BillingAddress:$.BillingAddress,
    Id:$.Id,
    Name:$.Name
}]]></ee:set-payload>
      </ee:message>
    </ee:transform>
		<file:write doc:name="Write" doc:id="83f39edd-bc18-4738-92c0-d3c427108ac4" config-ref="File_Config" path="/account"/>
  </flow>
</mule>
Create or Update an Object in a Parent-Child Relationship
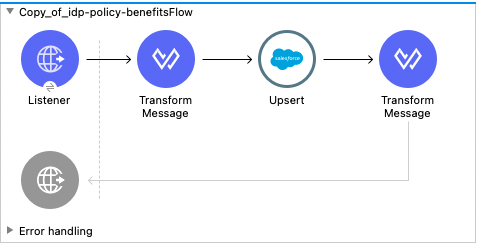
This example shows how to create the object relationship structure in Salesforce needed to perform an upsert using Salesforce Connector.
Configure the Flow
A Salesforce object can have standard or custom relationships between objects. The relationships between objects are usually one-to-many (parent-child) relationships, but can be any link between two objects residing in Salesforce.
The example uses two custom Salesforce object types that have a parent-child relationship:
-
Plane__c, the parent object that must exist in Salesforce -
Component__c, the object to upsert using Salesforce Connector
The relationship between the two custom objects is represented by a Plane__r field whose value is an object with two fields:
-
The
typefield, which has the referenced object type name as its value.In this example, the value of
typeisPlane_c. -
A field that identifies the instance of the parent object to reference.
In this example, the
Namefield references theCobrainstance ofPlane__c.
When you upsert Component__c, the POJO sent as input to Salesforce Connector looks like this:
 ----
 [{
 	// Component__c's fields ...
 	Plane__r: {
 		"type": "Plane__c",
 		"Name": "Cobra"
 	}
 }]
----
Creating the flow involves configuring a Listener component, a Transform Message component, an Upsert operation, and a second Transform Message component.
Configure the HTTP Listener
Configure the Listener component to initiate a Mule flow when a call is made to the / path:
-
Create a new Mule project in Studio.
-
From the Mule Palette view, select HTTP and drag the Listener component to the canvas.
-
In the properties window, click + next to the Connector configuration field to add a global element.
-
Accept the defaults.
-
In the properties window, set the Path field value to
/.
Add the First Transform Message Component
Add the first Transform Message component to convert the values from the HTTP input form to Java format so they can be used as input to the Upsert operation:
-
From the Mule Palette view, select Core and drag a Transform Message component to the right of Listener.
-
In the properties window, overlay the brackets in the Output section with this DataWeave code:
%dw 2.0
output application/java
---
[{
	Name: "NewPlaneComponent",
	Plane__r: {
		"type": "Plane__c",
		"Name": "Cobra"
	}
}]
Add the Upsert Operation
Add the Upsert operation to create or update a Salesforce object that is in a parent-child relationship:
-
From the Mule Palette view, select Salesforce and drag the Upsert operation to the right of Transform Message.
-
In the properties window, click + next to the Connector configuration field to add a global element.
-
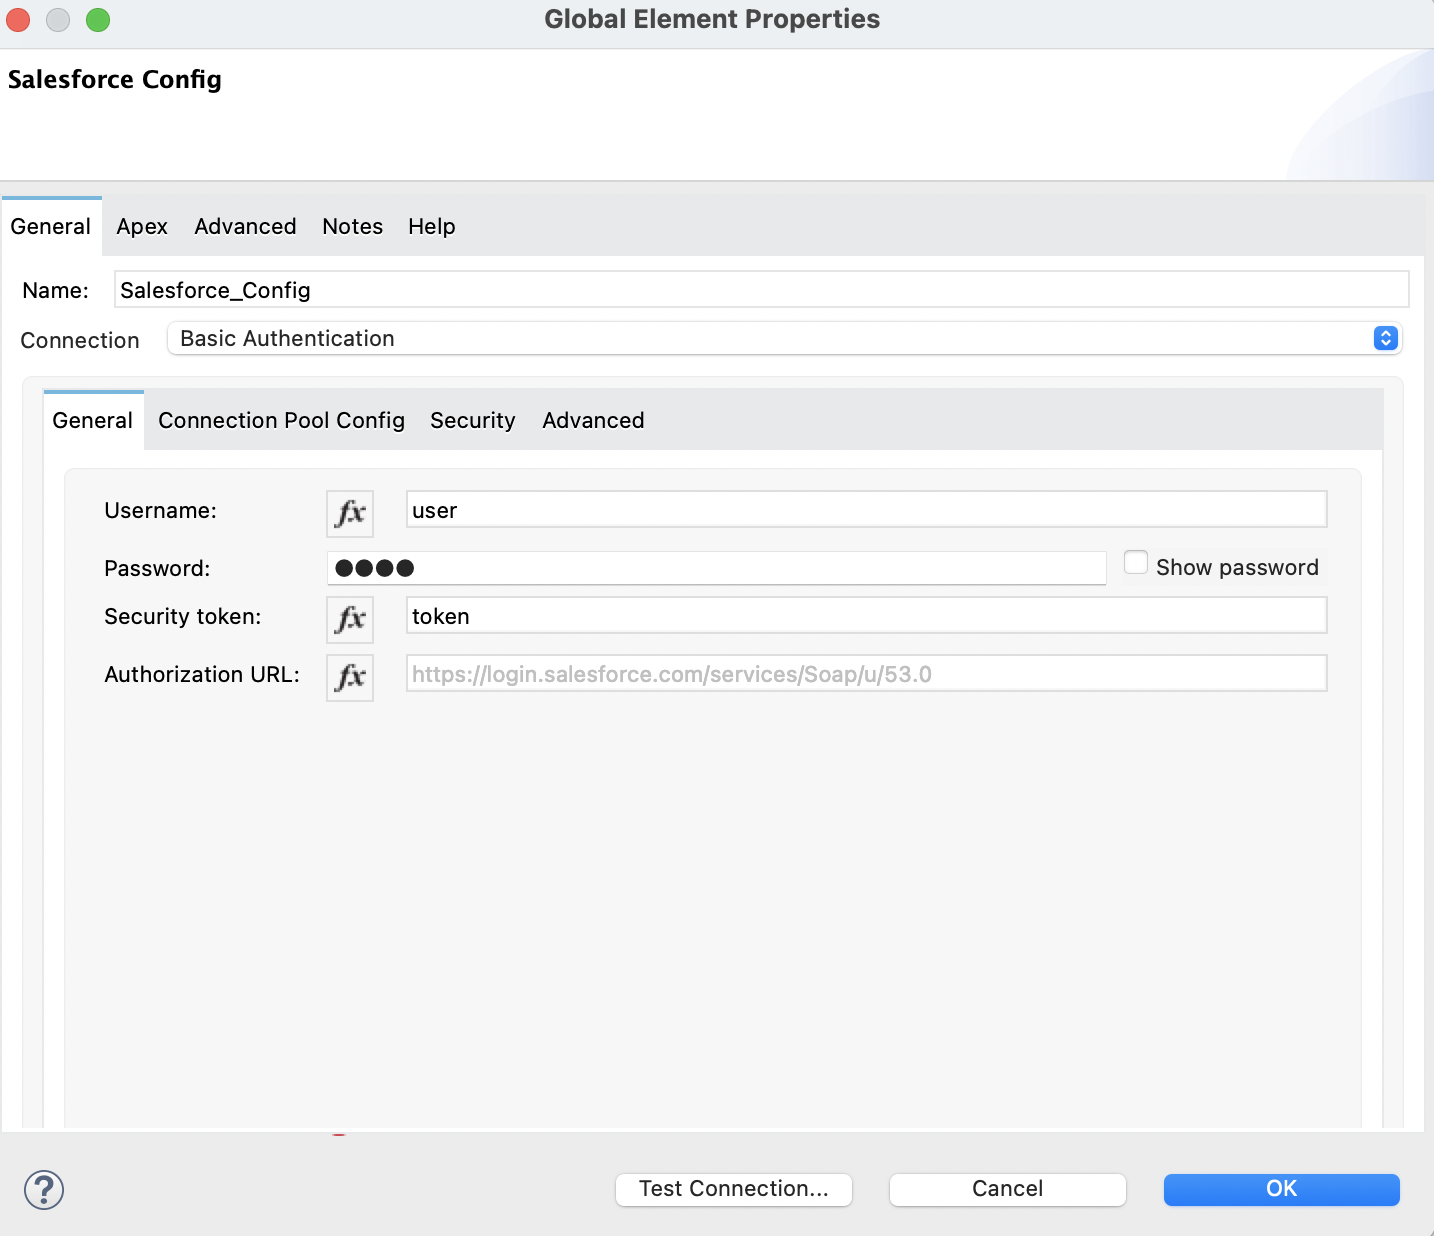
Configure the global element depending on the connection, for example:
Field Value Username
${salesforce.username}Password
${salesforce.password}Security
${salesforce.securityToken}Authorization URL
https://login.salesforce.com/services/Soap/u/53.0The following image shows an example of the Upsert configuration of the global element:
-
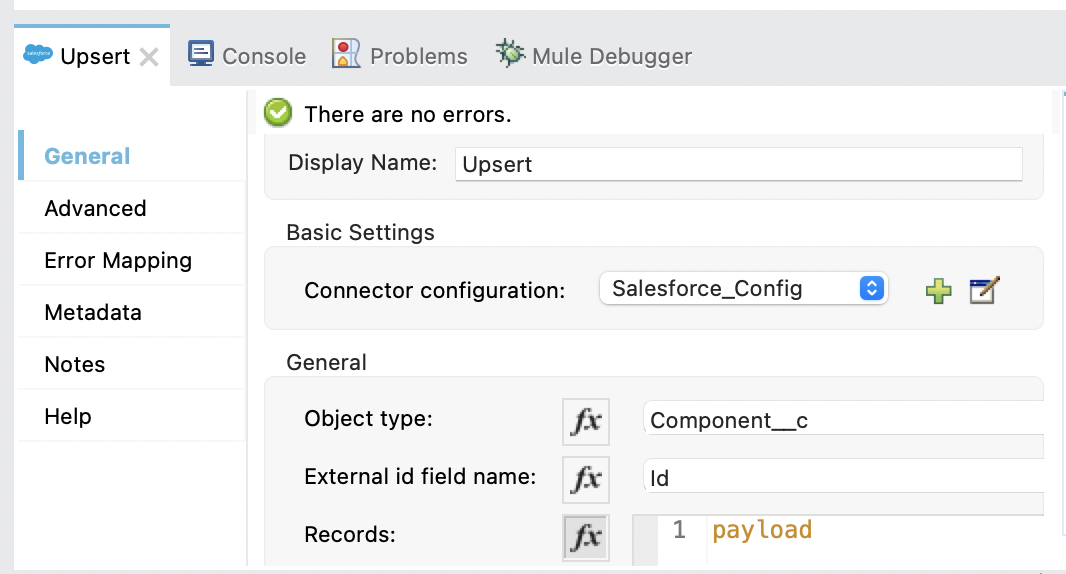
In the properties window, configure the following fields:
Field Value Display Name
Name for the connector operation.
Connector configuration
Global configuration you just created.
Object type
Component_cExternal id field name
IdRecords
payloadThe following image shows an example of the Upsert configuration in the properties window:
Add the Second Transform Message Component
Add the second Transform Message component to convert the values from Java format to JSON format:
-
From the Mule Palette view, select Core and drag a Transform Message component to the right of Upsert.
-
In the properties window, overlay the brackets in the Output section with this DataWeave code:
%dw 2.0
output application/json
---
payload
XML for This Example
Paste this code into the Studio XML editor to quickly load the flow for this example into your Mule app:
<?xml version="1.0" encoding="UTF-8"?>

<mule xmlns:ee="http://www.mulesoft.org/schema/mule/ee/core" xmlns:salesforce="http://www.mulesoft.org/schema/mule/salesforce"
	xmlns:http="http://www.mulesoft.org/schema/mule/http"
	xmlns="http://www.mulesoft.org/schema/mule/core" xmlns:doc="http://www.mulesoft.org/schema/mule/documentation" xmlns:xsi="http://www.w3.org/2001/XMLSchema-instance" xsi:schemaLocation="
http://www.mulesoft.org/schema/mule/http http://www.mulesoft.org/schema/mule/http/current/mule-http.xsd
http://www.mulesoft.org/schema/mule/ee/core http://www.mulesoft.org/schema/mule/ee/core/current/mule-ee.xsd http://www.mulesoft.org/schema/mule/core http://www.mulesoft.org/schema/mule/core/current/mule.xsd
  http://www.mulesoft.org/schema/mule/http
  http://www.mulesoft.org/schema/mule/http/current/mule-http.xsd
  http://www.mulesoft.org/schema/mule/ee/core
  http://www.mulesoft.org/schema/mule/ee/core/current/mule-ee.xsd
  http://www.mulesoft.org/schema/mule/salesforce
  http://www.mulesoft.org/schema/mule/salesforce/current/mule-salesforce.xsd">
	<http:listener-config name="HTTP_Listener_config" doc:name="HTTP Listener config" doc:id="4c035a4e-77bc-4deb-ba9e-9cb2a7ba3c44" >
		<http:listener-connection host="0.0.0.0" port="8081" />
	</http:listener-config>
	<salesforce:sfdc-config name="Salesforce_Config" doc:name="Salesforce Config" doc:id="936529ce-271b-49ac-be36-ca6a2b3d62ea" >
		<salesforce:basic-connection username="user" password="pass" securityToken="token" />
	</salesforce:sfdc-config>
	<flow name="Copy_of_idp-policy-benefitsFlow" doc:id="44a544bf-f94e-4d3d-827d-0882f4771df5" >
		<http:listener doc:name="Listener" doc:id="39aed35b-0147-49f1-a258-26f0cabc854b" config-ref="HTTP_Listener_config" path="/" />
		<ee:transform doc:name="Transform Message" doc:id="82fe7e7d-43f3-433a-bc08-6a0ffb78275e" >
			<ee:message >
				<ee:set-payload ><![CDATA[%dw 2.0
output application/java
---
[{
	Name: "NewPlaneComponent",
	Plane__r: {
		"type": "Plane__c",
		"Name": "Cobra"
	}
}]]]></ee:set-payload>
			</ee:message>
		</ee:transform>
		<salesforce:upsert objectType="Component__c" doc:name="Upsert" doc:id="0c3ca1fa-8ea1-4a99-b9b8-68f9db14d99f" config-ref="Salesforce_Config" externalIdFieldName="Id"/>
		<ee:transform doc:name="Transform Message" doc:id="e98409ad-e6cc-4d33-872a-f5e11cf7b869" >
			<ee:message >
				<ee:set-payload ><![CDATA[%dw 2.0
output application/json
---
payload]]></ee:set-payload>
			</ee:message>
		</ee:transform>
	</flow>
</mule>
Delete Accounts
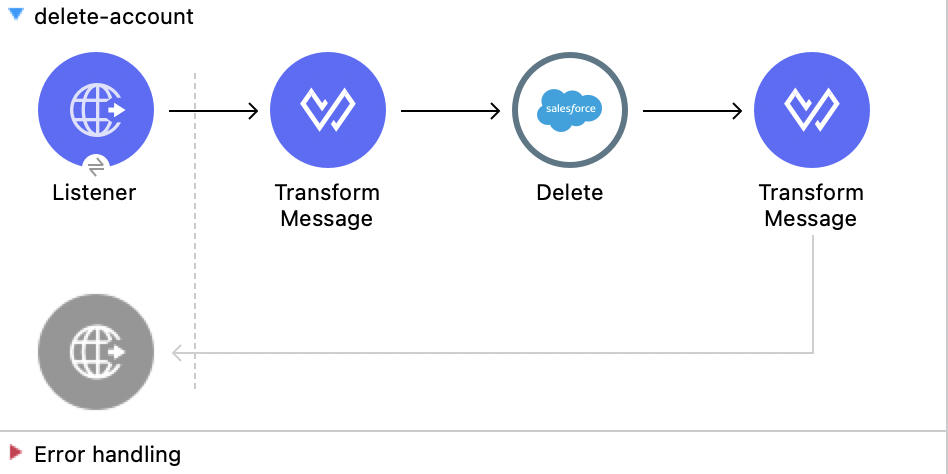
This example shows how to use Salesforce Connector to delete Salesforce accounts.
Configure the Flow
Creating the flow involves configuring a Listener component, a Transform Message component, a Delete operation, and a second Transform Message component.
Configure the HTTP Listener
Configure the Listener component to initiate a Mule flow when a call is made to the / path:
-
Create a new Mule project in Studio.
-
From the Mule Palette view, select HTTP and drag the Listener component to the canvas.
-
In the properties window, click + next to the Connector configuration field to add a global element.
-
Accept the defaults.
-
In the properties window, set the Path field value to
/.
Add the First Transform Message Component
Add the first Transform Message component to convert the values from the HTTP input form to Java format so they can be used as input to the Delete operation:
-
From the Mule Palette view, select Core and drag a Transform Message component to the right of Listener.
-
In the properties window, overlay the brackets in the Output section with this DataWeave code:
%dw 2.0
output application/java
---
[payload.Id]
Add the Delete Operation
Add the Delete operation to delete Salesforce accounts:
-
From the Mule Palette view, select Salesforce and drag the Delete operation to the right of Transform Message.
-
In the properties window, click + next to the Connector configuration field to add a global element.
-
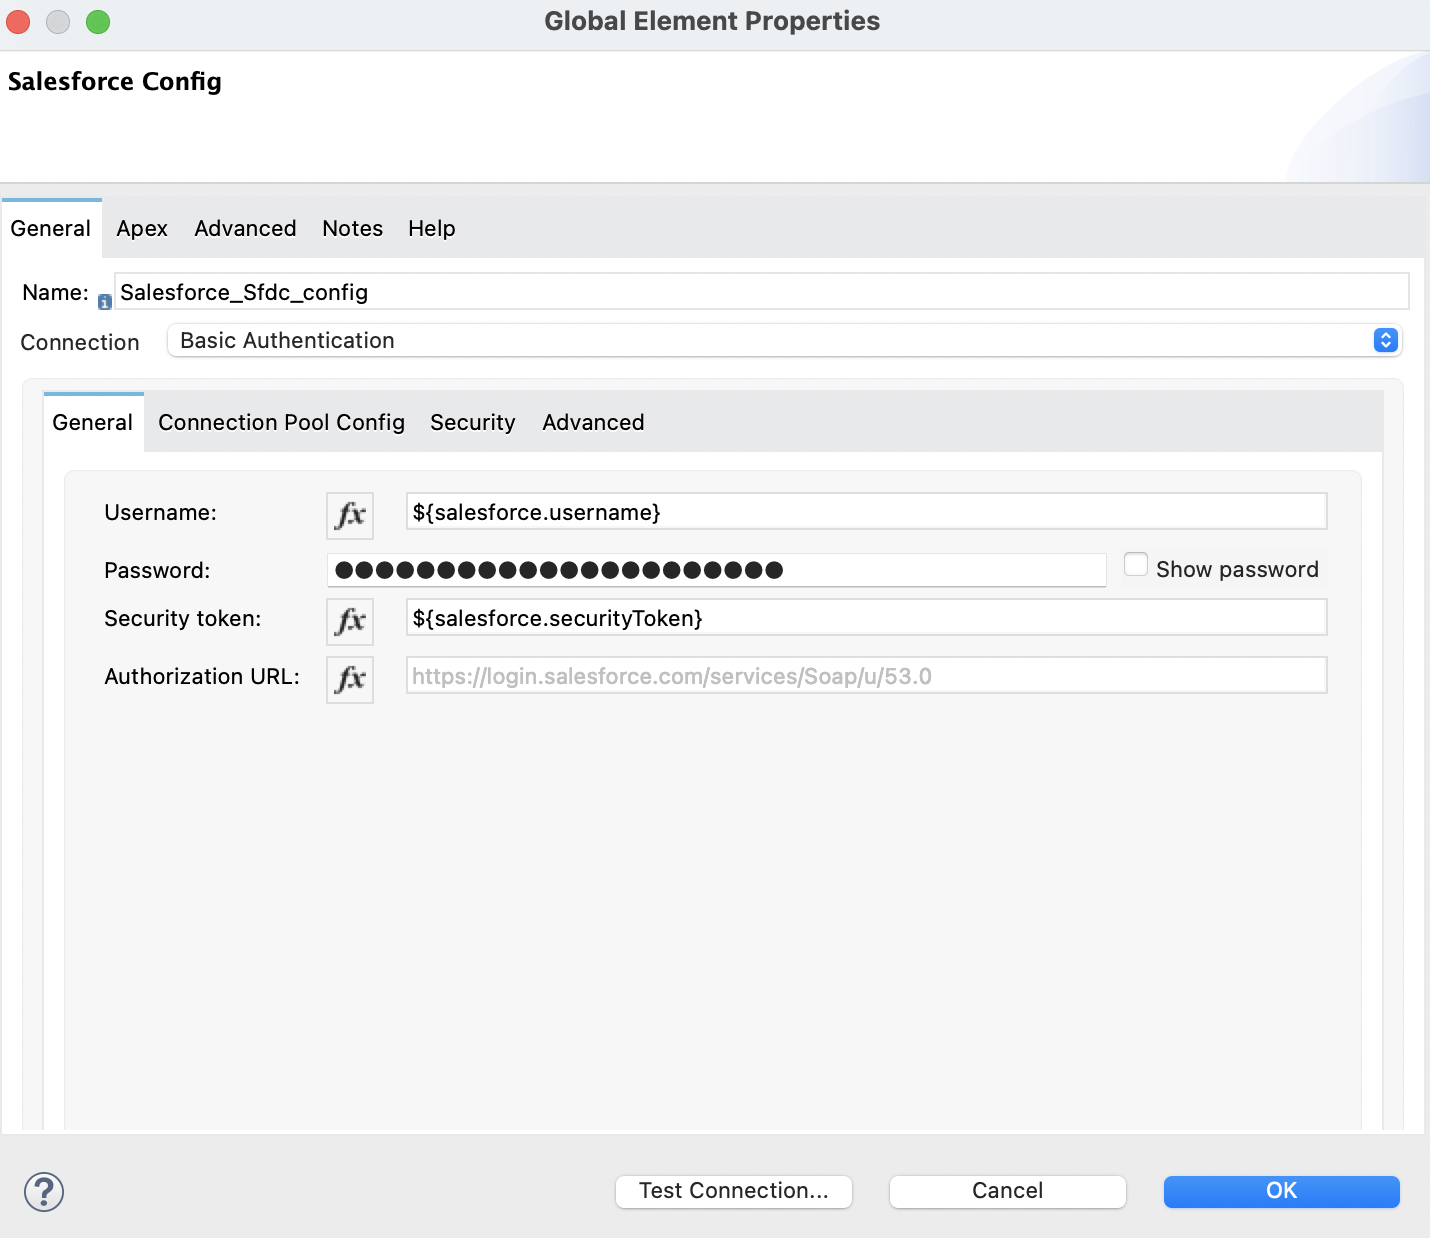
Configure the global element depending on the connection, for example:
Field Value Username
${salesforce.username}Password
${salesforce.password}Security
${salesforce.securityToken}Authorization URL
https://login.salesforce.com/services/Soap/u/53.0The following image shows an example of the Delete configuration of the global element:
-
In the properties window, configure the following fields:
Field Value Display Name
Name for the connector operation.
Connector configuration
Global configuration you just created.
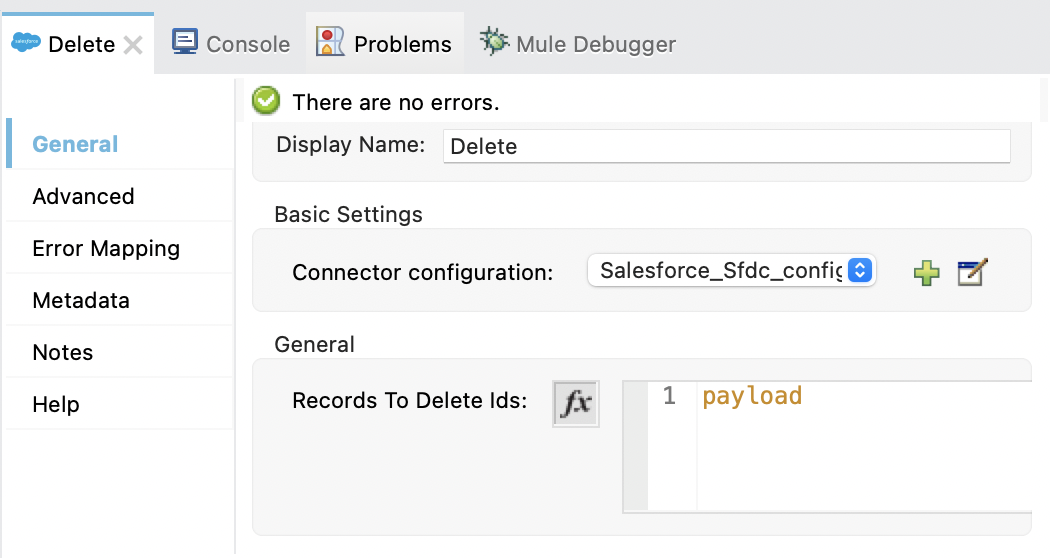
Records to Delete Ids
payloadThe following image shows an example of the Delete configuration in the properties window:
Add the Second Transform Message Component
Add the second Transform Message component to convert the values from Java format to JSON format:
-
From the Mule Palette view, select Core and drag a Transform Message component to the right of Delete.
-
In the properties window, overlay the brackets in the Output section with this DataWeave code:
%dw 2.0
output application/json
---
payload map {
  id:$.id,
  errors:$.errors,
  success:$.success
}
XML for This Example
Paste this code into the Studio XML editor to quickly load the flow for this example into your Mule app:
<?xml version="1.0" encoding="UTF-8"?>

<mule xmlns:file="http://www.mulesoft.org/schema/mule/file"
  xmlns:salesforce="http://www.mulesoft.org/schema/mule/salesforce"
  xmlns:ee="http://www.mulesoft.org/schema/mule/ee/core"
  xmlns:http="http://www.mulesoft.org/schema/mule/http"
  xmlns="http://www.mulesoft.org/schema/mule/core"
  xmlns:doc="http://www.mulesoft.org/schema/mule/documentation"
  xmlns:xsi="http://www.w3.org/2001/XMLSchema-instance"
  xsi:schemaLocation="
http://www.mulesoft.org/schema/mule/http http://www.mulesoft.org/schema/mule/http/current/mule-http.xsd
http://www.mulesoft.org/schema/mule/ee/core http://www.mulesoft.org/schema/mule/ee/core/current/mule-ee.xsd http://www.mulesoft.org/schema/mule/core
  http://www.mulesoft.org/schema/mule/core/current/mule.xsd
  http://www.mulesoft.org/schema/mule/http
  http://www.mulesoft.org/schema/mule/http/current/mule-http.xsd
  http://www.mulesoft.org/schema/mule/ee/core
  http://www.mulesoft.org/schema/mule/ee/core/current/mule-ee.xsd
  http://www.mulesoft.org/schema/mule/salesforce
  http://www.mulesoft.org/schema/mule/salesforce/current/mule-salesforce.xsd
  http://www.mulesoft.org/schema/mule/file
  http://www.mulesoft.org/schema/mule/file/current/mule-file.xsd">
  <configuration-properties file="mule-app.properties"/>
  <http:listener-config name="HTTP_Listener_config"
   doc:name="HTTP Listener config" >
  <http:listener-connection host="localhost" port="8081" />
  </http:listener-config>
  <salesforce:sfdc-config name="Salesforce_Sfdc_config"
   doc:name="Salesforce SFDC config">
    <salesforce:basic-connection
    username="${salesforce.username}"
    password="${salesforce.password}"
    securityToken="${salesforce.securityToken}" />
  </salesforce:sfdc-config>

  <flow name="delete-account" >
		<http:listener doc:name="Listener" doc:id="9744668a-66e4-4d69-8f1d-f3bfbd3e77be" config-ref="HTTP_Listener_config" path="/Delete"/>
		<ee:transform doc:name="Transform Message" >
      <ee:message >
        <ee:set-payload ><![CDATA[%dw 2.0
output application/java
---
[payload.Id]]]></ee:set-payload>
      </ee:message>
    </ee:transform>
    <salesforce:delete doc:name="Delete" doc:id="e4ad1f41-8409-42b6-ba90-e6a26e60a7ba" config-ref="Salesforce_Sfdc_config"/>
		<ee:transform doc:name="Transform Message" >
      <ee:message >
        <ee:set-payload ><![CDATA[%dw 2.0
output application/json
---
payload map {
  id:$.id,
  errors:$.errors,
  success:$.success
}]]></ee:set-payload>
      </ee:message>
    </ee:transform>
  </flow>
</mule>
Find Duplicate Accounts
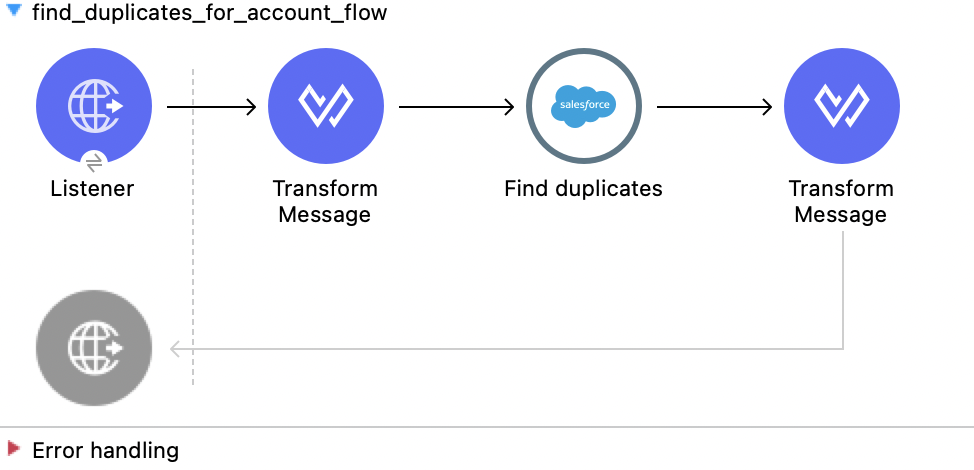
This example shows how to use Salesforce Connector to find duplicate Salesforce accounts.
Configure the Flow
Creating the flow involves configuring a Listener component, a Transform Message component, a Find duplicates operation, and a second Transform Message component.
Configure the HTTP Listener
Configure the Listener component to initiate a Mule flow when a call is made to the /findDuplicates path:
-
Create a new Mule project in Studio.
-
From the Mule Palette view, select HTTP and drag the Listener component to the canvas.
-
In the properties window, click + next to the Connector configuration field to add a global element.
-
Accept the defaults.
-
In the properties window, set the Path field value to
/findDuplicates.
Add the First Transform Message Component
Add the first Transform Message component to convert the values from the HTTP input form to Java format so they can be used as input to the Delete operation:
-
From the Mule Palette view, select Core and drag a Transform Message component to the right of Listener.
-
In the properties window, overlay the brackets in the Output section with this DataWeave code:
%dw 2.0
output application/java
---
[
  payload
]
Add the Find Duplicates Operation
Add the Find duplicates operation to find duplicate Salesforce accounts:
-
From the Mule Palette view, select Salesforce and drag the Find duplicates operation to the right of Transform Message.
-
In the properties window, click + next to the Connector configuration field to add a global element.
-
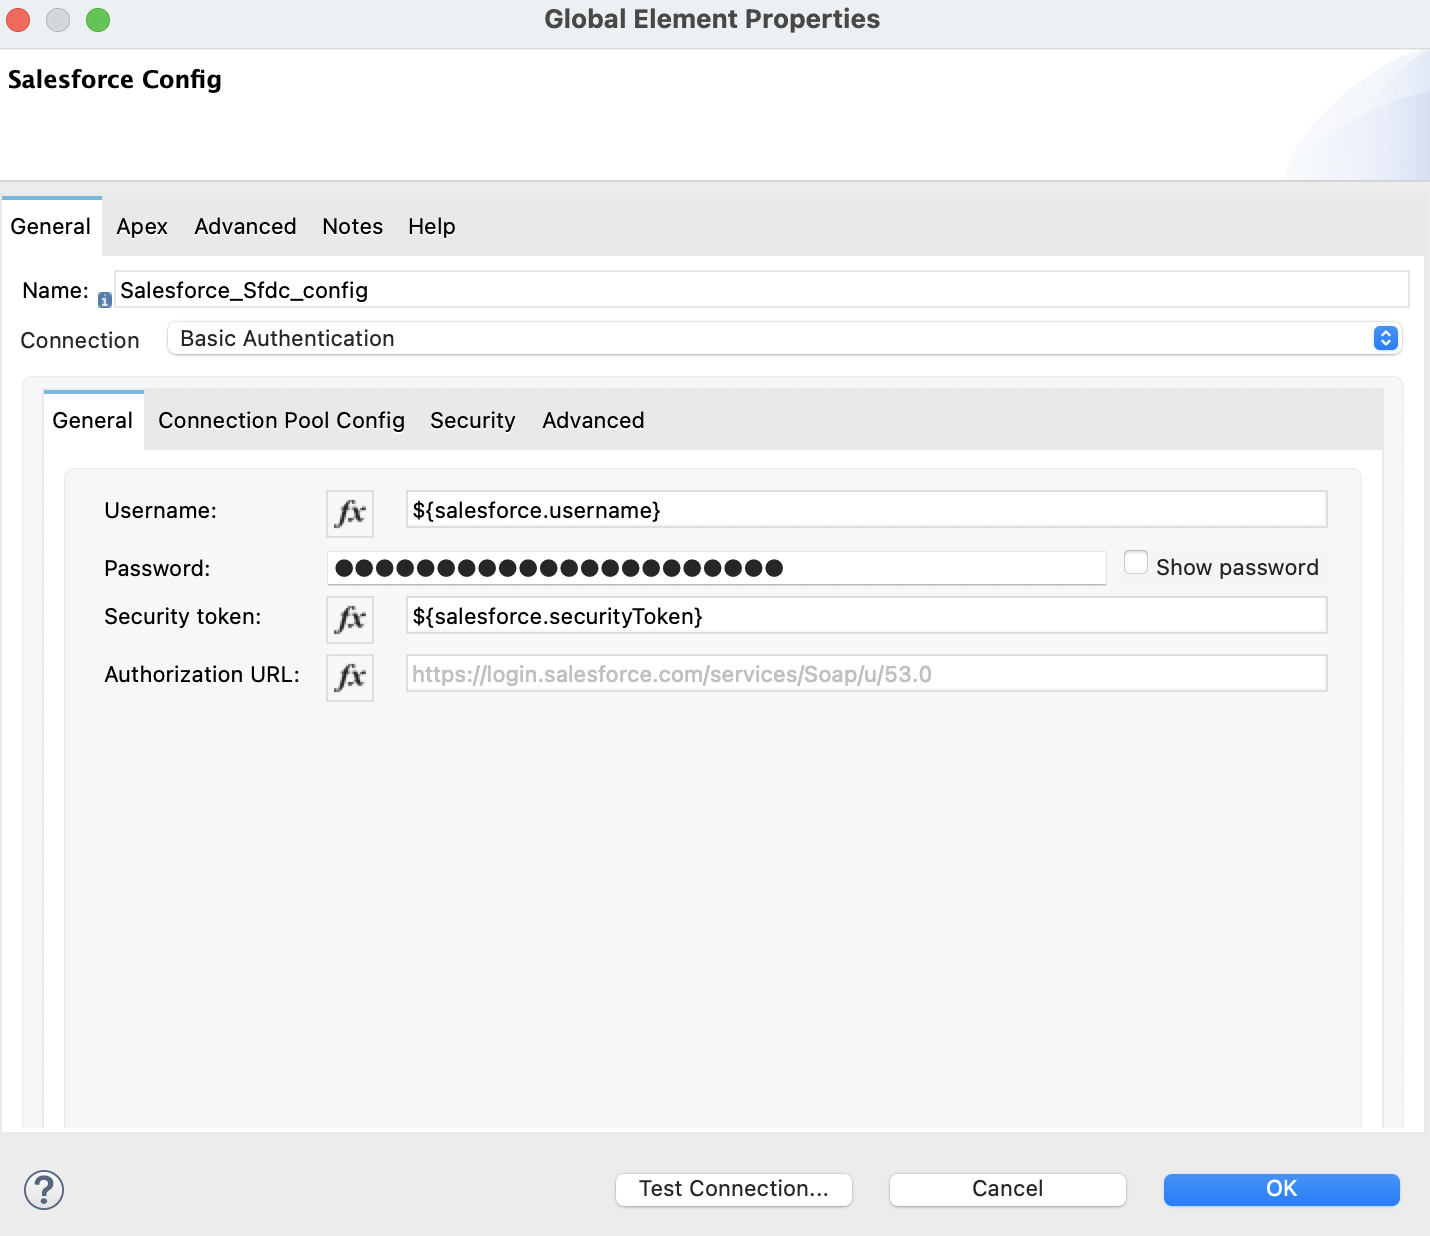
Configure the global element depending on the connection, for example:
Field Value Username
${salesforce.username}Password
${salesforce.password}Security
${salesforce.securityToken}Authorization URL
https://login.salesforce.com/services/Soap/u/53.0The following image shows an example of the Find duplicates configuration of the global element:
-
In the properties window, configure the following fields:
Field Value Display Name
Name for the connector operation.
Connector configuration
Global configuration you just created.
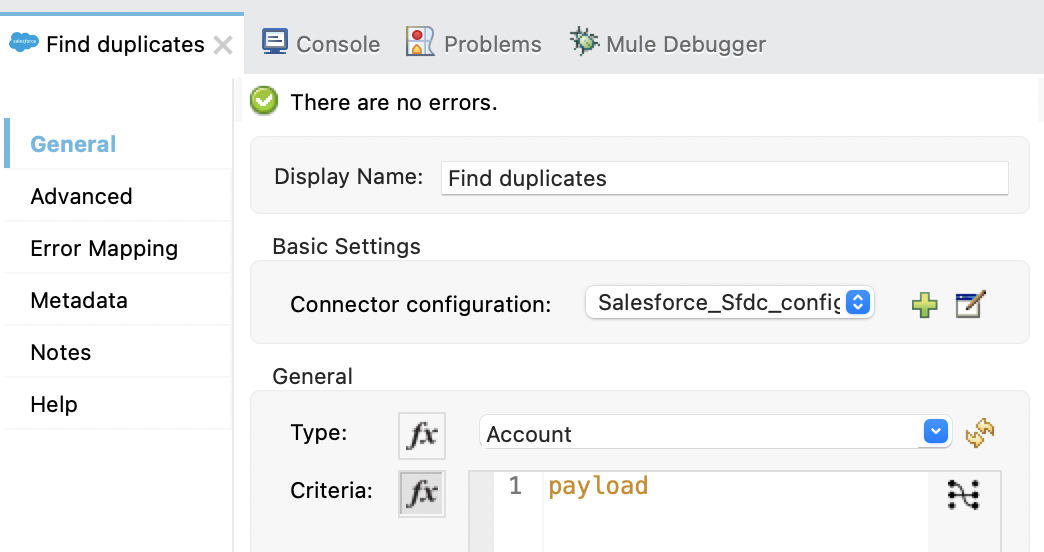
Type
AccountCriteria
payloadThe following image shows an example of the Find duplicates configuration in the properties window:
Add the Second Transform Message Component
Add the second Transform Message component to convert the values from Java format to JSON format:
-
From the Mule Palette view, select Core and drag a Transform Message component to the right of Find duplicates.
-
In the properties window, overlay the brackets in the Output section with this DataWeave code:
%dw 2.0
output application/json
---
{
  success: payload.success,
  duplicateResults: {
    (payload.duplicateResults map {
      matchRecords: $.matchResults
    }
    )
  },
  duplicateRuleEntityType: payload.duplicateRuleEntityType,
  duplicateRule: payload.duplicateRule,
  allowSave: payload.allowSave,
  errorMessage: payload.errorMessage
}
XML for This Example
Paste this code into the Studio XML editor to quickly load the flow for this example into your Mule app:
<?xml version="1.0" encoding="UTF-8"?>

<mule xmlns:file="http://www.mulesoft.org/schema/mule/file"
  xmlns:salesforce="http://www.mulesoft.org/schema/mule/salesforce"
  xmlns:ee="http://www.mulesoft.org/schema/mule/ee/core"
  xmlns:http="http://www.mulesoft.org/schema/mule/http"
  xmlns="http://www.mulesoft.org/schema/mule/core"
  xmlns:doc="http://www.mulesoft.org/schema/mule/documentation"
  xmlns:xsi="http://www.w3.org/2001/XMLSchema-instance"
  xsi:schemaLocation="
http://www.mulesoft.org/schema/mule/http http://www.mulesoft.org/schema/mule/http/current/mule-http.xsd
http://www.mulesoft.org/schema/mule/ee/core http://www.mulesoft.org/schema/mule/ee/core/current/mule-ee.xsd http://www.mulesoft.org/schema/mule/core
  http://www.mulesoft.org/schema/mule/core/current/mule.xsd
  http://www.mulesoft.org/schema/mule/http
  http://www.mulesoft.org/schema/mule/http/current/mule-http.xsd
  http://www.mulesoft.org/schema/mule/ee/core
  http://www.mulesoft.org/schema/mule/ee/core/current/mule-ee.xsd
  http://www.mulesoft.org/schema/mule/salesforce
  http://www.mulesoft.org/schema/mule/salesforce/current/mule-salesforce.xsd
  http://www.mulesoft.org/schema/mule/file
  http://www.mulesoft.org/schema/mule/file/current/mule-file.xsd">
  <configuration-properties file="mule-app.properties"/>
  <http:listener-config name="HTTP_Listener_config"
   doc:name="HTTP Listener config" >
  <http:listener-connection host="localhost" port="8081" />
  </http:listener-config>
  <salesforce:sfdc-config name="Salesforce_Sfdc_config"
   doc:name="Salesforce SFDC config">
    <salesforce:basic-connection
    username="${salesforce.username}"
    password="${salesforce.password}"
    securityToken="${salesforce.securityToken}" />
  </salesforce:sfdc-config>
  <flow name="find_duplicates_for_account_flow" >
    <http:listener config-ref="HTTP_Listener_config"
     path="/findDuplicates" doc:name="Listener" />
    <ee:transform doc:name="Transform Message" >
      <ee:message >
        <ee:set-payload ><![CDATA[%dw 2.0
output application/java
---
[
  payload
]]]></ee:set-payload>
      </ee:message>
    </ee:transform>
    <salesforce:find-duplicates config-ref="Salesforce_Sfdc_config"
     type="Account"
    doc:name="Find duplicates" />
    <ee:transform doc:name="Transform Message" >
      <ee:message >
        <ee:set-payload ><![CDATA[%dw 2.0
output application/json
---
{
  success: payload.success,
  duplicateResults: {
    (payload.duplicateResults map {
      matchRecords: $.matchResults
    }
    )
  },
  duplicateRuleEntityType: payload.duplicateRuleEntityType,
  duplicateRule: payload.duplicateRule,
  allowSave: payload.allowSave,
  errorMessage: payload.errorMessage
}]]></ee:set-payload>
      </ee:message>
    </ee:transform>
  </flow>
</mule>