
Configuring an SAP Secure Network Communication Connection with Certificate
Configure an SAP Secure Network Communication (SNC) with certificate to take advantage of security features such as secure data communication between the SAP system client and server, application-level end-to-end security, and the ability to change security products without impacting your SAP business applications. Enabling SNC with certificate requires you to configure the client environment, the SAP server, and Anypoint Connector for SAP (SAP Connector).
Before You Begin
To configure an SAP SNC with certificate, you must have access to:
-
The SAP GUI application. To install this client, Java must already be installed on your machine. Then, download the installer for your OS from SAP.
-
The SAPCAR utility and SAP Cryptographic Library, which you can download from the SAP Support Portal, if you are an S-user
-
An SAP ECC instance that can use SNC system variables
-
The following transactions:
-
STRUST(Trust Manager) -
SM30(Table Maintenance)
-
Configure the Client Environment
Configure the system variables that depend on the operating system you are using, and generate the personal security environment (PSE):
-
Open the Windows command line or Mac Terminal app.
-
Use the
SAPCARutility to unpack the SAP Cryptographic Library to the specified folder:SAPCAR -xvf <folder-name.SAR> -
Configure the following environment variables:
-
SNC_LIB:
<path_to_library>\sapcrypto.dll -
SECUDIR:
<path_to_library> -
LD_LIBRARY_PATH:
<path_to_library>\sapcrypto.dll -
SSF_LIBRARY_PATH:
<path_to_library>\sapcrypto.dllFor Windows, the
sapcrypto.dll64-bit version must be in a different path and added to a new variable calledSNC_LIB_64:
-
-
Use the
sapgenpsetool to create the PSE:sapgenpse gen_pse -v -p RFC.pseWhen you run this command, you must enter a PIN to use later and a distinguished name, which must be unique. For example, you can enter a distinguished name like this:
CN=RFC, C=AR, O=YourCompany, OU=ITYou can use STRUST to see names that are already in use.
-
Use the
sapgenpsetool to create thecred_v2file, which stores the credentials for accessing the PSE:sapgenpse seclogin -p RFC -O <user-credentials> -
Use the
sapgenpsetool to export the client’s certificate from the PSE:sapgenpse <export_own_cert> -v -p RFC -o RFC_MULE.crt
Configure the Client Environment When Deploying in CloudHub 2.0 or Runtime Fabric
In SAP Connector 5.9.5 and later, an application that uses the Certificate connection type can be deployed in CloudHub 2.0 or Runtime Fabric. SAP Connector has an embedded installer that sets up the Personal Security Environment (PSE).
You must first create your application:
-
Open Anypoint Studio.
-
Navigate to the
src/main/resourcesfolder of your application. -
In the
src/main/resourcesfolder, create a folder namedsec.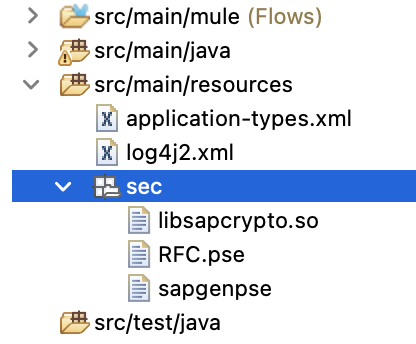
-
Add the following files to the
secfolder:-
libsapcrypto.soLinux version of the SAP CommonCryptoLib
-
sapgenpseLinux version of the SAP command line tool that manages PSE files
-
RFC.pseFile that you created in the previous step
-
-
Because CloudHub 2.0 runs on Linux machines, ensure that any dependency of the application is compiled for Linux, including
com.sap.conn.jco:libsapjco3. -
Save the application and export the
jarfile used for CloudHub 2.0 deployment.
You must then import the created application in CloudHub 2.0 or Runtime Fabric:
-
Log in to your Anypoint Platform account and navigate to Runtime Manager.
-
Click Deploy Application.
-
In Application Name, enter a name for the application, for example,
cert-ch2. -
In Deployment Target, select
CloudHub 2.0orRuntime Fabricif it is not selected already. -
Click Choose File and upload your
jarfile. -
In the Properties tab, add the following:
Property Example Value Description secFilesCopy
trueIf
true, triggers the embedded installer.sourceSecFolder
/opt/mule/apps/my-app-name/sec/Location of the
resources/secfolder in CloudHub 2.0 or Runtime Fabric. Replace the name of the application to match your scenario.targetSecFolder
/tmp/sec/Leave this value hardcoded.
pseFile
RFCName of the PSE file, without an extension.
psePassword
Your PSE file passwordPSE file password. Click the Protect button next to this property to hide its content.
osUsername
appDefault CloudHub 2.0 username that is used to create the
cred_v2file. You can omit this property, in which case the connector automatically figures it out.When using the embedded installer, you must reference the CommonCryptoLib library in the SAP Connector Config properties with the proper path. Property Example Value Description jco.client.snc_lib
${app.home}/sec/libsapcrypto.so
Location of the SAP CommonCryptoLib. The library configured through this property is used by the connector operations. Depending on the operating system you may have to use other libraries, for example, the CloudHub 2.0 operating system is Linux based.
jco.server.snc_lib
${app.home}/sec/libsapcrypto.so
Location of the SAP CommonCryptoLib. The library configured through this property is used by the connector sources. Depending on the operating system you may have to use other libraries, for example, the CloudHub 2.0 operating system is Linux based.
-
Click Start to run the application.
Configure the SAP Server
Configure the certificates and tables that authorize you to use SNC with your distinguished name. To configure the SAP server:
-
View the SAP distinguished name and certificates.
-
Link the SAP certificate to your certificate.
-
Authorize the SNC client in SAP.
View the SAP Distinguished Name and Certificates
View the SAP distinguished name and list of certificates:
-
Log in to the SAP GUI and enter the
strusttransaction. -
Select the SNC SAPCryptolib folder in the left pane.
The SAP distinguished name and certificate list are displayed.
Link the SAP Certificate to Your Certificate
Download the SAP instance certificate and link it to your certificate:
-
Click the glasses icon (first icon on the left of the screen) to enable the edition mode, and then double click
CN=SL-ABAP-IDP. -
Click the download button at the bottom of the screen and enter the target path for the download.
-
Click the import icon and enter the target path to upload your certificate.
-
Click Add to Certificate List and then click the save icon.
-
Open a command-line interface or terminal window and use the
sapgenpsetool to link your certificate to your PSE:sapgenpse maintain_pk -v -a <name_of_SAP_Server_Certificate.crt> -p <name_of_your_PSE.pse>The following example links a certificate named
IDE.crtto a PSE namedRFC.pse: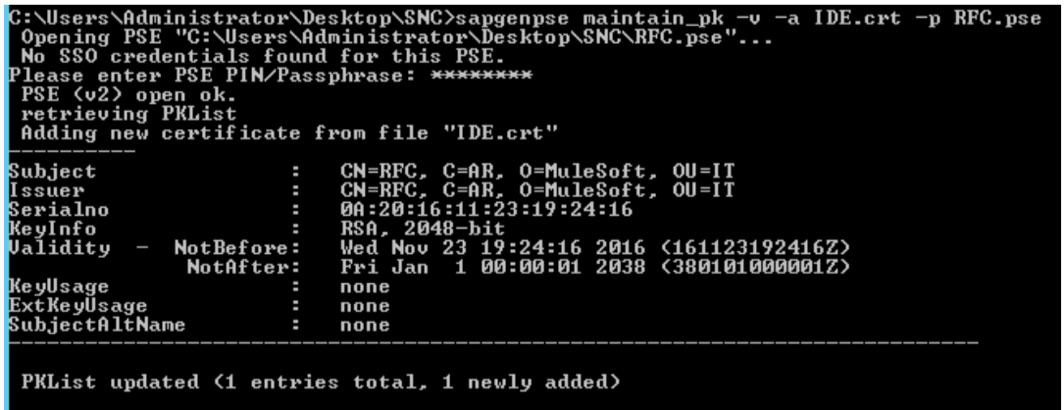
Authorize the SNC Client in SAP
Add a new entry to the VSNCSYSACL view to enable your distinguished name to use SNC:
-
In the SAP GUI, navigate to the SM30 transaction and enter
VSNCSYSACLas the view name. -
Click Maintain.
-
Select E as the work area.
-
In the System ID field, enter the SAP ID.
-
In the SNC name field, enter your distinguished name:
p:<your-distinguished-name> -
Select all of the checkboxes to activate the entries.
-
Click the save icon.
-
If the server accepts the SNC name, it displays a
Canonical Name Determinedmessage in the SNC data box. -
If the server does not accept the SNC name, check that the name used on the PSE file is the same as the name used on the Mule app and the name listed on STRUST.
-
-
Enable the SAP user for the Mule app so the app can use the SNC connection type:
-
Navigate to the SM30 transaction, specify the
VUSREXTIDview, and click Maintain. -
In the External ID type field, select
DNas the work area. -
In the External ID field, enter the distinguished name.
-
In the User field, enter the SAP username.
-
Select Activated.
-
Click the save icon.
-
Configure SAP Connector
Configure SAP Connector to enable SNC with certificate:
-
Access Anypoint Studio.
-
Select SAP in the Studio canvas.
-
Click the plus sign (+) next to the Connector configuration field to access the global element configuration fields.
-
Configure the X.509 certificate connection:
-
In the Connection field, select
Certificate. -
On the General tab, configure these fields:
-
X.509 Certificate (PEM, for example .pem or .crt)
-
Sap client ID
-
Application server host
-
-
On the Advanced tab, configure the extended properties.
-
SAP Server-Side Extended Properties Example:
The following table shows example values for the server-side extended properties:
| Property | Example Value |
|---|---|
jco.server.snc_mode |
|
jco.server.snc_partnername |
|
jco.server.snc_qop |
|
jco.server.snc_myname |
|
jco.server.snc_lib |
|
SAP Client Side Extended Properties Example
The following table shows example values for the client side extended properties:
| Property | Example Value |
|---|---|
jco.client.snc_mode |
|
jco.client.snc_partnername |
|
jco.client.snc_qop |
|
jco.client.snc_myname |
|
jco.client.snc_lib |
|
jco.client.x509cert |
|