Sockets Examples
Anypoint Connector for Sockets (Sockets Connector) enables you to send or receive transport layer packages through both UDP and TCP sockets. The following examples show you how to use the available operations while taking into consideration the transport layer protocol you want to implement in your application, and how to create a custom TPC protocol
Send a Message
In the following example, you have set up your Socket Listener and you want to build an application that upon receiving specific data from an external client, performs a database query and sends a message to a UDP Server Socket with the obtained results. Note that, even though we chose UDP for this example, you can use the Send operation to send messages to both TCP and UDP sockets:
	<sockets:listener-config name="Sockets_Listener_config" doc:name="Sockets Listener config">
		<sockets:tcp-listener-connection host="localhost" port="8082" >
			<sockets:protocol >
				<sockets:direct-protocol />
			</sockets:protocol>
		</sockets:tcp-listener-connection>
	</sockets:listener-config>

	<db:config name="Database_Config" doc:name="Database Config">
		<db:oracle-connection host="localhost" user="sys as sysdba" password="Oradoc_db1" serviceName="orclpdb1.localdomain" />
	</db:config>

	<sockets:request-config name="Sockets_Request_config" doc:name="Sockets Request config" >
		<sockets:udp-requester-connection host="localhost" port="8085" />
	</sockets:request-config>

	<flow name="socketSearchDatabaseAndReturnResult">
		<sockets:listener doc:name="Listener" config-ref="Sockets_Listener_config" outputMimeType="application/json"/>
		<db:select doc:name="Select" config-ref="Database_Config">
			<db:sql>#["SELECT first_name, last_name from SYSTEM.MUSICIANS where id = :id"]</db:sql>
			<db:input-parameters><![CDATA[#[{ 'id': payload.id }]]]></db:input-parameters>
		</db:select>
		<logger level="INFO" doc:name="Logger" message="#[payload]" />
		<sockets:send doc:name="Send" config-ref="Sockets_Request_config">
			<sockets:content ><![CDATA[#[output application/json --- 'name': payload[0].FIRST_NAME as String ++ ' ' ++ payload[0].LAST_NAME as String]]]></sockets:content>
		</sockets:send>
	</flow>
To test this example:
-
Initialize an Oracle database by using the following script:
    CREATE TABLE SYSTEM.MUSICIANS(
        id INTEGER GENERATED BY DEFAULT AS IDENTITY,
        age INTEGER,
        first_name VARCHAR2(100),
        last_name VARCHAR2(100),
        PRIMARY KEY(id)
    );

    INSERT INTO SYSTEM.MUSICIANS(age, first_name, last_name) VALUES(37, 'Farrokh', 'Bulsara');
    INSERT INTO SYSTEM.MUSICIANS(age, first_name, last_name) VALUES(36, 'Brian Harold', 'May');
    INSERT INTO SYSTEM.MUSICIANS(age, first_name, last_name) VALUES(35, 'Roger', 'Meddows Taylor');
INSERT INTO SYSTEM.MUSICIANS(age, first_name, last_name) VALUES(32, 'John', 'Deacon');-
At port 8085, start a UDP server to which the results will be sent by running the netcat command
nc -ul 8085.
-
Run your Mule application and start a TCP client socket to send the expected query parameter by running netcat command
nc localhost 8082and sending the data{"id": 2}.
Send and Receive Messages
Because sockets are full-duplex, they allow bidirectional communication, enabling you to send and receive messages simultaneously. The following example operation is slightly different from the example of only sending a message because this example not only sends data to the client but also expects a response.
This operation can be used for both TCP and UDP sockets.
The operation will:
-
Send the data using the client associated to the RequesterConnection.
-
Block until data is received or Timeout is met (in which case a null payload will be returned).
Building on the example of only sending data, in this scenario you add a new flow, socketSendQueryAndReceiveResult, that connects to the Listener from the socketSearchDatabaseAndReturnResult flow, send the query string, and wait for the response, which is then written to a file:
	<sockets:listener-config name="Sockets_Listener_config" doc:name="Sockets Listener config" >
		<sockets:tcp-listener-connection host="localhost" port="8082" >
			<sockets:protocol >
				<sockets:direct-protocol />
			</sockets:protocol>
		</sockets:tcp-listener-connection>
	</sockets:listener-config>

	<sockets:listener-config name="Sockets_Listener_config1" doc:name="Sockets Listener config" >
		<sockets:tcp-listener-connection host="localhost" port="8085" >
			<sockets:protocol >
				<sockets:direct-protocol />
			</sockets:protocol>
		</sockets:tcp-listener-connection>
	</sockets:listener-config>

	<sockets:request-config name="Sockets_Request_config" doc:name="Sockets Request config" >
		<sockets:tcp-requester-connection host="localhost" port="8082" >
			<sockets:protocol >
				<sockets:direct-protocol />
			</sockets:protocol>
		</sockets:tcp-requester-connection>
	</sockets:request-config>

	<db:config name="Database_Config" doc:name="Database Config" >
		<db:oracle-connection host="localhost" user="sys as sysdba" password="Oradoc_db1" serviceName="orclpdb1.localdomain" />
	</db:config>

	<file:config name="File_Config" doc:name="File Config" >
		<file:connection />
	</file:config>

	<flow name="socket-testFlow">
		<sockets:listener doc:name="Listener" config-ref="Sockets_Listener_config" outputMimeType="application/json" />
		<db:select doc:name="Select" config-ref="Database_Config">
			<db:sql >#["SELECT first_name, last_name from SYSTEM.MUSICIANS where id = :id"]</db:sql>
			<db:input-parameters><![CDATA[#[{ 'id': payload.id }]]]></db:input-parameters>
		</db:select>
		<ee:transform doc:name="Transform Message">
			<ee:message >
				<ee:set-payload><![CDATA[%dw 2.0
					output application/json --- 'name': payload[0].FIRST_NAME as String ++ ' ' ++ payload[0].LAST_NAME as String]]>
				</ee:set-payload>
			</ee:message>
		</ee:transform>
	</flow>

	<flow name="socketSendAndReceive" >
		<sockets:listener doc:name="Listener" config-ref="Sockets_Listener_config1" outputMimeType="application/json"/>
		<sockets:send-and-receive doc:name="Send and receive" config-ref="Sockets_Request_config" outputMimeType="application/json">
		</sockets:send-and-receive>
		<logger level="INFO" doc:name="Logger" message='#[payload]'/>
		<file:write path="musicians.json" config-ref="File_Config" mode="CREATE_NEW" />
	</flow>
To test this example, use the same database setup as used for the sending example, run the Mule application, access the endpoint using the following netcat command nc localhost 8085, and send the data {"id":2}.
Create a Custom TCP Protocol
The following example creates a TCP-based custom protocol that appends a string header to every message sent and limits input message size to a fixed length by truncating all additional characters.
-
Create a class that implements the
TcpProtocolinterface:
package org.mule.extension.socket.protocol;

import static java.lang.System.arraycopy;
import static org.slf4j.LoggerFactory.getLogger;

import org.apache.commons.io.output.ByteArrayOutputStream;
import org.mule.extension.socket.api.socket.tcp.TcpProtocol;
import org.slf4j.Logger;

import java.io.IOException;
import java.io.OutputStream;
import java.io.InputStream;
import java.io.ByteArrayInputStream;
import java.io.BufferedOutputStream;

public class CustomTestTcpProtocol implements TcpProtocol {

  protected static final int READ_ATTEMPTS = 50;
  protected static final int CUSTOM_BUFFER_SIZE = 30;
  private static final String HEADER = "This is my custom protocol.";
  private static final Logger LOGGER = getLogger(CustomTestTcpProtocol.class);

  protected int bufferSize;

  public CustomTestTcpProtocol() {
    this(CUSTOM_BUFFER_SIZE);
  }

  public CustomTestTcpProtocol(int bufferSize) {
    this.bufferSize = bufferSize;
  }

  @Override
  public InputStream read(InputStream socketIs) throws IOException {
    byte[] buffer = new byte[HEADER.length() + bufferSize];

    int bytesRead, attempts = 0;
    while ((bytesRead = socketIs.read(buffer)) <= 0 && (attempts < READ_ATTEMPTS)) {
      attempts++;
    }

    if (bytesRead <= 0) {
      throw new IOException("Number of read attempts exceeded! Failed to read any data from socket!");
    }

    ByteArrayOutputStream byteArrayOutputStream = new ByteArrayOutputStream(bytesRead);
    byteArrayOutputStream.write(buffer, 0, bytesRead);
    return new ByteArrayInputStream(byteArrayOutputStream.toByteArray());
  }

  @Override
  public void write(OutputStream os, InputStream data) throws IOException {
    byte[] messageToSend = new byte[HEADER.length() + bufferSize];
    byte[] inputPayload = new byte[bufferSize];

    int dataLength = data.read(inputPayload);
    if (dataLength == bufferSize) {
      LOGGER.warn("Data length exceeds buffer size so data will be chunked.");
    }

    arraycopy(HEADER.getBytes(), 0, messageToSend, 0, HEADER.length());

    if (dataLength >= 0) {
      arraycopy(inputPayload, 0, messageToSend, HEADER.length(), dataLength);
    }

    BufferedOutputStream writer = new BufferedOutputStream(os);
		writer.write(messageToSend, 0, HEADER.length() + dataLength);
		writer.flush();
    }
  }
}-
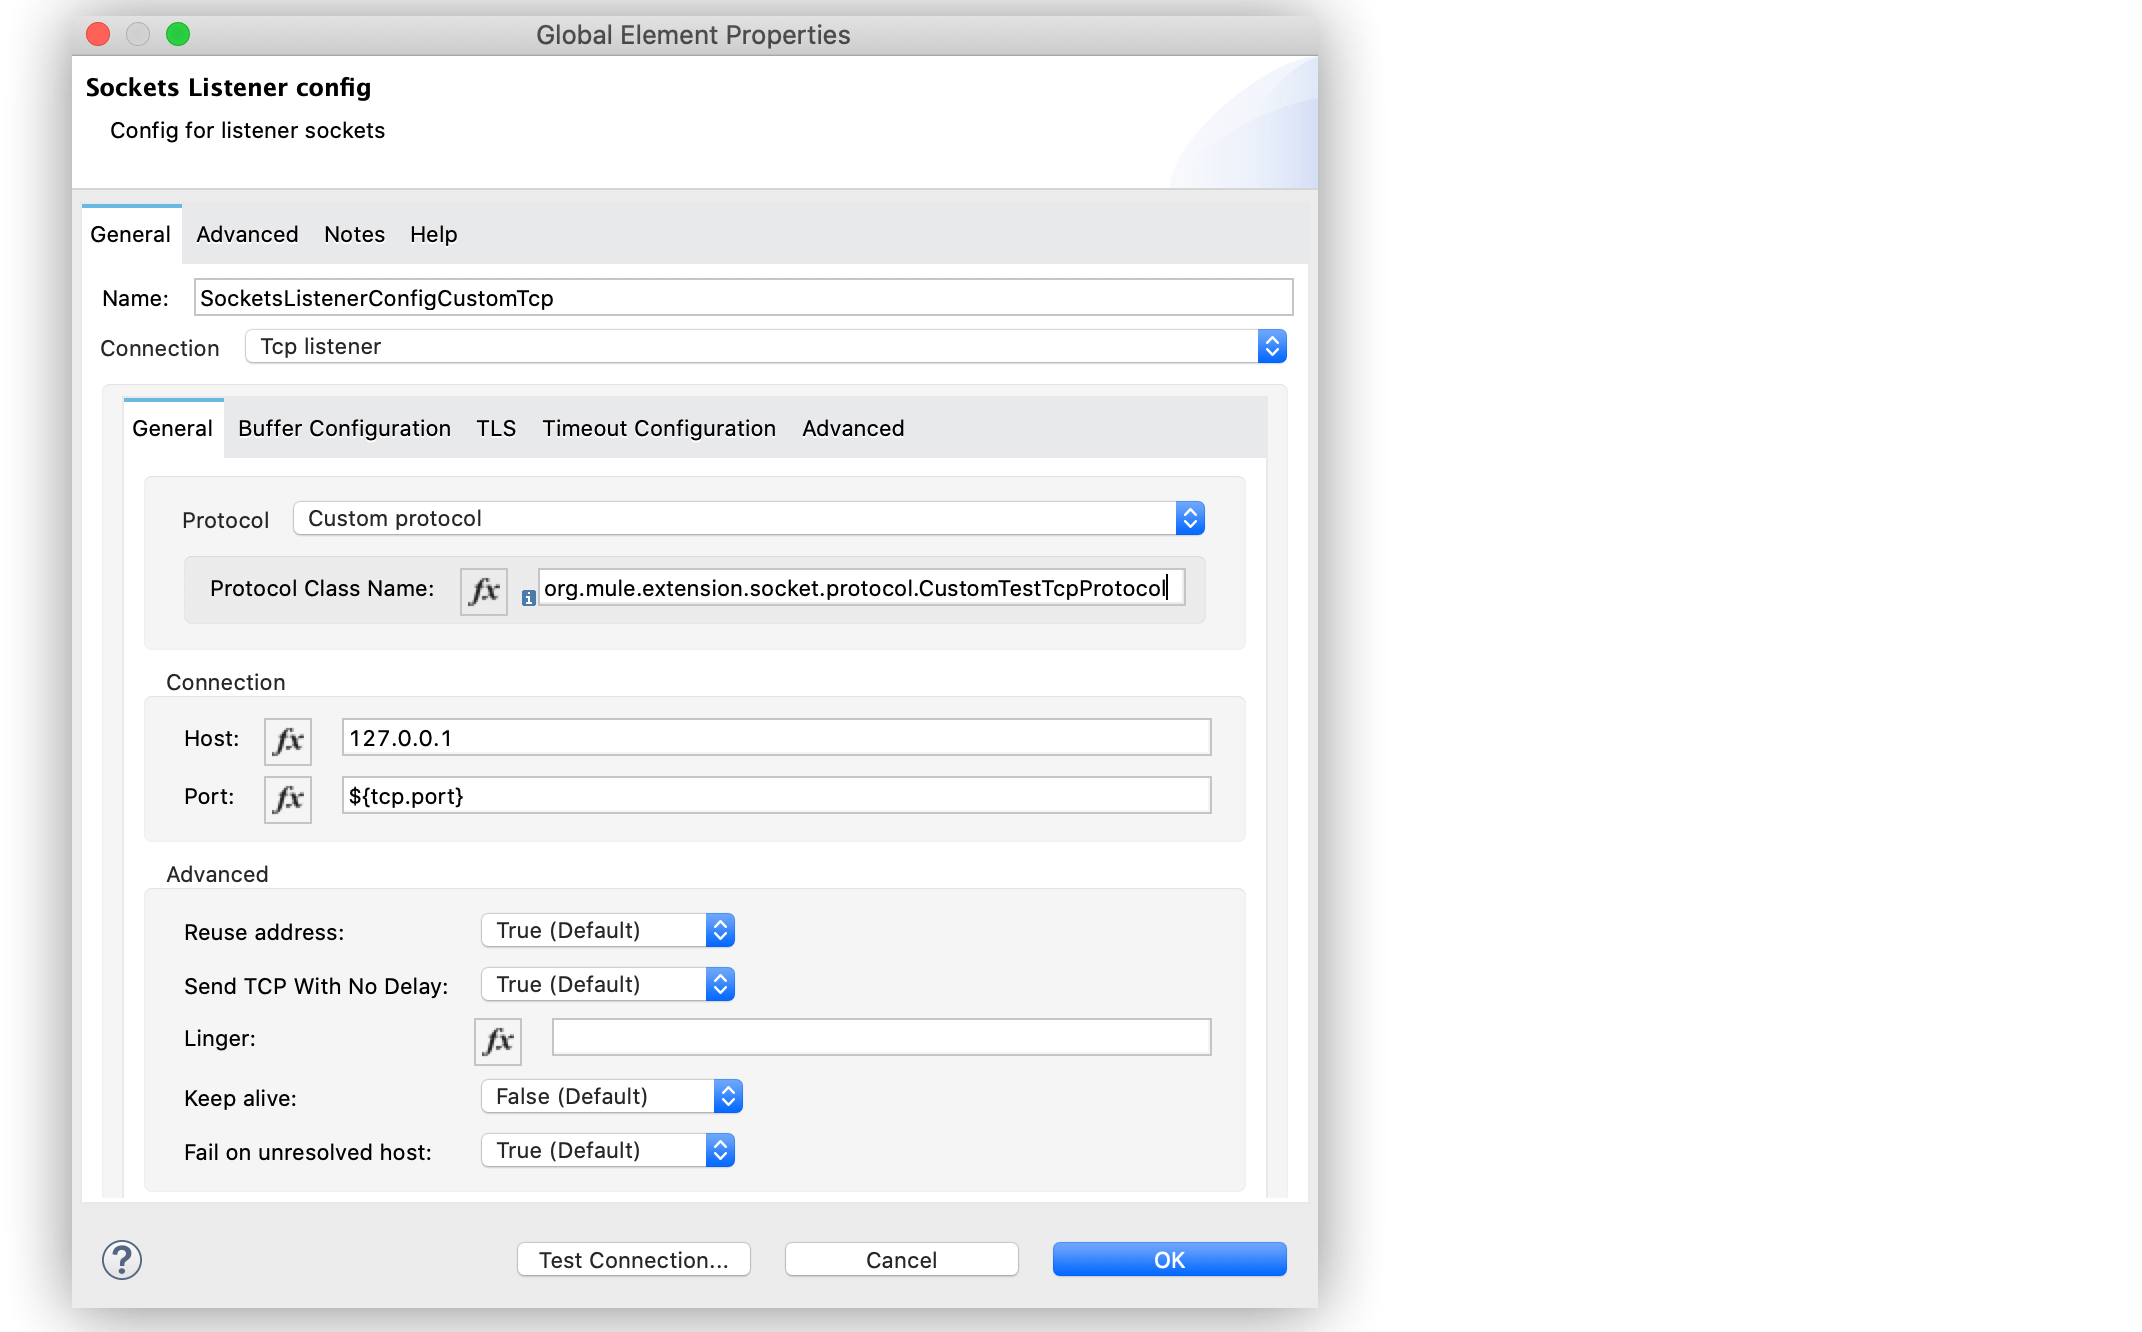
Add the class name in the Connector configuration window of the Sockets Listener source and either the Sockets Send operation or Send and receive operation:
-
Sockets Listener source
-
In Studio, open the Global Element Properties configuration for your Sockets Listener source.
-
On the General tab, set Protocol to
Custom protocol. -
Add the class name in the Protocol Class Name field.
-
-
-
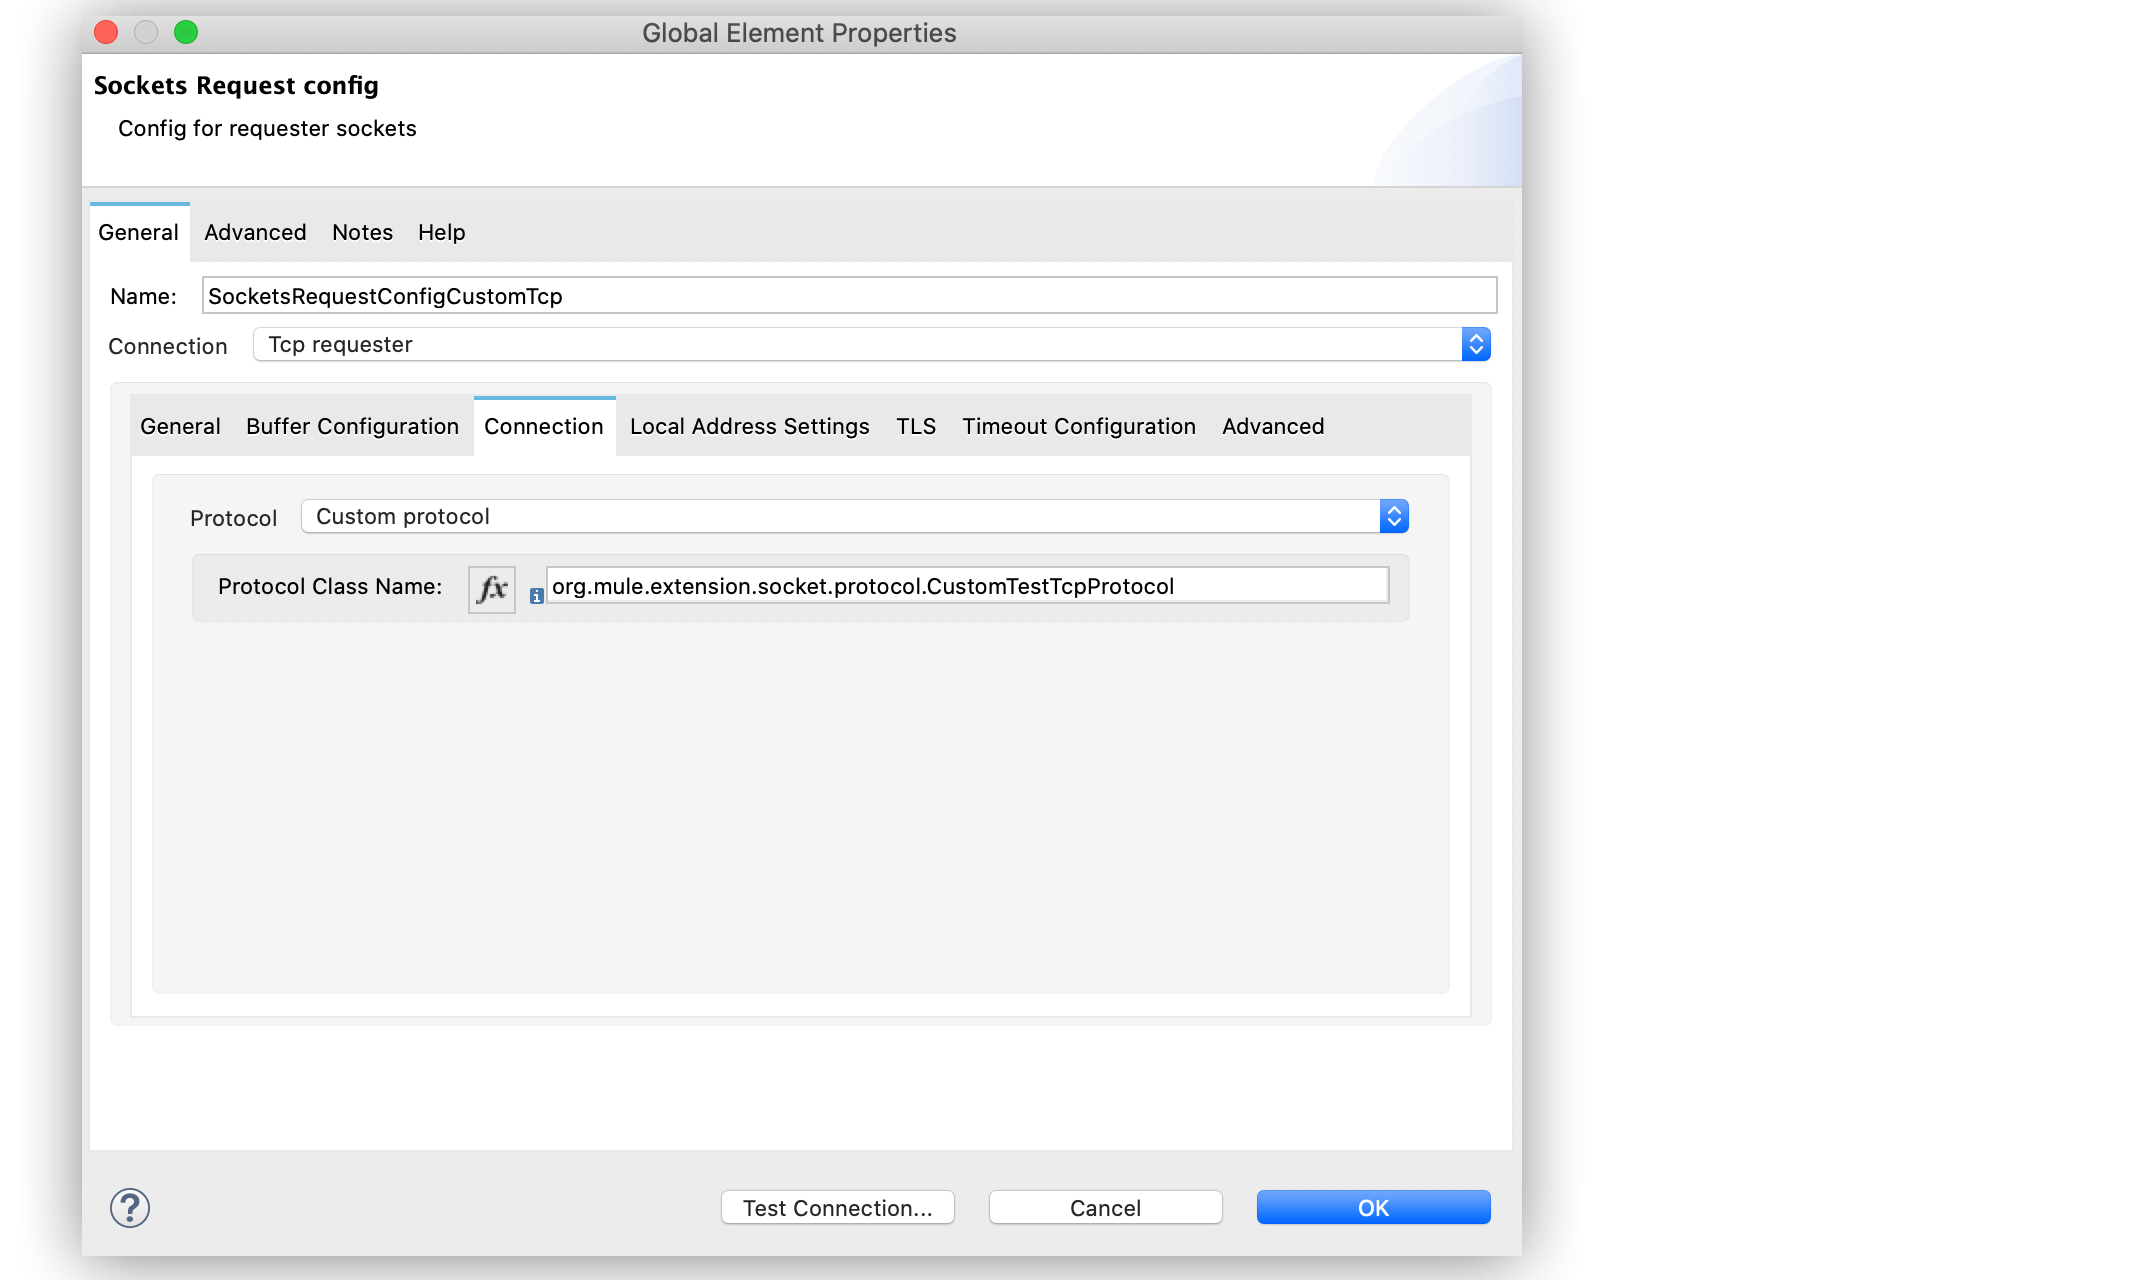
Sockets Send operation or Send and receive operation
-
In Studio, open the Global Element Properties configuration of your Sockets Send operation or Send and receive operation.
-
On the Connection tab, set Protocol to
Custom protocol. -
Add the class name in the Protocol Class Name field.
-
In the Configuration XML tab, use the class parameter to add the class in the sockets:custom-protocol section of the connector operation:
<sockets:request-config name="SocketsRequestConfigCustomTcp" >
    <sockets:tcp-requester-connection host="127.0.0.1" port="${tcp.port}" failOnUnresolvedHost="true" sendTcpNoDelay="true">
        <sockets:protocol>
            <sockets:custom-protocol class="org.mule.extension.socket.protocol.CustomTestTcpProtocol"/>
        </sockets:protocol>
    </sockets:tcp-requester-connection>
</sockets:request-config>

<sockets:listener-config name="SocketsListenerConfigCustomTcp">
    <sockets:tcp-listener-connection host="127.0.0.1" port="${tcp.port}">
        <sockets:protocol>
            <sockets:custom-protocol class="org.mule.extension.socket.protocol.CustomTestTcpProtocol"/>
        </sockets:protocol>
    </sockets:tcp-listener-connection>
</sockets:listener-config>