Veeva Vault Connector 1.4 Examples
The following examples show how to configure the connector in Anypoint Studio:
Create Documents in Veeva Vault
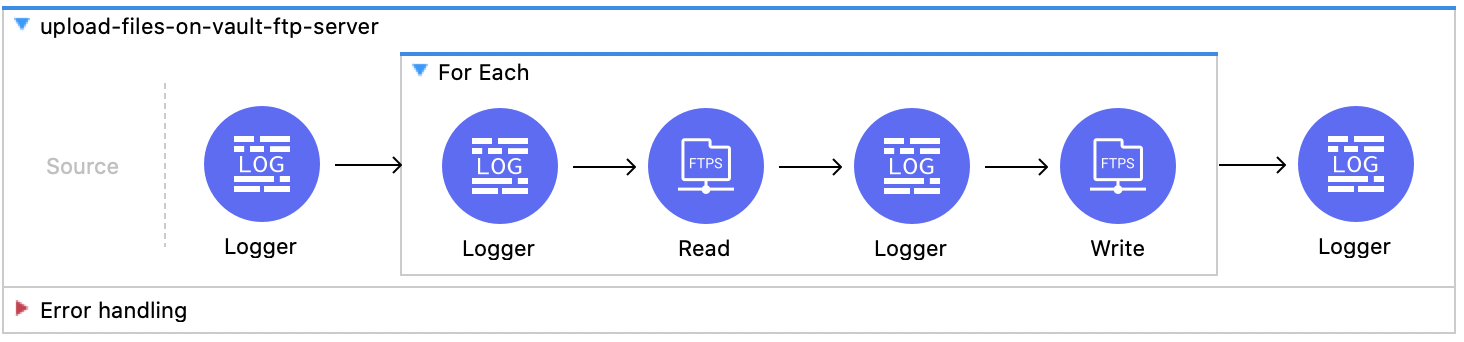
This example creates documents in bulk with document metadata fetched from an external source (database). Before creating documents in Veeva Vault, the document files are uploaded using the Veeva Vault FTP server. The documents' created status is inserted in the database.
The following screenshots show the Studio app flows for this example:
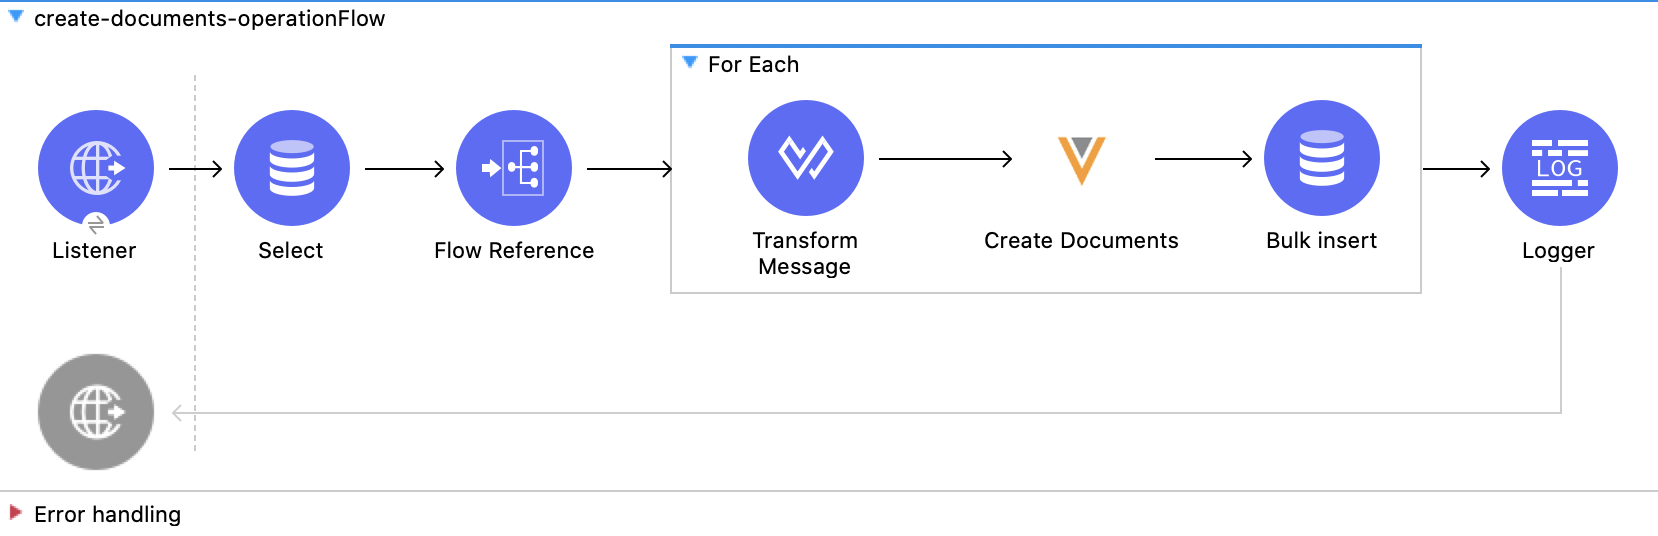
Create the First Flow
-
From the Mule Palette view, select HTTP and drag the Listener source to the canvas.
-
Configure HTTP Listener for your environment.
-
From the Mule Palette view, select Database and drag the Select operation to the canvas to fetch document metadata from the table.
-
Configure Database Connector to use your connection credentials.
-
In the SQL Query Text field, enter
>SELECT * FROM createdocuments. -
From the Mule Palette view, select Core and drag the Flow Reference component to the canvas to reference the subflow
upload-files-on-vault-ftp-server. -
From the Mule Palette view, select Core and drag the For Each scope to the canvas containing the following elements:
-
From the Mule Palette view, select Core and drag the Transform Message component to the canvas to transform document metadata into CSV format.
-
From the Mule Palette view, select Veeva Vault and drag the Create Documents operation to the canvas.
-
Enter the following values for the Veeva Vault connection:
-
Username
-
Password
-
Vault URL
-
Vault version
-
Vault client ID
-
-
From the Mule Palette view, select Database and drag the Bulk insert operation to the canvas to insert the document created status data into the database table.
-
-
Configure Database Connector to use your connection credentials.
-
From the Mule Palette view, select Core and drag the Logger component to the canvas to log information in the console or log file.
Create the Second Flow
-
From the Mule Palette view, select Core and drag the Logger component to the canvas to log information for this subflow.
-
From the Mule Palette view, select Core and drag the For Each scope to the canvas containing the following elements:
-
From the Mule Palette view, select Core and drag the Logger component to the canvas.
-
From the Mule Palette view, select FTPS and drag the Read operation to the canvas .
-
From the Mule Palette view, select Core and drag the Logger component to the canvas.
-
From the Mule Palette view, select FTPS and drag the Write operation to the canvas to write the file to the Veeva Vault FTP server.
-
-
From the Mule Palette view, select Core and drag another Logger component to the canvas.
-
Configure FTPS Connector to use the credentials for the Veeva Vault FTP server.
XML for the Example
Paste this code into your Studio XML editor to quickly load the two flows of this example into your Mule app:
<flow name="create-documents-operationFlow" >
<http:listener doc:name="Listener" config-ref="HTTP_Listener_config" path="/create-documents"/>
<db:select doc:name="Select" config-ref="Database_Config">
<db:sql >SELECT * FROM createdocuments</db:sql>
</db:select>
<flow-ref doc:name="upload-files-on-vault-ftp-server" name="upload-files-on-vault-ftp-server"/>
<ee:transform doc:name="Transform Message" >
<ee:message>
<ee:set-payload><![CDATA[%dw 2.0
output application/csv headerLineNumber = 0 , header = true
---
payload map ( payload01 , indexOfPayload01 ) -> {
lifecycle__v: payload01.lifecycle__v,
study__v: payload01.study__v,
subtype__v: payload01.subtype__v,
name__v: payload01.name__v ++ '--' ++ randomInt(10000) as String,
type__v: payload01.type__v,
classification__v: payload01.classification__v,
product__v: payload01.product__v,
file: payload01.file as String
}]]></ee:set-payload>
</ee:message>
</ee:transform>
<veevavault:create-documents metadataFormat="CSV" doc:name="Create Documents" config-ref="Veeva_Vault_Config"/>
<db:bulk-insert doc:name=__"Bulk insert" config-ref="Database_Config">
<db:bulk-input-parameters ><![CDATA[#[output application/java
---
payload.data map () -> {
'id': $.id as String,
'external_id__v': $.external_id__v as String,
'responseStatus': $.responseStatus
}]]]>
</db:bulk-input-parameters>
<db:sql >INSERT into documents (id, external_id__v, responseStatus) VALUES (:id: external_id__v, :responseStatus)
</db:sql>
</db:bulk-insert>
<logger level="INFO" doc:name="Logger" message="Document Created :: #[output application/json --- payload]"/>
<error-handler >
<on-error-propagate enableNotifications="true" logException="true" doc:name="On Error Propagate" type="ANY" >
<logger level="INFO" doc:name="Logger" message="Flow Exception Handled -- #[payload]" />
</on-error-propagate>
</error-handler>
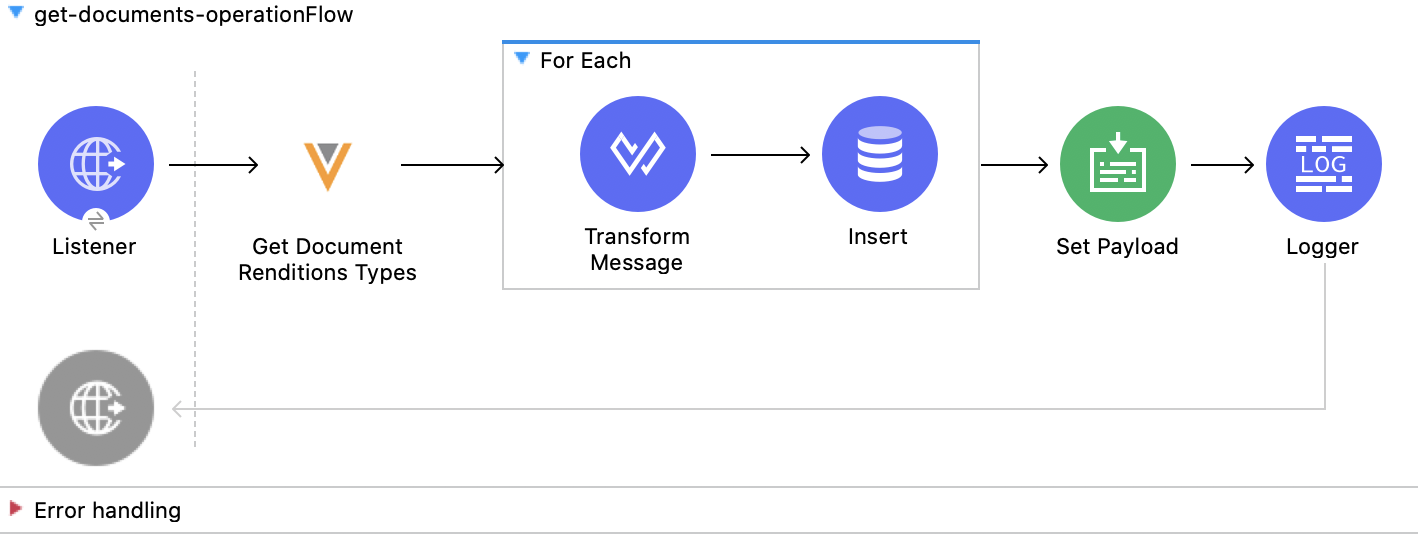
</flow>Retrieve Document Details
This example retrieves document details based on document type, subtype, and classification and then stores the document details in the database.
The following screenshot shows the Studio app flow for this example:
-
From the Mule Palette view, select HTTP and drag the Listener source to the canvas.
-
Configure HTTP Listener for your environment.
-
From the Mule Palette view, select Veeva Vault and drag the Get Documents operation to the canvas.
-
Enter the following values for the Veeva Vault connection:
-
Username
-
Password
-
Vault URL
-
Vault version
-
Vault client ID
-
-
Click the respective refresh button to fetch the document type, subtype, and classification list.
-
Select the document type, subtype, and classification from each of the respective drop-down lists.
-
Add the document properties in the Document Properties list for your business requirements to incorporate the properties name in the VQL query to build dynamically.
-
From the Mule Palette view, select Core and drag the For Each scope to the canvas containing the following elements:
-
From the Mule Palette view, select Core and drag the Transform Message component to the canvas.
-
From the Mule Palette view, select Database and drag the Insert operation to the canvas.
-
Configure the Database Connector configuration with your connection credentials.
-
-
Using DataWeave, configure the transformation according to your business requirements.
-
Configure the Insert operation to insert data into table.
-
From the Mule Palette view, select Core and drag the Set Payload transformer to the canvas to set a payload to return to the triggered source.
-
From the Mule Palette view, select Core and drag the Logger component to the canvas to log information in the console or log file.
XML for the Example
Paste this code into your Studio XML editor to quickly load the flow for this example into your Mule app:
<flow name="get-documents-operationFlow" >
<http:listener doc:name="Listener" config-ref="HTTP_Listener_config" path="/get-documents" />
<veevavault:get-documents doc:name="Get Documents" config-ref="Veeva_Vault_Config" >
<veevavault:documents type="site_management__c">
<veevavault:document-properties >
<veevavault:document-property value=__"name__v"__ />
<veevavault:document-property value=__"type__v"__ />
<veevavault:document-property value=__"subtype__v"__ />
<veevavault:document-property value=__"classification__v"__ />
<veevavault:document-property value=__"lifecycle__v"__ />
<veevavault:document-property value=__"status__v"__ />
<veevavault:document-property value=__"study__v"__ />
<veevavault:document-property value=__"product__v"__ />
</veevavault:document-properties>
</veevavault:documents>
</veevavault:get-documents>
<foreach doc:name="For Each" >
<ee:transform doc:name="Transform Message" >
<ee:message >
<ee:set-payload ><![CDATA[%dw 2.0
output application/json
---
payload]]></ee:set-payload>
</ee:message>
</ee:transform>
<db:insert doc:name="Insert" config-ref="Database_Config">
<db:sql >INSERT INTO [.underline]#createdocuments# (name__v, type__v, subtype__v, classification__v, lifecycle__v,
product__v, status__v, study__v, file) VALUES (:name__v, :type__v, :subtype__v, :classification__v, :lifecycle__v, :product__v, :status__v, :study__v, :file)</db:sql>
<db:input-parameters ><![CDATA[#[%dw 2.0
output application/json
---
{
'name__v': payload.name__v as String,
'type__v': payload.type__v as String,
'subtype__v': payload.subtype__v as String,
'classification__v': payload.classification__v as String,
'lifecycle__v': payload.lifecycle__v as String,
'product__v': payload.product__v[0],
'status__v': payload.status__v as String,
'study__v': payload.study__v[0],
'file': "CDA.docx"
}]]]></db:input-parameters>
</db:insert>
</foreach>
<set-payload value="#[output application/json --- payload.payload]" doc:name="Set Payload" />
<logger level=__"INFO" doc:name="Logger" message="Document Details :: #[payload]"/>
<error-handler >
<on-error-propagate enableNotifications="true" logException="true" doc:name="Error Propagate" type="ANY" >
<logger level="INFO" doc:name="Logger" message="Flow Exception Handled -- #[payload]" />
</on-error-propagate>
</error-handler>
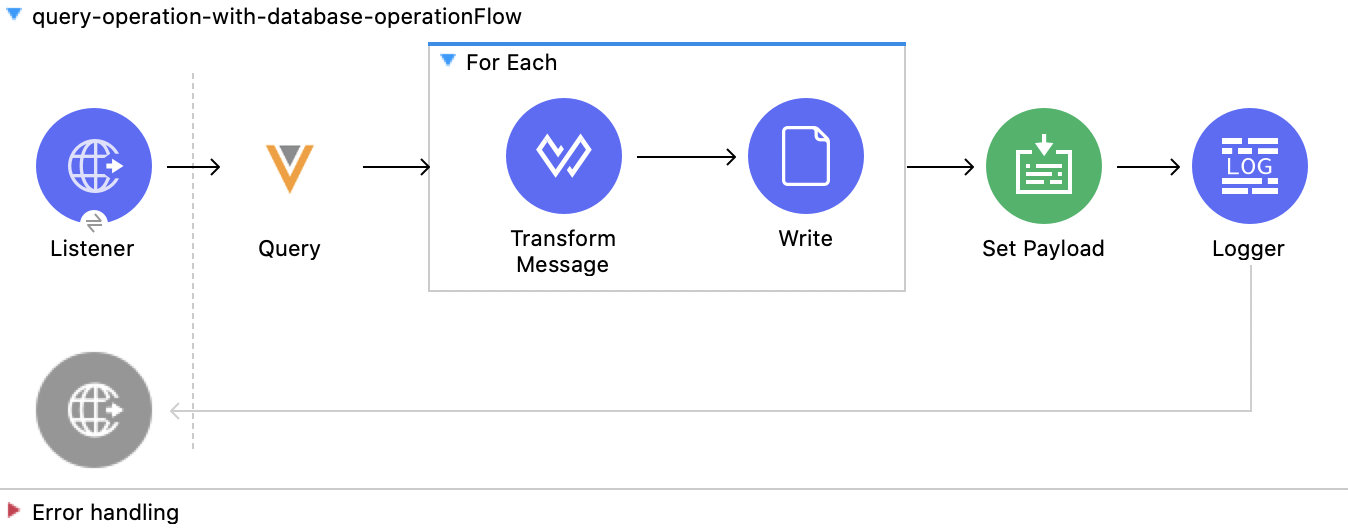
</flow>Fetch Document or Object Data
This example uses a VQL query to fetch document or object data from Veeva Vault.
The following screenshot shows the Studio app flow for this example:
-
From the Mule Palette view, select HTTP and drag the Listener source to the canvas.
-
Configure HTTP Listener for your environment.
-
From the Mule Palette view, select Veeva Vault and drag the Query operation to the canvas.
-
Enter the following values for the Veeva Vault connection:
-
Username
-
Password
-
Vault URL
-
Vault version
-
Vault client ID
-
-
Define the VQL query according to your business requirement.
-
Add an input placeholder if used in the VQL query to incorporate dynamically with VQL at runtime.
-
From the Mule Palette view, select Core and drag the For Each scope to the canvas containing the following elements:
-
From the Mule Palette view, select Core and drag the Transform Message component to the canvas.
-
From the Mule Palette view, select File and drag the Write operation to the canvas.
-
-
Configure the transformation according to your business requirements using DataWeave.
-
Configure the File Connector configuration with the working file path.
-
Configure the Write operation to write payload data into the specified file.
-
From the Mule Palette view, select Core and drag the Set Payload transformer to the canvas to set a payload to return to the triggered source.
-
From the Mule Palette view, select Core and drag the Logger component to the canvas to log information in the console or log file.
XML for the Example
Paste this code into your Studio XML editor to quickly load the flow for this example into your Mule app:
<flow name="query-operation-with-database-operationFlow" >
		<http:listener doc:name="Listener" config-ref="HTTP_Listener_config" path="/query"/>
		<veevavault:query doc:name="Query" fetchSize="1000" config-ref="Veeva_Vault_Config">
			<veevavault:vql >SELECT id, name__v, type__v, subtype__v, classification__v, lifecycle__v, status__v, study__v, product__v  from :table WHERE name__v= 'F22611234--6764'</veevavault:vql>
			<veevavault:input-parameters ><![CDATA[#[{
				'table': 'documents'
			}]]]></veevavault:input-parameters>
		</veevavault:query>
		<foreach doc:name="For Each" >
		<ee:transform doc:name="Transform Message" >
			<ee:message >
				<ee:set-payload ><![CDATA[%dw 2.0
				output application/json
				---
				payload]]></ee:set-payload>
			</ee:message>
		</ee:transform>
		<file:write doc:name="Write" path="query.json" config-ref="File_Config" mode="APPEND">
			<file:content><![CDATA[#[output application/json
			---
			payload]]]></file:content>
						</file:write>

		</foreach>
		<set-payload value="#['Flow Completed']" doc:name="Set Payload" />
		<logger level="INFO" doc:name="Logger" message="Query Operation flow Completed - #[payload]"/>
		<error-handler >
			<on-error-propagate enableNotifications="true" logException="true" doc:name="On Error Propagate" type="ANY">
				<logger level="INFO" doc:name="Logger" message="Flow Exception Handled --  #[payload]"/>
			</on-error-propagate>
		</error-handler>
	</flow>
Validate a Spark Message
This example triggers a Spark message from Veeva Vault and validates the Spark message.
The following screenshot shows the Studio app flow for this example:

-
From the Mule Palette view, select HTTP and drag the Listener source to the canvas.
-
The JKS certificate for HTTP Connector requires the
.jksfile for HTTP Listener to receive Spark messages over a TLS connection with Veeva Vault.
The following steps show how to create a.jksfile using the Java Keytool located under the<JDK_HOME>/bindirectory: -
Run the following command from the
<JDK_HOME>/bindirectory:`keytool -genkey -keyalg RSA -alias mule -keystore spark-listener.jks -storepass password -validity 360 -keysize 2048`
This creates a `spark-listener.jks` file in the current directory.
-
Copy and import the
spark-listener.jksfile from thesrc/main/resourcesproject directory. -
Configure HTTP Listener as follows:
-
In the General tab, configure the following:
-
Protocol: HTTPS
-
Host: 0.0.0.0
-
Port: 8082
-
-
In the TLS tab, configure the following:
-
Type: JKS
-
Path: spark-listener.jks
-
Alias: mule
-
Key Password: password
-
Password: password
-
-
-
From the Mule Palette view, select Veeva Vault and drag the Spark Validator operation to the canvas.
-
Enter the following values for the Veeva Vault connection:
-
Username
-
Password
-
Vault URL
-
Vault version
-
Vault client ID
-
-
Configure the Spark Validator parameters as follows:
-
Include Spark Header:
FALSE -
Public Key Path:
${file.keyPath}
Define thefile.keyPathproperty in theconfiguration.yamlwith the path to where the public key file (00001.pem) is stored. -
Spark Headers:
#[attributes.headers] -
Spark Message:
#[payload]
-
-
From the Mule Palette view, select Core, drag the Set Payload operation to the canvas, and define the following in the Value field:
---- output application/json --- { "payload" : payload, "attributes": attributes } ---- -
From the Mule Palette view, select Core and drag the Logger component to the canvas to log the payload with the following message:
Spark Message :: #[payload]
XML for the Example
Paste this code into your Studio XML editor to quickly load the flow for this example into your Mule app:
<flow name="spark-message-validator-operationFlow" >
    <http:listener doc:name="Listener" config-ref="Spark_Listener" path="/"/>
    <veevavault:spark-message-validator doc:name="Spark Validator" config-ref="Veeva_Vault_Config" publicKeyPath="${file.keyPath}" includeSparkHeader="TRUE"/>
    <set-payload value='#[output application/json --- {
			"payload" : payload,
			"attributes": attributes
		}]' doc:name="Set Payload" />
    <logger level="INFO" doc:name="Logger" message="Spark Message :: #[payload]"/>
</flow>
Invoke the REST API to Create a Single Document
This example invokes the REST API to create a single document.
The following screenshot shows the Studio app flow for this example:
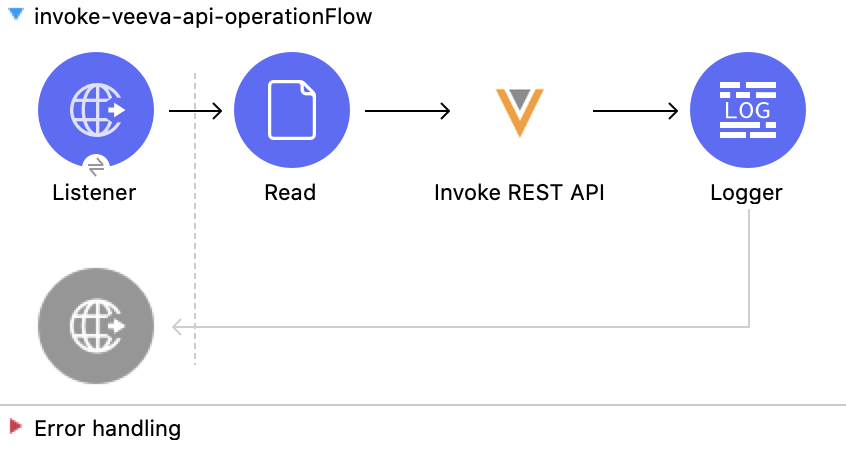
| You must configure the parameters according to your requirements to invoke the Veeva Vault REST API. |
-
From the Mule Palette view, select HTTP and drag the Listener source to the canvas.
-
Configure HTTP Listener for your environment.
-
From the Mule Palette view, select File and drag the Read operation to the canvas and configure the file path to read from the file content that is associated with Veeva Vault document.
-
From the Mule Palette view, select Veeva Vault and drag the Invoke REST API operation to the canvas.
-
Enter the following values for the Veeva Vault connection:
-
Username
-
Password
-
Vault URL
-
Vault version
-
Vault client ID
-
-
Configure the POST request:
Method: POST,
Path: "/objects/documents",
Headers:
	Key: "Accept"
	Value: "application/json"
	Key: "Content-Type"
	Value: "multipart/form-data; boundary=abcdefg"
URI Parameters: Leave it empty.
Query Parameters: Leave it empty.
%dw 2.0 output multipart/form-data boundary='abcdefg' --- { parts: { file: { headers: { "Content-Disposition": { "name": "file", "filename": attributes.fileName }, "Content-Type": payload.^mimeType }, content : payload }, name__v: { headers: { }, content: 'Test Document' }, type__v: { headers: { }, content: 'Trial Management' }, subtype__v: { headers: { }, content: 'Meetings' }, classification__v: { headers: { }, content: 'Kick-off Meeting Material' }, lifecycle__v: { headers: { }, content: 'Base Doc Lifecycle' }, study__v: { headers: { }, content: '0ST000000000301' }, comments__c: { headers: { }, content: 'Test Document' } } } -
Configure the PUT request:
Method: PUT,
Path: "/objects/documents/{doc_id}",
Headers:
	Key: "Accept"
	Value: "application/json"
	Key: "Content-Type"
	Value: "application/x-www-form-urlencoded"
URI Parameters:
	Key: "doc_id"
	Value: "259592"
Query Parameters: Leave it empty.
%dw 2.0 output application/x-www-form-urlencoded --- { "id": "259592", "name__v": "Kick-off Meeting Material Updated", "product__v": "00P000000000403", "study__v": "0ST000000000202", "notes__v": "Notes Updated" } -
From the Mule Palette view, select Core and drag the Logger component to the canvas to log the payload with the following message:
Invoke Veeva API response :: #[payload]
XML for the Example
Paste this code into your Studio XML editor to quickly load the flow for this example into your Mule app:
	<flow name="invoke-veeva-api-operationFlow" >
		<http:listener doc:name="Listener" config-ref="HTTP_Listener_config" path="/invoke-veeva-api"/>
		<file:read doc:name="Read" config-ref="File_Config" path="#['testdata/Test Document Renditions.pdf']" outputMimeType="application/octet-stream"/>
		<veevavault:invoke-rest-api doc:name="Invoke REST API" config-ref="Veeva_Vault_Config" path="/objects/documents" method="POST">
			<veevavault:body ><![CDATA[#[%dw 2.0
output multipart/form-data boundary='abcdefg'
---
{
	parts: {
		file: {
			headers: {
				"Content-Disposition": {
					"name": "file",
					"filename": attributes.fileName
				},
				"Content-Type": payload.^mimeType
			},
			content : payload
		},
		name__v: {
			headers: {

			},
			content: 'Test Document'
		},
		type__v: {
			headers: {

			},
			content: 'Trial Management'
		},
		subtype__v: {
			headers: {

			},
			content: 'Meetings'
		},
		classification__v: {
			headers: {

			},
			content: 'Kick-off Meeting Material'
		},
		lifecycle__v: {
			headers: {

			},
			content: 'Base Doc Lifecycle'
		},
		study__v: {
			headers: {

			},
			content: '0ST000000000301'
		},
		comments__c: {
			headers: {

			},
			content: 'Test Document'
		}
	}
}]]]></veevavault:body>
			<veevavault:headers ><![CDATA[#[output application/java
---
{
	"Accept" : "application/json",
	"Content-Type" : "multipart/form-data; boundary=abcdefg"
}]]]></veevavault:headers>
		</veevavault:invoke-rest-api>
		<logger level="INFO" doc:name="Logger" message="Invoke Veeva API response :: #[payload]" />
	</flow>