
Manage, Secure, and Monitor the American Flights API
After deploying your American Flights API to CloudHub 2.0, register it with API Manager to apply governance policies, secure it with a policy, and monitor its performance and health with Runtime Manager.
Create an API Instance and Link it with Your Application
Use API Manager to manage, monitor, and secure your APIs. After deploying your application to CloudHub 2.0, configure autodiscover to register it with API Manager to apply governance policies, track usage, and control access.
Step 1: Navigate to API Manager
-
Sign in to Anypoint Platform.
Show me how
-
US cloud (non-EU host): Anypoint Platform (US)
-
EU cloud (EU host): Anypoint Platform (EU)
-
-
From the Anypoint Platform home page, click Agents & Tools > API Manager in the navigation menu.
-
Ensure you are working on the same environment where you deployed your application (for example, Sandbox).
Step 2: Create an API Instance
Create an API instance that links your deployed application to the API specification you published earlier.
-
In API Manager, click Add and select Add new API.
-
In the runtime section, select Mule Gateway and click Next.
-
In the API section:
-
Click Select API from Exchange.
-
Search for "American Flights API" (the API specification you published earlier).
-
Select your API and click Next.
-
-
In the Downstream section, click Next.
-
In the Upstream section, set the Upstream URL to your application’s public endpoint (the one you see in Runtime Manager).
For example:
https://american-flights-api-implementation-ij0c18.5sc6y6-3.usa-e2.cloudhub.io/. Click Next. -
In the Review section, click Save to create the API instance.
Verify that your API status now shows Active.
-
Copy your API Instance ID for use in the next step while configuring API Autodiscovery.
Step 3: Configure API Autodiscovery
API Autodiscovery links your running application to the API instance you created in the previous step, so API Manager and Runtime Manager can report accurate status and enforce policies against the correct application.
-
Open your project in Anypoint Code Builder.
-
Open MuleSoft Vibes.
-
Send this message:
Enable API autodiscovery for my current project with this info:
- API Instance ID: {your_api_instance_id}
- Environment: {environment}
Replace {your_api_instance_id}with the ID you copied in the previous step, and{environment}with the environment you used to deploy your application (for example, Sandbox). -
Save your project and deploy a new version from Anypoint Code Builder.
You need to deploy a new version because you updated the project’s code.
When prompted for the asset version, specify
1.0.1so you can identify the updated deployment when monitoring it in Runtime Manager.
Step 4: Configure Business Group Credentials
Your application needs valid Business Group credentials to connect to the API instance for autodiscovery and policy enforcement. Configure these credentials as properties in Runtime Manager.
-
Sign in to Anypoint Platform.
-
Click Access Management in the navigation menu.
-
Click Business Groups in the sidebar.
-
Click your business group (the same one you used throughout this tutorial).
-
Copy the Client ID and Client Secret.
-
Open Runtime Manager and select your deployed application.
-
On the side panel, click Settings.
-
Ensure your application is Stopped.
-
Add these properties:
Property Key Property Value anypoint.platform.client_id{your_client_id}anypoint.platform.client_secret{your_client_secret}Replace
{your_client_id}and{your_client_secret}with the values you copied. -
Click Apply Changes.
After setting the properties and restarting your application with API Autodiscovery configured, confirm that the API status shows Active in API Manager.
| If the status doesn’t show Active right away, wait a few minutes, verify the properties are configured correctly in Runtime Manager, and check the status again. |
Your API is now registered with API Manager and ready for policy configuration.
Secure the API with a Policy
Policies in API Manager let you enforce security, compliance, and governance rules on your API without modifying application code. In this section, you apply a Client ID Enforcement policy to secure your API. Common policies include:
-
Client ID Enforcement: Requires client applications to authenticate using a client ID and secret.
-
Rate Limiting: Controls the number of requests allowed per time period.
-
IP Whitelist/Blacklist: Restricts access based on IP addresses.
-
CORS: Configures Cross-Origin Resource Sharing headers.
-
OAuth 2.0: Implements OAuth 2.0 authentication and authorization.
For this tutorial, you apply the Client ID Enforcement policy to require API consumers to register their applications.
Step 1: Apply the Client ID Enforcement Policy
-
In API Manager, navigate to your American Flights API instance.
-
Click the Policies tab.
-
Click Add Policy.
-
Search for Client ID Enforcement, select it, and click Next.
-
Set the following values:
Field Name Field Value Credentials origin
Select customExpression.
Client ID Expression
#[attributes.headers['client_id']]Client Secret Expression
#[attributes.headers['client_secret']]This configuration requires clients to pass their credentials in HTTP headers. Alternative configurations can extract credentials from query parameters or custom locations. -
Click Apply to activate the policy.
Step 2: Test the Policy
After applying the policy, verify that unauthenticated requests are rejected.
-
In your REST client, send a request without client credentials:
GET http://american-flights-api-implementation{your_app_id}{region}.cloudhub.io/api/flightsReplace this URL with your application’s actual endpoint URL.
-
Verify that you receive a
401 Unauthorizedresponse.
Then, create a test client application to obtain credentials:
-
In Anypoint Platform, navigate to Exchange.
-
Search for your "American Flights API".
-
Click Request Access.
-
In API Instance, select your instance.
-
In Application, select Create a new application.
-
Provide an application name and click Create.
-
Click Request Access.
-
Copy the Client ID and Client Secret provided.
-
Test with credentials. In your REST client, add headers and resend the request:
GET http://american-flights-api-implementation{your_app_id}us-e2.cloudhub.io/api/flights
Headers:
client_id: <your-client-id>
client_secret: <your-client-secret>
Replace this URL with your application’s actual endpoint URL.
-
Verify that you receive a
200 OKresponse with flight data.
Your API is now secured and requires authenticated clients to access it.
Policy Best Practices
When applying policies:
-
Start with client authentication: Always require client identification before exposing APIs externally.
-
Apply rate limiting: Protect your API from abuse by limiting request rates.
-
Use layered security: Combine multiple policies (authentication + rate limiting + IP filtering).
-
Test thoroughly: Verify both authorized and unauthorized access scenarios.
-
Document requirements: Inform API consumers about authentication requirements and rate limits.
Monitor and Manage Your Application with Runtime Manager
Runtime Manager is Anypoint Platform’s operational dashboard for deployed applications. It provides real-time monitoring, log access, and management capabilities for applications running on CloudHub 2.0.
Runtime Manager provides:
-
Application Status: Real-time status of deployed applications.
-
Performance Metrics: CPU, memory, and network usage.
-
Logs: Application logs and system logs.
-
Alerts: Configurable notifications for application issues.
-
Application Management: Start, stop, restart, and redeploy applications.
-
Scaling: Adjust worker size and count.
Step 1: Review Application Status
-
From Anypoint Platform, click Agents & Tools > Runtime Manager in the navigation menu.
-
In the Applications list, locate your application (for example,
american-flights-api-yourname). -
Click the application name.
-
On the side panel, click Dashboard to review key information:
-
Status: Shows whether the application is running, starting, or stopped.
A green indicator with "Running" confirms your application is healthy.
-
Replicas: Number of replicas and vCores assigned.
-
Last Updated: When the application was last deployed or updated.
-
URL: The application’s public URL.
-
Step 2: View Application Logs
Logs help you troubleshoot issues and monitor application behavior.
-
In the side panel, click Logs.
-
View recent log entries:
-
Log Level: Filter by INFO, WARN, ERROR, or DEBUG.
-
Search: Search for specific log messages or error codes.
-
Time Range: Adjust the time range to view historical logs.
If you don’t see any entries, select a previously used Config from the dropdown menu.
-
-
Example log entries:
[INFO] Application started successfully [INFO] HTTP Listener on 0.0.0.0:8081 [INFO] Deployed application: american-flights-api -
Search for specific events:
-
Search for "ERROR" to find errors.
-
Search for "flights" to see API-related logs.
-
Search for "Database" to see database operations.
-
Step 3: Monitor Performance Metrics
Monitor your application’s resource usage to ensure it runs efficiently.
-
In the side panel, select Dashboard.
-
Select the Performance tab.
-
Review performance metrics such as average inbound and outbound response times.
-
Select the Infrastructure tab.
-
Review metrics such as CPU % and memory usage.
Step 4: Manage Your Application
Use Runtime Manager to control your application’s lifecycle. From the application dashboard, you can:
-
Stop: Click Stop to stop the application.
The application remains deployed but stops serving requests.
-
Start: Click Start to start a stopped application.
-
Delete: Click Delete to remove the application from CloudHub.
This action is permanent and cannot be undone.
-
Update Configurations: Click Apply Changes after changing configurations such as properties, to restart the application without redeploying.
Step 5: Scale Your Application
As your API usage grows, scale your application by adjusting worker size or count.
-
From the application dashboard, click Settings.
-
In the Deployment Target section:
-
Replica Count: Increase the number of workers for horizontal scaling.
-
Replica Size: Change the worker size (for example, from 0.1 to 0.2 vCores).
-
-
Click Apply Changes.
-
CloudHub redeploys your application with the new configuration.
| Scaling changes the resources allocated to your application and may affect your CloudHub costs. Monitor performance metrics before scaling to ensure it’s necessary. |
Stop Your Application
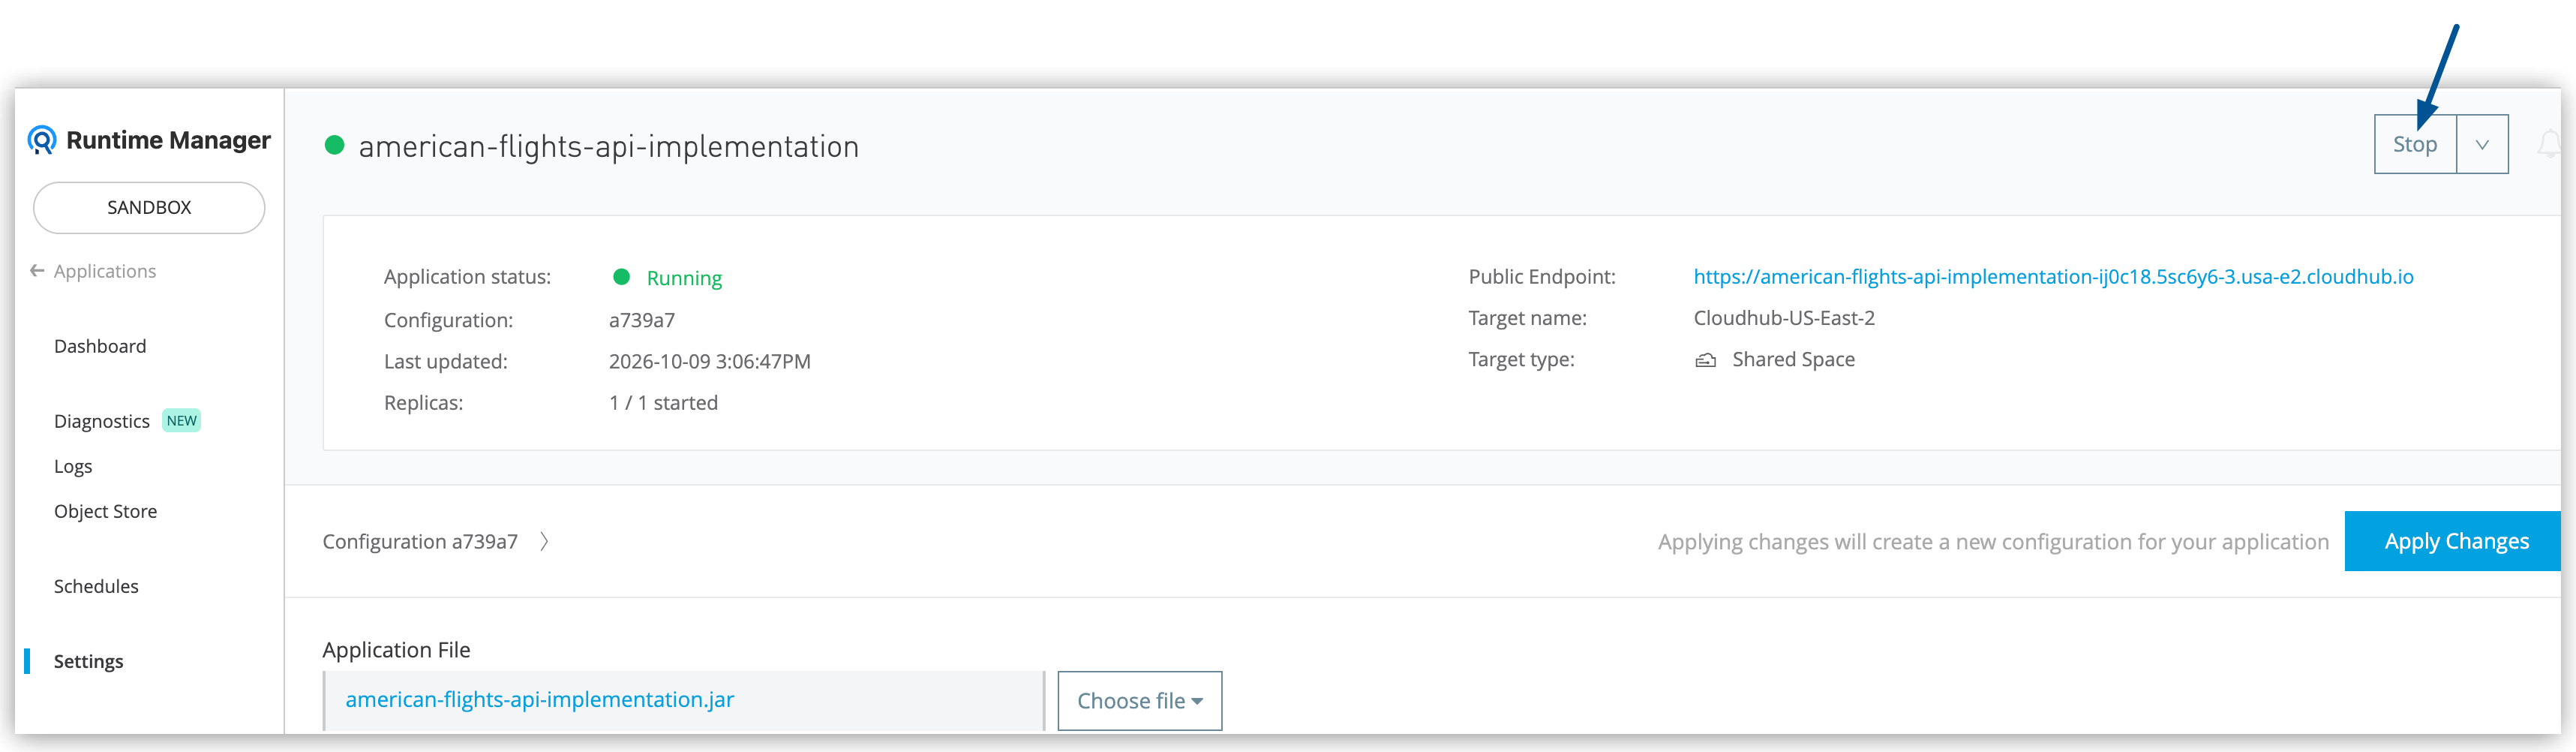
When you finish the tutorial, stop the application so it doesn’t keep consuming resources.
-
In Runtime Manager, open your application settings.
-
Click Stop.
This concludes the American Flights API tutorial series. You designed an API specification, implemented it as an integration, validated and transformed data, debugged and tested your application, deployed it to CloudHub 2.0, and secured and monitored it in production.