Configuring a Forward Proxy for Omni Gateway in Local Mode
A forward proxy, such as Squid, enables you to route external HTTP Omni Gateway connections through a proxy connection.
For both Connected Mode and Local Mode, you configure a forward proxy using YAML configuration files.
The following diagram demonstrates how an internal network communicates with an external network using a forward proxy.
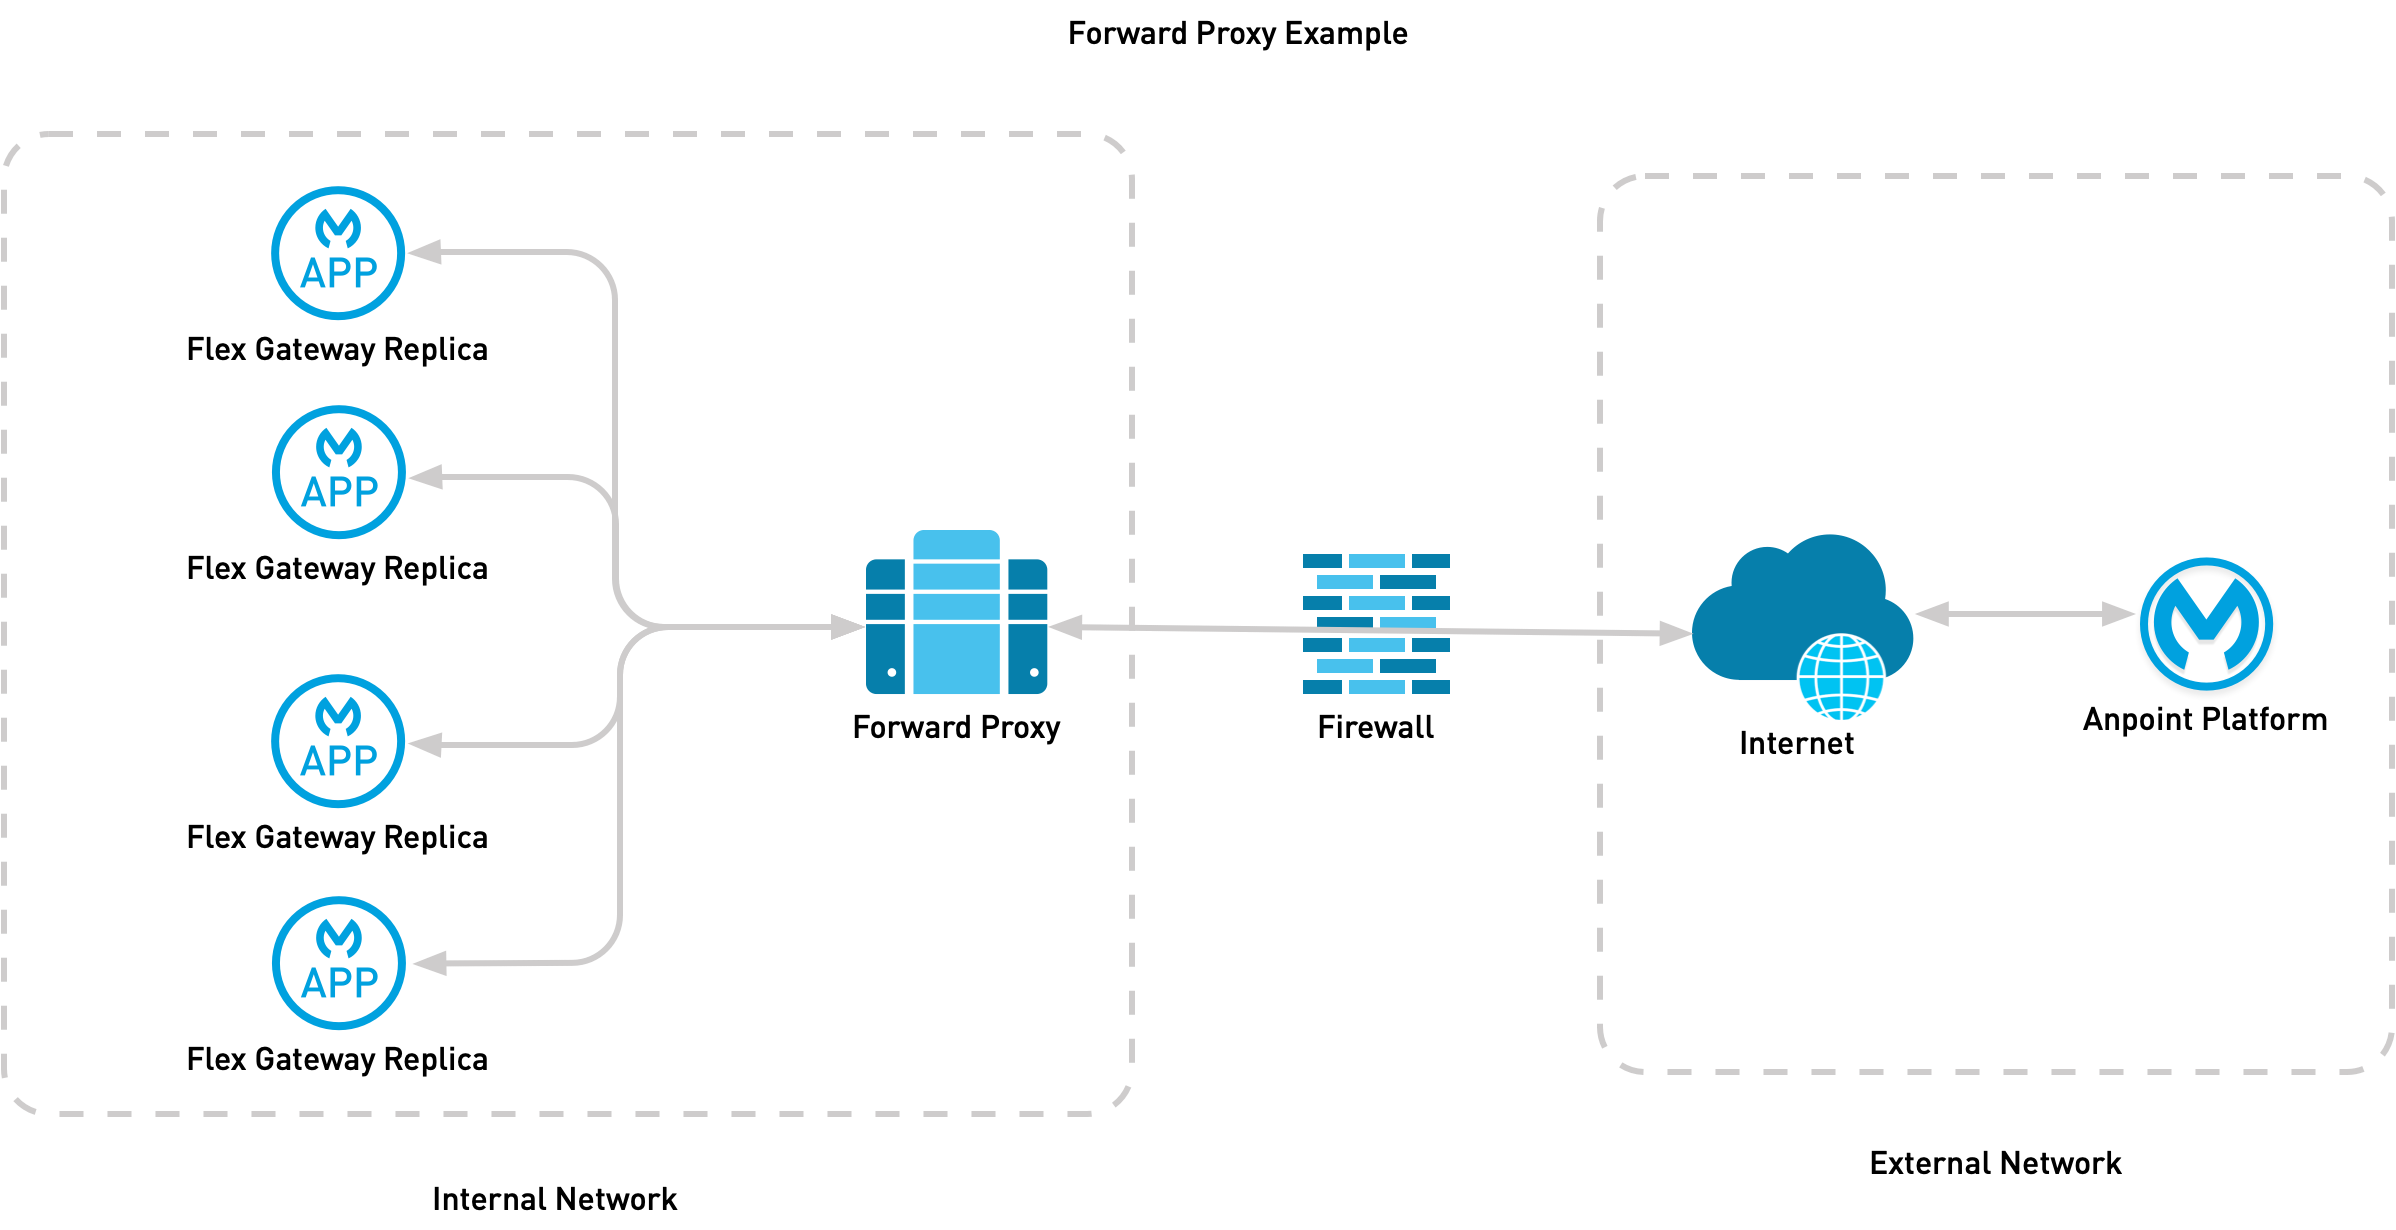
As in the diagram, when using a forward proxy, HTTP communication out of your internal network must travel through the forward proxy.
In this example, all HTTP API upstream communication must also pass through the forward proxy. For more information about how to enable some connections to communicate directly without the forward proxy, see noProxy Parameter.
|
|
|
Forward Proxy Connections
Only HTTP connections route through the forward proxy.
The following connections route through the forward proxy:
-
Connections to Anypoint Platform
-
Outbound policy connections
-
Connections to upstream services
-
HTTP (Fluent Bit) log connections
Using the noProxy parameter, you can configure HTTP and HTTPS connections to connect directly without using the forward proxy.
Configuring a forward proxy does not alter these connections:
-
Connections to shared storage
-
Lightweight Directory Access Protocol (LDAP) connections
-
Non-HTTP log connections
noProxy Parameter
Adding the noProxy parameter enables HTTP services you trust to communicate without using the forward proxy.
For example, when you enable noProxy, you can list HTTP log connections and connections to upstream services to have them connect directly to Omni Gateway.
When using the noProxy parameter in the YAML configuration file to communicate with HTTP logs, you must list the exact domain name. You cannot list the domain suffix, for example, .svc.cluster.local. You need to list full domain name, <logging-name>.svc.cluster.local, for all HTTP log connections.
The following diagram demonstrates the differences in communication using noProxy:
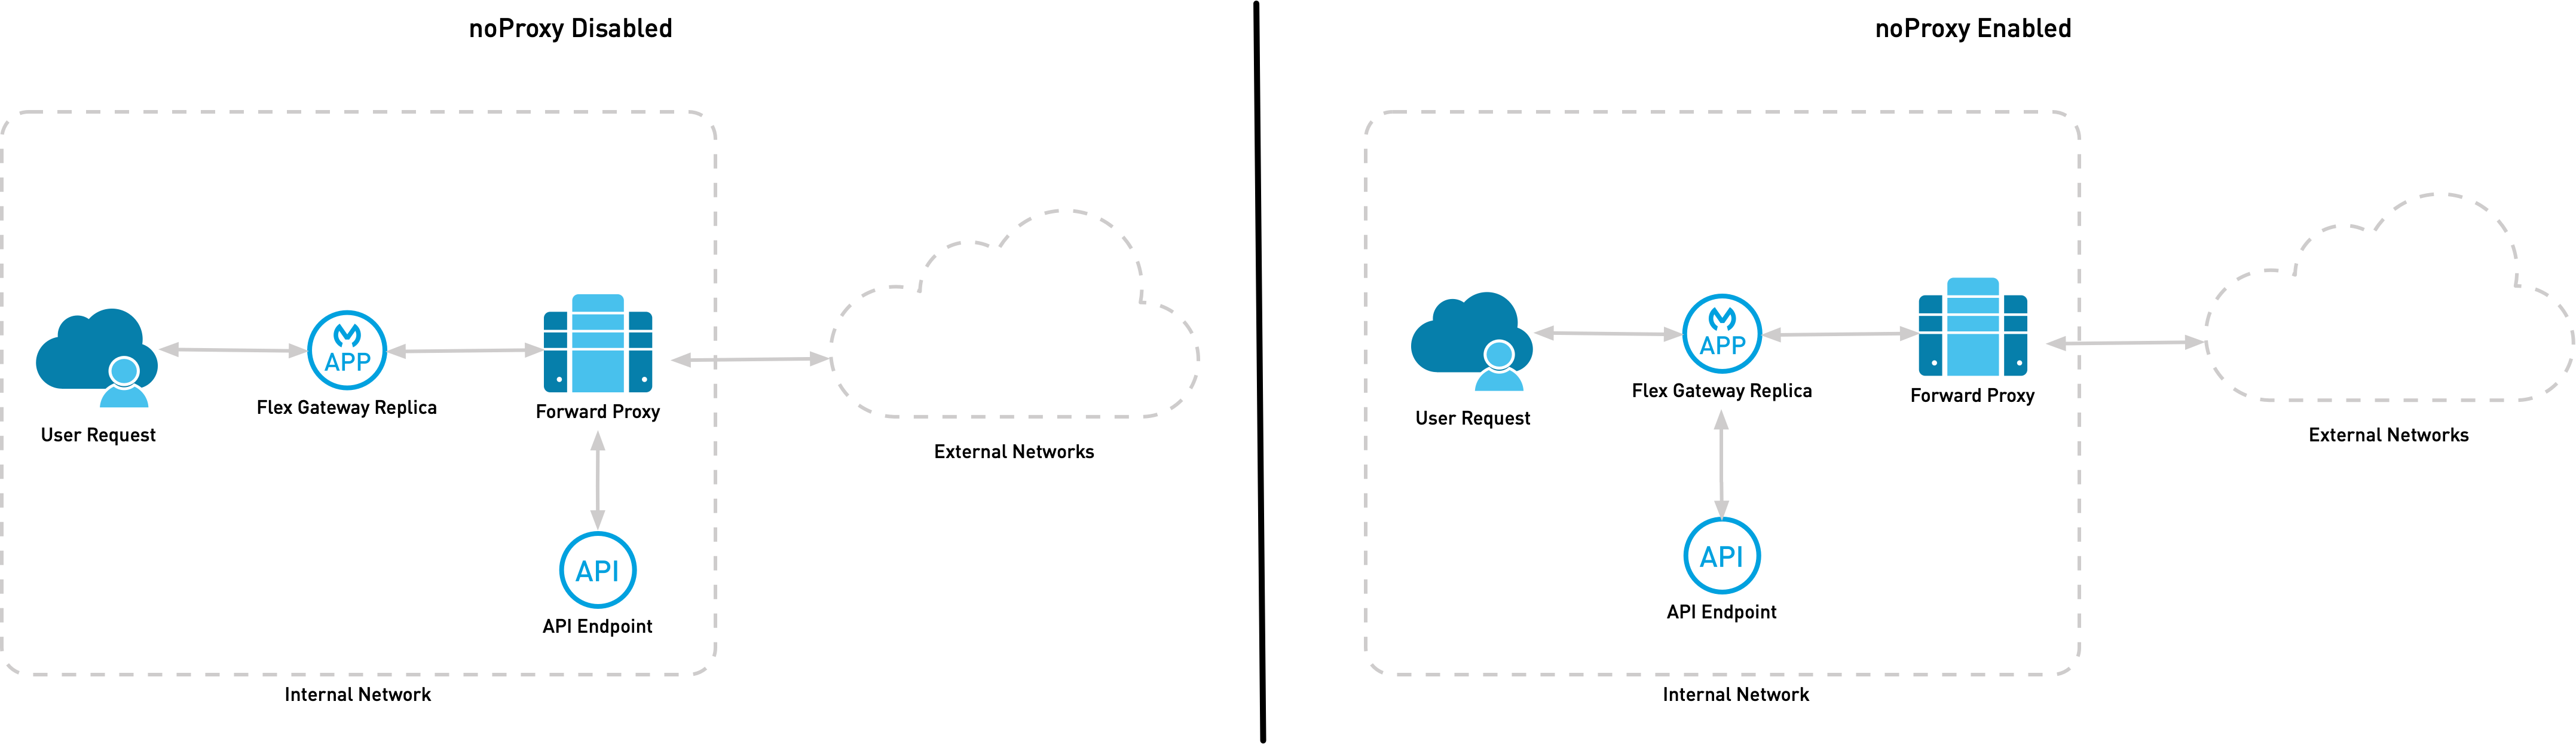
In the diagram, when you do not enable noProxy, Omni Gateway communicates with the internal API endpoint using the forward proxy. When you enable noProxy and list the API Upstream domain, Omni Gateway communicates directly with the internal API endpoint.
Configuring Forward Proxy Parameters
apiVersion: gateway.mulesoft.com/v1alpha1
kind: Configuration
metadata:
  name: forward-proxy
spec:
  forwardProxy:
    https:
      address: http://proxy:8888
      basicAuth:
        username: <string>
        password: <string>
    noProxy:
       - fluentd
- .svc.cluster.local| Parameter | Required or Optional | Description |
|---|---|---|
|
required |
Proxy adddress. |
|
Optional |
Supplies the authentication username and password. |
|
Required when |
Authentication username |
|
Required when |
Authentication password. |
|
Optional |
Array containing domain names or IP addresses to communicate to without using the forward proxy. Each IP address must be listed in the array. The |
Configure a Forward Proxy for Omni Gateway as a Linux Service
-
Create a YAML configuration file in the Omni Gateway configuration directory:
sudo touch /usr/local/share/mulesoft/flex-gateway/conf.d/forward-config.yaml -
Update the file with your desired forward proxy configuration details.
-
If your Omni Gateway does not have direct internet access, see Forward Proxy Omni Gateway Registration.
Configure a Forward Proxy for Omni Gateway in a Docker Container
| If you have already added a volume for a folder with your Omni Gateway configuration files, skip to the create and save a YAML file step. |
-
Press Ctrl+C to stop your Omni Gateway and any replicas.
-
Create a folder named
appin the directory with your Omni Gateway configuration files. -
Restart your Omni Gateway with an additional volume for the new
appdirectory:docker run --rm \ -v "$(pwd)":/usr/local/share/mulesoft/flex-gateway/conf.d \ -p 8080:8080 \ mulesoft/flex-gatewaySpecify an optional name you want to assign to your Omni Replica by including the following: -e FLEX_NAME=<name-for-flex-replica> \. -
Create and save a YAML file with your desired forward proxy configuration details.
-
If your Omni Gateway does not have direct internet access, see Forward Proxy Omni Gateway Registration.
Configure a Forward Proxy for Omni Gateway in a Kubernetes Cluster
To configure a forward proxy for Omni Gateway, create a new YAML configuration resource with your forward proxy details.
If your Omni Gateway does not have direct internet access, see Forward Proxy Omni Gateway Registration.
Forward Proxy Omni Gateway Registration
If your Omni Gateway is in an internal network where all internet connections pass through the forward proxy, you must add the --https-proxy flag when registering an Omni Gateway.
Add the --https-proxy flag with your proxy address parameter:
--https-proxy=http://proxy:8888
Provide your username and password parameters if you enable basicAuth:
--https-proxy=http://<username>:<password>@proxy:8888
The following sample registration command shows flag placement:
flexctl register \
--username=<your-username> \
--password=<your-password> \
--environment=<your-environment-id> \
--organization=<your-org-id> \
--output-directory=/usr/local/share/mulesoft/flex-gateway/conf.d \
--https-proxy=http://<username>:<password>@proxy:8888 \
my-gateway| Use the relevant registration command for your Omni Gateway deployment. |