HTTP Request Configuration Reference
A typical use of the HTTP request operation is to consume an external HTTP service using the default GET method. By default, the GET and OPTIONS methods do not send the payload in the request; the body of the HTTP request is empty. The other methods send the message payload as the body of your request.
After sending a request, the connector receives the response and passes it to the next element in your application’s flow.
The required minimum setting for the request operation is a host URI, which can include a path. You can configure the following types of authentication in the request operation:
-
Basic
-
OAuth
-
NT LAN Manager (NTLM)
-
Digest
Map Between Mule Messages and HTTP Requests
By default, the HTTP request operation sends the Mule message payload as the HTTP request body but you can customize it using a DataWeave script or expression.
Add Custom Parameters
In addition to the body of the request, you can configure:
-
Request and response size limits
-
Headers
-
Query parameters
-
URI parameters
-
A map of multiple headers or parameters
| Mule 4 provides support for HTTP request Server Name Indication (SNI), which is handled in the backend of HTTP Connector. |
HTTP Request and Response Size Limits
By default, Mule defines different limits for the HTTP request size, response size, and request/response header size. However, you can change these max values by modifying the corresponding property in the wrapper.conf file.
| Maximum Allowed Value | Property | Default Value (in bytes) |
|---|---|---|
Request/Response Header Size |
|
|
Request Size |
|
|
Response Size |
|
|
Headers
Select Headers in the General configuration to add headers to the request. For example, add header names HeaderName1 and HeaderName2, add header values HeaderValue1 and HeaderValue2. You can use DataWeave expressions, for example #[{'HeaderName1' : 'HeaderValue1', 'HeaderName2' : 'HeaderValue2'}].
There are also use cases in which there are a set of default headers you always want to set. For example, you might want to always send authentication headers like x-csrf-token: Fetch.
You can specify default headers at the config level so that you don’t have to specify them on every single request. For example:
<http:request-config name="requestConfig">
    <http:request-connection host="localhost" port="8081" streamResponse="true" responseBufferSize="1024"/>
    <http:default-headers >
        <http:default-header key="x-csrf-token" value="Fetch" />
    </http:default-headers>
</http:request-config>
With this configuration, those headers will be added to every outbound request, alongside any headers you specify in the actual request.
The default headers also accept expressions, allowing you to use dynamic values. For example:
<http:request-config name="requestConfig">
    <http:request-connection host="localhost" port="8081" streamResponse="true" responseBufferSize="1024"/>
    <http:default-headers >
        <http:default-header key="custom-role" value="#[vars.role]" />
    </http:default-headers>
</http:request-config>
This practice is helpful and convenient but has some important caveats to consider. Using expressions in a configuration element constitutes a dynamic configuration. The lifecycle of a dynamic configuration is not explained here, but in a nutshell, all expressions in the config are evaluated each time the connector is used and for each set of distinct values a new configuration instance is created and initialized.
For the particular case of the HTTP connector, this means that it’s only a good idea to use default headers with expressions when you are certain that the universe of all possible values that those expressions can take is small. If, on the contrary, it is likely that every single evaluation is going to yield a different value, you’ll end up creating several instances of the HTTP client, which will affect performance (due to the extra work that initializing a client takes) and be resource-consuming. For such cases, the recommendation is to not use default headers but rather to specify headers on the request operation itself:
<http:request config-ref="requestConfig" method="#[attributes.method]" path="#[attributes.maskedRequestPath]">
	<http:headers>#[{'custom-role':vars.role}]</http:headers>
</http:request>
Query Parameters
In General > Request > Query Parameters, click the plus icon (+) to add a parameter to a request. Type a name and value for the parameter or use a DataWeave expression to define the name and value.
URI Parameters
You configure a URI parameter when you want to use a placeholder, such as /customer/{customerId}, in the path of your request. To configure a URI parameter, type the placeholder enclosed in curly brackets in the Path field. Select URI Parameters, click +, and enter a name and value.
For example, enter customerId and 20 as the name and value.
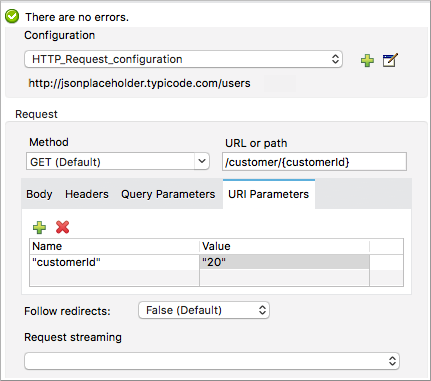
Alternatively, you can use DataWeave expressions in the name and value fields.
When the application runs, it performs a GET request to http://www.example.com/customer/20.
Dynamic Parameters and Headers
If, at design time, you don’t know how many query parameters or headers a request might need, use DataWeave and a variable map to dynamically assign parameters or headers to the request.
For example, you create a map variable named customMap and assign the variable a map of values using DataWeave, then use that variable to set up the headers of your request:
#[vars.customMap ++ {'HeaderName1' : 'HeaderValue1'}]
To set URI parameters dynamically, use a DataWeave expression that returns a map of the parameters. For example:
-
Set Path to:
/test/{p1}/{p2} -
URI Parameter names: p1 and p2
-
URI Parameter value:
#[vars.customMap] -
Before the request, assuming p1 already set:
#[vars.customMap ++ {'p2': 'customer'}]
The connector resolves parameters for each request, and evaluates DataWeave expressions in the context of the current message, in the order specified in the request. If the same parameter is defined more than once, the latest value is used.
Sending Form Parameters in a POST Request
To send parameters in a POST request, In General > Request, select the POST method.
In Body, construct the payload of the Mule message as application/x-www-form-urlencoded with the names and the values of the parameters to send. For example:
#[output application/x-www-form-urlencoded --- {'key1':'value1', 'key2':'value2'}]
A POST request is sent to the host location you specify with Content-Type: application/x-www-form-urlencoded, and the body is “key1=value1&key2=value2”.
Map Between HTTP Responses and Mule Messages
An HTTP response is mapped to a Mule message similar to the way the HTTP request is mapped to a Mule message.
The following elements don’t apply to HTTP responses:
-
Query parameters
-
URI parameters
-
Inbound attributes related to the HTTP request URI
In addition, the HTTP request operation adds the following attributes to the Mule message when receiving a response:
-
attributes.statusCode: Status code of the HTTP response -
attributes.reasonPhrase: Reason phrase of the HTTP response
Round-Robin Requests
The request operation connects to configured hosts using round robin DNS. Mule runtime engine resolves all IP addresses associated to the specified host and performs load balancing by distributing the requests across all returned IPs.
When connecting to resources that require authentication, the external service needs to replicate session information between IP addresses under the host of your service. Otherwise, your requests might get rejected for being unauthorized.
When your external resource does not handle sticky sessions you need to add the service host name to the mule.http.disableRoundRobin system property when starting the Mule Runtime:
./mule -M-Dmule.http.disableRoundRobin=serverhostname.comWhen configured in this way, the request does not use round robin DNS when connecting to the configured host.
HTTP Response Validation
When the HTTP request operation receives an HTTP response, it validates the response through its status code. By default, it throws an error when the status code is higher than or equal to 400. Consequently, if the server returns a 404 (Resource Not Found) or a 500 (Internal Server Error) a failure occurs and error handling is triggered.
To get a detailed overview of an HTTP response body when an exception is thrown during an HTTP request call, review the following example in the Mule Errors documentation.
You can change the set of valid HTTP response codes by configuring General > Response > Response Validator.
-
None: Connector uses the default validator, which throws an error when the status code is greater than or equal to 400.
-
Success Status Code Validator: All the status codes defined within this element are considered valid. The request throws an error for any other status code.
-
Failure Status Code Validator: All the status codes defined within this element are considered invalid and an error is thrown. The request is considered valid with any other status code.
To set which status codes are acceptable as successful responses, in General > Response > Response Validator, select Success Status Code Validator. In Values, enter the list of acceptable status codes, separated by commas. For example: 200,201. If the HTTP response has any other status value, it fails and raises an error.
A range of failure status codes is defined by two ASCII .. full stop characters. Any value between 500 and 599 is considered a failure and raises an error. If the HTTP response has any other status value, it’s considered a success.
Configure a Target
By default, the body of a request is taken from the [payload] of the incoming Mule message and the response is sent onwards as the [payload] of the output Mule message. You can change this default behavior through the General > Request > Body and General > Output > Target Variable attributes. Use this attribute to specify a location other than payload for the output data, such as a variable.
Configure Request Streaming
By default, if the type of the payload is a stream, streaming is used to send the request. You can change this default behavior. Select General > Request > Request Streaming with one of the following values:
-
AUTO (default): The behavior depends on the payload type. If the payload is an InputStream, then streaming is enabled, otherwise it is disabled.
-
ALWAYS: Always enable streaming regardless of the payload type.
-
NEVER: Never stream, even if the payload is a stream.
When streaming, the request does not contain the Content-Length header. It contains the Transfer-Encoding header and sends the body in chunks until the stream is fully consumed.
Configuring Response Streaming
When requesting a large payload, you can choose to stream the response by setting the streamResponse attributes in the HTTP request configuration.
By default, the streamResponse attribute is set to false. When setting this attribute to true, you enable Mule to handle the response as a stream by saving chunks to an in-memory buffer. You can configure the buffer size using the responseBufferSize attribute, but its default size is 10 KB.
<http:request-config name="requestConfig">
    <http:request-connection host="localhost" port="8081" streamResponse="true" responseBufferSize="1024"/>
</http:request-config>
To avoid issues, it’s important to consume responses when streaming.
Retry Mechanisms
The HTTP Connector uses a retry mechanism that enables you to configure how many times it tries consuming an external HTTP service. The HTTP Connector uses this mechanism to reconnect an HTTP client with an HTTP service. The HTTP Connector does not manage TCP connections, so this mechanism does not reconnect sockets.
The HTTP Request operation does not use the reconnection strategy for retries. The reconnection strategy is a mechanism the Mule SDK uses to re-establish Connections when a ConnectionException is caught. It does not affect connections to an HTTP service created by the HTTP Requester.
To learn more about Connections, see Connections documentation
|
To configure how many times the HTTP Requester can try consuming an external HTTP service (retries), you can either use the Until Successful scope, or the built-in retry mechanism in the requester:
-
Until Successful scope
The Until Successful scope processes the components within it, in order, until they succeed or exhaust the maximum number of retries. Enclosing the HTTP Requester in this scope, enables you to configure the maximum number of retriesmaxRetries, and the timemillisBetweenRetriesbetween them, for example:
<until-successful maxRetries="5" millisBetweenRetries="10000">
    <http:request method="GET" config-ref="requestConfig" />
</until-successful>
For additional information on the scope, see Until Successful Scope.
-
Built-in mechanism
When the HTTP Requester receives an error of typeRemotely Closed, the requester automatically retries by default the idempotent methodsPUT,DELETE,GET,HEAD,OPTIONS, andTRACE, three times before it fails.
Thereby, you can configure two system properties for this mechanism:-
-M-Dmule.http.client.maxRetries=5
This system property enables to configure the number of retries before the HTTP Requester fails, additionally, you can also set its value to zero to avoid using the built-in mechanism. -
-M-Dmule.http.client.retryOnAllMethods=true
This system property extends the built-in mechanism to all the methods, and not only the idempotent ones.
-
For additional information on these properties, see System Properties, and to understand why nonidempotent methods, such as POST, aren’t retried by default, refer to RFC 7230.