Configure HTTP Request Operation
The Anypoint Connector for HTTP (HTTP Connector) Request operation enables you to consume an external HTTP service using the default GET method. Otherwise, you can choose what methods the operation accepts:
-
The
GETandOPTIONSmethods do not send the payload in the request (the body of the HTTP request is empty). -
The
CONNECT,DELETE,PATCH,POST, andPUTmethods send the message payload as the body of the HTTP request.
After the HTTP Request operation sends an HTTP request, the connector receives an HTTP response and passes it to the next element in the Mule app’s flow. The HTTP response indicates success or failure, using a variety of status codes. You can also customize how the operation generates HTTP responses in the connector operation global configuration.
By default, the operation sends the Mule message payload as the HTTP request body but you can customize it using a DataWeave script or expression. In addition to the body of the request, you can configure:
-
Request and response size limits
-
Headers
-
Query parameters
-
URI parameters
-
A map of multiple headers or parameters
| Mule 4 provides support for HTTP request Server Name Indication (SNI), which is handled in the backend of HTTP Connector. |
Configure HTTP Request Connection
To use an HTTP Request operation, you must set a request global configuration with a connection provider to a host URI, which can include a path. You can additionally configure a receiving port and a communication protocol.
-
Host
Indicates where the requests are sent. Additionally, it can be a host name or an IP. -
Port
Indicates where the requests are sent. -
Protocol
Indicates the protocol for communication, either HTTP for standard connections or HTTPS for TLS secure connections.
To enable secure connections through HTTPS, you must define a TLS configuration context in the connection and provide:
-
A keystore for the server
-
A truststore if you need two-way authentication
To learn about TLS configuration, refer to the Configure TLS with Keystores and Truststores documentation.
Additionally, you can configure the Authentication field with the following types:
-
Basic authentication
-
Digest authentication
-
Ntlm authentication (NT LAN Manager)
To learn about authentication types and examples, refer to the Configure Authentication for HTTP Requests documentation.
The following example shows how to configure the HTTP Request connection in Studio:
-
In the Mule Palette view, select HTTP > Request.
-
Drag Request to the Studio canvas.
-
Click the plus sign (+) next to the Connector configuration field to configure a global element that can be used by all instances of HTTP Request in the app.
-
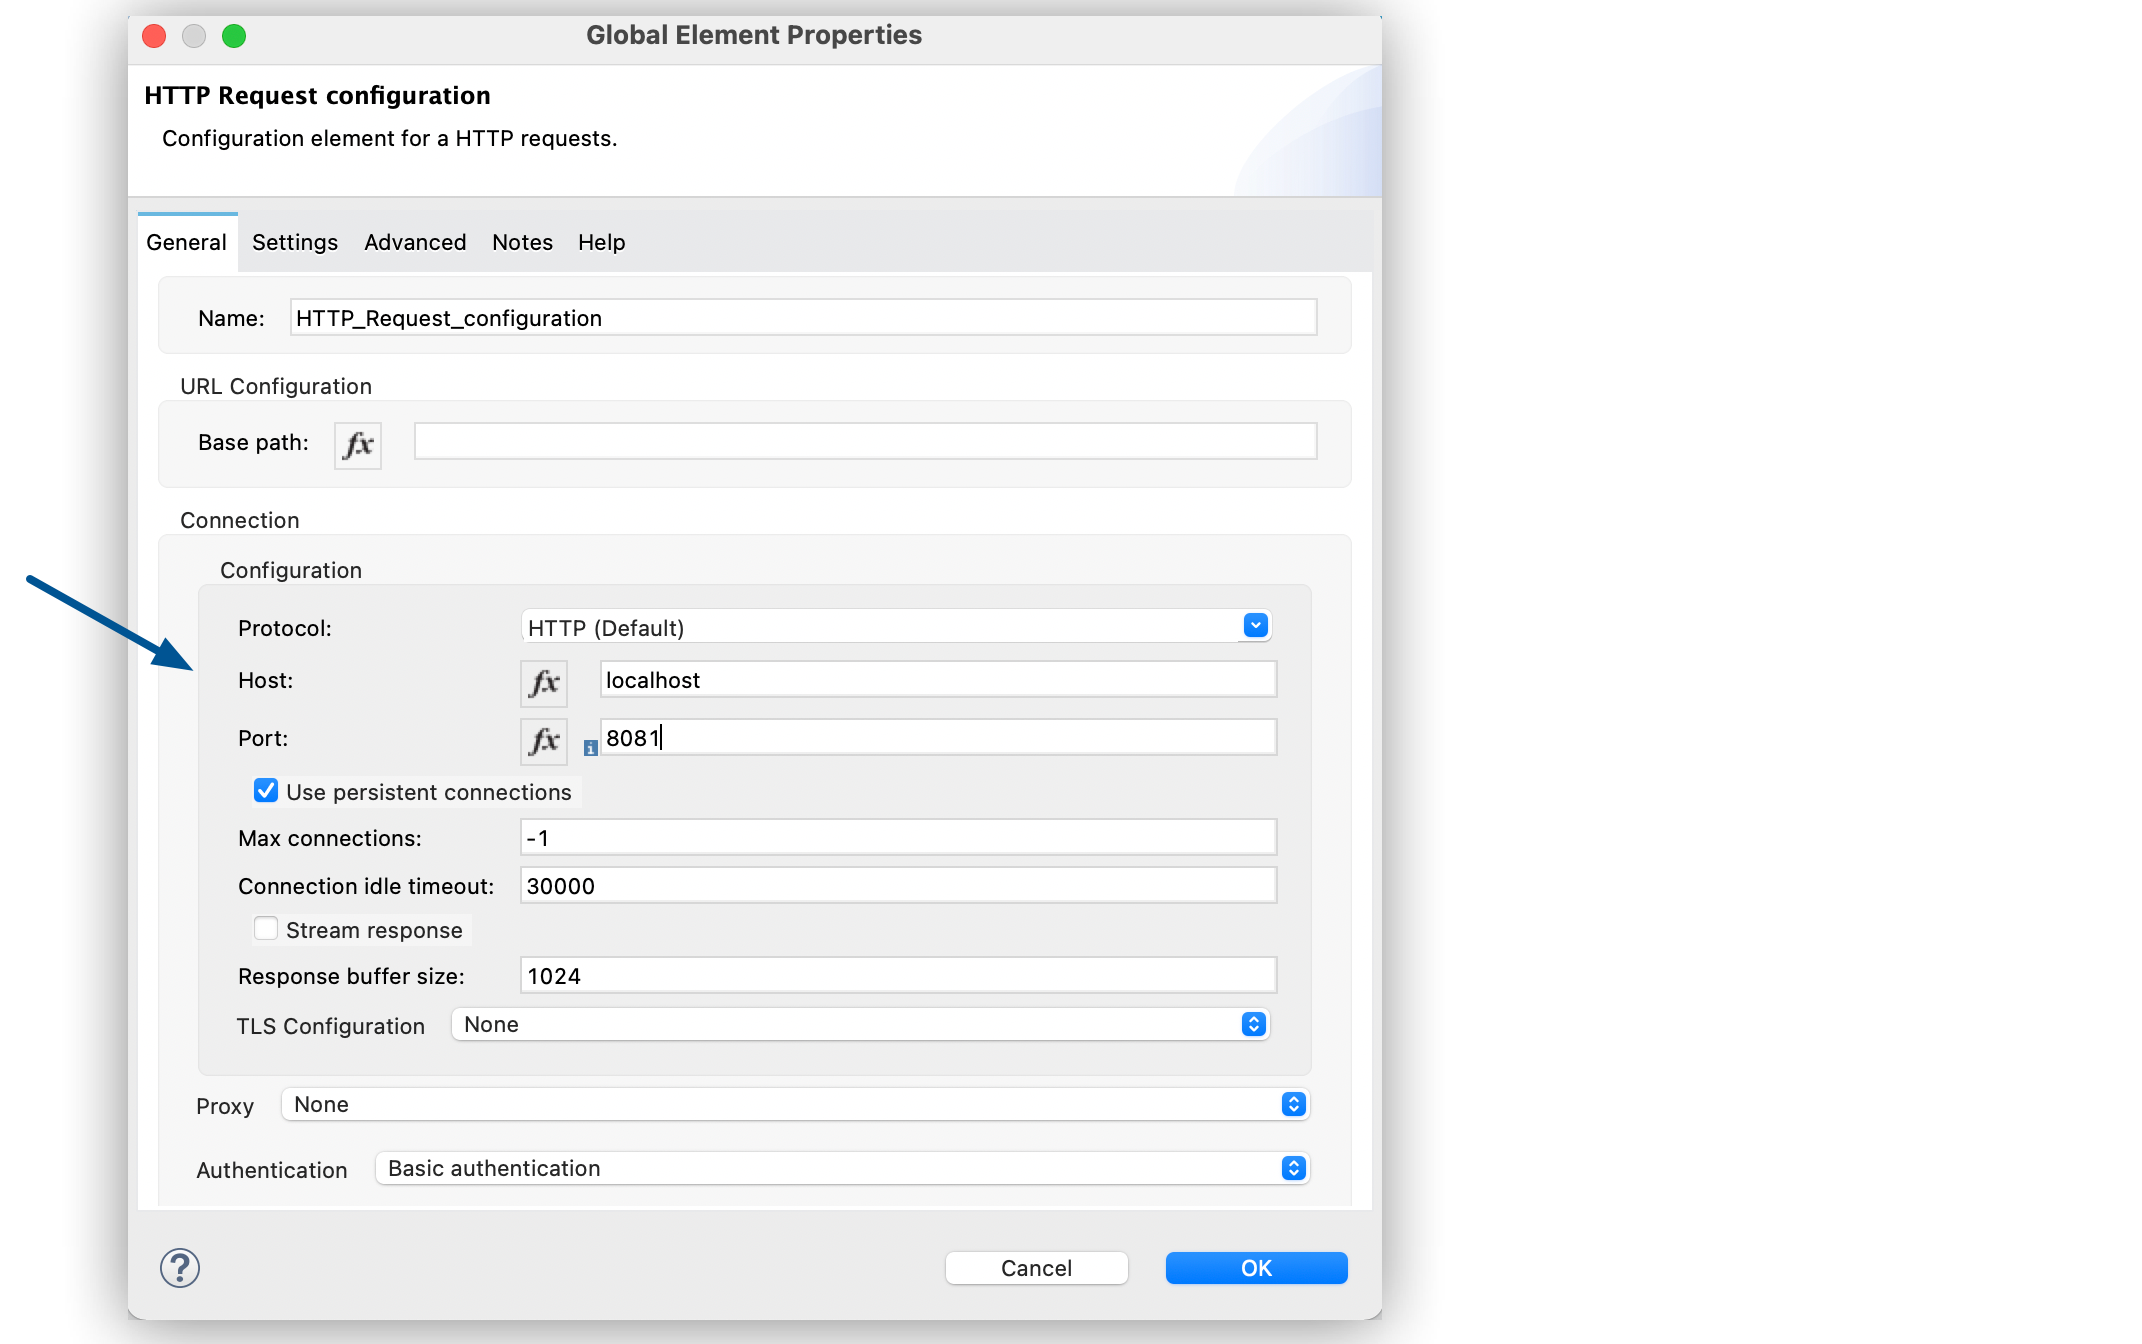
Set Host to
localhostand Port to8081:

-
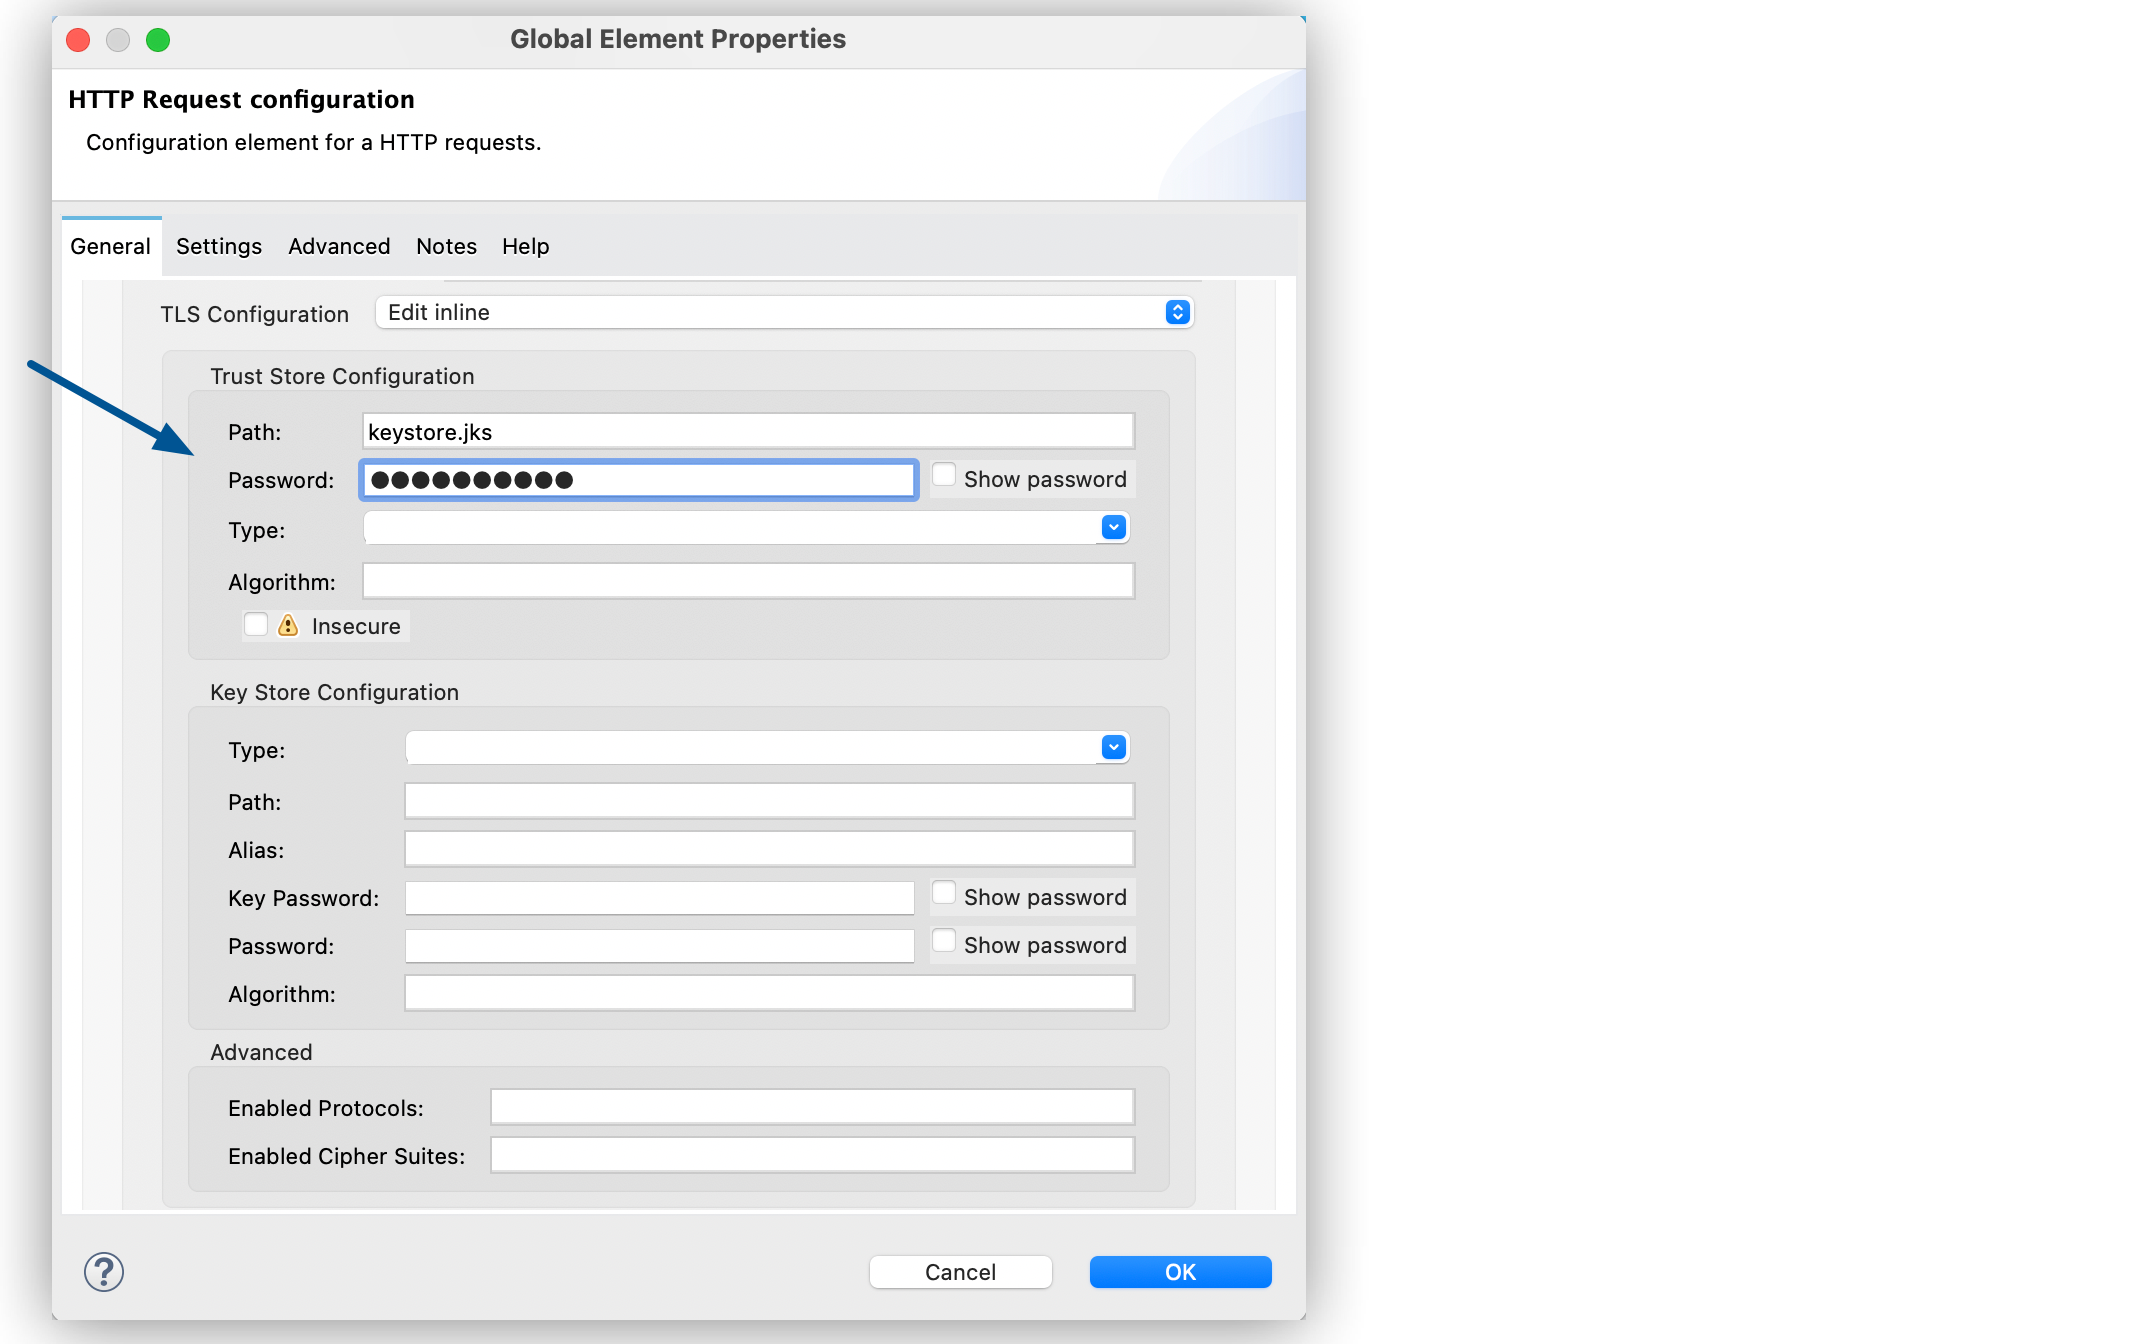
Set TLS configuration to Edit inline.
-
In the Trust Store Configuration section, set Path to
keystore.jksand Password toMypassword:
-
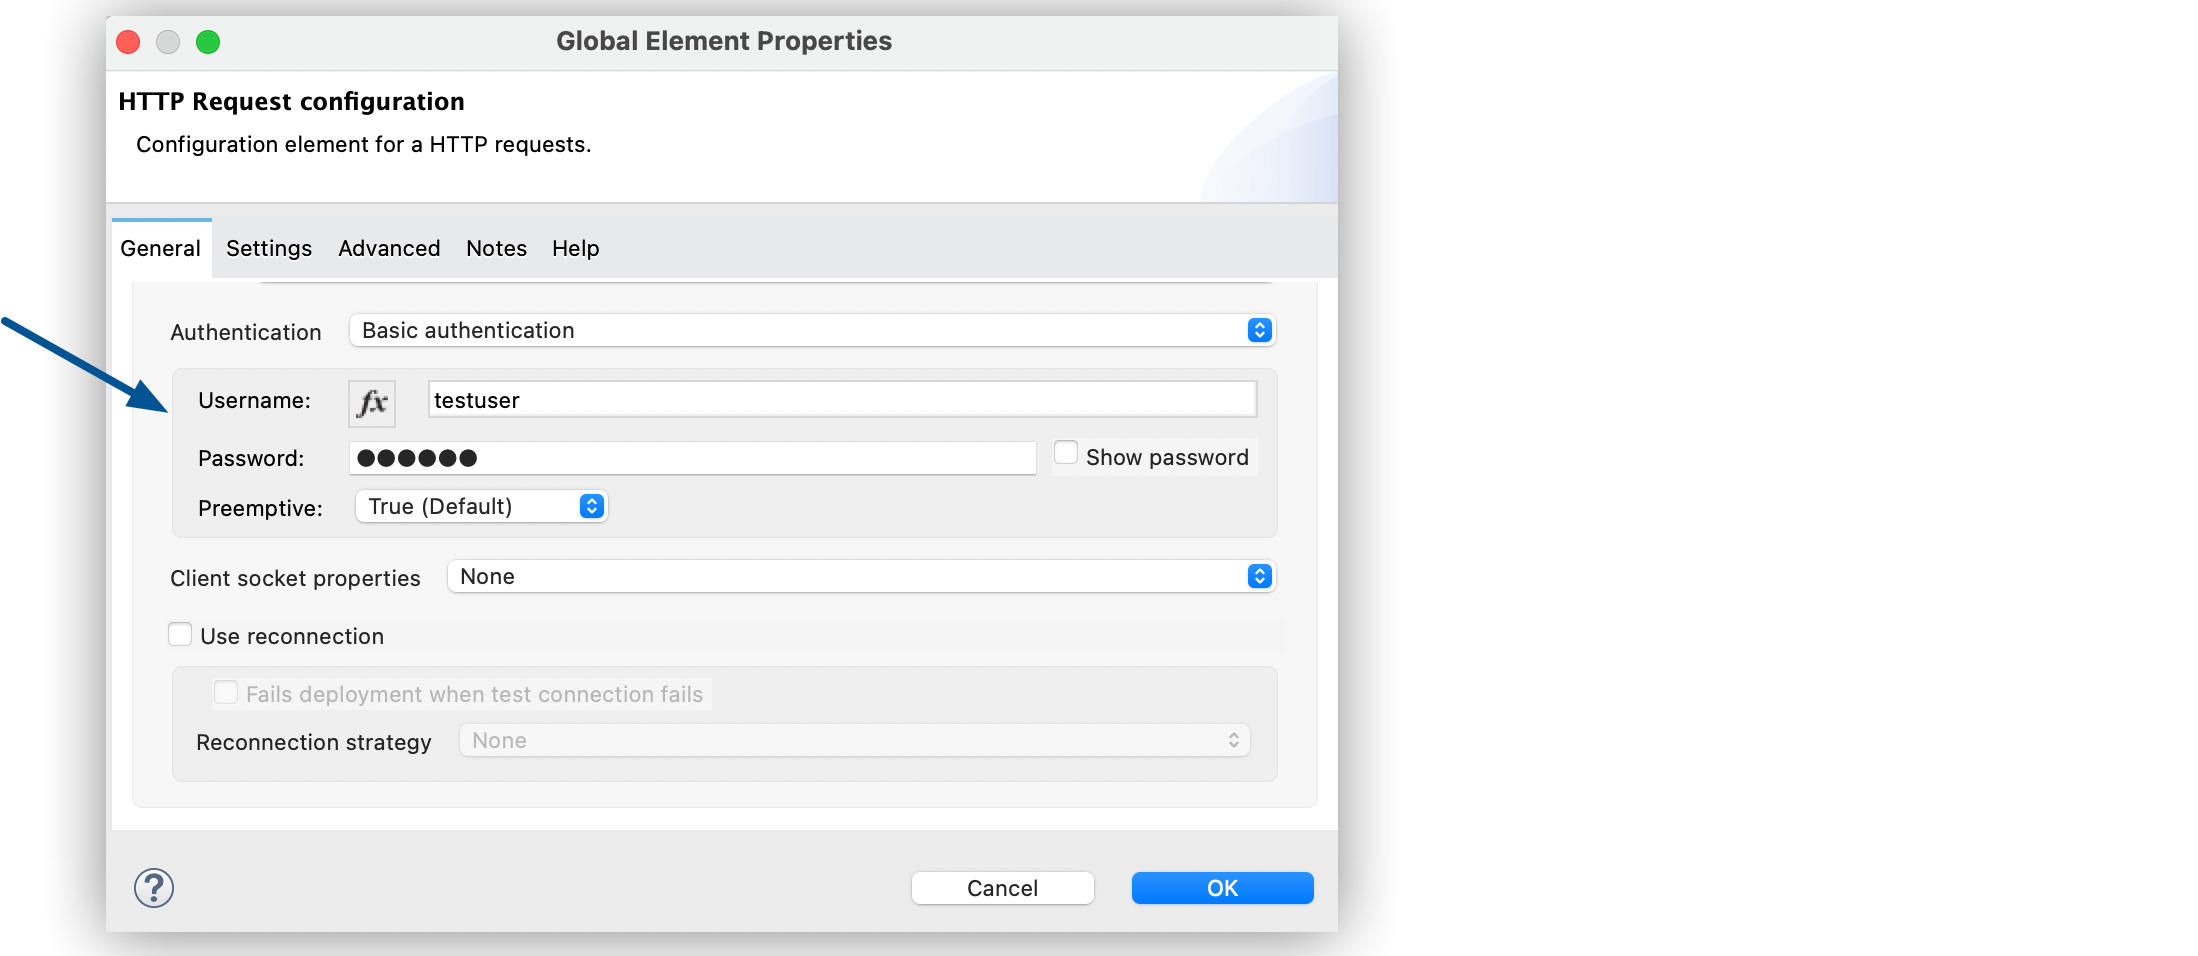
Set Authentication to Basic authentication.
-
Set Username to
testuserand Password toMypassword.
-
Click OK.
-
In the HTTP Request configuration screen, set Path to
/testpath:
In the Configuration XML editor, the host, port, path, trust-store, and authentication configurations look like this example:
<http:request-config name="HTTP_Request_configuration">
		<http:request-connection host="localhost" port="8081">
			<tls:context >
				<tls:trust-store path="keystore.jks" password="Mypassword" />
			</tls:context>
			<http:authentication >
				<http:basic-authentication username="testuser" password="Mypassword" />
			</http:authentication>
		</http:request-connection>
	</http:request-config>
  <flow name="httplistenerresponseFlow1" >
  <http:request method="GET" config-ref="HTTP_Request_configuration" path="/testpath"/>
</flow>
Configure HTTP Request and Response Size Limits
By default, Mule defines maximum values for the HTTP request size, response size, and request/response header size. However, you can change these values by modifying the following properties in the wrapper.conf file:
| Name | Property | Description | Default Value (in bytes) |
|---|---|---|---|
Request/Response Header Size |
|
Maximum size in bytes accepted for the HTTP request header section (request line + headers) |
|
Request Size |
|
Maximum size of the receive buffer that controls the number of unread bytes to hold and reflects the maximum number of unacknowledged bytes to send. |
|
Response Size |
|
Maximum size of the send buffer that controls the outgoing packages until there is an acknowledgment from the receiving systems. |
|
You can also change the maximum values for the server response headers, server request headers, and client request headers by modifying the following system properties in the wrapper.conf file:
| Name | Property | Description | Default Value |
|---|---|---|---|
Server Response Headers |
|
Maximum amount of headers allowed on a response sent from the HTTP server. |
|
Server Request Headers |
|
Maximum amount of headers allowed on a request sent to the HTTP server. |
|
Client Request Headers |
|
Maximum amount of headers allowed on a request sent by the HTTP client. |
|
There is no such Max Client Response Header system property as there is no maximum limit for client HTTP response headers.
To learn more about how to set system properties in the wrapper.conf file, refer to the Set System Properties in the wrapper.conf File documentation.
Configure Headers
You add headers to an HTTP request at one of two levels:
-
Headers
At the HTTP Request operation level -
Default headers
At the HTTP Request global configuration level
Configure default headers at the HTTP global configuration level to avoid specifying every header on every single request. With this configuration, those headers are added to every outbound request, alongside any headers you configure at the HTTP Request operation level. Some parameters, including the default headers, also accept expressions, allowing you to use dynamic values.
The following example shows how to configure the Headers field at the HTTP Request operation level in Studio:
-
Select the HTTP Request operation from your flow.
-
In General, at the Request section, select the Headers tab.
-
Click the plus sign (+) to add a new header.
-
In the Name column, change "Key" to
"HeaderName1". -
In the Value column, change "Value" to
"HeaderValue1".

In the Configuration XML editor, the headers configuration looks like this:
<http:request method="GET" config-ref="HTTP_Request_configuration" path="/testpath">
 <http:headers ><![CDATA[#[output application/java
---
{
	"HeaderName1" : "HeaderValue1"
}]]]></http:headers>
		</http:request>
You can use DataWeave expressions to add headers as well:
-
In the HTTP Request operation configuration window, select the Headers tab.
-
Click fx to switch to literal mode.
-
In the box located in the right section of the fx button, add the DataWeave expression
[{'HeaderName1' : 'HeaderValue1'}].

In the Configuration XML editor, the headers configuration looks like this:
<http:request method="GET" config-ref="HTTP_Request_configuration" path="/testpath">
			<http:headers ><![CDATA[#[[{'HeaderName1' : 'HeaderValue1'}]]]]></http:headers>
		</http:request>
The following example shows how to configure the Default headers field at the HTTP Request global configuration level in Studio:
-
Select the HTTP Request operation from your flow.
-
Click the plus sign (+) next to the Connector configuration field to configure a global element that can be used by all instances of HTTP Request in the app. If a configuration is already created, click the edit button instead.
-
Click Settings.
-
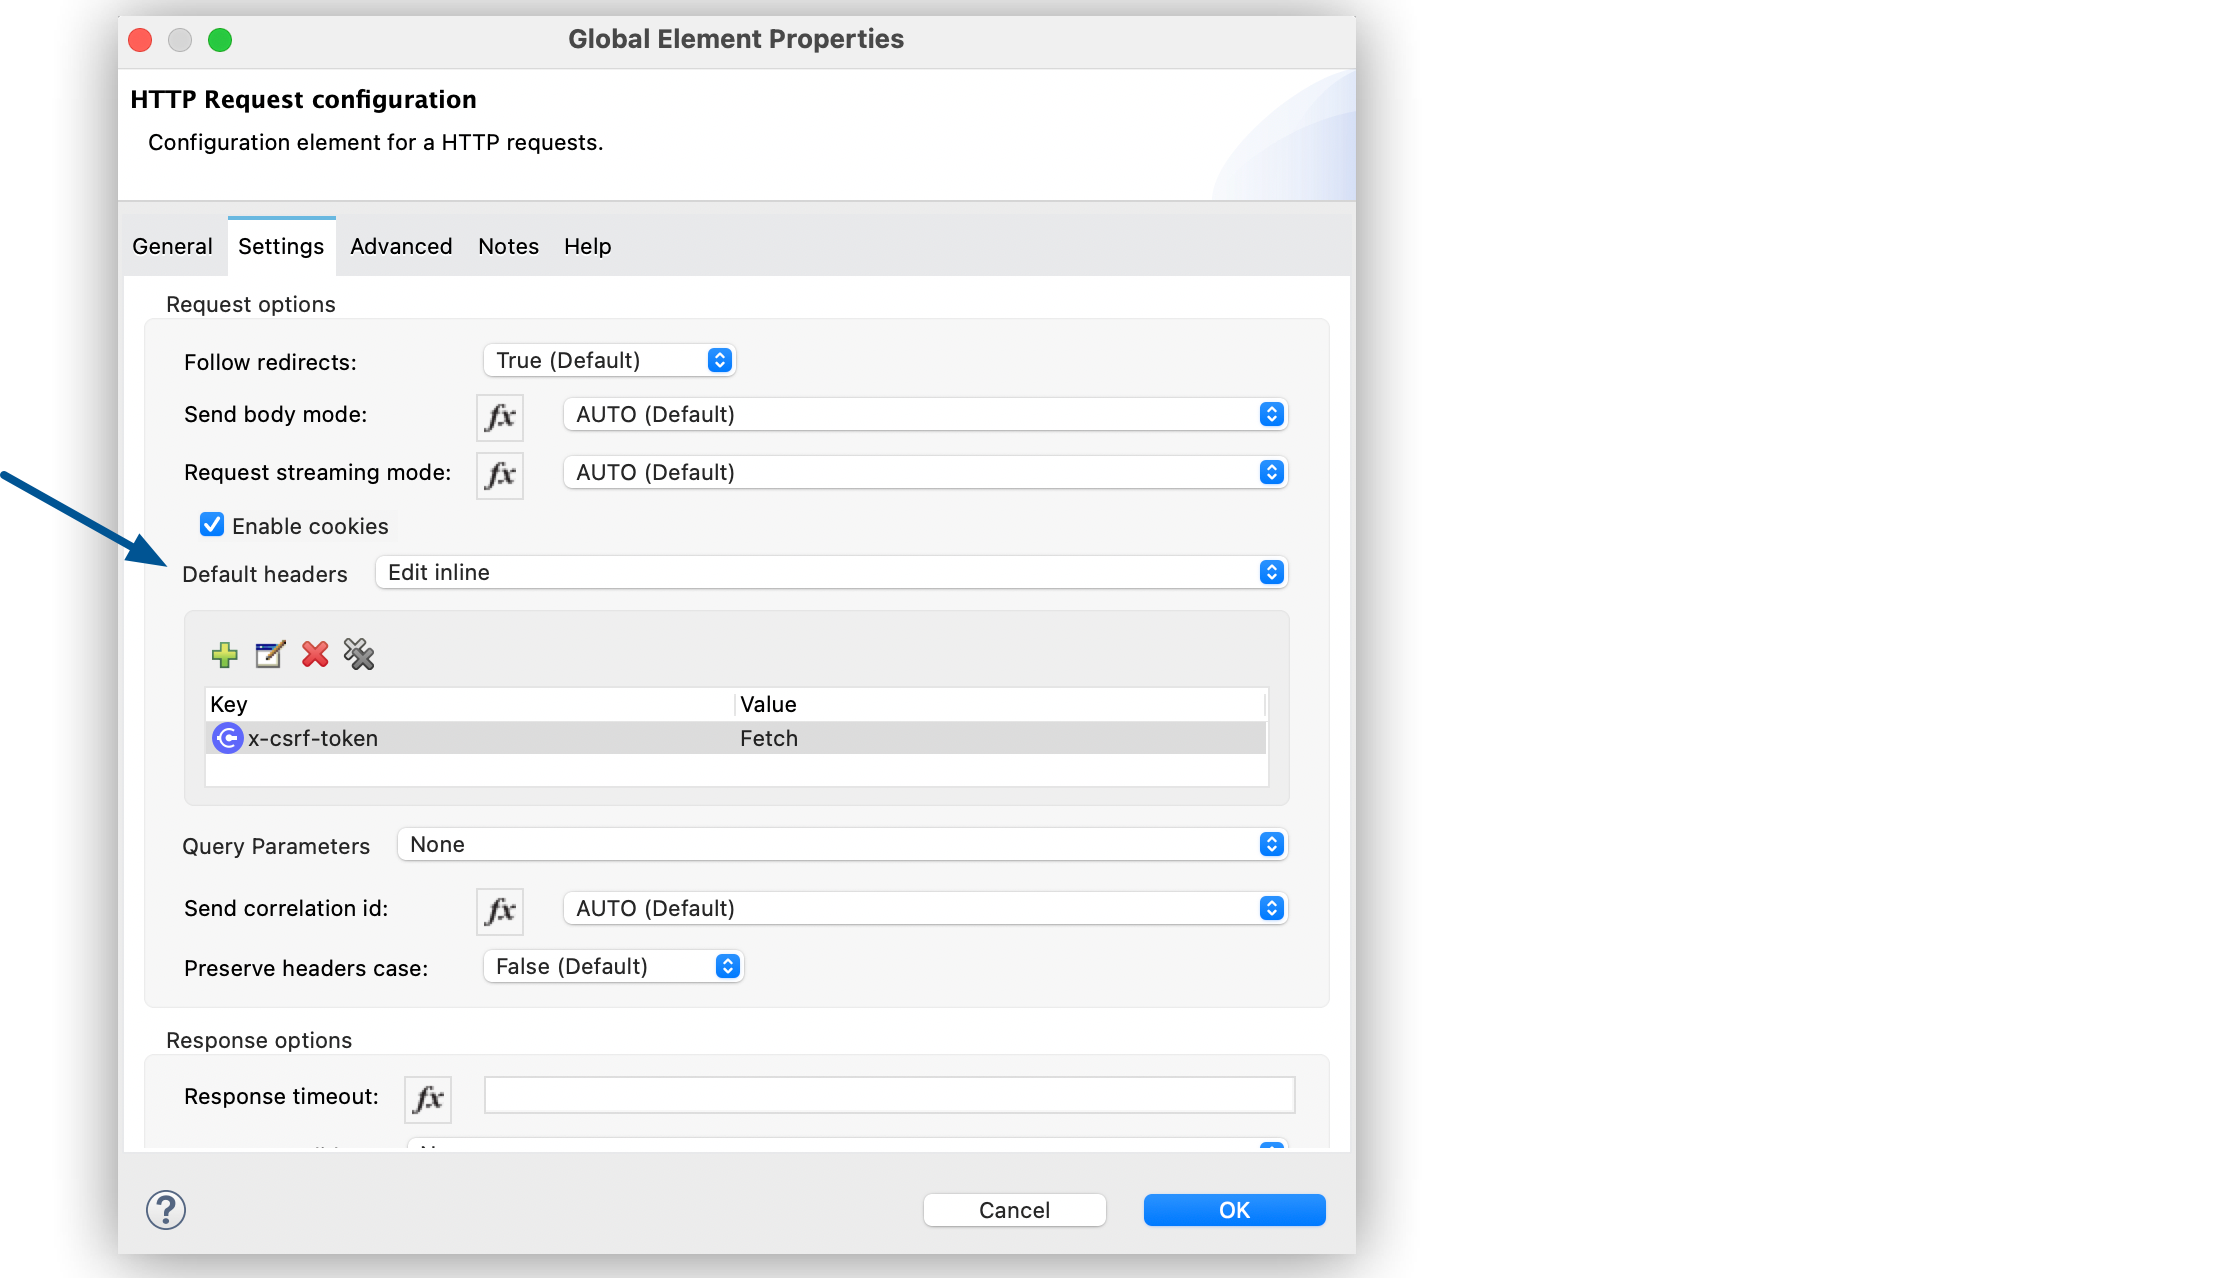
Set Default headers to Edit inline.
-
Click the plus sign (+) to add a new header.
-
Set Key to
x-csrf-token. -
Set Value to
Fetch.
-
Click Finish.
In the Configuration XML editor, the default-headers configuration looks like this:
<http:default-headers >
    <http:default-header key="x-csrf-token" value="Fetch" />
</http:default-headers>
The following example shows how to configure default headers with DataWeave expressions, allowing you to use dynamic values:
-
In the Default headers configuration window.
-
For Value, click fx to switch to literal mode.
-
Set Value to
#[vars.role].
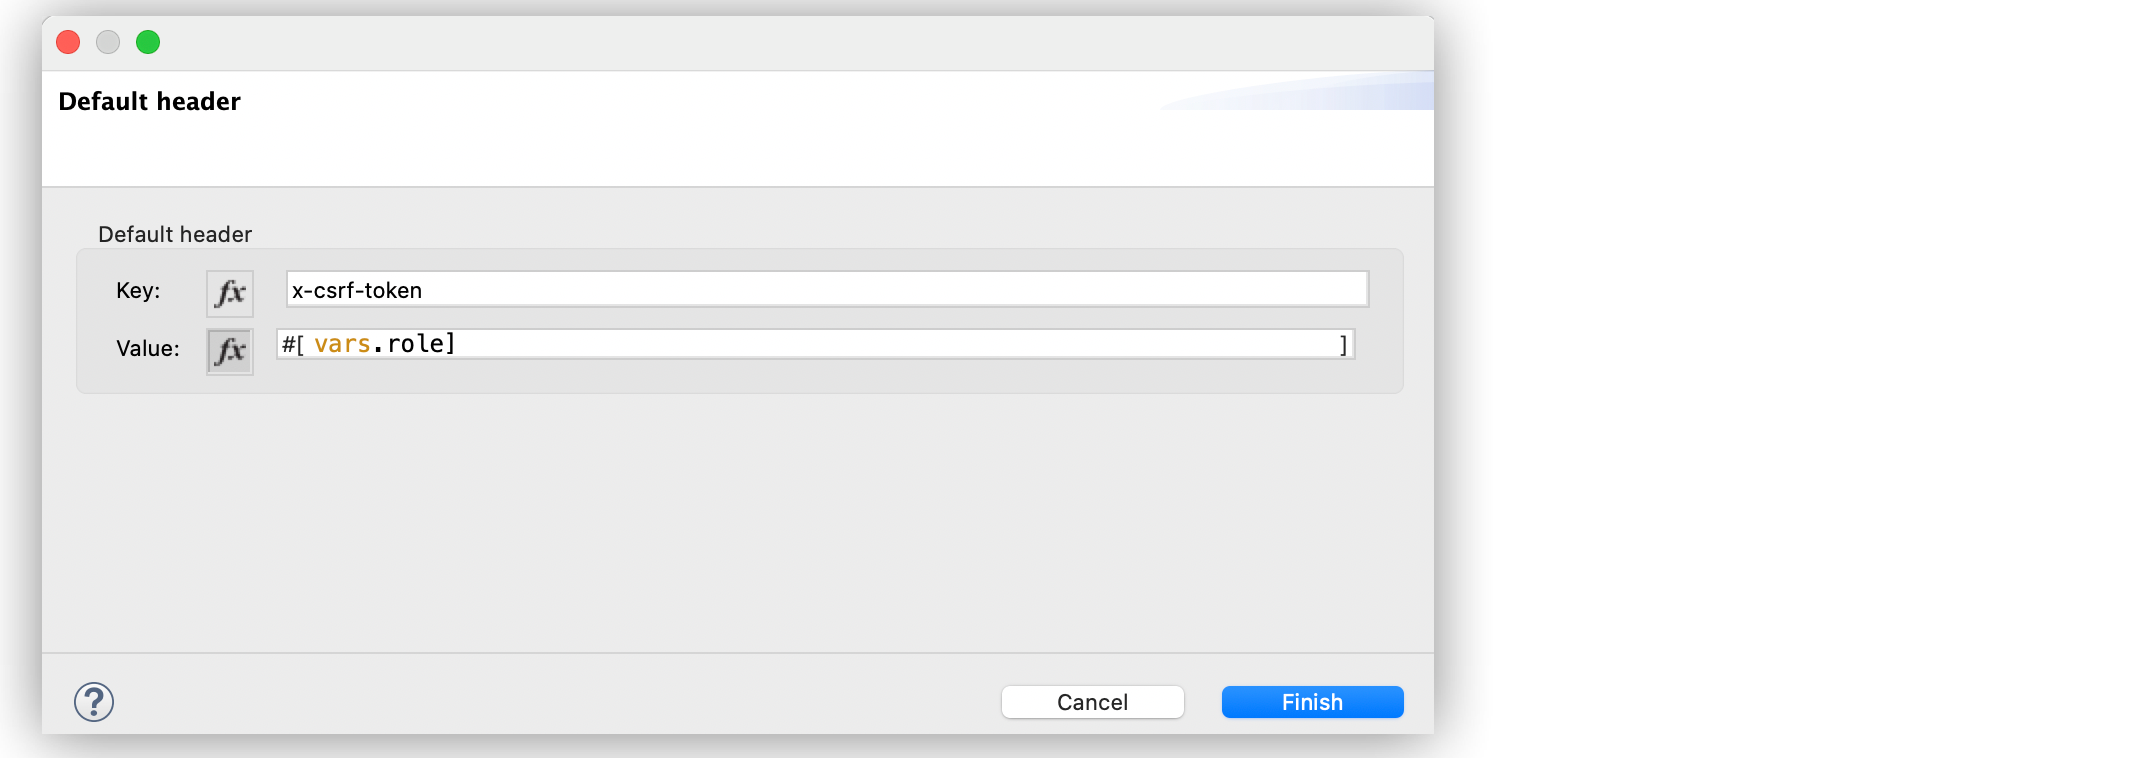
In the Configuration XML editor, the default-headers configuration looks like this:
<http:request-config name="requestConfig">
    <http:default-headers >
        <http:default-header key="custom-role" value="#[vars.role]" />
    </http:default-headers>
</http:request-config>
Using DataWeave expressions in a configuration element constitutes a dynamic configuration. Each time a Mule app uses an HTTP Request operation, all expressions in the configuration are evaluated, and for each set of distinct values, a new configuration instance is created and initialized.
| For HTTP Connector, use default headers with small value expressions. Otherwise, every single evaluation returns a different value and creates several instances of the HTTP client, consuming valuable resources and negatively affecting performance. |
In such cases, configure headers with expressions at the HTTP Request operation level:
<http:request config-ref="requestConfig" method="#[attributes.method]" path="#[attributes.maskedRequestPath]">
	<http:headers>#[{'custom-role':vars.role}]</http:headers>
</http:request>
Configure Query Parameters
To configure query parameters for an HTTP request, follow these steps:
-
In Studio, select the HTTP Request operation from your flow.
-
In General, at the Request section, select the Query Parameters tab.
-
Click the plus sign (+) to add a parameter to the request.
-
In the Name column, change "Key" to
"Keyquery". -
In the Value column, change "Value" to
"Valuequery".

In the Configuration XML editor, the query-params configuration looks like this:
<http:request method="GET" config-ref="HTTP_Request_configuration" path="/testpath">
	<http:query-params ><![CDATA[#[output application/java
---
{
	"keyquery" : "Valuequery"
}]]]></http:query-params>
		</http:request>
You can use DataWeave expressions to add query parameters as well:
-
In the HTTP Request operation configuration window, select the Query Parameters tab.
-
Click fx to switch to literal mode.
-
In the box located in the right section of the fx button, add the DataWeave expression
[{'Keyquery' : 'Valuequery'}].

In the Configuration XML editor, the query-params configuration looks like this:
<http:request method="GET" config-ref="HTTP_Request_configuration" path="/testpath">
	<http:query-params ><![CDATA[#[[{'Keyquery' : 'Valuequery'}]]]]></http:query-params>
</http:request>
Configure URI Parameters
Configure URI parameters when you want to use a placeholder, such as /customer/{customerId}, in the path of your request.
The following example shows how to configure the URI Parameters field in Studio:
-
Select the HTTP Request operation from your flow.
-
In General, set Path to
/customer/{customerId}. -
Select the URI Parameters tab.
-
Click the plus sign (+) to add a new URI parameter.
-
In the Name column, change "Key" to
"customerID". -
In the Value column, change "Value" to
"20".

In the Configuration XML editor, the uri-params configuration looks like this:
<http:request method="GET" config-ref="HTTP_Request_configuration" path="/customer/{customerId}">
			<http:uri-params ><![CDATA[#[output application/java
---
{
	"customerID" : "20"
}]]]></http:uri-params>
		</http:request>
You can use DataWeave expressions to add URI parameters as well:
-
In the HTTP Request operation configuration window, select the URI Parameters tab.
-
Click fx to switch to literal mode.
-
In the box located in the right section of the fx button, add the DataWeave expression
[{'customerID' : '20'}].

In the Configuration XML editor, the uri-params configuration looks like this:
<http:request method="GET" config-ref="HTTP_Request_configuration" path="/customer/{customerId}">
			<http:uri-params ><![CDATA[#[[{'customerID' : '20'}]]]]></http:uri-params>
		</http:request>
When the Mule app runs, it performs a GET request to: http://www.example.com/customer/20.
Configure Dynamic Parameters and Headers
When designing your application, if you don’t know how many parameters or headers an HTTP request might need, use DataWeave expressions and a variable map to dynamically assign parameters or headers to the HTTP request.
To set headers dynamically, create a variable map and assign the variable values using DataWeave. Then, use that variable to set up the headers of your request. For example, with a variable map named customMap, you set up the following headers for the request: #[vars.customMap ++ {'HeaderName1' : 'HeaderValue1'}]
To set URI parameters dynamically, use a DataWeave expression that returns a map of the parameters. For example, follow these steps:
-
Set Path to
`/test/{p1}/{p2}.` -
In General, at Request section, click the URI Parameters tab.
-
Click the fx button to enter literal mode.
-
Set the following expression
vars.customMap ++ {'p2': 'customer'}. -
Before the Request operation, add a Set Variable operation.
-
Set Name to
customMap. -
Set Value to the expression
{'p1': 'some'}.
The XML looks like this:
<set-variable value="#[{'p1': 'some'}]" variableName="customMap"/>
<http:request method="GET" config-ref="HTTP_Request_configuration" path="/test/{p1}/{p2}">
  <http:uri-params ><![CDATA[#[vars.customMap ++ {'p2': 'customer'}]]]></http:uri-params>
</http:request>
If you trigger this flow, the request operation sends a request to the path /test/some/customer.
HTTP Connector resolves parameters for each request, and evaluates DataWeave expressions in the context of the current message, in the order specified in the request. If a single parameter is defined more than once, the latest value is used.
Send Form Parameters
To send form parameters in a POST request, follow these steps:
-
In Studio, select the HTTP Request operation from your flow.
-
In General, set Method to POST.
-
In Body, construct the payload of the Mule message as
application/x-www-form-urlencodedwith the names and the values of the parameters to send, for example:
[output application/x-www-form-urlencoded --- {'key1':'value1', 'key2':'value2'}
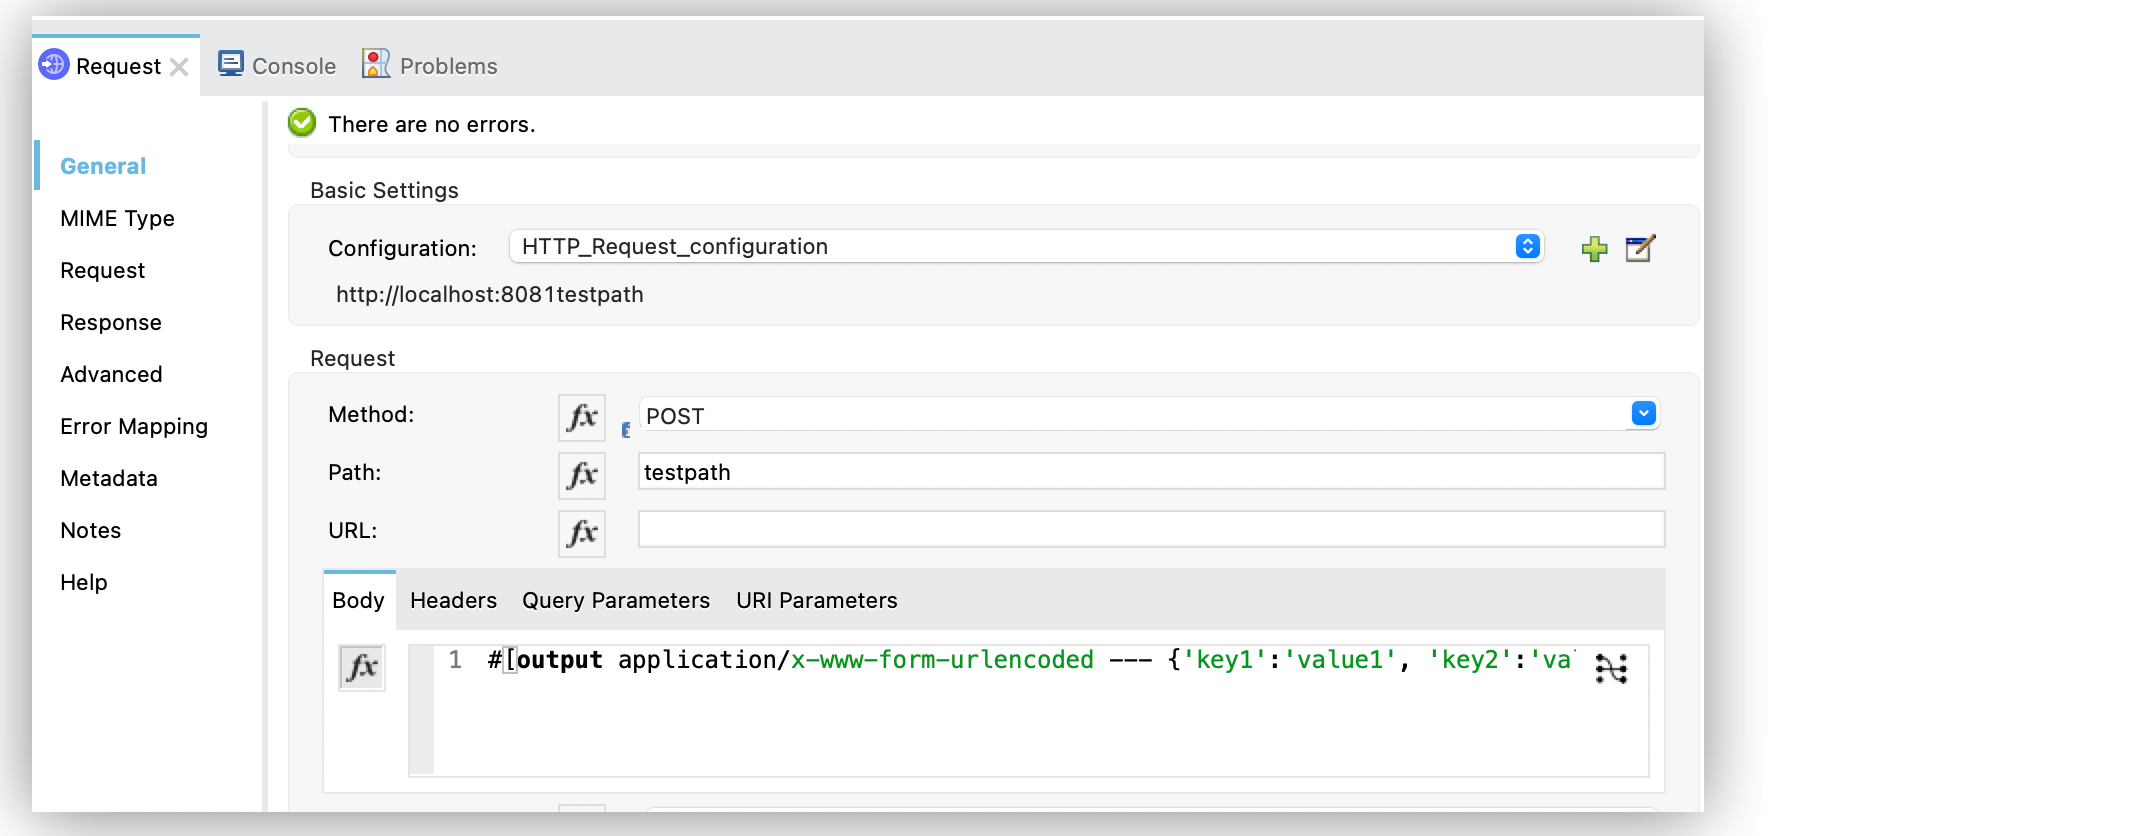
In the Configuration XML editor, the body configuration looks like this:
<flow name="httprequestFlow" >
	<http:request method="POST" config-ref="HTTP_Request_configuration" path="testpath">
		<http:body ><![CDATA[#[output application/x-www-form-urlencoded --- {'key1':'value1', 'key2':'value2'}]]]></http:body>
	</http:request>
</flow>
The HTTP Request operation sends a POST request to the host location. The HTTP request contains Content-Type: application/x-www-form-urlencoded and the body is key1=value1&key2=value2.
Configure Round-Robin Requests
The HTTP Request operation connects to configured hosts using round-robin DNS. Mule resolves all IP addresses associated with the specified host and performs load balancing by distributing the requests across all returned IPs.
When the operation connects to resources that require authentication, the external service must replicate session information between IP addresses within the host of your service to avoid request rejection.
If the external resource does not manage sticky sessions, add the service host name to the mule.http.disableRoundRobin system property. The HTTP request won’t use round-robin DNS to connect to the configured host.
Configure this system property when starting Mule by adding:
./mule -M-Dmule.http.disableRoundRobin=serverhostname.com
Configure Response Validator
When the HTTP Request operation receives an HTTP response, the operation validates the response through the response status code. By default, HTTP Connector throws an HTTP error response when the status code is 400 or above. Consequently, if the server returns a 404 (Resource Not Found) or a 500 (Internal Server Error) a failure occurs and the connector triggers the error handling.
Two ASCII .. full stop characters define the range of failure status codes, which means that you can configure a range in a status code validator for example 200..399. In XML looks like this:
<http:response-validator >
	<http:success-status-code-validator values="200..399" />
</http:response-validator>
Any value from 500 through 599 is considered a failure and raises an error. If the HTTP response has any other status code value, it’s considered a success.
The HTTP Request operation adds the following attributes to the Mule message when receiving an HTTP response:
-
attributes.statusCode
Code representing the status of the HTTP response -
attributes.reasonPhrase
A phrase describing the reasoning behind the HTTP response
For a more detailed example of an HTTP response body during an HTTP request call, refer to the HTTP Error Response example documentation.
In the HTTP Request operation configuration, you can customize HTTP responses by configuring the Response validator field to any of these options:
-
None
Uses the default validator, which throws an error when the status code is greater than or equal to 400. -
Expression or Bean reference
Uses a DataWeave expression or bean reference to define the status code. -
Failure status coded validator
Defines failure status codes that throw errors. -
Success status code validator
Defines status codes that indicate success.
The following example shows how to configure the Response validator field in Studio:
-
Select the HTTP Request operation from your flow.
-
In General, click the Response tab.
-
Set Response validator to Success status code validator.
-
In Values, add the list of acceptable status codes, separated by commas, such as
200,201.
If the HTTP response returned has any other status value, the operation fails and raises an error.

In the Configuration XML editor, the response-validator configuration looks like this:
<http:request method="POST" config-ref="HTTP_Request_configuration" path="testpath">
    <http:response-validator >
      <http:success-status-code-validator values="200,201" />
    </http:response-validator>
  </http:request>
Configure a Target Variable
By default, the body of an HTTP request is taken from the [payload] of the incoming Mule message and the HTTP response is sent as the [payload] of the output Mule message.
You can change this behavior for the HTTP Request operation, either in the Body field section or by updating the value of the Target Variable field. This value specifies a location other than payload for the output data, such as a variable.
The following example shows how to configure the Target Variable field in Studio:
-
Select the HTTP Request operation from your flow.
-
In General, select the Advanced tab.
-
Set Target Variable to
testvariable. -
Set Target Value to
testvalue.
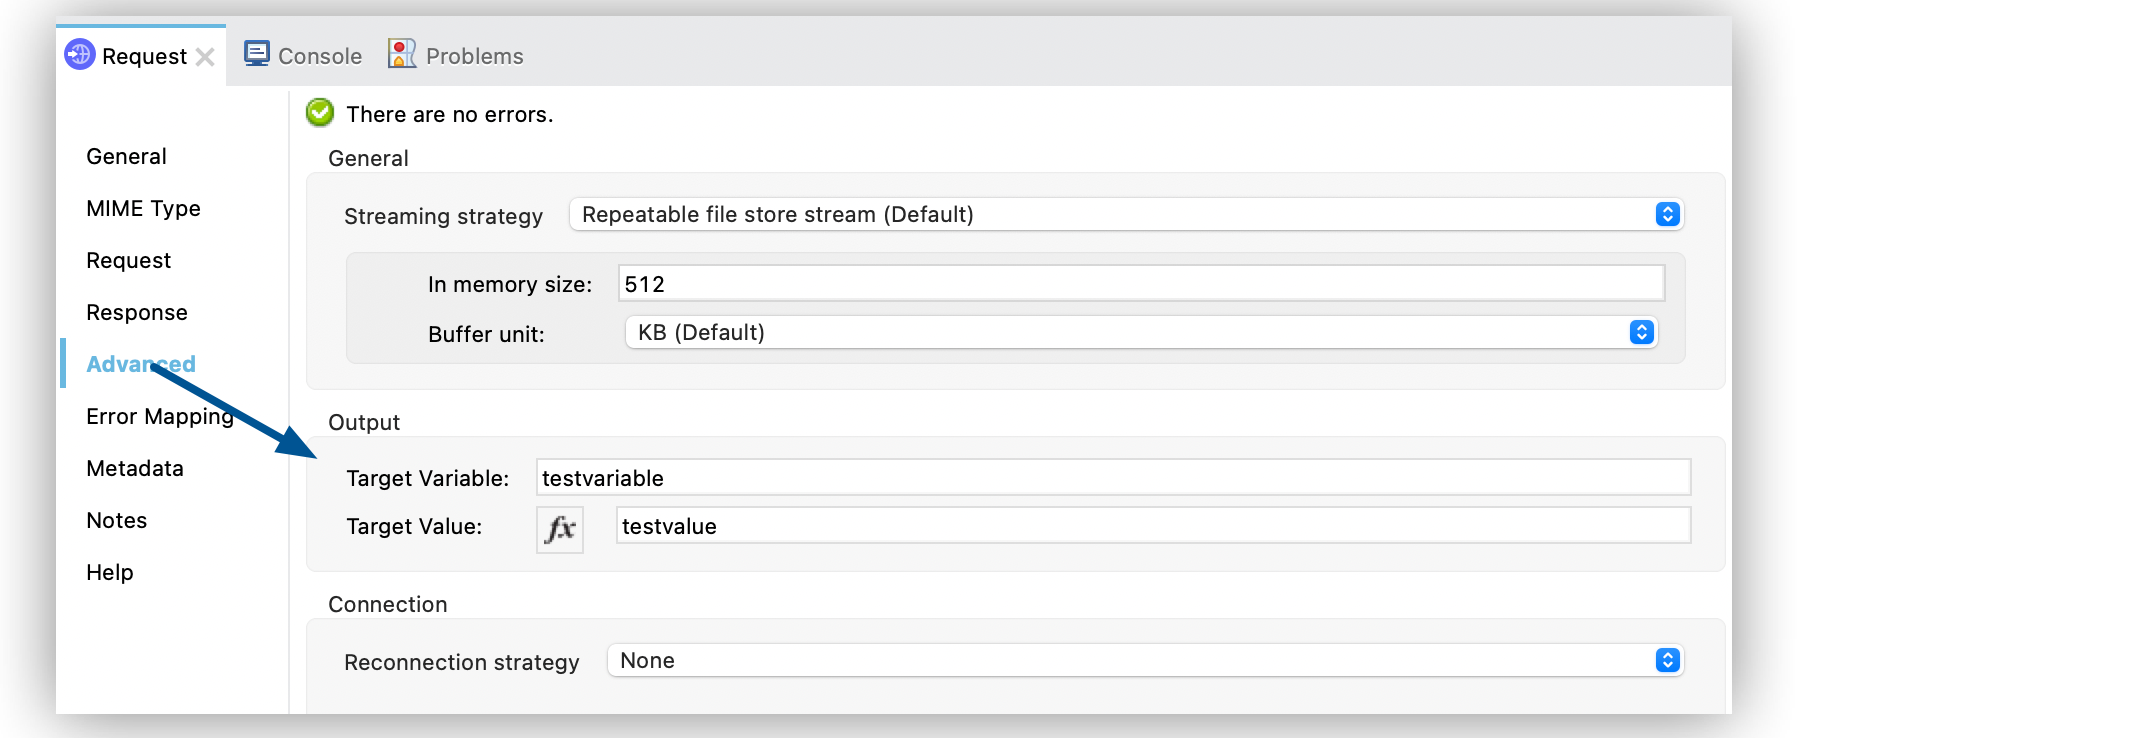
In the Configuration XML editor, the target and targetValue configurations look like this example:
<http:request method="POST" config-ref="HTTP_Request_configuration" path="testpath" target="testvariable" targetValue="testvalue">
		</http:request>
Configure Request Streaming Mode
When HTTP Connector manages request bodies, the connector considers the type of data to send. You can configure the HTTP Request operation to send HTTP requests in chunks. By default, if the payload type is stream, the operation uses the streaming mechanism to send HTTP requests.
To control this behavior, configure the Request streaming mode field to any of these options:
-
ALWAYS
Always enable streaming regardless of the payload type. -
AUTO (default)
The behavior depends on the payload type. If the payload is a stream, streaming is enabled. Otherwise, it is disabled. -
NEVER
Never stream, even if the payload is a stream.
When streaming, the HTTP request does not contain the Content-Length header. The request contains the Transfer-Encoding header and sends the body in chunks until the stream is fully consumed.
The following example shows how to configure the Request streaming mode field in Studio:
-
In the Mule Palette view, select HTTP > Request.
-
Drag Request to the Studio canvas.
-
Set Path to
/path. -
In the HTTP Request operation configuration screen, click the Request tab.
-
Set Request streaming mode to
ALWAYS.

In the Configuration XML editor, the requestStreamingMode configuration looks like this:
<flow name="httprequestFlow"  >
		<http:request method="GET" requestStreamingMode="ALWAYS" config-ref="HTTP_Request_configuration" path="/path"/>
	</flow>
Configure the Request Streaming System Property
Setting Request streaming mode to ALWAYS causes the Mule app to send HTTP requests in chunks, but the configuration doesn’t imply that the Mule app streams the payload internally. The HTTP Request operation needs all the data in memory before sending HTTP requests. Therefore, if the Mule app needs to send a very large request body, the Mule app can generate a high memory consumption, and eventually cause an out-of-memory error. To prevent this issue, Mule provides the mule.http.requestStreaming.enable system property to enable internal request streaming.
If you configure this system property, the HTTP Request operation starts sending the request body before all of the data is in memory. Therefore, the Mule app won’t need as much memory as it would need if you don’t configure this property.
Configure this system property when starting Mule by adding:
./mule -M-Dmule.http.requestStreaming.enable=true
The default value of this property depends on the Mule runtime version. For Mule 4.4 and earlier, the property defaults to false. For Mule 4.5 and later, the property defaults to true.
You can also configure the internal buffer mule.http.requestStreaming.bufferSize system property for the streaming mechanism.
Configure this system property when starting Mule by adding:
./mule -M-Dmule.http.requestStreaming.bufferSize=value
To learn how to set system properties in Anypoint Studio or for on-premises deployments, refer to the system properties documentation.
Configure Response Streaming
When requesting a large payload, you can choose to stream the response by selecting the Stream response field in the HTTP Request global configuration.
By default, the Stream response box is deselected (false). When you select this box (true), you enable Mule to manage the HTTP response as a stream by saving chunks to an in-memory buffer. You can also reconfigure the Response buffer size default of 1024 to a larger value; however, to avoid buffering issues, it’s important to consume responses when streaming.
The following example shows how to configure the Request streaming mode and Response buffer size fields in Studio:
-
In the Mule Palette view, select HTTP > Request.
-
Drag Request to the Studio canvas.
-
Set Path to
/path. -
Click the plus sign (+) to open the HTTP Request global configuration.
-
Select the Stream response box.
-
Set Response buffer size to `100:.
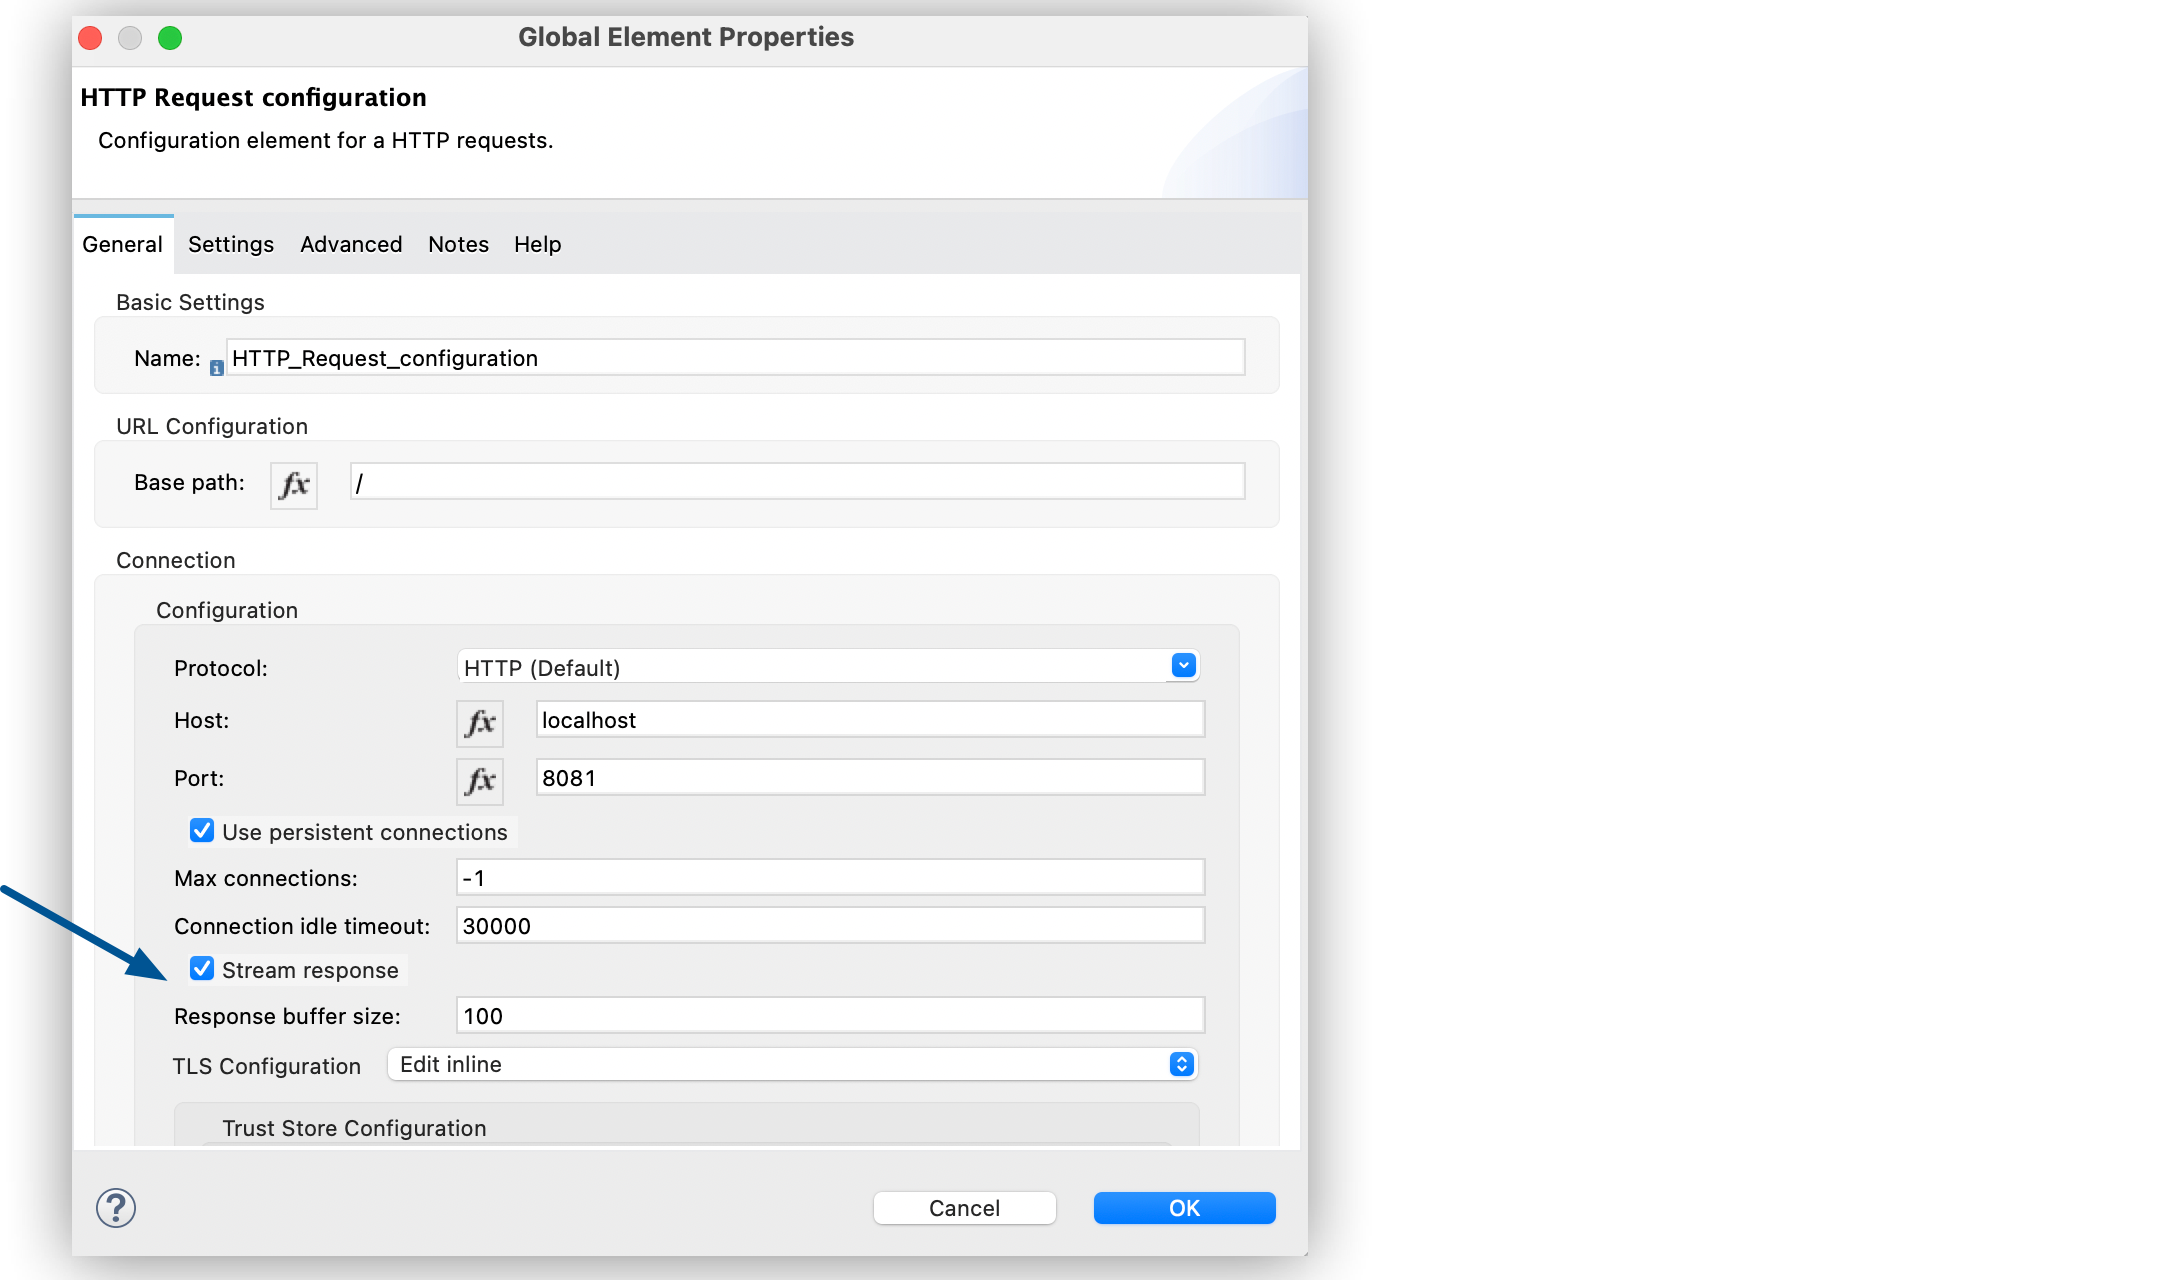
In the Configuration XML editor, the streamResponse and responseBufferSize configurations look like this example:
<http:request-config name="requestConfig">
    <http:request-connection host="localhost" port="8081" streamResponse="true" responseBufferSize="100"/>
</http:request-config>
Configure Retry Mechanisms
The HTTP Request operation does not use the reconnection strategy for retries. The reconnection strategy is a mechanism that Mule SDK uses to reestablish connections when a ConnectionException error occurs. This mechanism does not affect connections to an HTTP service created by the HTTP Request operation.
To learn more about connections, refer to the Mule SDK Connections documentation.
HTTP Connector uses a retry mechanism that enables you to configure how many times it attempts to consume an external HTTP service. The connector uses this mechanism to reconnect an HTTP client with an HTTP service. HTTP Connector does not manage TCP connections, so this mechanism does not reconnect sockets.
To configure how many times the HTTP Request operation can retry consuming an external HTTP service (retries), you can use either:
-
The Until Successful scope component
-
The built-in retry mechanism in the HTTP Request operation
Configure Retry Mechanism with Until Successful Scope
The Until Successful scope processes the components within the scope, in order, until they succeed or exhaust the maximum number of retries. Enclosing the HTTP Request operation in this scope enables you to configure the Max Retries and Milliseconds Between Retries fields.
The following example shows how to configure the retry mechanism with the Until Successful scope in Studio:
-
In the Mule Palette view, select Core > Until Successful.
-
Drag the Until Successful scope component to the Studio canvas.
-
Set Max retries to
5. -
Set Milliseconds Between Retries to
10000. -
In the Mule Palette view, select HTTP > Request.
-
Drag Request into the Until Successful scope component.

In the Configuration XML editor, the until-successful, maxRetries, and millisBetweenRetries configurations look like this example:
<until-successful maxRetries="5" millisBetweenRetries="10000">
    <http:request method="GET" config-ref="requestConfig" />
</until-successful>
To learn more about this scope, refer to the Until Successful Scope documentation.
Configure Built-In Retry Mechanism
When the HTTP Request operation receives an error of type Remotely Closed, the operation automatically retries the idempotent methods PUT, DELETE, GET, HEAD, OPTIONS, and TRACE three times before the retry fails. You can configure two system properties to customize this mechanism:
-
mule.http.client.maxRetries=5
This system property enables you to configure the number of retries before the HTTP Request operation fails. Additionally, you can set the system property value to zero to avoid using the built-in mechanism.
Configure this system property when starting Mule by adding:
./mule -M-Dmule.http.client.maxRetries=5
-
mule.http.client.retryOnAllMethods=true
This system property extends the built-in mechanism to all the methods, and not only the idempotent ones.
Configure this system property when starting Mule by adding:
./mule -M-Dmule.http.client.retryOnAllMethods=true
To learn how to set system properties, refer to the System Properties documentation. To understand why nonidempotent methods, such as POST, aren’t retried by default, refer to RFC 7230.


