LDAP Connector
LDAP Connector v3.2
Lightweight Directory Access Protocol (LDAP) 用 Anypoint Connector は、インターネットプロトコル (IP) ネットワーク上の分散ディレクトリ (ネットワークユーザー権限情報など) のメンテナンスとアクセスを促進するために公開されている標準です。
無料で使用できるオープンソースのプロジェクトやパッケージに多くの LDAP サーバーが含まれています。LDAP サーバーのインストール、実行、設定の詳細については、このドキュメントでは説明しません。
このドキュメントでは、シンプルな LDAP Connector の設定例を紹介し、基本的なインストール手順と LDAP Connector を使用した LDAP サーバーへの接続手順について説明します。
リリースノート: LDAP Connector リリースノート
Exchange: LDAP Connector
| このバージョンのコネクタでは、TLS 経由の LDAP のみがサポートされます。 |
始める前に
LDAP Connector を使用するには、次のものが必要です。
-
OpenLDAP、Apache Directory、Microsoft Active Directory インスタンスのいずれかへのアクセス。
-
Anypoint Studio バージョン 7.0 (以上)。
LDAP Connector を本番環境で使用するには、次のいずれかが必要です。
-
Mule を使用するための Enterprise ライセンス。
-
CloudHub Starter、Professional、Enterprise のいずれかのアカウント。
この情報を使用するには、LDAP、Mule Runtime Engine (Mule)、Anypoint Connector、Anypoint Studio の基礎、Mule フローの要素、グローバル要素に精通している必要があります。
POM ファイル情報
<dependency>
  <groupId>com.mulesoft.connectors</groupId>
  <artifactId>mule-ldap-connector</artifactId>
  <version>x.x.x</version>
  <classifier>mule-plugin</classifier>
</dependency>
x.x.x を使用しているコネクタに対応するバージョンに置き換えます。
最新の pom.xml ファイル情報を取得するには、 Anypoint Exchange でコネクタにアクセスし、[Dependency Snippets (連動関係スニペット)] をクリックします。
Studio プロジェクトへのコネクタの追加
Anypoint Studio には、Studio プロジェクトにコネクタを追加する 2 つの方法があります。Studio タスクバーの Exchange ボタンから追加するか、[Mule Palette (Mule パレット)] ビューから追加します。
Exchange を使用してコネクタを追加する
-
Studio で Mule プロジェクトを作成します。
-
Studio タスクバーの左上にある Exchange アイコン (X) をクリックします。
-
Exchange で、[Login (ログイン)] をクリックし、Anypoint Platform のユーザー名とパスワードを指定します。
-
Exchange で、「ldap」を検索します。
-
コネクタを選択して [Add to project (プロジェクトに追加)] をクリックします。
-
画面の指示に従ってコネクタをインストールします。
Studio でコネクタに追加する
-
Studio で Mule プロジェクトを作成します。
-
[Mule Palette (Mule パレット)] ビューで、[(X) Search in Exchange ((X) Exchange 内を検索)] をクリックします。
-
[Add Modules to Project (モジュールをプロジェクトに追加)] で、検索項目に「ldap」と入力します。
-
[Available modules (使用可能なモジュール)] で、このコネクタの名前をクリックします。
-
[Add (追加)] をクリックします。
-
[Finish (完了)] をクリックします。
LDAP Connector のグローバル要素を設定する
Mule アプリケーションで LDAP Connector を使用するには、グローバル LDAP 設定要素を設定する必要があります。グローバル要素は、アプリケーションで必要となる任意の数の LDAP Connector で使用できます。このコネクタは、基本設定ではサーバー側のプーリングをサポートします。これは、[Pooling (プーリング)] セクションで設定できます。
-
キャンバスの下部にある [Global Elements (グローバル要素)] タブをクリックします。
-
[Global Configuration Elements (グローバル設定要素)] 画面で、[Create (作成)] をクリックします。
次のウィンドウが表示されます。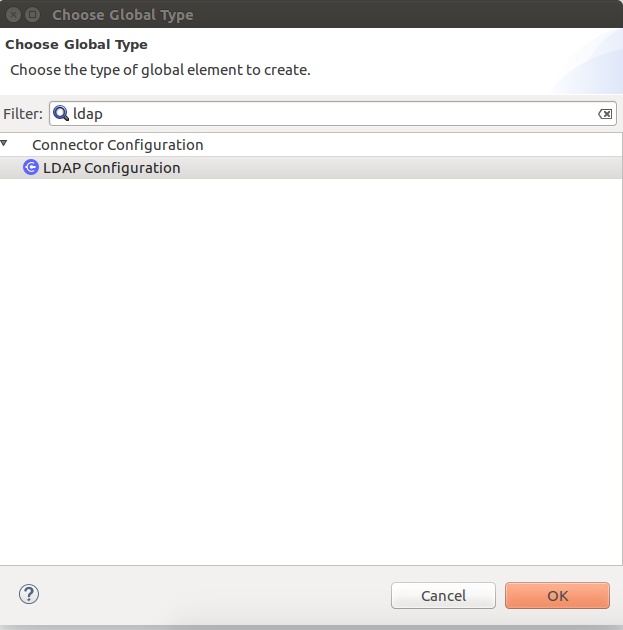
-
[Choose Global Type (グローバル型の選択)] ウィザードで、[Connector Configuration (コネクタ設定)] を展開し、[LDAP Configuration (LDAP 設定)] を選択し、[OK] をクリックします。
次のウィンドウが表示されます。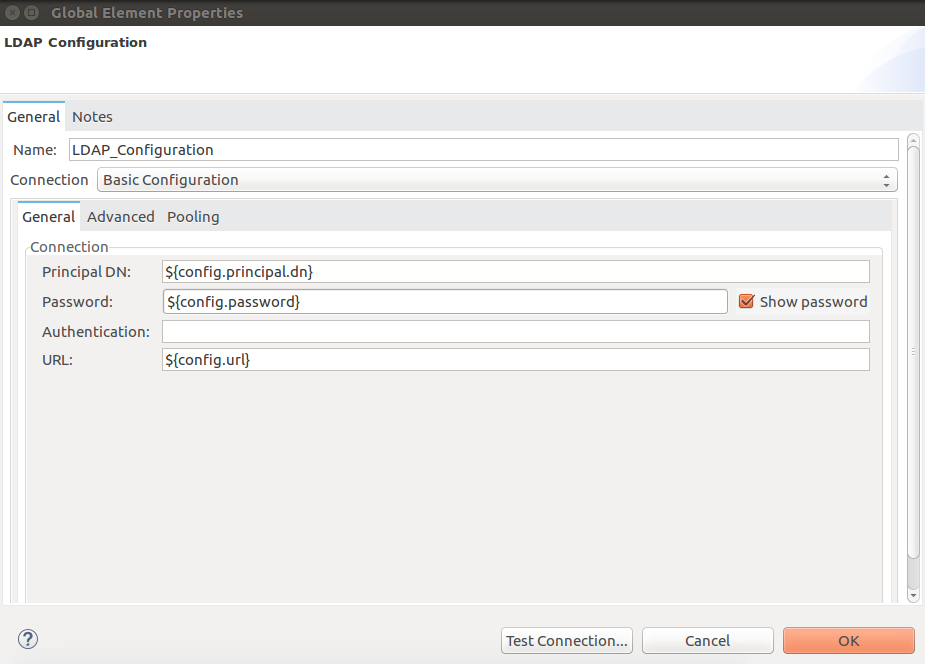
-
ドロップダウンリストから [Basic configuration (基本設定)] または [TLS configuration (TLS 設定)] を選択し、そのプロパティを設定します。
パラメーター 説明 Name (名前)
コネクタの参照に使用される名前。
Principal DN (プリンシパル DN)
ユーザーの DN (識別名)
Password (パスワード)
ユーザーのパスワード
Authentication (認証)
使用する認証メカニズムを指定します。デフォルト値は
Simple です。URL
LDAP サーバーへの接続 URL
上の画像では、プレースホルダーの値は、プロジェクトの
src/main/resources フォルダーにある設定ファイル mule-artifact.properties を参照します。 ログイン情報をグローバル設定プロパティに入力するか、それらの値を含む設定ファイルを参照することができます。ログイン情報をグローバル設定プロパティにハードコードすることもできますが、その値が含まれる設定ファイルを代わりに参照した場合、メンテナンスを簡略化し、プロジェクトの再利用性を向上できます。これらの値を別個のファイルに保存しておくと、アクセスログイン情報が異なるさまざまな環境 (本番、開発、QA など) にデプロイする必要がある場合に便利です。
-
[Advanced (詳細)] タブと [Pooling (プーリング)] タブのデフォルトエントリを保持します。
[Pooling (プーリング)] タブは、[Basic configuration (基本設定)] でのみ使用できます。 -
[Test Connection (接続をテスト)] をクリックして、グローバル設定のパラメーターが正確であることと、Mule が LDAP サーバーのインスタンスに正常に接続できることを確認します。
-
[OK] をクリックして、グローバルコネクタ設定を保存します。
XML エディターまたはスタンドアロンで設定する
-
設定ファイルに LDAP 名前空間が含まれていることを確認します。
<mule xmlns:ldap="http://www.mulesoft.org/schema/mule/ldap" xmlns="http://www.mulesoft.org/schema/mule/core" xmlns:doc="http://www.mulesoft.org/schema/mule/documentation" xmlns:spring="http://www.springframework.org/schema/beans" xmlns:xsi="http://www.w3.org/2001/XMLSchema-instance" xsi:schemaLocation="http://www.springframework.org/schema/beans http://www.springframework.org/schema/beans/spring-beans-current.xsd http://www.mulesoft.org/schema/mule/core http://www.mulesoft.org/schema/mule/core/current/mule.xsd http://www.mulesoft.org/schema/mule/ldap http://www.mulesoft.org/schema/mule/ldap/current/mule-ldap.xsd"> <!-- Put your flows and configuration elements here --> </mule> -
次の設定コードを使用して、LDAP の基本設定のグローバル要素を作成します。
<ldap:config name="LDAP_Configuration" doc:name="LDAP Configuration"> <ldap:basic-connection authDn="${config.principal.dn}" authPassword="${config.password}" url="${config.url}"> <ldap:extended-configurations> <ldap:extended-configuration key="key.name" value="key.value" /> </ldap:extended-configuration> </ldap:extended-configurations> </ldap:basic-connection> </ldap:config> -
XML ファイルに対する変更を保存します。
コネクタの使用
LDAP Connector は次の操作をサポートしています。
| 操作 | 説明 |
|---|---|
Bind |
LDAP サーバーに対して認証します。これは、各操作の前に自動的に行われますが、要求に応じて実行することもできます。 |
Search |
指定された検索条件を使用して、ベース DN で LDAP 検索を実行します。 |
Search one |
一意の結果を返すことが想定される LDAP 検索を実行します。 |
Paged result search |
LDAP 検索を実行し、結果をフローの残りの部分に流し込みます。 |
Lookup |
一意の LDAP エントリを取得します。 |
Exists |
LDAP エントリが LDAP サーバーに存在するかどうかを確認します。 |
Add |
新しい LDAP エントリを作成します。 |
Add single-valued attribute |
特定の単一値属性を既存の LDAP エントリに追加します。 |
Add multi-valued attribute (複数値属性を追加) |
特定の複数値属性を既存の LDAP エントリに追加します。 |
Modify |
既存の LDAP エントリを更新します。 |
Modify single-valued attribute (単一値属性を変更) |
既存の LDAP エントリの特定の単一値属性を更新します。 |
Modify multi-valued attribute (複数値属性を変更) |
既存の LDAP エントリの特定の複数値属性を更新します。 |
Delete |
既存の LDAP エントリを削除します。 |
Delete single-valued attribute (単一値属性を削除) |
既存の LDAP エントリの特定の単一値属性を削除します。 |
Delete multi-valued attribute (複数値属性を削除) |
既存の LDAP エントリの特定の複数値属性を削除します。 |
Rename |
既存の LDAP エントリの名前を変更します。 |
コネクタの名前空間とスキーマ
Studio でアプリケーションを設計するときに、コネクタをパレットから Anypoint Studio キャンバスにドラッグすると、XML コードにコネクタの名前空間とスキーマの場所が自動的に入力されます。
名前空間: http://www.mulesoft.org/schema/mule/ldap
スキーマの場所: http://www.mulesoft.org/schema/mule/ldap/current/mule-ldap.xsd
Studio の XML エディターまたはその他のテキストエディターで手動でコーディングを行う場合は、これらを設定 XML の <mule> タグの内部に貼り付けてください。
|
<mule xmlns:ldap="http://www.mulesoft.org/schema/mule/ldap" xmlns="http://www.mulesoft.org/schema/mule/core"
	xmlns:doc="http://www.mulesoft.org/schema/mule/documentation"
	xmlns:spring="http://www.springframework.org/schema/beans"
	xmlns:xsi="http://www.w3.org/2001/XMLSchema-instance" xsi:schemaLocation="http://www.springframework.org/schema/beans http://www.springframework.org/schema/beans/spring-beans-current.xsd
http://www.mulesoft.org/schema/mule/core http://www.mulesoft.org/schema/mule/core/current/mule.xsd
http://www.mulesoft.org/schema/mule/ldap http://www.mulesoft.org/schema/mule/ldap/current/mule-ldap.xsd">

      <!-- put your global configuration elements and flows here -->

</mule>
ユースケースとデモ
LDAP Connector の最も一般的なユースケースとデモアプリケーションウォークスルーを次に示します。
Active Directory へのユーザーアカウントの追加 |
ビジネスユーザーアカウントをベース DN で定義された Active Directory グループに追加できます。 |
ユーザー属性の取得 |
ビジネスユーザーの基本属性を 1 つ以上の目的のために取得できます (メールや電話など)。 |
フローを追加する
-
Anypoint Studio で新しい Mule プロジェクトを作成します。
-
適切な Mule インバウンドエンドポイント (HTTP リスナーなど) をフローの先頭に追加します。
-
LDAP Connector の任意の操作 (Add entry 操作など) をドラッグしてキャンバスにドロップします。
-
コネクタをクリックして、プロパティエディターを開きます。
-
次のパラメーターを設定します。
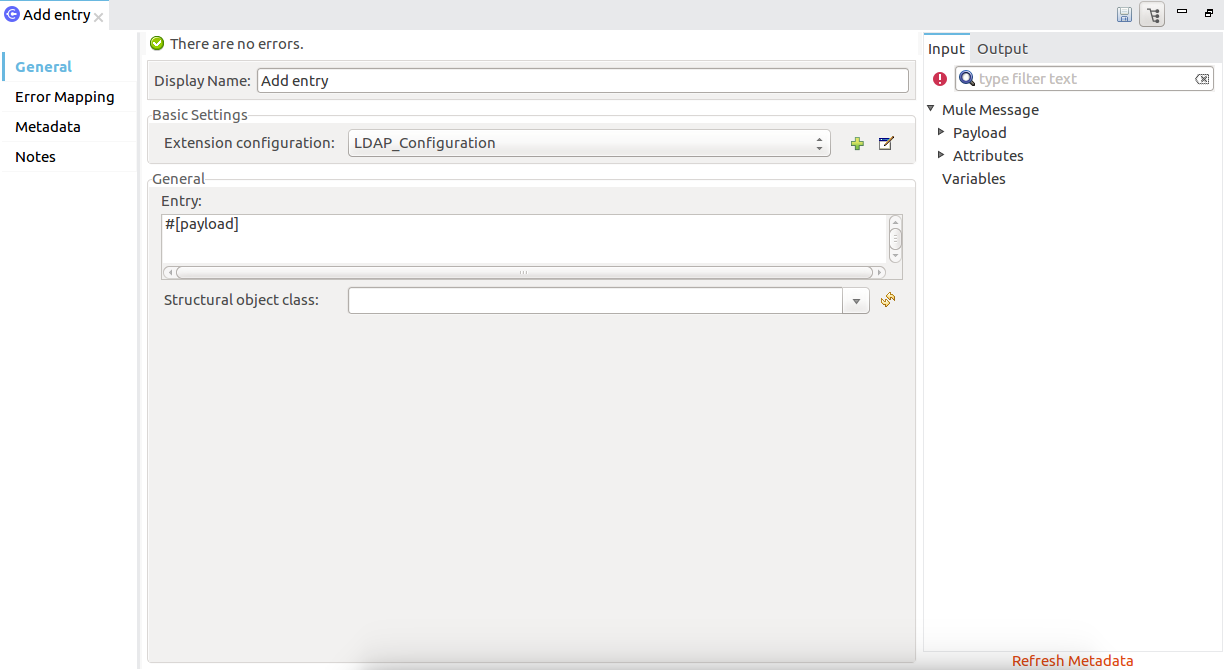
項目 説明 Display Name (表示名)
アプリケーションでの LDAP 操作の一意の表示ラベルを入力します。
Basic Settings (基本設定)
Connector configuration (コネクタ設定)
このコネクタにリンクされているグローバル要素に接続します。グローバル要素は、対象リソースまたはサービスへの接続に関する再利用可能なデータをカプセル化します。作成したグローバル LDAP Connector 要素を選択します。
General (一般)
Entry (エントリ)
#[payload]。これは、前のコンポーネント (通常は DataWeave コンポーネント) で作成され、このプロセッサーへの入力ペイロードとして変換された LDAPEntry オブジェクトを参照します。
-
[Structural object class (構造オブジェクトクラス)] テキスト項目の直後にある更新ボタンをクリックして、構造オブジェクトクラスに基づくメタデータを取得します。これによって、ディレクトリ情報ツリーがトラバースされ、階層とそれが継承するすべてのプロパティが取得されます。
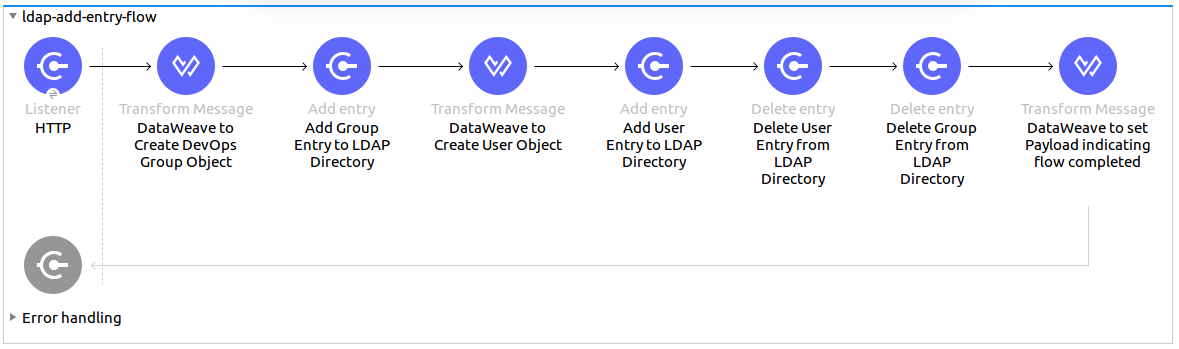
LDAP Connector を使用したユースケース例 1
組織の個人を組織の部署に追加または削除します。
-
Anypoint Studio で新しい Mule プロジェクトを作成します。
-
次のプロパティを
mule-artifact.properties ファイルに追加して LDAP ログイン情報を保持し、このファイルをプロジェクトの src/main/resources ディレクトリに置きます。config.principal.dn=<DN> config.password=<Password> config.url=<URL> -
[HTTP Listener (HTTP リスナー)] をキャンバスにドラッグし、次のパラメーターを設定します。
パラメーター Value (値) Display Name (表示名)
HTTP
Connector configuration (コネクタ設定)
まだ HTTP 要素が作成されていない場合、プラス記号をクリックして新しい HTTP リスナー設定を追加し、[OK] をクリックします。デフォルトのままにします。
Path (パス)
/
-
DataWeave コンポーネントを使用して組織の部署エントリを作成します。[DataWeave] コンポーネントを [HTTP Listener (HTTP リスナー)] の横にドラッグし、次のスクリプトを使用します。
%dw 2.0 output application/java --- { dn : "ou=DevOpsGroup," ++ attributes.queryParams.dn, ou : "DevOpsGroup", objectclass : ["top", "organizationalUnit"] } -
LDAP Connector の [Add entry] 操作を [DataWeave] コンポーネントの横にドラッグして、LDAP エントリを追加します。
-
新しい LDAP グローバル要素を追加することで LDAP Connector を設定します。[Connector Configuration (コネクタ設定)] 項目の横にあるプラス記号をクリックします。
-
以下の表に従ってグローバル要素を設定します。
パラメーター 説明 値 名前
参照する設定の名前を入力します。
<Configuration_Name>
Principal DN (プリンシパル DN)
ユーザーの DN (識別名)。
${config.principal.dn}Password (パスワード)
ユーザーのパスワード。
${config.password}URL
LDAP サーバーへの接続 URL。
${config.url} -
対応する XML 設定は次のようになります。
	<ldap:config name="LDAP_Configuration" doc:name="LDAP Configuration">
		<ldap:basic-connection authDn="${config.principal.dn}"
			authPassword="${config.password}" url="${config.url}">
      <ldap:extended-configurations>
         <ldap:extended-configuration key="key.name" value="key.value" />
         </ldap:extended-configuration>
      </ldap:extended-configurations>
		</ldap:basic-connection>
	</ldap:config>
-
-
[Test Connection (接続をテスト)] をクリックして、Mule が LDAP サーバーインスタンスに接続できることを確認します。
-
正常に接続できた場合は、[OK] をクリックして設定を保存します。
そうでない場合は、見直して、誤ったパラメーターを修正してからもう一度テストします。 -
LDAP Connector のプロパティエディターに戻り、Add entry 操作に必要なパラメーターを設定します。
パラメーター Value (値) Display Name (表示名)
Add Group Entry to LDAP Directory (LDAP ディレクトリへのグループエントリの追加)
Basic Settings (基本設定)
Connector configuration (コネクタ設定)
作成したグローバル LDAP Connector 要素を選択します。
General (一般)
Entry (エントリ)
#[payload]。デフォルト値です。
-
DataWeave コンポーネントを使用して組織の個人エントリを作成します。[DataWeave] コンポーネントを [LDAP Connector] の横にドラッグし、次のスクリプトを使用します。
%dw 2.0 output application/java --- { dn : "cn=Test User,ou=DevOpsGroup," ++ attributes.queryParams.dn, uid : "testUser", cn : "Test User", sn : "User", userPassword : "test1234", objectclass : ["top", "person", "organizationalPerson", "inetOrgPerson"] } -
LDAP Connector の [Add entry] 操作を [DataWeave] コンポーネントの横にドラッグして、LDAP ユーザーエントリを追加します。
-
LDAP Connector のプロパティエディターで、次のようにパラメーターを設定します。
パラメーター Value (値) Display Name (表示名)
Add User Entry to LDAP Directory (LDAP ディレクトリへのユーザーエントリの追加)
Basic Settings (基本設定)
Connector configuration (コネクタ設定)
作成したグローバル LDAP Connector 要素を選択します。
General (一般)
Entry (エントリ)
#[payload]。デフォルト値です。
-
これでエントリを正常に追加できたので、LDAP Connector を使用してエントリを削除してみましょう。
-
[Delete entry (エントリの削除)] 操作を [LDAP Connector] の横にドラッグして、LDAP ユーザーエントリを削除します。
-
LDAP Connector のプロパティエディターで、次のようにパラメーターを設定します。
パラメーター Value (値) Display Name (表示名)
Delete User Entry from LDAP Directory (LDAP ディレクトリからのユーザーエントリの削除)
Basic Settings (基本設定)
Connector configuration (コネクタ設定)
作成したグローバル LDAP Connector 要素を選択します。
General (一般)
DN
#['cn=Test User,ou=DevOpsGroup,' ++ attributes.queryParams.dn] -
もう 1 つの [Delete entry (エントリの削除)] 操作を [LDAP Connector] の横にドラッグして、LDAP グループエントリを削除します。
パラメーター Value (値) Display Name (表示名)
Delete Group Entry From LDAP Directory (LDAP ディレクトリからのグループエントリの削除)
Basic Settings (基本設定)
Connector configuration (コネクタ設定)
作成したグローバル LDAP Connector 要素を選択します。
General (一般)
DN
#['ou=DevOpsGroup,' ++ attributes.queryParams.dn] -
[DataWeave] コンポーネントを [LDAP Connector] の横にドラッグし、ペイロードを「Flow Successfully Completed」 (フロー正常完了) に設定します。
ユースケース 1 のコード
このユースケース例のフローをすばやく Mule アプリケーションに読み込むには、次のコードを XML エディターに貼り付けます。
<?xml version="1.0" encoding="UTF-8"?>

<mule xmlns:ee="http://www.mulesoft.org/schema/mule/ee/core"
	xmlns:ldap="http://www.mulesoft.org/schema/mule/ldap"
	xmlns:http="http://www.mulesoft.org/schema/mule/http"
	xmlns="http://www.mulesoft.org/schema/mule/core"
	xmlns:doc="http://www.mulesoft.org/schema/mule/documentation"
	xmlns:spring="http://www.springframework.org/schema/beans"
	xmlns:xsi="http://www.w3.org/2001/XMLSchema-instance"
	xsi:schemaLocation="http://www.springframework.org/schema/beans
	http://www.springframework.org/schema/beans/spring-beans-current.xsd
	http://www.mulesoft.org/schema/mule/core
	http://www.mulesoft.org/schema/mule/core/current/mule.xsd
	http://www.mulesoft.org/schema/mule/http
	http://www.mulesoft.org/schema/mule/http/current/mule-http.xsd
	http://www.mulesoft.org/schema/mule/ldap
	http://www.mulesoft.org/schema/mule/ldap/current/mule-ldap.xsd
	http://www.mulesoft.org/schema/mule/ee/core
	http://www.mulesoft.org/schema/mule/ee/core/current/mule-ee.xsd">


	<http:listener-config name="HTTP_Listener_config"
		doc:name="HTTP Listener config">
		<http:listener-connection host="127.0.0.1"
			port="8081" />
	</http:listener-config>

	<ldap:config name="LDAP_Configuration" doc:name="LDAP Configuration">
		<ldap:basic-connection authDn="${config.principal.dn}"
			authPassword="${config.password}" url="${config.url}">
      <ldap:extended-configurations>
         <ldap:extended-configuration key="key.name" value="key.value" />
         </ldap:extended-configuration>
      </ldap:extended-configurations>
		</ldap:basic-connection>
	</ldap:config>

	<flow name="ldap-add-entry-flow">
		<http:listener config-ref="HTTP_Listener_config" path="/"
			doc:name="HTTP" />

		<ee:transform doc:name="DataWeave to Create DevOps Group Object">
			<ee:message>
				<ee:set-payload><![CDATA[%dw 2.0
output application/java
---
{
	dn : "ou=DevOpsGroup," ++ attributes.queryParams.dn,
	ou : "DevOpsGroup",
	objectclass : ["top", "organizationalUnit"]
}
]]></ee:set-payload>
			</ee:message>
		</ee:transform>

		<ldap:add config-ref="LDAP_Configuration"
			doc:name="Add Group Entry to LDAP Directory" />


		<ee:transform doc:name="DataWeave to Create User Object">
			<ee:message>
				<ee:set-payload><![CDATA[%dw 2.0
output application/java
---
{
	dn : "cn=Test User,ou=DevOpsGroup," ++ attributes.queryParams.dn,
	uid : "testUser",
	cn : "Test User",
	sn : "User",
	userPassword : "test1234",
	objectclass : ["top", "person", "organizationalPerson", "inetOrgPerson"]
}
]]></ee:set-payload>
			</ee:message>
		</ee:transform>


		<ldap:add config-ref="LDAP_Configuration"
			doc:name="Add User Entry to LDAP Directory" />

		<ldap:delete config-ref="LDAP_Configuration"
			dn="#['cn=Test User,ou=DevOpsGroup,' ++ attributes.queryParams.dn]"
			doc:name="Delete User Entry from LDAP Directory" />

		<ldap:delete config-ref="LDAP_Configuration"
			dn="#['ou=DevOpsGroup,' ++ attributes.queryParams.dn]"
			doc:name="Delete Group Entry from LDAP Directory" />

		<ee:transform doc:name="DataWeave to set Payload indicating flow completed">
			<ee:message>
				<ee:set-payload><![CDATA[%dw 2.0
output application/json
---
{
	result : "Flow Successfully Completed"
}
]]></ee:set-payload>
			</ee:message>
		</ee:transform>
	</flow>


</mule>
LDAP Connector を使用したユースケース例 2
カスタムトラストストアを設定することで、どのサーバーへの通信が許可されるかを識別できます。
そのために、拡張設定パラメーターを使用してカスタムトラストストアを指定できます。
上のユースケース 1 と同じものを使用してこれを実行できますが、LDAP Connector の設定部分に TLS 設定を使用するということが異なります。
次の LDAP Connector 用の XML 設定スニペットでは TLS 設定を使用しています。これを使用して上のユースケース 1 の XML ファイルを更新します。
<ldap:config name="LDAP_Configuration" doc:name="LDAP Configuration">
<ldap:tls-connection authDn="${config.principal.dn}"
        authPassword="${config.password}" url="${config.url}">
    <ldap:extended-configurations>
        <ldap:extended-configuration
        	key="org.mule.module.ldap.trustStorePath"
        	value="the_path_to_trust_store_jks_file" />
        <ldap:extended-configuration
        	key="org.mule.module.ldap.trustStorePassword"
        	value="changeit" />
    </ldap:extended-configurations>
</ldap:tls-connection>
</ldap:config>