Connector Configuration Reference
This document describes the general configuration for Operation-Based, and Endpoint-Based connectors. For instructions on usage of a specific connector, consult the connector’s documentation from the Anypoint Connectors page.
Prerequisites
While you do not need full proficiency in Mule to configure connectors, you should be familiar with Mule and the Anypoint Studio interface. If you have not done so already, cement your understanding of the Mule application design process, and Studio:
Further, it is best you attain a basic understanding of Mule Application Flows, Global Elements, and Anypoint Connectors before moving on.
Configuration Basics
When you add a connector configuration for a connector it is saved by default as a Global Element. This global element stores a Connector Configuration specific to a connector type, available from any instance of a connector of that type within the Mule app.
| It is typical to perform different operations from several connectors sharing the same configuration. |
Configuring an Operation-Based Connector
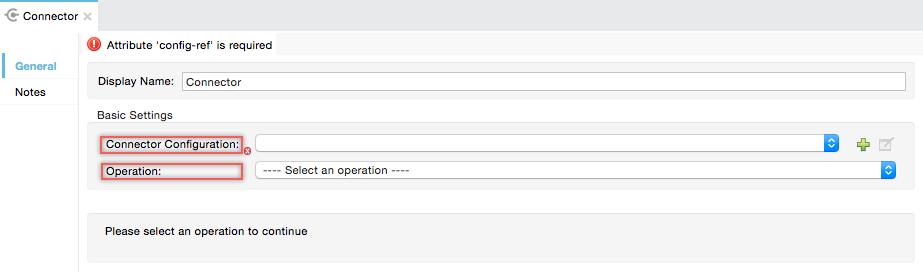
At a minimum, all operation-based connectors require a Connector Configuration and an Operation to run in a flow successfully. Operations are defined at the connector scope, rather than through the global connector configuration scope.
Whether you are working with the connector in the Anypoint Studio Visual Editor or are crafting the XML code by hand, you must specify both configuration and operation.
| Field | Description |
|---|---|
Connector Configuration |
Define connection parameters here. This configuration gets saved in a Global Element that allows you use the connector configuration globally across the same type of connector. |
Operation |
Select an operation from the Operation dropdown to specify the function that the connector should perform. In the case of the GitHub connector, you have, for example, "Get collaborator" or "Get commits" |
Anypoint Studio Visual Editor
-
Drag and drop a connector from the palette onto your canvas.
-
Access the connector’s properties using the Studio UI. Click the plus sign next to the Connector Configuration dropdown.
-
You can add the credentials directly or store and reference them such as from the
mule-app.propertiesfile. For this example, in the .properties file we inputgithub.user=myuser. Use the Ant syntax '${}' as shown in the configuration window.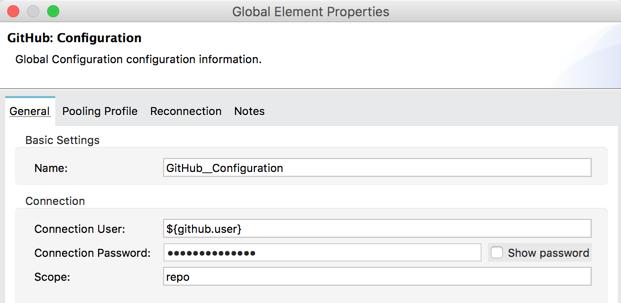
-
Click OK to close the configuration window.
-
-
Choose an operation for the connector to perform.
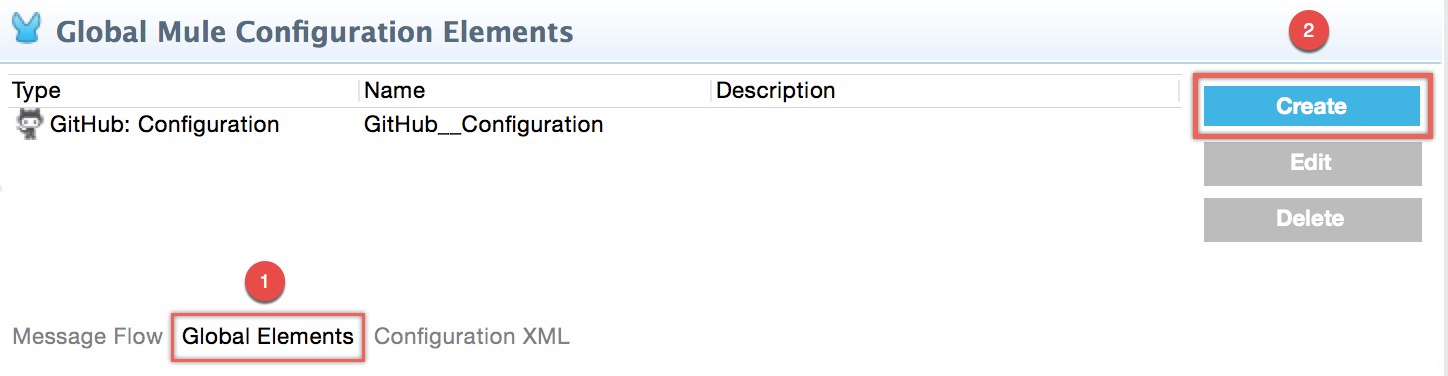
Alternatively, you can create the connector configuration by adding a Global Element first then reference it from the Connector Configuration dropdown:
-
Click the Global Element tab below the canvas in Anypoint Studio to create a global element where you define connector settings or properties.
-
Click Create, to define a new global element with the properties you require.
-
Add or reference the credentials through the UI and click OK.
-
The configuration you just created will show as available from the Connector Configuration dropdown.
-
XML Editor Approach
-
If you decide not to use Anypoint Studio or its user interface, add the desired connector configuration to your code in the XML editor. The visual representation generates in Studio after you properly:
-
Include the predefined namespace and schema location of the connector in the XML Configuration file’s header.
GitHub Connector Namespace and Schema Location Examplexmlns:github="http://www.mulesoft.org/schema/mule/github" ... xsi:schemaLocation=" ... http://www.mulesoft.org/schema/mule/github http://www.mulesoft.org/schema/mule/github/current/mule-github.xsd "> -
Define the global connector configuration in your XML. It should look like:
<connectorname:config name="ConnectorName__Configuration" user="username" pass="password"… />with all its required fields set inside the brackets. This line of XML code goes above the flow’s<flow>XML block. -
Reference the configuration by specifying the global element’s
nameattribute in theconfig-refattribute of the connector. For example, the GitHub connector would use the global element called "GitHub__Configuration":<github:add-collaborator config-ref="GitHub__Configuration" doc:name="GitHub" owner="" repositoryName=""/> -
Select an operation for the connector to perform.
-
Refer to a particular connector’s Technical Reference document for guidance on any fields you do not understand. You may access this material via Anypoint Exchange. There you can also discover which connectors are bundled automatically in Anypoint Studio.
Configuring an Endpoint-Based Connector
Endpoints pass messages into and out of a Mule flow, usually to external resources such as databases, Web clients, or email servers, but they can exchange messages with other Mule flows as well. As with the operation-based connector, you normally fill out fields in a global connector configuration. However, in this case the configuration is used to set up a global endpoint.
Inbound Endpoints
An Inbound Endpoint, which resides at the beginning of a flow and acts as a Message Source, triggers a new flow instance each time it receives a message.
Each incoming message must follow the specific protocol supported by the receiving endpoint. For example, email can arrive on a POP3 or IMAP inbound endpoint, but files must use the FTP, File, or SFTP endpoints.
Studio Visual Editor
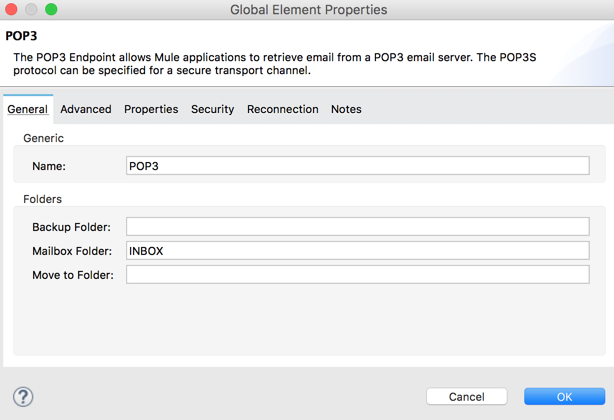
The POP3 component is acting as the inbound endpoint in the example flow:
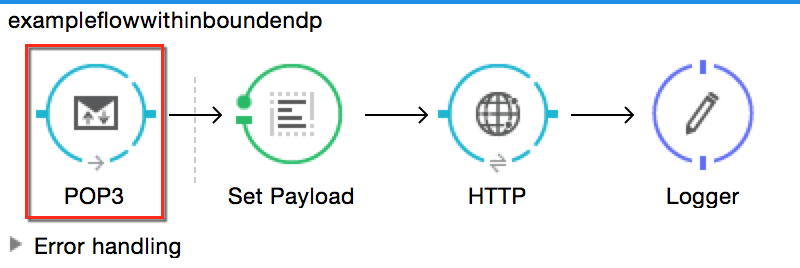
Clicking on the POP3 connector you see the fields specific to the connector instance.

When you click the plus sign, you find the dialog to set up a configuration:
XML Editor
Note the backupFolder and moveToFolder were seen as fields in the Studio UI, and are seen in the connector configuration, which takes this form.
<pop3:connector name="POP3" backupFolder="" moveToFolder="" validateConnections="true" doc:name="POP3"/>
<?xml version="1.0" encoding="UTF-8"?>

<mule xmlns:http="http://www.mulesoft.org/schema/mule/http" xmlns:jetty="http://www.mulesoft.org/schema/mule/jetty" xmlns:tracking="http://www.mulesoft.org/schema/mule/ee/tracking" xmlns:pop3="http://www.mulesoft.org/schema/mule/pop3" xmlns="http://www.mulesoft.org/schema/mule/core" xmlns:doc="http://www.mulesoft.org/schema/mule/documentation"
	xmlns:spring="http://www.springframework.org/schema/beans"
	xmlns:xsi="http://www.w3.org/2001/XMLSchema-instance"
	xsi:schemaLocation="http://www.springframework.org/schema/beans http://www.springframework.org/schema/beans/spring-beans-current.xsd
http://www.mulesoft.org/schema/mule/core http://www.mulesoft.org/schema/mule/core/current/mule.xsd
http://www.mulesoft.org/schema/mule/jetty http://www.mulesoft.org/schema/mule/jetty/current/mule-jetty.xsd
http://www.mulesoft.org/schema/mule/http http://www.mulesoft.org/schema/mule/http/current/mule-http.xsd
http://www.mulesoft.org/schema/mule/pop3 http://www.mulesoft.org/schema/mule/pop3/current/mule-pop3.xsd
http://www.mulesoft.org/schema/mule/ee/tracking http://www.mulesoft.org/schema/mule/ee/tracking/current/mule-tracking-ee.xsd">
    <jetty:connector name="Jetty" configFile="a" resourceBase="a" doc:name="Jetty"/>
    <http:request-config name="HTTP_Request_Configuration" host="a" port="a" basePath="a" doc:name="HTTP Request Configuration"/>
    <pop3:connector name="POP3" backupFolder="" moveToFolder="" validateConnections="true" doc:name="POP3"/>
    <flow name="exampleflowwithinboundendp">
        <pop3:inbound-endpoint host="localhost" user="" password="" connector-ref="POP3" responseTimeout="10000" doc:name="POP3"/>
        <set-payload doc:name="Set Payload"/>
        <http:request config-ref="HTTP_Request_Configuration" path="s" method="s" doc:name="HTTP"/>
        <logger level="INFO" doc:name="Logger"/>
    </flow>
</mule>
Outbound Endpoints
If an endpoint-based connector is not the first processor (i.e., the message source) in a flow, it is designated as an outbound endpoint, since it uses the specific transport channel it supports (such as SMTP, FTP, or JDBC) to dispatch messages to targets outside the flow, which can range from file systems to email servers to Web clients and can also include other Mule flows.
In many cases, an outbound endpoint completes a flow by dispatching a fully processed message to its final, external destination. However, outbound endpoints don’t always complete flow processing, because they can also exist in the middle of a flow, dispatching data to an external source, and also passing that (or some other data) to the next message processor in the flow.
Anypoint Studio Visual Editor
Here we can see there is a POP3 connector being used as an inbound endpoint, but additionally, note there is a POP3 connector configured in the middle of the process side of the flow, as an outbound endpoint.

XML Editor
<flow name="exampleflow2" >
   <pop3:inbound-endpoint host="localhost" user="${prod.user}" responseTimeout="10000" doc:name="POP3"/>
   <set-payload doc:name="Set Payload" value="foo"/>
   <pop3:outbound-endpoint host="localhost" user="${prod.user}" responseTimeout="10000" doc:name="POP3"/>
   <logger level="INFO" doc:name="Logger" message="bar"/>
</flow>
Composite Sources
A special scope known as a Composite Source Scope allows you to encapsulate two or more connectors that receive the same type of data (for example, email, files, database maps, or HTML) into a single message processing block. Each embedded connector listens on its specific channel for incoming messages. Whichever connector receives a message first becomes the message source for that particular instance of the flow.
Anypoint Studio Visual Editor
There are two different message sources for this example flow, a POP3 endpoint, and a Jetty endpoint.
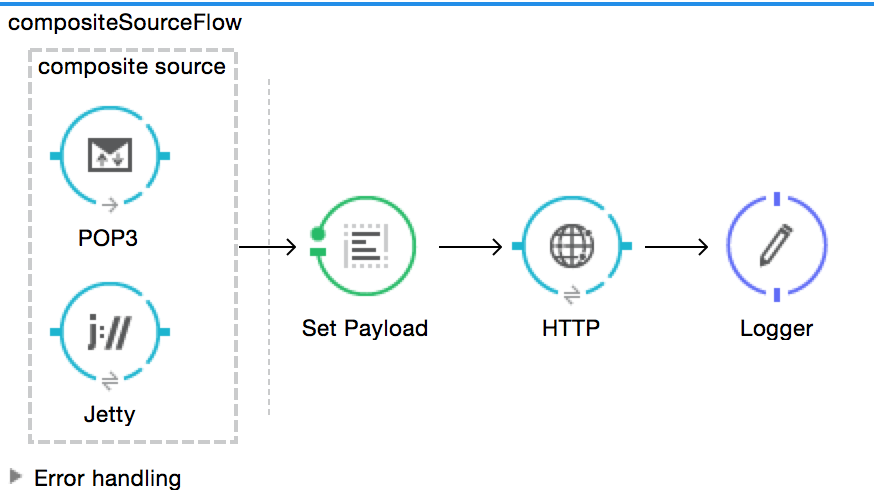
In Anypoint Studio Visual Editor you drag the Composite Source scope onto the canvas from your palette, then drag the connectors into the Composite Source scope processing block. The composite source then allows the each embedded connector to act as a temporary, non-exclusive message source when it receives an incoming message.
XML Editor
<http:request-config name="HTTP_Request_Configuration" host="localhost" port="8083" doc:name="HTTP Request Configuration"/>
    <flow name="exampleflow2" >
        <composite-source doc:name="Composite Source">
            <pop3:inbound-endpoint host="localhost" user="${prod.user}" responseTimeout="10000" doc:name="POP3"/>
            <jetty:inbound-endpoint exchange-pattern="one-way" address="www.example.com" doc:name="Jetty"/>
        </composite-source>
        <set-payload doc:name="Set Payload" value="foo"/>
        <http:request config-ref="HTTP_Request_Configuration" path="/" method="POST" doc:name="HTTP"/>
        <logger level="INFO" doc:name="Logger" message="bar"/>
    </flow>
Add a composite-source tag into your flow, then embed multiple connectors inside the scope of the tag. The composite source then allows the each connector to act as a temporary, non-exclusive message source when it receives an incoming message.
Common Endpoint Configuration Fields
While unique properties exist for various endpoint-based connectors, most of these processors share common properties.
The General tab often provides these fields.
| Field | Description |
|---|---|
Display Name |
Defaults to the connector name. Change the display name, which must be alpha-numeric, to reflect the endpoint’s specific role, for example, |
Exchange-Pattern |
Defines the interaction between the client and server. The available patterns are one-way and request-response. A one-way exchange-pattern assumes that no response from the server is necessary, while a request-response exchange-pattern waits for the server to respond before it allows message processing to continue. |
Host |
The default name is |
Port |
The port number used to connect to the server. (For example, 80) |
Path |
Allows specification of a path. for example, /enter/the/path |
Connector Configuration |
Define global connection parameters. |
Depending on the protocol and type (inbound or outbound); these additional parameters may appear on the General tab:
| Field | Description |
|---|---|
Polling Frequency |
Time is milliseconds (ms) to check for incoming messages. Default value is 1000 ms. |
Output Pattern |
Choose the pattern from a drop down list. Used when writing parsed filenames to disk. |
Query Key |
Enter the key of the query to use. |
Transaction |
Lets you select the element to use for a transaction. Click the plus + button to add Mule transactions. |
Cron Information |
Enter a cron expression to schedule events by date and time. |
Method |
The operation performed on message data. Available options are: OPTION, GET, HEAD, POST, PUT, TRACE, CONNECT, and DELETE. |
The Advanced tab often includes these fields.
| Field | Description |
|---|---|
Address |
Enter the URL address. If using this attribute, include it as part of the URI. Mutually exclusive with host, port, and path. |
Response Timeout |
How long the endpoint waits for a response (in ms). |
Encoding |
Select the character set the transport uses. For example, UTF-8 |
Disable Transport Transformer |
Check this box if you do not want to use the endpoint’s default response transport. |
MIME Type |
Select a format from the drop-down list that this endpoint supports. |
Connector Endpoint |
Define a global version of the connector configuration details. |
Business Events |
Check the box to enable default event tracking. |
The Transformers tab often includes these fields.
| Field | Description |
|---|---|
Global Transformers (Request) |
Enter the list of transformers to apply to a message before delivery. The transformers are applied in the order they are listed. |
Global Transformers (Response) |
Enter a list of synchronous transformers to apply to the response before it is returned from the transport. |
Summary and Considerations
A connector configuration typically references credentials like a username, password, and security tokens. Try using the .properties file in src/main/app to store the credentials. The values will be picked up from the .properties file, for example:
my.ConnectionProperty=myvalue.
Reference this value in the connector configuration using Ant syntax - ${my.ConnectionProperty}. The value myvalue is what the configuration(s) would use.
For instance, a Mule application with four different HTTP connectors may all reference the same global HTTP connector configuration which defines specifics such as security, protocol, and proxy settings. Because they all reference the same global connector configuration, all four HTTP endpoints behave consistently within the application.
Selected global connector configurations can also be defined as Shared Resources for a domain and referenced by all applications for that same domain. For more information, see Shared Resources.
Tips
When you design an application, make sure you initially use an account for your test or development purposes, rather than any account for production. The corresponding connector XML tags follow a standard format most of the time:
<connectorName>:config for operation-based connectors,
and for endpoint-based connectors: <connectorName>:connector
See Also
-
Return to the Anypoint Connectors main page.