Configuring Properties
This page describes configuring properties, such as property placeholders and system properties.
Property Placeholders
You can use Ant![]() -style property placeholders in your Mule configuration. For example:
-style property placeholders in your Mule configuration. For example:
<smtp:outbound-endpoint user="${smtp.username}" password="${smtp.password}"/>xmlThe values for these placeholders can be made available in a variety of ways, as described in the sections that follow.
Global Properties
You can use the <global-property> element to set a placeholder value from within your Mule configuration, such as from within another Mule configuration file. Do not use the global property syntax to reference the values from a .properties file. To reference properties from a file, read the section on properties files.
<global-property name="smtp.host" value="smtp.mail.com"/>
<global-property name="smtp.subject" value="Subject of Email"/>xmlProperties Files
|
If you deploy multiple applications through a Shared Resources structure, don’t set anything in the properties files, as there might potentially be conflicts between the various apps that share a domain. Instead, set environment variables over the scope of the deployed app, its domain, and other apps under that domain. As explained in Shared Resources, in Studio you can create these variables through the Environment tab of the Run Configurations menu, reachable via the drop-down menu next to the Play button. |
In Anypoint Studio, you can add properties to the default properties file in your project’s folders.
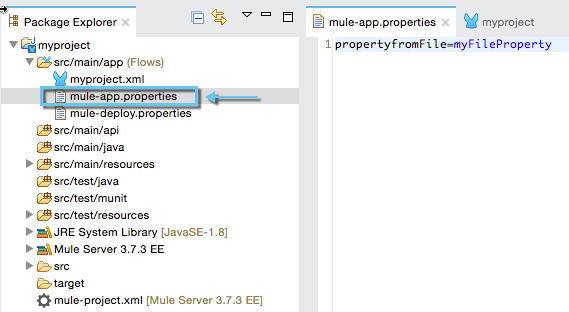
To load properties from a custom file, you can place your custom properties file at src/main/resources and use the standard Spring element
<context:property-placeholder>:
<?xml version="1.0" encoding="UTF-8"?>
<mule xmlns="http://www.mulesoft.org/schema/mule/core"
xmlns:context="http://www.springframework.org/schema/context"
xmlns:xsi="http://www.w3.org/2001/XMLSchema-instance"
xsi:schemaLocation="http://www.mulesoft.org/schema/mule/core http://www.mulesoft.org/schema/mule/core/current/mule.xsd
http://www.springframework.org/schema/context http://www.springframework.org/schema/context/spring-context-4.1.xsd">
<context:property-placeholder location="smtp.properties"/>
<flow name="myProject_flow1">
<logger message="${propertyFromFile}" doc:name="System Property Set in Property File"/>
</flow>xmlTo load multiple properties files, separate each with commas:
<context:property-placeholder location="email.properties,http.properties,system.properties"/>xmlThese files must be located at src/main/resources, inside your Mule project.
You can also pass HTTP URL’s in the location attribute, as below, to refer the properties from a centralized location:
<context:property-placeholder location="https://www.abccompany.com/property/http.properties"/>xmlSince properties from files, system properties and environment variables are referred to through the same syntax, you can add a system-properties-mode parameter to your property placeholder to ensure that overrides work in the way that you desire. The accepted values for this parameter are ENVIRONMENT, NEVER, FALLBACK, and OVERRIDE:
<context:property-placeholder location="app.properties" system-properties-mode="ENVIRONMENT"/>
<flow name="myProject_flow1">
<logger message="${propertyFromFile}" doc:name="System Property Set in Property File"/>
</flow>xmlMessage Properties
You can use placeholders to perform logic on message properties such as the header. For example, if you wanted to evaluate the content-type portion of the message header, you would specify it as #[message.inboundProperties['Content-Type']]. Typically, you use message property placeholders with expressions. For more information, see Mule Expression Language MEL.
System Properties
The placeholder value can come from a JDK system property. If you start Mule from the command line, you would specify the properties as follows:
mule -M-Dsmtp.username=JSmith -M-Dsmtp.password=ChangeMe
You can also edit the system properties in conf/wrapper.conf if you are deploying Mule as a webapp. When running Mule in a container.
You can also specify the server ID in the web.xml file as follows:
<context-param>
<param-name>mule.serverId</param-name>
<param-value>MyServer</param-value>
</context-param>xmlIf you start Mule programmatically, you would specify the properties as follows before creating and starting the Mule context:
System.getProperties().put("smtp.username", "JSmith"); System.getProperties().put("smtp.password", "ChangeMe");text
There are also several system properties that are immutable after startup. To set these, customize the MuleConfiguration using the set method for the property (such as setId for the system ID), create a MuleContextBuilder, load the configuration to the builder, and then create the context from the builder.
For example:
SpringXmlConfigurationBuilder configBuilder = new SpringXmlConfigurationBuilder("my-config.xml"); DefaultMuleConfiguration muleConfig = new DefaultMuleConfiguration(); muleConfig.setId("MY_SERVER_ID"); MuleContextBuilder contextBuilder = new DefaultMuleContextBuilder(); contextBuilder.setMuleConfiguration(muleConfig); MuleContextFactory contextFactory = new DefaultMuleContextFactory(); MuleContext muleContext = contextFactory.createMuleContext(configBuilder, contextBuilder); muleContext.start();text
For information on the set methods you can use to set system properties, see:
For information on configuration builders, see About Configuration Builders.
Setting System Properties in Anypoint Studio
You can also add properties when you launch your project on Anypoint Studio, through the Run Configurations menu:
-
Right-click your project in Package Explorer.
-
Click Run As > Run Configurations.
-
Pick the Arguments tab.
-
Add your arguments to the VM arguments field, preceding property names with -D
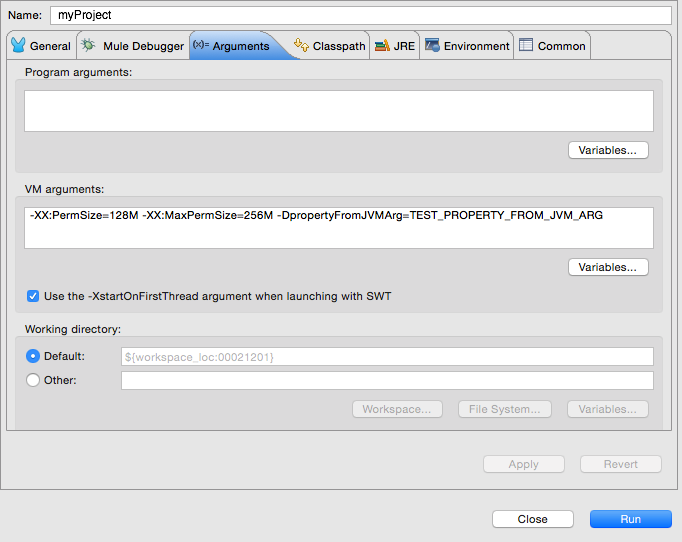
Your properties are now available each time you deploy your app through Studio. You can then reference them with the following syntax:
<logger message="${propertyFromJVMArg}" doc:name="System Property Set in Studio through JVM args"/>xml
Environment Variables
Environment variables can be defined in various different ways, there are also several ways to access these from your apps. Regardless of how an environment variable is defined, the recommended way to reference it is through the following syntax:
${variableName}
Environment Variables From the OS
To reference a variable that is defined in the OS, you can simply use the following syntax:
<logger message="${USER}" doc:name="Environment Property Set in OS" />xmlSetting Environment Variables in Anypoint Studio
You can set variables in Studio through the Run Configuration menu:
-
Right-click your project in Package Explorer.
-
Select Run As > Run Configurations.
-
Pick the Environment tab.
-
Click the New button and assign your variable a name and value.
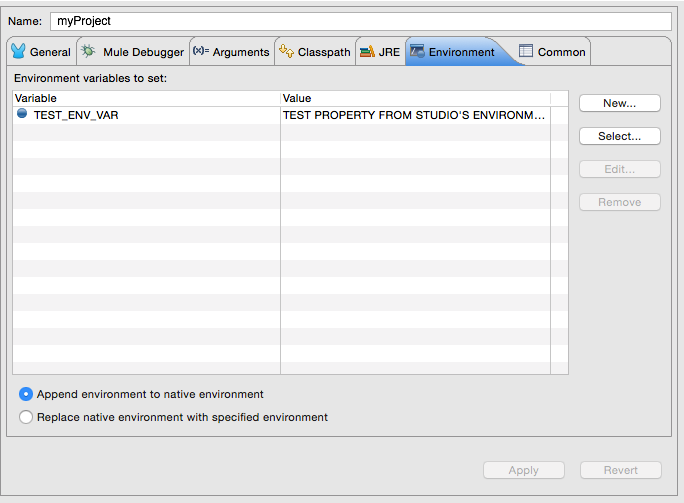
Your variable is now available each time you deploy through Studio. You can reference it with the following syntax:
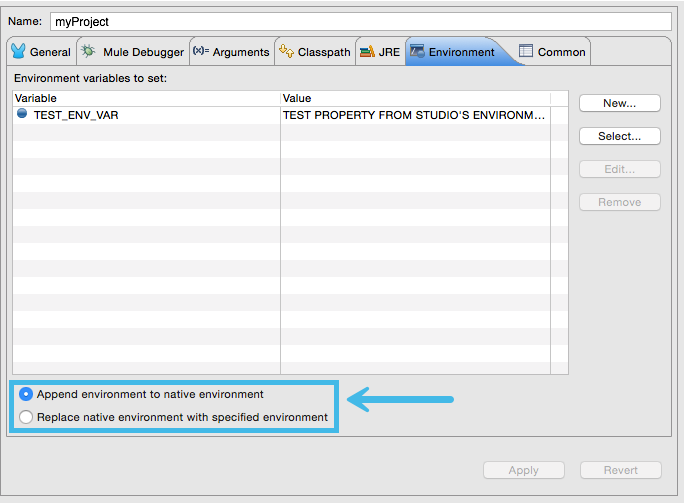
<logger message="${TEST_ENV_VAR}" doc:name="Environment Property Set in Studio"/>xml| The syntax makes no distinction between when you’re referencing a variable in the OS and a variable defined here. In case names overlap, there’s a radio button you can select when creating these variables that lets you define whether these variables overrides the original OS ones or not. |
Setting Properties Values in Runtime Manager
If you deploy your application to Runtime Manager, you can also set properties through the Runtime Manager console. These can be defined when Deploying to CloudHub, or on an already running application.
Note: If you also have the same variables set in the mule-app.properties file inside your application, the environment variables you set here in the console always override the values in 'mule-app.properties' when your application deploys.
To create an environment variable or application property:
-
Log in to your Anypoint Platform account.
-
Click Runtime Manager.
-
Either click Deploy Application to deploy a new application, or select a running application and click Manage Application.
-
Select the Properties tab in the Settings section.
See Managing Applications on CloudHub and Secure Application Properties for more details.
See Also
-
Read more about mule messages and their properties in our Mule School: The MuleMessage, Property Scopes, and Variables
 .
.