Python Component Reference
In spite of the rich selection of elements available in Mule, you may find yourself in need to put together some custom code to carry out part of a complex task, if you’re comfortable coding in Python, then the Python Component is the ideal versatile tool to fall back on for these cases. Mule also includes also equivalent scripting components for other languages. The Python Component is also handy for when you’re modernizing legacy systems, as you can simply throw the old lines of code into a component instead of having to reengineer the code’s behavior through a series of different Mule components (this is not ideal from a debugging and maintenance perspective, though). The Python script is generally executed at runtime (client-side request) and the custom logic embedded in the script could trigger an application to execute a database transaction, or modify your web-page interface.
Python also allows the developer to configure interceptors and alter the values or references of particular properties in a script. Interceptors are configured to provide additional services to a message as it flows through a component. For example, a developer can configure an interceptor to execute scheduling or logging of a particular event while a message is being processed. The Python component also includes a custom interceptor which allows you to configure settings for Spring elements. Use the Advanced tab to access Script Properties, then define the value and reference for a particular property in the script.
When using Python, typing-in or appending a script to the component is the only configuration required.
| Placing a Python Component is actually the same as placing a Script component and then selecting the Python engine. |
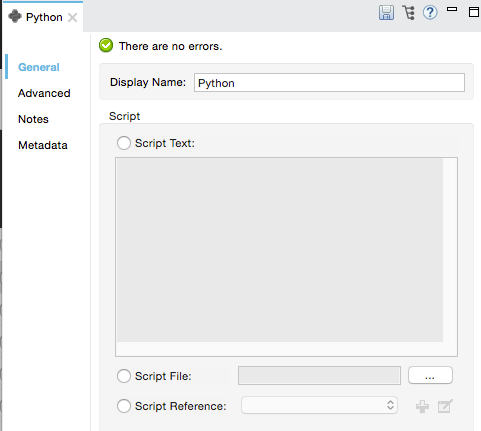
General Tab
To configure the Python component, from the Message Flow canvas double-click the Python icon to open the Properties Editor. Use the General tab to specify the file location of the script or simply type in the script on the script text window. The scripting engine is Python.
| Panel | Description |
|---|---|
Display |
Defaults to the generic component name. Change the Display Name, which must be alpha-numeric, to reflect the component’s specific role, i.e., |
Script |
Script Text: Type the script that the component will load directly into this space. |
Advanced Tab
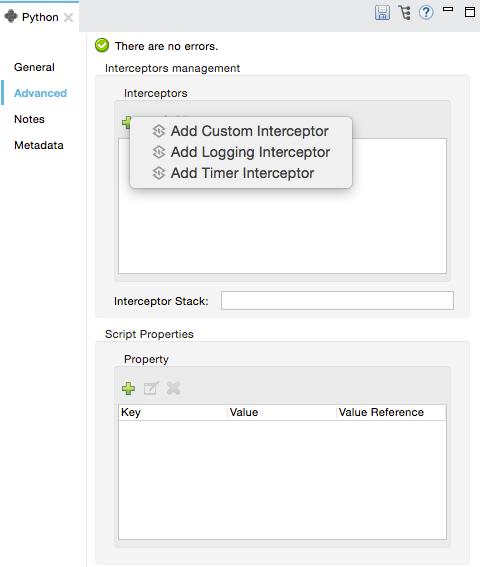
Use the Advanced tab to optionally configure interceptors and, depending on the interceptor, enter Spring values.You also have the option to specify script properties, which are key/value pairs used to alter or change properties in the script. See the Script Component Reference page for information on using the advanced tab.
Adding External Libraries
In Mule, Python is used through Jython![]() . This library requires to set the environment variable python.path
. This library requires to set the environment variable python.path![]() to correctly find the external libraries.
to correctly find the external libraries.
When deploying to a customer managed Mule runtime (one that’s deployed on-premises), then you can set the python.path property directly in the wrapper.conf file. See system properties for a better understanding of how to set it.
When deploying to a MuleSoft managed Mule runtime (deployed to CloudHub), then you must add an application property to your deployed application. Name this property python.path and set it to /opt/mule/mule-CURRENT/apps/<APPNAME>/classes.
Interceptors
Interceptors alter the values or references of particular properties in a script. They are configured to provide additional services to a message as it flows through a component. For example, you can configure an interceptor to execute scheduling or logging of a particular event while a message is being processed. The Script component also includes a custom interceptor which allows you to configure settings for Spring elements.
For example, you can add an interceptor that logs transactions and the time for each transaction. Use the Add Custom Interceptor to create a custom interceptor that can reference Spring objects. The Interceptor Stack enables you to bundle multiple interceptors. Use the Interceptor Stack to apply multiple interceptors on a Python component. The interceptors are applied in the order defined in the stack.
Script Properties
Configure these parameters to define the attribute keys and their associated values. This enables the script component to quickly look up a value associated with a key.
Examples
The example below uses the “Greedy Coin Changer” algorithm![]() to transform one currency into another. It uses some transformers to transform the input data and then applies a Python algorithm to convert the currency.
to transform one currency into another. It uses some transformers to transform the input data and then applies a Python algorithm to convert the currency.
<http:listener-config name="http_conf" host="localhost" port="8081" doc:name="HTTP Response Configuration"/>
<flow name="greedy">
<http:listener path="/" doc:name="HTTP Connector" config-ref-inbound="http_conf"/>
<http:body-to-parameter-map-transformer />
<set-payload value="#[payload['amount']]" />
<transformer ref="StringToNumber" />
<transformer ref="DollarsToCents"/>
<scripting:component doc:name="GBP Currency Script">
<scripting:script file="greedy.py">
<property key="currency" value="GBP"/>
</scripting:script>
</scripting:component>
</flow>xmlBelow are the contents of the python file that implements the algorithm:
# Adapted from "Python Algorithms: Greedy Coin Changer" by Noah Gift
# http://www.oreillynet.com/onlamp/blog/2008/04/python_greedy_coin_changer_alg.html
import sys
class Change:
def __init__(self, currency, amount):
self.amount = amount
if currency == "USD":
self.coins = [1,5,10,25]
self.coin_lookup = {25: "quarters", 10: "dimes", 5: "nickels", 1: "pennies"}
elif currency == "GBP":
self.coins = [1,2,5,10,20,50,100,200]
self.coin_lookup = {200: "two_pounds", 100: "pounds", 50: "fifty_pence", 20: "twenty_pence", 10: "ten_pence", 5: "five_pence", 2: "two_pence", 1: "pennies"}
#else:
# print "Currency $currency not recognized"
# exit 1
self.result = ""
def printer(self,num,coin):
if num:
if coin in self.coin_lookup:
if self.result == "":
self.result = '%1.0f %s' % (num, self.coin_lookup[coin])
else:
self.result = '%s, %1.0f %s' % (self.result, num, self.coin_lookup[coin])
def recursive_change(self, rem):
if len(self.coins) == 0:
return []
coin = self.coins.pop()
num, new_rem = divmod(rem, coin)
self.printer(num,coin)
return self.recursive_change(new_rem) + [num]
c = Change(currency, payload)
c.recursive_change(c.amount)
result = "[" + c.result + "]"pythonSee Also
-
Refer to the generic Script Component Reference to see how a script works with one-way and request-response connectors.
-
For more information see the Mule page Scripting Module.