Script Component Reference
In spite of the rich selection of elements available in Mule, you may find yourself in need of creating custom code to carry out all or part of a complex task. The Script Component is the ideal versatile tool to fall back on for these cases. The Script Component is also handy for when you’re modernizing legacy systems, as you can simply throw the old lines of code into a scripting component instead of having to reengineer the code’s behavior through a series of different Mule components (this is not ideal from a debugging and maintenance perspective, though). When using the Script component, you can select any of the following scripting engines: Groovy, JavaScript, Python, or Ruby. While Java is not available in the Script Component, there’s a separate specialized Java component that works similarly. Java is handled differently in a separate element because Java is the native language in which Mule is coded.
In Anypoint Studio, if you browse the palette you notice that there are separate individual components for each of the different supported languages; using one of those is the same as using the generic Script component and then picking the corresponding language in the "scripting engine" field.
For each of these languages, besides a "component", there’s also a transformer. Transformers are more specialized in that they’re already prepared to take a message’s payload as input and to return a payload as output. Anything you can do with a transformer can also be done with a component.
|
If you’re more comfortable coding in .Net, then you should check out the .NET integration framework |
Basic Usage
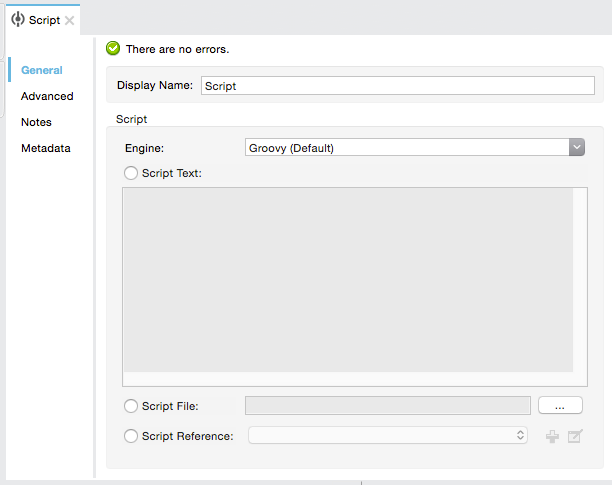
To set up in the scripting component, identify what scripting engine to use, and the script itself, which you can reference or type directly into the element.
Studio Visual Editor
To configure the Script component, double-click the Script element to open the Properties Editor. Use the General tab to specify the file location of the script or simply type in your code on the script text window.
Choose a programming language for the scripting component:
-
Groovy
-
JavaScript
-
Python
-
Ruby
| Keep in mind that if you’d rather code in Java, there’s also a Java Component that works very similarly. |
| Panel | Description |
|---|---|
Display Name |
Defaults to the generic component name. Change the Display Name, which must be alpha-numeric, to reflect the component’s specific role, such as, |
Engine |
From the Engine property drop-down list select a scripting engine. The default scripting engine is Groovy. |
Select one of the following: |
Script Text: Type the script that the component loads directly into this space. |
XML Editor
- Choose a programming language for the scripting component
-
-
Groovy
-
JavaScript
-
Python
-
Ruby
-
Regarding the code itself, there are three ways of using the Script component:
Add code directly: Add a child element containing the code itself
File reference: Enter the location of the script to be loaded by the component. The file can reside on the classpath or the local file system.
Script reference: Lets you add a Java bean, which encapsulates multiple objects into a single bean. The Script component can then store and re-use the bean when applicable.
| Keep in mind that if you’d rather code in Java, there’s also a Java Component that works very similarly. |
Adding code directly:
<scripting:component doc:name="Script">
<scripting:script engine="Groovy">
<script:text>
return payload.toString().replaceAll("$oldStr", "$newStr")
</script:text>
</script:script>
</scripting:component>xmlWith a file reference:
<scripting:component doc:name="Script">
<scripting:script engine="Groovy" file="myCode.gy"/>
</scripting:component>xmlWith a script reference:
<scripting:component doc:name="Script">
<scripting:script engine="Groovy" script-ref="Bean"/>
</scripting:component>xml| Panel | Description |
|---|---|
|
Displays a name when looking at the element in the Studio visual editor. |
|
Select the scripting engine to run the script. The default scripting engine is Groovy. |
|
Enter the location of the script to be loaded by the component. The file can reside on the classpath or the local file system. |
script-ref |
Script Reference: Lets you add a Java bean, which encapsulates multiple objects into a single bean. The Script component can then store and re-use the bean when applicable. |
| Child element | Description |
|---|---|
script:text |
Add this as a child element and type the script into it, the component executes this code. |
property |
Define a property that is callable from the script. |
Advanced Configuration
Studio Visual Editor
Use the Advanced tab to optionally configure interceptors and, depending on the interceptor, enter Spring values. In Groovy, Python, and Ruby you also have the option to specify script properties, which are key/value pairs used to alter or change properties in the script.
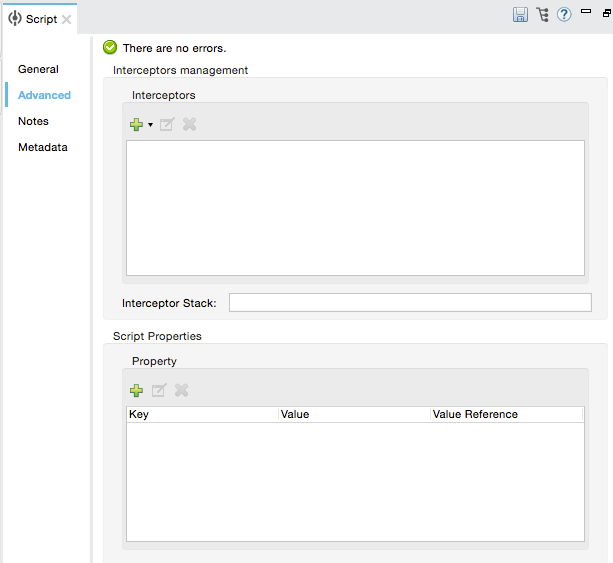
Interceptors
Interceptors alter the values or references of particular properties in a script. They are configured to provide additional services to a message as it flows through a component. For example, you can configure an interceptor to execute scheduling or logging of a particular event while a message is being processed. The Script component also includes a custom interceptor which allows you to configure settings for Spring elements.
For example, you can add an interceptor that logs transactions and the time for each transaction. Use the Add Custom Interceptor to create a custom interceptor that can reference Spring objects. The Interceptor Stack enables you to bundle multiple interceptors. Use the Interceptor Stack to apply multiple interceptors on a Groovy component. The interceptors are applied in the order defined in the stack.
Script Properties
Configure these parameters to define the attribute keys and their associated values. This enables the script component to quickly look up a value associated with a key.
XML Editor
Interceptors
Interceptors alter the values or references of particular properties in a script. They are configured to provide additional services to a message as it flows through a component. For example, you can configure an interceptor to execute scheduling or logging of a particular event while a message is being processed. The Script component also includes a custom interceptor which allows you to configure settings for Spring elements.
For example, you can add an interceptor that logs transactions and the time for each transaction. You can add a Custom Interceptor that references Spring objects. The Interceptor Stack enables you to bundle multiple interceptors. Use the Interceptor Stack to apply multiple interceptors on a Groovy component. The interceptors are applied in the order defined in the stack.
<scripting:component doc:name="Groovy">
<logging-interceptor/>
<scripting:script engine="Groovy" file="myCode.gy">
</scripting:script>
</scripting:component>xmlScript Properties
Configure these parameters to define the attribute keys and their associated values. This enables the script component to quickly look up a value associated with a key.
<scripting:component doc:name="Groovy">
<scripting:script engine="Groovy" file="myCode.gy">
<property key="myProperty" value="#[payload.myProperty]"/>
</scripting:script>
</scripting:component>xmlScript Properties Included by Default
Script properties are included with every script component (on any language) to make the execution context accessible. Note that the access to these variables depends on the language you select.
The script properties are:
| Property | Description |
|---|---|
|
Expose the logger for the script. This is preferable to use the standard output. |
|
Mule Message. |
|
Current message payload. |
|
Original message payload. |
|
Context object for the current request. |
|
Mule event ID. |
|
Map with invocation variables. |
|
Map with session variables. |
|
Only present if exception is present. Null if it’s not the case. |
|
Adds lookup, register, and unregister methods for Mule-specific entities. |
|
Mule context. |
Full Code Examples
The example below uses two properties and executes a Groovy code that’s written directly on the component. The executed code inspects the payload and replaces every instance of the string "1" with the string "x", both these values are defined in the properties.
<flow name="groovyTransformerWithParameters">
<script:transformer name="stringReplaceWithParams">
<script:script engine="groovy">
<property key="oldStr" value="l" />
<property key="newStr" value="x" />
<script:text>
return payload.toString().replaceAll("$oldStr", "$newStr")
</script:text>
</script:script>
</script:transformer>
</flow>xmlThe example below uses the “Greedy Coin Changer” algorithm![]() to transform one currency into another. It uses some transformers to transform the input data and then, depending on the value of a passed parameter, applies one of the two algorithms: the one in Groovy if the currency is US Dollars, or the one in Python in the case of British pounds.
to transform one currency into another. It uses some transformers to transform the input data and then, depending on the value of a passed parameter, applies one of the two algorithms: the one in Groovy if the currency is US Dollars, or the one in Python in the case of British pounds.
<http:listener-config name="http_conf" host="localhost" port="8081" doc:name="HTTP Response Configuration"/>
<flow name="greedy">
<http:listener path="/" doc:name="HTTP Connector" config-ref-inbound="http_conf"/>
<http:body-to-parameter-map-transformer />
<set-payload value="#[payload['amount']]" />
<transformer ref="StringToNumber" />
<transformer ref="DollarsToCents"/>
<choice>
<when expression="payload.currency == 'USD'">
<scripting:component doc:name="USD Currency Script">
<scripting:script file="greedy.groovy">
<property key="currency" value="USD"/>
</scripting:script>
</scripting:component>
</processor-chain>
</when>
<when expression="payload.currency == 'GBP'">
<processor-chain>
<scripting:component doc:name="GBP Currency Script">
<scripting:script file="greedy.py">
<property key="currency" value="GBP"/>
</scripting:script>
</scripting:component>
</processor-chain>
</when>
</choice>
</flow>xmlBelow is the groovy implementation of the algorithm:
// Adapted from the Groovy Cookbook
// https://web.archive.org/web/20150213041152/http://groovy.codehaus.org/Greedy+Coin+Changer+in+Groovy
enum USD {
quarters(25), dimes(10), nickels(5), pennies(1)
USD(v) { value = v }
final value
}
enum GBP {
two_pounds (200), pounds (100), fifty_pence(50), twenty_pence(20), ten_pence(10), five_pence(5), two_pence(2), pennies(1)
GBP(v) { value = v }
final value
}
def change(currency, amount) {
currency.values().inject([]){ list, coin ->
int count = amount / coin.value
amount = amount % coin.value
list += "$count $coin"
}
}
switch (currency) {
case "USD": return change(USD, payload).toString()
case "GBP": return change(GBP, payload).toString()
default: throw new AssertionError("Unsupported currency: $currency")
}javaAnd this is the Python version of the algorithm:
# Adapted from "Python Algorithms: Greedy Coin Changer" by Noah Gift
# http://www.oreillynet.com/onlamp/blog/2008/04/python_greedy_coin_changer_alg.html
import sys
class Change:
def __init__(self, currency, amount):
self.amount = amount
if currency == "USD":
self.coins = [1,5,10,25]
self.coin_lookup = {25: "quarters", 10: "dimes", 5: "nickels", 1: "pennies"}
elif currency == "GBP":
self.coins = [1,2,5,10,20,50,100,200]
self.coin_lookup = {200: "two_pounds", 100: "pounds", 50: "fifty_pence", 20: "twenty_pence", 10: "ten_pence", 5: "five_pence", 2: "two_pence", 1: "pennies"}
#else:
# print "Currency $currency not recognized"
# exit 1
self.result = ""
def printer(self,num,coin):
if num:
if coin in self.coin_lookup:
if self.result == "":
self.result = '%1.0f %s' % (num, self.coin_lookup[coin])
else:
self.result = '%s, %1.0f %s' % (self.result, num, self.coin_lookup[coin])
def recursive_change(self, rem):
if len(self.coins) == 0:
return []
coin = self.coins.pop()
num, new_rem = divmod(rem, coin)
self.printer(num,coin)
return self.recursive_change(new_rem) + [num]
c = Change(currency, payload)
c.recursive_change(c.amount)
result = "[" + c.result + "]"javaSee Also
-
For more information see the Mule page Scripting Module
-
Read more about the JavaScript Component
-
Read more about the Ruby Component
-
Read more about the Groovy Component
-
Read more about the Python Component
-
Read more about the Java Component