Deploying Mule as a Service to Websphere
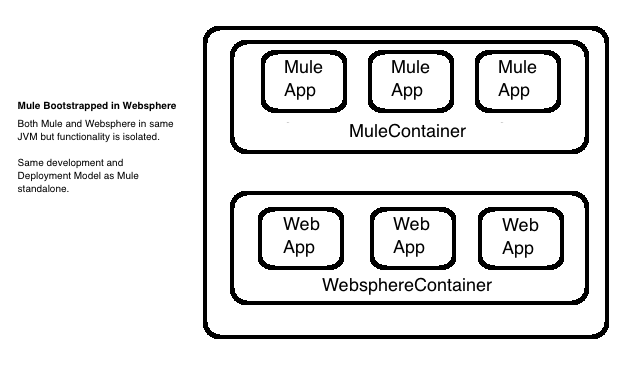
This page describes how to deploy your Mule applications on a Websphere Application server. This is intended to run an isolated fully-functional mule container embedded into the foreign Websphere JVM.
Install and Configure Websphere
You can follow the steps![]() to install WebSphere Application Server for developers. A full-featured no-charge install that just requires an IBM ID registration, not a purchase. (see FAQ
to install WebSphere Application Server for developers. A full-featured no-charge install that just requires an IBM ID registration, not a purchase. (see FAQ![]() )
)
-
First install the IBM Installation Manager.
Use the userinst executable to install it in a non-privileged directory location, so that root access is not required. For example, install it at:Main location: $HOME/opt/IBM/InstallationManager/
Shared resources: $HOME/opt/IBM/IMShared/
Data files: $HOME/var/ibm/InstallationManager/ -
Then run the installation manager to install WebSphere 9.0 at
$HOME/opt/IBM/WebSphere/AppServer/.
You need to run the script in$HOME/opt/IBM/InstallationManager/eclipse/IBMID
Use the userinst script, so it is installed on a local user folder (not system-wide)
Once installed, you can continue to install Mule on websphere.
Installing Mule on Websphere as a service
These instructions assume the following unless explicitly specified otherwise:
Profiles are stored at: $HOME/tmp/websphere_profiles
Commands are run from the directory: $HOME/opt/IBM/WebSphere/AppServer
MULE_HOME is configured at: $HOME/opt/mule-enterprise-standalone-3.9.1
-
Create profile for admin_agent and websphere application server.
bin/manageprofiles.sh -create \ -profileName admin1 \ -profilePath $HOME/tmp/websphere_profiles/admin1 \ -templatePath management \ -serverName adminagent \ -serverType ADMIN_AGENT \ -nodeName adminnode1 \ -cellName cell1 \ -hostName localhost \ -startingPort 31000bin/manageprofiles.sh -create \ -profileName default1 \ -profilePath $HOME/tmp/websphere_profiles/default1 \ -templatePath default \ -serverName server1 \ -nodeName node1 \ -cellName cell1 \ -hostName localhost \ -isDefault \ -keyStorePassword ugorji \ -startingPort 32000When managing profiles, you can see status of the profiles created or deleted in the folder $HOME/opt/IBM/WebSphere/AppServer/logs/manageprofiles:
<profile_name>_create.log
<profile_name>_delete.log
-
Start the administration server. This performs sysadmin functions for the actual worker server.
bin/startServer.sh -profileName admin1 adminagent -
Go to the profile folder for the administration agent and register the application server profile.
cd $HOME/tmp/websphere_profiles/admin1/bin \ ./registerNode.sh -profilePath $HOME/tmp/websphere_profiles/default1 -
Check the status of all servers in all profiles
bin/serverStatus.sh -all -profileName admin1bin/serverStatus.sh -all -
Start up the application server
bin/startServer.sh server1 -
For sanity, restart the administration agent.
bin/stopServer.sh -profileName admin1 adminagent bin/startServer.sh -profileName admin1 adminagent -
Log into the adminagent at
https://localhost:31001/ibm/console
Log in as the user: system (no credentials) and select node1 so you can “administer” the application server (not the adminagent). -
Configure the CustomService so that Mule starts and shutsdown during WebSphere startup and shutdown.
-
On left navigation tree, click: Servers → Server Types → WebSphere application servers.
-
In table of servers, click on server1
-
Under 'Server Infrastructure', expand 'Administration' and select 'Custom services'.
-
Create a new one with the configuration below:
: Any property that starts with sysprop denotes a system property that we will set.
Mule uses some system properties at startup:Property Value Check
Enable service at server startup
Classname
WebSphereMuleCustomService
Display Name
WebSphereMuleCustomService
Description
Service for starting up and shutting down Mule within Websphere process image
Classpath
mule-external-container-support-base-VERSION.jar:websphere-to-mule-VERSION.jar
Use the absolute paths for both files -
Click 'Custom properties' and add the following name/value pairs (give any description you want):
:
Property Value sysprop.mule.home
$HOME/opt/mule-enterprise-standalone-3.9.1
sysprop.anypoint.platform.client_id
sysprop.anypoint.platform.client_secretConfigure your credentials to communicate with your management plane, else you will see NullPointerExc during shutdown.
sysprop.mule.agent.enabled
false
Disable MMC agent, if you do NOT use MMC, for faster startup. mule.log.errors.on.shutdown
true
Log all errors caught during shutdown to standard error stream.
Sometimes, log4j throws errors during shutdown, due to its use of shutdown hooks. This is a log4j bug fixed in v2.7, but Mule uses log4j v2.5. You can disable log4j’s shutdown hooks to resolve this if it shows up, by modifying the log4j2.xml and update the top element to <Configuration shutdownHookNote that you should look at your wrapper.conf and reproduce your configurations here appropriately, as the wrapper.conf is NOT read.
The appropriatewrapper.java.additional.<n>=-Dname=valuelines in wrapper.conf should be updated to sysprop.name=value accordingly. For example, to modify the MMC bind port and configure mule for fips140-2, you should set the following:sysprop.mule.mmc.bind.port=7890 sysprop.mule.security.model=fips140-2
-
-
Setup the following JVM system properties.
Go to "Application servers" → "server" → "Java and Process Management" → "Process Definition" → "Additional Properties" → "Java Virtual Machine" → "Generic JVM argument" and set the following system properties with your digested license:-Dmule.license.content=<digested license string>
You can also set the an external filename for the license:
-Dmule.license.content=/home/user/muleLicense.xml
-
Restart the application server, and verify that Mule starts up
bin/stopServer.sh server1 bin/startServer.sh server1 -
Look at the log files as necessary, and also to see that Mule is running in the WebSphere application server. Log files should by default, be in
$HOME/tmp/websphere_profiles/default1/logs/server1/
 SystemOut.log
 SystemErr.log
By default, Mule logs to standard output. You can configure it to go elsewhere by updating the log4j configuration for Mule.
You should see Mule startup messages, culminating with a list of the Mule domains and applications as is familiar for standalone Mule startup.
You should see Mule startup messages, culminating with a list of the Mule domains and applications as is familiar for standalone Mule startup.
Install and Configure Websphere
The result of defining a Mule WAS custom service is that when the server starts, WebSphereMuleCustomService is loaded and initialized. During the initialize method, WebSphereMuleCustomService setups an embedded Mule runtime and creates a custom classloader that bypasses the System Classloader.
This custom component loads the classes in the lib folder of the Mule distribution needed for an embedded mule as well as any resource found in /conf folder. These are the classes that the Mule runtime will have visibility to as well as those in the IBM JDK libraries.
A separate thread is started and mule goes on with the initialization based on this classloader which does not have access to the WAS server libraries.