Enabling WS-Security
Enterprise
When a Web service exposes private network data to the outside world, that data travels through 4 - 7 separate protocol layers (TCP/IP or OSI) thus introducing potential security vulnerabilities. Implementing security at a higher layer on the protocol stack — the application layer, for instance — generally provides better protection than an implementation at the lower transport layer, which provides only HTTPS security.
To implement application-layer security, enable WS-Security (a CXF configuration) on your Web service. WS-Security defines a new SOAP header which is capable of carrying various security tokens that systems use to identify a Web service caller’s identity and privileges, and can include the following:
-
Encryption
-
Digital signature
-
Timestamp
You can also add a custom token validator to the SOAP Component.
Enabling WS-Security
To enable WS-Security on a CXF web service in your application, you must add WS-configurations to the SOAP Component in your flow. This approach enables WS-Security locally within your flow, for one Web service only.
To the Mule flow that involves a web service, add a CXF component to publish, consume, or proxy a Web service. Complete the following steps to configure WS-Security on the SOAP component.
Enabling WS-Security in Studio Visual Editor
-
Search for "cxf" and drag the CXF (SOAP) building block to the canvas.
-
Click the CXF element to open the properties menu.
-
Choose an Operation.
-
Click the Security tab.
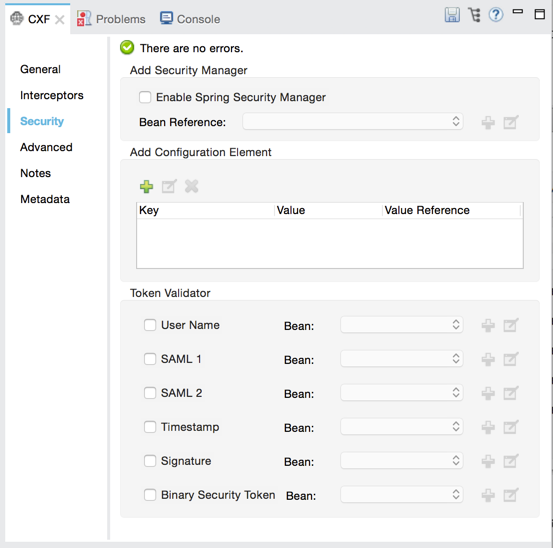
-
Click the plus icon in the Add Configuration Element pane to create a new key-value pair.
-
Click cxf:property key and Enter a key, such as
action, in the Key field and press Enter: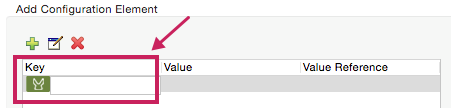
In XML, this step mirrors the addition of a key-value pair inside the ws-config child element of a ws-security element. By adding configuration elements to your SOAP component, you are creating a map of key-value pairs that correspond to the CXF WSS4J security-configuration text strings in WSHandlerConstants and WSConstants.
-
Click the Value field and specify a WSConstant (a class to define the kind of access the server allows) or a WSHandlerConstant (a class to specify the names, actions, and other strings for data deployment of the WSS handler). For example, enter
UsernameTokenin the value field.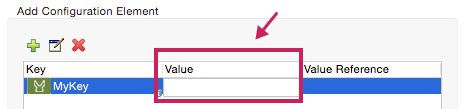
-
Open the Value Reference field and specify the bean that the key must reference. When the key must reference a bean (for instance, when the key is
passwordCallbackRef), enter the name of the bean in the Value Reference field. -
Repeat the steps above to add as many ws-security configurations as you wish to your Web service, then click OK to save your configurations.
Enabling WS-Security in Studio XML Editor or Standalone
-
To your CXF element (a SOAP component), add a child element for
cxf:ws-security. -
Within the
cxf:ws-securitychild element, add a child element forcxf:ws-config. -
Within the
cxf:ws-configchild element, add a child element forcxf:property. -
Add two attributes to the cxf:property child element according to the table below. Be sure to enter either a
value`OR a `value-ref; the two are mutually exclusive.Attribute Description key
Specify a name for the property.
value
Specify a WSConstant (a class to define the kind of access the server allows) or a WSHandlerConstant (a class to specify the names, actions, and other strings for data deployment of the WSS handler). For example, enter
UsernameTokenin the value field.value-ref
Specify the bean that the key must reference. When the key must reference a bean (for instance, when the key is
passwordCallbackRef), specify the name of the bean as the value-ref. -
Repeat the preceding step to add as many WS-security configurations as you wish to your Web service. Refer to sample code below.
View the Namespace:
<mule xmlns:cxf="http://www.mulesoft.org/schema/mule/cxf" ... xsi:schemaLocation=" http://www.mulesoft.org/schema/mule/cxf http://www.mulesoft.org/schema/mule/cxf/current/mule-cxf.xsd">xml<http:listener-config name="listener-config" host="localhost" port="8081"/> <flow name="Creation1Flow1" doc:name="Creation1Flow1"> <http:listener config-ref="listener-config" path="/" doc:name="HTTP Connector"/> <cxf:jaxws-service doc:name="SOAP"> <cxf:ws-security> <cxf:ws-config> <cxf:property key="action" value="UsernameToken"/> </cxf:ws-config> </cxf:ws-security> </cxf:jaxws-service> </flow>xml
Adding a Token Validator
If you have enabled WS-Security on your Web service in Mule, you can further configure the SOAP component to delegate authentication of the message credentials it transmits or receives.
A SOAP component may get bogged down with the tasks of both processing and authenticating messages. To lighten this load, you can instruct WS-security to delegate certain message authentication tasks to a Token Validator, including:
-
Validating the
UsernameTokenin cases where theCallbackHandlerimplementation does not have access to the password. -
Validating the attributes of a received SAML assertion.
-
Dispatching a received security token to a third-party security service for validation.
Complete the following procedure to add token validators to your Web service.
Adding a Token Validator in Studio Visual Editor
-
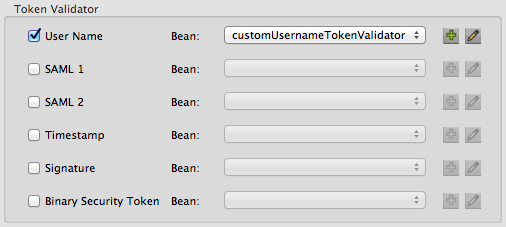
In the Security tab of your SOAP component, click one or more of the check boxes to delegate message authentication tasks to token validators. Refer to the table below for the activity of each token validator.

Token Validator Purpose User Name
Authenticates the username and password credentials associated with each message in a manner similar to HTTP Digest authentication.
SAML 1
Checks messages against SAML 1.1 assertion statements in order to approve or reject access to the Web service.
SAML 2
Checks messages against SAML 2.0 assertion statements in order to approve or reject access to the Web service.
Timestamp
Examines the timeliness of messages – when they were created and received, and when they expire – to make decisions about which messages to process. The timestamp is in UTC time and is a combination of date and time of day per Chapter 5.4 of ISO 8601, which is known as the dateTime format.
Signature
Examines the digital signature attached to messages to make decisions about which messages to process.
Binary Security Token
Examines binary encoded security tokens (such as Kerberos) to make decisions about which messages to process.
-
In the Bean field associated with the token validator you have selected, use the drop-down menu to select an existing bean that your token validator references to apply, replace, or extend the default behavior associated with a specific security token.
If you have not yet created any beans, click the plus sign icon to open a new properties panel in which you can create and configure a new bean. The bean imports the Java class you have built to specify the custom validator’s override behavior.
Java code for bean creation:
public class UsernameTokenTestValidator implements Validator { @Override public Credential validate(Credential credential, RequestData data) throws WSSecurityException { UsernameToken usernameToken = credential.getUsernametoken(); if(!"secret".equals(usernameToken.getPassword())) { throw new WSSecurityException(WSSecurityException.FAILED_AUTHENTICATION); } return credential; } }java -
Click OK to save changes.
Adding a Token Validator in Studio XML Editor or Standalone
-
Above all flows in your Mule project, create a global
spring:beanelement to import the Java class you have built to specify the token validator’s behavior. Refer to code sample below.Java code for bean creation:
public class UsernameTokenTestValidator implements Validator { @Override public Credential validate(Credential credential, RequestData data) throws WSSecurityException { UsernameToken usernameToken = credential.getUsernametoken(); if(!"secret".equals(usernameToken.getPassword())) { throw new WSSecurityException(WSSecurityException.FAILED_AUTHENTICATION); } return credential; } }java -
To the CXF element in your flow, add a child element (below any
cxf:ws-configelements you may have added) forcxf:ws-custom-validator. -
To the
cxf:ws-custom-validatorchild element, add a child element according to the type of action you want the validator to perform. Refer to the table below.Token Validator Purpose cxf:username-token-validator
Authenticates the username and password credentials associated with each message in a manner similar to HTTP Digest authentication.
cxf:saml1-token-validator
Checks messages against SAML 1.1 assertion statements in order to approve or reject access to the Web service.
cxf:saml2-token-validator
Checks messages against SAML 2.0 assertion statements in order to approve or reject access to the Web service.
cxf:timestamp-token-validator
Examines the timeliness of messages – when they were created and received, and when they expire – to make decisions about which messages to process. The timestamp is in UTC time and is a combination of date and time of day per Chapter 5.4 of ISO 8601, which is known as the dateTime format.
cxf:signature-token-validator
Examines the digital signature attached to messages to make decisions about which messages to process.
cxf:bst-token-validator
Examines binary encoded security tokens (such as Kerberos) to make decisions about which messages to process.
-
Add a
refattribute to the validator to reference the global spring:bean element which imports the Java class.View the namespace:
<mule xmlns:cxf="http://www.mulesoft.org/schema/mule/cxf" ... xsi:schemaLocation=" http://www.mulesoft.org/schema/mule/cxf http://www.mulesoft.org/schema/mule/cxf/current/mule-cxf.xsd">xml<spring:beans> <spring:bean id="customTokenValidator" name="Bean" class="org.mule.example.myClass"/> </spring:beans> <http:listener-config name="listener-config" host="localhost" port="8081"/> <flow name="Creation1Flow1" doc:name="Creation1Flow1"> <http:listener config-ref="listener-config" path="/" doc:name="HTTP Connector"/> <cxf:jaxws-service doc:name="SOAP"> <cxf:ws-security> <cxf:ws-config> <cxf:property key="action" value="UsernameToken"/> </cxf:ws-config> <cxf:ws-custom-validator> <cxf:username-token-validator ref="Bean"/> </cxf:ws-custom-validator> </cxf:ws-security> </cxf:jaxws-service> </flow>xml
Complete Code Example
View the namespace:
<mule xmlns:cxf="http://www.mulesoft.org/schema/mule/cxf"
...
xsi:schemaLocation="
http://www.mulesoft.org/schema/mule/cxf http://www.mulesoft.org/schema/mule/cxf/current/mule-cxf.xsd">xmlView the example code:
<spring:beans>
<spring:bean id="Bean" name="samlCustomValidator" class="com.mulesoft.mule.example.security.SAMLCustomValidator"/>
</spring:beans>
<http:listener-config name="listener-config" host="localhost" port="63081"/>
<flow name="UnsecureServiceFlow" doc:name="UnsecureServiceFlow">
<http:listener config-ref="listener-config" path="services/unsecure" doc:name="HTTP Connector"/>
<cxf:jaxws-service serviceClass="com.mulesoft.mule.example.security.Greeter" doc:name="Unsecure service"/>
<component class="com.mulesoft.mule.example.security.GreeterService" doc:name="Greeter Service" />
</flow>
<flow name="UsernameTokenServiceFlow" doc:name="UsernameTokenServiceFlow">
<http:listener config-ref="listener-config" path="services/username" doc:name="HTTP Connector"/>
<cxf:jaxws-service serviceClass="com.mulesoft.mule.example.security.Greeter" doc:name="Secure UsernameToken service">
<cxf:ws-security>
<cxf:ws-config>
<cxf:property key="action" value="UsernameToken Timestamp"/>
<cxf:property key="passwordCallbackClass" value="com.mulesoft.mule.example.security.PasswordCallback"/>
</cxf:ws-config>
</cxf:ws-security>
</cxf:jaxws-service>
<component class="com.mulesoft.mule.example.security.GreeterService" doc:name="Greeter Service"/>
</flow>
<flow name="UsernameTokenSignedServiceFlow" doc:name="UsernameTokenSignedServiceFlow">
<http:listener config-ref="listener-config" path="services/signed" doc:name="HTTP Connector"/>
<cxf:jaxws-service serviceClass="com.mulesoft.mule.example.security.Greeter" doc:name="Secure UsernameToken Signed service">
<cxf:ws-security>
<cxf:ws-config>
<cxf:property key="action" value="UsernameToken Signature Timestamp"/>
<cxf:property key="signaturePropFile" value="wssecurity.properties"/>
<cxf:property key="passwordCallbackClass" value="com.mulesoft.mule.example.security.PasswordCallback"/>
</cxf:ws-config>
</cxf:ws-security>
</cxf:jaxws-service>
<component class="com.mulesoft.mule.example.security.GreeterService" doc:name="Greeter Service"/>
</flow>
<flow name="UsernameTokenEncryptedServiceFlow" doc:name="UsernameTokenEncryptedServiceFlow">
<http:listener config-ref="listener-config" path="services/encrypted" doc:name="HTTP Connector"/>
<cxf:jaxws-service serviceClass="com.mulesoft.mule.example.security.Greeter" doc:name="Secure UsernameToken Encrypted service">
<cxf:ws-security>
<cxf:ws-config>
<cxf:property key="action" value="UsernameToken Timestamp Encrypt"/>
<cxf:property key="decryptionPropFile" value="wssecurity.properties"/>
<cxf:property key="passwordCallbackClass" value="com.mulesoft.mule.example.security.PasswordCallback"/>
</cxf:ws-config>
</cxf:ws-security>
</cxf:jaxws-service>
<component class="com.mulesoft.mule.example.security.GreeterService" doc:name="Greeter Service"/>
</flow>
<flow name="SamlTokenServiceFlow" doc:name="SamlTokenServiceFlow">
<http:listener config-ref="listener-config" path="services/saml" doc:name="HTTP Connector"/>
<cxf:jaxws-service serviceClass="com.mulesoft.mule.example.security.Greeter" doc:name="Secure SAMLToken service">
<cxf:ws-security>
<cxf:ws-config>
<cxf:property key="action" value="SAMLTokenUnsigned Timestamp"/>
</cxf:ws-config>
<cxf:ws-custom-validator>
<cxf:saml2-token-validator ref="samlCustomValidator"/>
</cxf:ws-custom-validator>
</cxf:ws-security>
</cxf:jaxws-service>
<component class="com.mulesoft.mule.example.security.GreeterService" doc:name="Greeter Service"/>
</flow>
<flow name="SignedSamlTokenServiceFlow" doc:name="SignedSamlTokenServiceFlow">
<http:listener config-ref="listener-config" path="services/signedsaml" doc:name="HTTP Connector"/>
<cxf:jaxws-service serviceClass="com.mulesoft.mule.example.security.Greeter" doc:name="Secure SAMLToken Signed service">
<cxf:ws-security>
<cxf:ws-config>
<cxf:property key="action" value="SAMLTokenUnsigned Signature"/>
<cxf:property key="signaturePropFile" value="wssecurity.properties" />
</cxf:ws-config>
<cxf:ws-custom-validator>
<cxf:saml2-token-validator ref="samlCustomValidator"/>
</cxf:ws-custom-validator>
</cxf:ws-security>
</cxf:jaxws-service>
<component class="com.mulesoft.mule.example.security.GreeterService" doc:name="Greeter Service"/>
</flow>xmlSignature Key Identifier
Defines which key identifier type to use for signature. This is a String value and is specified with the XML signatureKeyIdentifier element. For more information on each value, see http://coheigea.blogspot.com/2013/03/signature-and-encryption-key.html.
Note: Prior to Mule 3.8.2, signatureKeyIdentifier could only be set to DirectReference. In Mule 3.8.2, MULE-11301 fixed this issue.
Possible values are:
-
DirectReference
-
EmbeddedKeyName
-
EncryptedKeySHA1
-
IssuerSerial
-
SKIKeyIdentifier
-
Thumbprint
-
X509KeyIdentifier
Example:
<cxf:jaxws-client doc:name="SAMLToken Signed SOAP client" operation="greet" serviceClass="com.mulesoft.mule.example.security.Greeter">
<cxf:ws-security>
<cxf:ws-config>
<cxf:property key="action" value="SAMLTokenSigned"/>
<cxf:property key="samlPropFile" value="saml.properties"/>
<cxf:property key="signatureKeyIdentifier" value="DirectReference"/>
<cxf:property key="user" value="joe"/>
<cxf:property key="passwordCallbackClass" value="com.mulesoft.mule.example.security.PasswordCallback"/>
<cxf:property key="samlCallbackClass" value="com.mulesoft.mule.example.security.SAMLCallbackHandler"/>
</cxf:ws-config>
</cxf:ws-security>
</cxf:jaxws-client>xmlSee Also
-
Learn more about configuring a CXF component in your Mule application.