Using Maven with Mule
Maven![]() is a project management utility that you can use to develop projects in Mule. Mule provides built-in Maven functionality, including the features listed below.
is a project management utility that you can use to develop projects in Mule. Mule provides built-in Maven functionality, including the features listed below.
In Anypoint Studio:
In Mule:
Maven-Mule functionality is provided by two Mule plugins for Maven.
-
Maven Tools for Mule is a plugin that provides archetypes for building regular Mule applications, allowing you to develop Mule applications from within Maven.
-
The Mule Maven plugin allows you to control Mule instances from within a Maven environment.
This page provides an overview of the benefits and options for working with Maven to manage your Mule projects.
Full list of Mule-Maven documentation pages:
Prerequisites
This document assumes that you are familiar with Maven, managing pom.xml files, and working with Maven plugins. If you are just getting started with Maven, we suggest you follow Maven’s Getting Started tutorial![]() .
.
Note: Anypoint Exchange![]() provides Maven dependency information.
Click a connector asset and click Dependency Snippets to list the Maven pom.xml file dependency.
provides Maven dependency information.
Click a connector asset and click Dependency Snippets to list the Maven pom.xml file dependency.
Benefits
Though highly recommended, a project manager like Maven is not strictly necessary to develop applications in Mule. You can build, manage, and deploy Mule applications using Anypoint Studio without enabling Maven support, or you can build Mule applications outside of Studio without Maven by manually creating your folder structure and importing the required libraries into your packaged applications. However, Maven can facilitate the management of your Mule applications both inside and outside of Anypoint Studio, providing these benefits:
-
When you create a new Mule project using MuleSoft’s mule-project-archetype or create a Maven-enabled project in Studio, you can be confident that you are working with the correct Mule project folder structure and basic set of standard dependencies.
-
If you are working with Maven in Studio, Studio automatically manages your POM file every time you add new elements to your flow that require additional dependencies.
-
The Maven POM file makes sharing projects easier and more lightweight, because the POM references the dependencies so that you don’t have to manually find and include every dependency within the project itself.
-
If you are working in a team, each team member might have different Studio configurations or be referencing different dependency versions. Using Maven to manage the builds ensures that the resulting final build is sanitized and standardized.
-
Using Maven, you can program automatic builds using external frameworks such as bamboo for continuous integration.
Options for Using Maven with Mule
Depending on where you are with your project and what your goals are, you can:
-
Build and run a new Maven project in Anypoint Studio. If you’re starting from scratch and you want to use Maven to build your project, begin by creating a new Maven-based project in Studio. You can then run the project with Maven from the command line, or run it directly from Studio. See Building a Mule Application with Maven in Studio for a step-by-step guide demonstrating how to create, manage, and run a Mule project with Maven.
-
Create and run a new Maven in Mule. If you want to use Maven to create your project for Mule (outside Studio), use Maven Tools for Mule. This is a Mule plugin that makes it extremely easy to create a Mule application by running Maven with a few simple parameters. You need to add dependencies for any Anypoint Connectors that you want to use in your project and, if you are an Enterprise customer, configure your
settings.xmlfile to point to the MuleSoft Enterprise repository. To enable access, click Help > Install New Software and in Work with, click Anypoint Addons Update Site > Maven Tools for Mule. Click Next and follow the install prompts: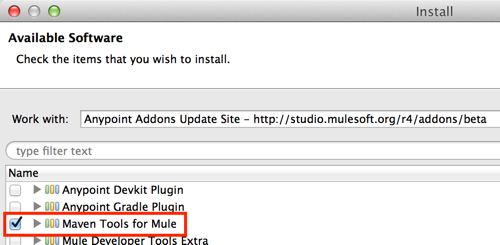
-
Import an existing Maven project into Studio. If you already have a Maven project you want to work on further with Studio, use the built-in functionality in Studio to import the pom.xml file using the
studio:studiogoal. Access Importing a Maven Project into Studio for details. -
Mavenize an existing Studio project. If you have built a project in Studio and want to convert it to a Maven project, you can use the built-in support in Studio to "Mavenize" the project. Access Enabling Maven Support for a Studio Project for details.
Tips
-
Use Studio: Studio’s built-in Maven support minimizes the chance that you would have to manually update your POM file with new dependencies as you add to, or modify your applications.
-
Update your POM file and settings.xml if necessary: When updating your POM file, the
<packaging>…</packaging>tag is mandatory. Depending on the type of project you are creating, valid values for this tag aremule-application,mule-domain,mule-policy, andmule-domain-bundle. For example, if you create a Mule project using Anypoint Studio, the tag is automatically configured as<packaging>mule-application</packaging>. If you create Maven projects from the command line using archetypes, you need to manage your POM file manually, and in some cases, adjust yoursettings.xmlfile to point to the MuleSoft Enterprise repository and supply credentials. In some cases, even if you manage your project with Studio, you may need to make manual adjustments to your POM as well. See the configuration instructions for more information. -
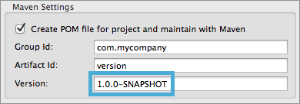
SNAPSHOT version: Use SNAPSHOT to identify versions of your project as you work toward producing a stable product you intend to release. For example, you can build a 1.0.0-SNAPSHOT version of your project, test functionality, make changes etc. until you are ready to release it as version 1.0.0. Then you can build upon using a new version, 1.1.0-SNAPSHOT.
See Also
-
Learn more about adjusting your Studio Preferences to work with Maven.
-
Learn more about importing Maven projects into Studio or "mavenizing" existing Studio projects.
-
Using Maven outside of Studio? Refer to these instructions for configuring your Maven installation to point to the necessary repositories.
-
Access the Maven reference documentation.