Step 5. Deploy the API to CloudHub 2.0
Deploy your tested API to CloudHub 2.0 to make it accessible from anywhere. You update the project version, configure deployment settings, and deploy directly from Anypoint Code Builder. After deployment, verify the API is running by sending a request to its public CloudHub URL.
Step 5.1: Prepare for Deployment
CloudHub 2.0 requires a release version (not a snapshot). When you scaffolded the project, Anypoint Code Builder created a pom.xml with -SNAPSHOT in the version (Maven’s convention for work-in-progress code). Remove it before deploying.
-
In Anypoint Code Builder, open
pom.xmlin your project. -
Find the
<version>element and remove-SNAPSHOT:<groupId>com.mycompany</groupId> <artifactId>hello-world-impl</artifactId> <version>1.0.0</version> <packaging>mule-application</packaging> -
Save the file.
Step 5.2: Deploy to CloudHub 2.0
-
Open
hello-world-api.xmlin the editor. -
Click
 (Deploy to CloudHub).
Alternatively, open the Command Palette and select
MuleSoft: Deploy to CloudHub. -
If prompted, click Allow to sign in to Anypoint Platform, then select a business group.
-
When prompted via the VS Code command palette, select CloudHub 2.0 as the deployment target, then select the region to deploy the application to.
-
At the prompt, select the environment to deploy to.
-
If the project doesn’t already have a
deploy_ch2.jsonfile, Anypoint Code Builder indicates that a deployment configuration file has been created and opens it for you to review:{ "runtime": "4.x.x", (1) "applicationName": "hello-world-impl-vh", (2) "replicas": 1, (3) "replicaSize": "0.1", (4) "deploymentModel": "rolling", (5) "autoStart": true, (6) "ObjectStoreV2": true (7) }1 The Mule runtime version to use for the deployment. 2 Defines part of the URL for accessing your application on CloudHub. This must be unique across all applications deployed to CloudHub 2.0. Update this to include your initials or another unique identifier. 3 Number of application instances to run. Use 1 for this tutorial; increase for production workloads. 4 The vCore allocation per replica. 0.1 vCores provides 0.5 GB of memory. 5 The deployment strategy. Use rollingfor zero-downtime updates, orrecreatefor a full restart.6 Starts the application automatically after deployment. 7 Enables Anypoint Object Store v2 for storing application state. Anypoint Code Builder packages the application and deploys it to CloudHub 2.0.
The VS Code status bar shows the progress of the deployment.
The Output panel opens with Mule Maven Output selected.
After a couple of minutes, you’ll see
Deployment successful. -
Click Open in Runtime Manager.
Your browser opens to Runtime Manager in Anypoint Platform, showing your application.
Step 5.3: Verify in Runtime Manager
-
Wait for the status to change from Deploying to Running.
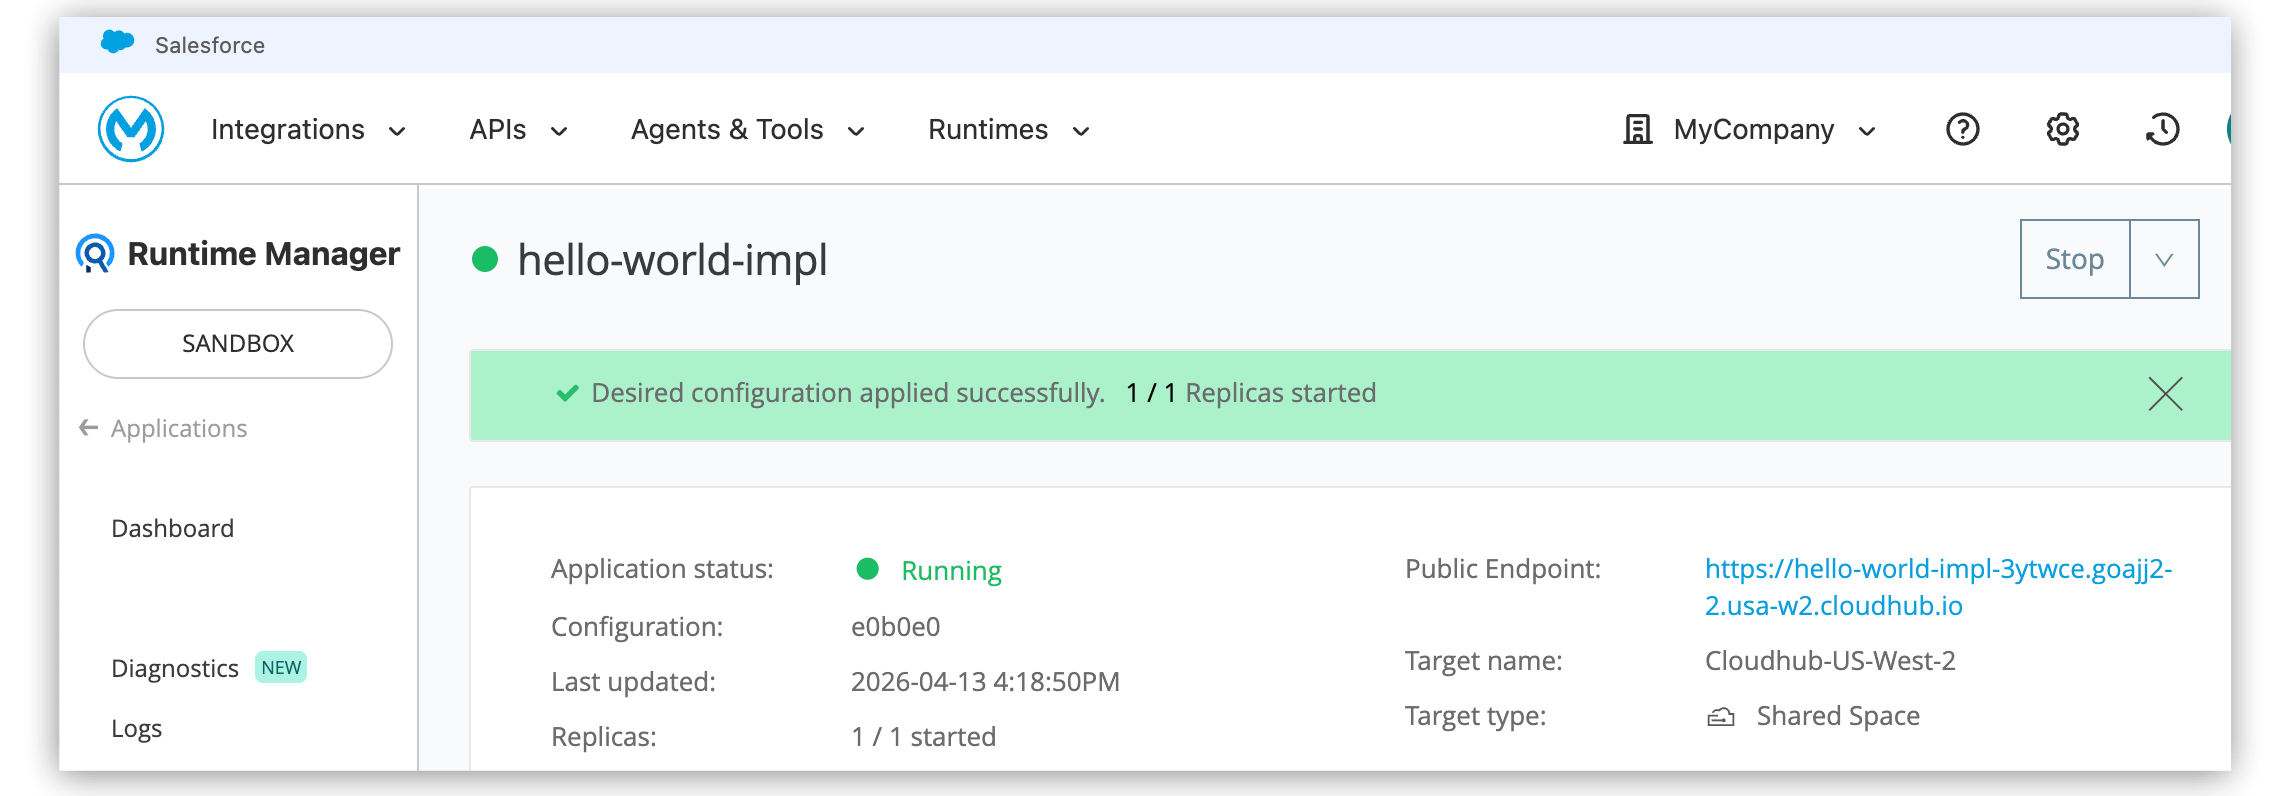
The first deployment typically takes 5–10 minutes. You can monitor progress in the Output panel (Mule Maven Output) in Anypoint Code Builder. As long as the status shows Deploying and not an error, the deployment is working. -
After the app is running, copy the application URL from Runtime Manager.
The application URL is the base hostname only. Your API endpoint is at the /api/greetingpath. Don’t send requests to the root URL (/) as it returns a 404. -
Open Postman and send a request to the full API path:
https://hello-world-impl-jsmith.<space-domain>.cloudhub.io/api/greeting?name=WorldReplace
hello-world-impl-jsmith.<space-domain>with the hostname from Runtime Manager. -
Verify you receive your greeting:
{
  "message": "Hello, World!"
}
Congratulations! Your API is live in the cloud!
What You Learned
You prepared your project for release and deployed it to CloudHub 2.0 using the built-in deploy command in Anypoint Code Builder. After deployment, you confirmed the application was running in Runtime Manager and verified the live endpoint with Postman.
Troubleshoot Deployment Issues
If your deployment fails with an error message similar to:
Failed to deploy to CloudHub 2.0: PUBLISH 409: ASSET_PRE_CONDITIONS_FAILED.
Cannot create a new asset with the provided groupId, assetId, version, state.
An asset already exists with this version and published lifecycle state.
This means that the version specified in your pom.xml is already published to Exchange. Exchange doesn’t allow you to overwrite published versions.
To resolve this issue:
-
Open your
pom.xmlfile in the project. -
Increment the
<version>element:<version>1.0.1</version>Each time you deploy, you must use a unique version number. -
Save the file.
-
Retry the deployment.