Adding and Removing User Libraries
Anypoint Studio leverages Eclipse’s![]() capacity to add and remove user libraries. As an organized set of
capacity to add and remove user libraries. As an organized set of .jar files, a user library provides an easy way to reference files across projects. Rather than individually adding files to a project, create a user library to store .jar files, then add the library in your project’s build class path.
The ability to share libraries between Studio projects enables organizations to share information or access credentials, or provide consistent configurations.
In Anypoint Studio 5.3 and newer, you can specify a library that resides in your system’s classpath, and use the Spring import feature to make external references available to your Mule Project. Studio then resolves dependencies in your flow against the external library.
Note: The Studio 5.3 feature also works if you use Maven.
Adding User Libraries
Included within Anypoint Studio are several libraries available to add to, then reference in your projects.
To add a user library to your Studio project:
-
Locate your library in the classpath of your system or on a shared drive.
-
In your Mule flow, add Spring import statements that point to your project:
<spring:beans> <spring:import resource="classpath:yourproject.xml"/> </spring:beans>xmlA complete example flow containing the Spring import statements (lines 10 - 12) is as follows:
<?xml version="1.0" encoding="UTF-8"?> <mule xmlns:http="http://www.mulesoft.org/schema/mule/http" xmlns:sfdc="http://www.mulesoft.org/schema/mule/sfdc" xmlns="http://www.mulesoft.org/schema/mule/core" xmlns:doc="http://www.mulesoft.org/schema/mule/documentation" xmlns:spring="http://www.springframework.org/schema/beans" xmlns:xsi="http://www.w3.org/2001/XMLSchema-instance" xsi:schemaLocation="http://www.springframework.org/schema/beans http://www.springframework.org/schema/beans/spring-beans-current.xsd http://www.mulesoft.org/schema/mule/core http://www.mulesoft.org/schema/mule/core/current/mule.xsd http://www.mulesoft.org/schema/mule/http http://www.mulesoft.org/schema/mule/http/current/mule-http.xsd http://www.mulesoft.org/schema/mule/sfdc http://www.mulesoft.org/schema/mule/sfdc/current/mule-sfdc.xsd"> <spring:beans> <spring:import resource="classpath:demo.xml"/> </spring:beans> <http:listener-config name="HTTP_Listener_Configuration" host="0.0.0.0" port="8081" doc:name="HTTP Listener Configuration"/> <sfdc:config name="Salesforce__Basic_authentication" username="foo" password="fooaroo" doc:name="Salesforce: Basic authentication"/> <flow name="demoFlow"> <http:listener config-ref="HTTP_Listener_Configuration" path="/" doc:name="HTTP"/> <set-payload value=""Hello World"" doc:name="Set Payload"/> <sfdc:no-operation-selected config-ref="Salesforce__Basic_authentication" doc:name="Salesforce"/> </flow> </mule>xml -
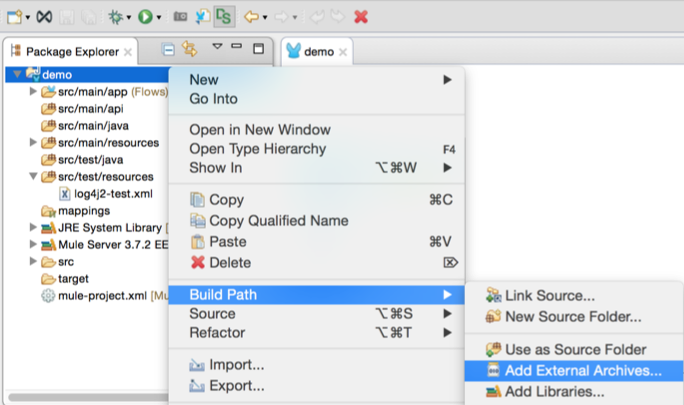
In the Package Explorer pane in Studio, right-click the name of your project.
-
Select Build Path, then Add External Archive.
-
In the JAR Selection menu, locate the JAR to add and click Open.
The JAR then appears in your project’s Referenced Libraries section.
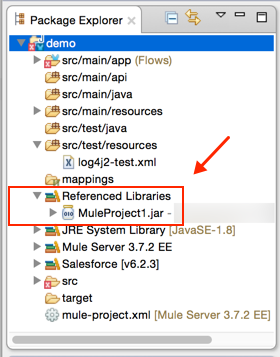
Studio then resolves any dependencies against the JAR file.
Removing User Libraries
Follow the procedure below to remove a user library from your Studio project.
-
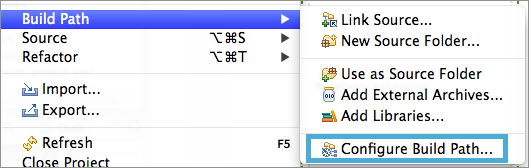
In the Package Explorer pane in Studio, right-click the name of your project.
-
Select Build Path, then Configure Build Path…
-
In the Properties panel, select Java Build Path in the left navigation bar, then click the Libraries tab.
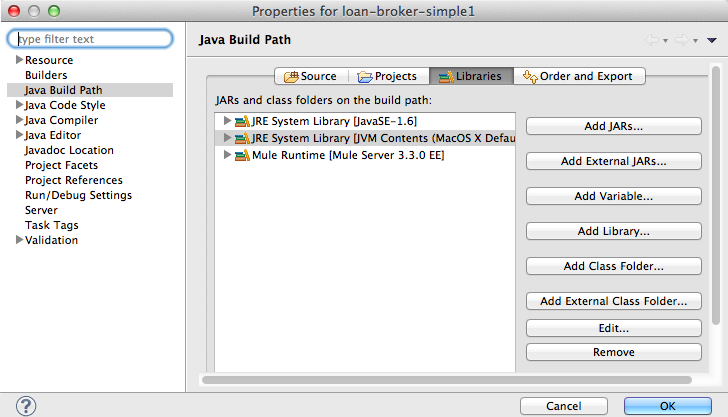
-
Click to select the user library you wish to remove, then click Remove.
-
Click OK to save your user library changes.
See Also
-
Java uses the classpath
 to resolve dependencies in an application.
 -
For more information on the use of Spring, see Using Spring Beans as Flow Components and About the XML Configuration File.