Consuming a REST API
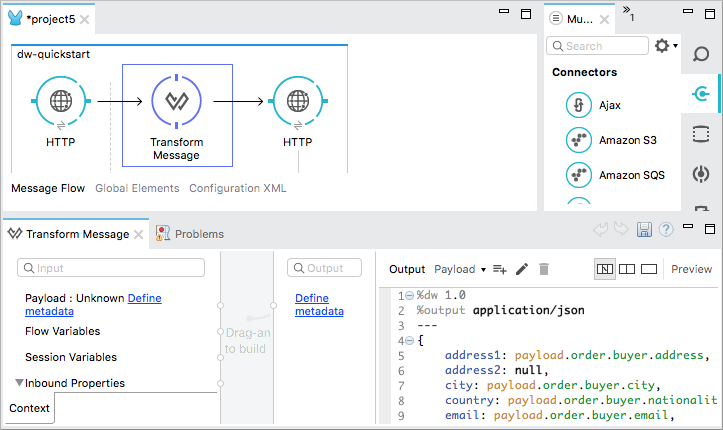
To consume a REST API from within a Mule application, you can configure an HTTP Request Connector. This document describes how to prepare a request, call a REST API, and work with its response.
If you connect to the same REST API many times, or work with an API having complex authentication protocols, consider developing your own Anypoint Connector. Check whether a connector already exists in Anypoint Exchange for the API you want to connect to. If so, download it into Anypoint Studio.
Basic Anatomy
In its simplest incarnation, a Mule application for consuming a REST API consists of the following things:
-
One or more message processors configured to build your request
-
An HTTP request connector configured to call the REST API
-
One or more message processors configured to accept and process the response

You can configure portions of the application that build the request and process the response. This document focuses on calling the REST API with an HTTP connector.
Minimum Configuration
The REST API you’re consuming needs to have a RAML file that describes it. In the RAML, you can define the following things:
-
Authentication
-
A base URI for configuring the outbound HTTP endpoint
-
Scope
Based on authentication credentials, the application can limit calls to only GET requests on certain resources, for example, or otherwise limit access to a resource.
-
Resources
You need configure the path of the resources for the outbound HTTP endpoint.
-
Methods
The default method for the HTTP outbound endpoint is POST, so you need to be aware of what methods are supported for the resource and, if necessary, change this default to the method you need to make a successful call.
-
Input validation
For POST and PUT calls, the API almost always requires that input format, such as JSON and XML match its schema.
If you reference a RAML file that describes your API, then the HTTP connector proactively presents you with smart suggestions.
In Mule Runtime, you can define or configure the following things:
-
Output format
After the HTTP outbound endpoint in your flow, you need message processors to accept the response from the API and translate the response into a useable format.
-
Redirects If the API uses redirects, enable redirects in your HTTP outbound endpoint.
-
Headers for methods
POST, PUT, and DELETE requests almost always require headers.
-
Error handling
Simple Example
This example consumes the OpenWeatherMap API.
In this example:
-
The API doesn’t require authentication.
-
The base URL is
http://api.openweathermap.org/data/2.5/ -
The scope is limited to a few resources, including weather and forecast. The only method available on the resource is GET.
-
The sample API requests available in the documentation show that to retrieve the information about the current weather in London, UK, your API request needs to look like this:
http://api.openweathermap.org/data/2.5/weather?q=London,uk
This URL uses the following format:

To implement this call in your Mule application, configure your HTTP request connector as described below. This example shows only the configuration of this HTTP Connector. To make this example work, you would need to, at minimum, to configure an HTTP Listener to trigger a message in the flow and at least one message processor to accept the response. See the full examples for more information.
Example in Studio
-
Open the Properties Editor of the HTTP Connector.
-
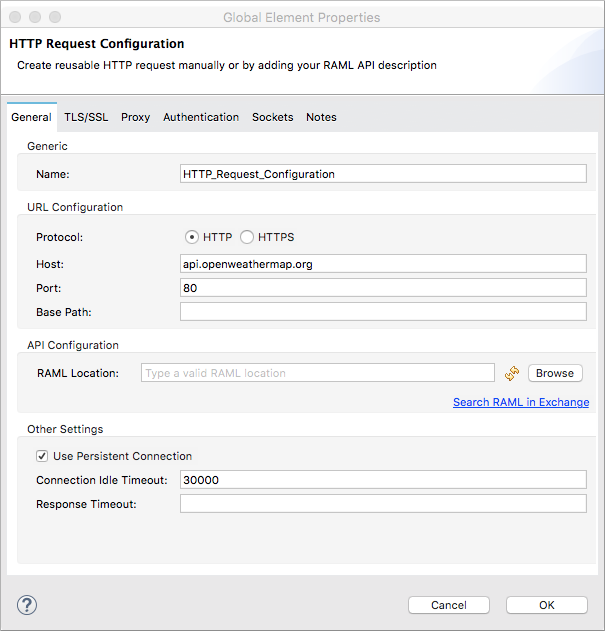
Click
 next to Connector Configuration to create a new global element that encapsulates configuration parameters for the connector.
 -
Set the Host to api.openweathermap.org and the Port to 80.
-
Click OK.
-
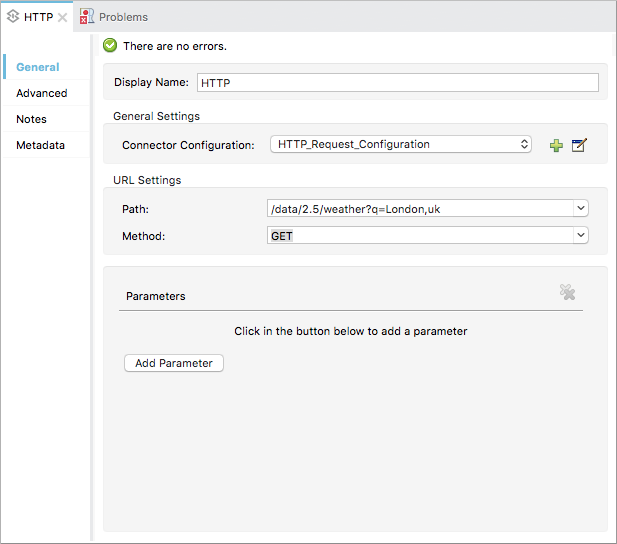
In the connector properties editor, set the Path to
/data/2.5/weather?q=London,uk.When you specify the host you set in the global element together with the path to comprise the entire URL you want to reach.
-
Select the Method you want to use from the drop-down list. This example uses GET.
-
Click Save.
If the API you are calling requires working with security requirements, involves redirects, or requires a specifying an HTTP content-type and encoding header, the HTTP connector supports additional configuration options to manage these details.
Example in the XML Editor
<http:request-config name="HTTP_Request_Configuration" host="api.openweathermap.org" port="80" doc:name="HTTP Request Configuration"/>
<flow name="basic_tutorialFlow1">
<...>
<http:request config-ref="HTTP_Request_Configuration" path="/data/2.5/weather?q=London,uk" method="GET" doc:name="HTTP"/>
</flow>xmlJSON Response
The JSON response, in this example, has the following structure:
{
"coord": {
"lon": -0.13,
"lat": 51.51
},
"sys": {
"message": 0.0506,
"country": "GB",
"sunrise": 1396589257,
"sunset": 1396636746
},
"weather": [
{
"id": 801,
"main": "Clouds",
"description": "few clouds",
"icon": "02d"
}
],
"base": "cmc stations",
"main": {
"temp": 287.46,
"pressure": 1010,
"temp_min": 285.93,
"temp_max": 289.26,
"humidity": 73
},
"wind": {
"speed": 2.06,
"gust": 4.11,
"deg": 310
},
"clouds": {
"all": 24
},
"dt": 1396633274,
"id": 2643743,
"name": "London",
"cod": 200
}jsonYou can use the Transform Message component or a JSON-to-Object transformer to transform this response into another format from which you can extract information, such as route messages.
If this API has an associated RAML file, you can reference it in the configuration element of the connector. With that in place, after you select the verb and asset to call, Studio exposes the metadata corresponding to the output. Integration with other elements in a flow is simplified.
Configuring Dynamic Requests with MEL Expressions
In the previous example, the request was hardcoded in the URL:
http://api.openweathermap.org/data/2.5/weather?q=London,uk
Most use cases require that the call to the API change dynamically based on some data in the message. For example, in the following GET request example, the call instructs Mule runtime to extract the city name from the payload of the message.
http://api.openweathermap.org/data/2.5/weather?q=#[payload.city]
Configuring Dynamic Requests in the Studio Visual Editor
-
In the HTTP connector properties editor, shorten the Path field to only
/data/2.5/weather -
Click Add Parameter to create a few new fields that correspond to a new query-param. For the query parameter name, type
qand for its value typeLondon,uk. This matches the part of the string you removedq=London,uk.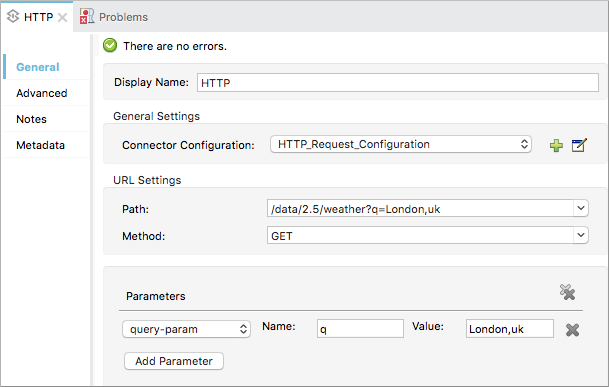
-
Replace the hard-coded string in the Parameters Value
London,ukto a variable incoming element of the Mule message:#[payload.city].Using this variable assumes there is an element named city in the message payload.
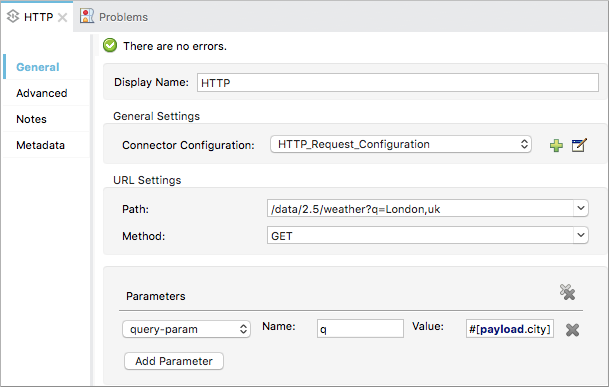
If you’re referencing a RAML file in your Connector Configuration, after selecting the path and method, the required query-params for the request type are displayed.
Configuring Dynamic Requests in Standlone XML
<http:request-config name="HTTP_Request_Configuration" host="api.openweathermap.org" port="80" doc:name="HTTP Request Configuration"/>
<flow name="basic_tutorialFlow1">
<http:request config-ref="HTTP_Request_Configuration" path="/data/2.5/weather " method="GET" doc:name="HTTP">
<http:request-builder>
<http:query-param paramName="q" value="#[payload.city]"/>
</http:request-builder>
</http:request>
</flow>xmlQuery a Different Resource
In some cases, you might want to query a different resource depending on data in your message properties or in variables that you set earlier in your flow. For example:
http://api.someservice.com/#[flowVars['resource_path']]?#[flowVars['query_param']]=#[flowVars['query_param_value']]
Dynamically Configure a Method
You might want to dynamically configure the method, such as GET or POST, based on logic performed earlier in your flow. To override the method set in the HTTP outbound endpoint, use a Property transformer before the endpoint to explicitly set the http.method property.
Configure with the Studio Visual Editor
Insert a Property transformer in your flow before your HTTP connector and configure it to set the http.method property. Mule runtime uses this property to override the method attribute set on the HTTP connector.
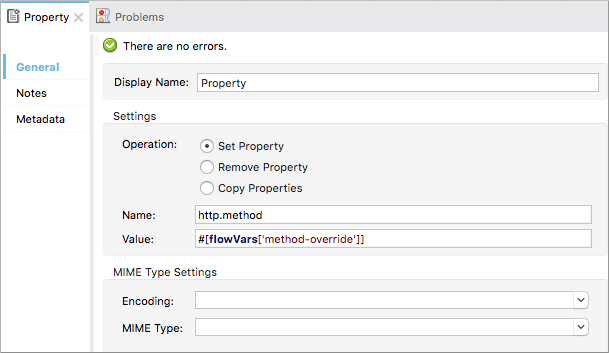
This sample configuration assumes that you have configured a flow variable earlier in your flow called method-override that populates the value of that variable with a valid method.
Configure with Standalone XML
Insert a set-property element in your flow before your HTTP connector and configure it to set the http.method property. If set, Mule runtime uses this property to override the method attribute set on the HTTP connector.
<set-property propertyName="http.method" value="#[flowVars['method-override']]" doc:name="Property"/>xmlThis sample configuration assumes that you have configured a flow variable earlier in your flow called method-override with logic to populate the value of that variable with a valid method.
Handling HTTP Content-Type and Encoding
When you send a POST request, Mule runtime adheres to the following rules regarding Content-Type and encoding of the body.
Sending
For a String, char[], Reader, or similar |
|
For binary content |
Encoding is not relevant. Mule runtime sets
|
Receiving
When receiving HTTP responses, the payload of the Mule message is typically the InputStream of the HTTP response.
Working with Custom Headers
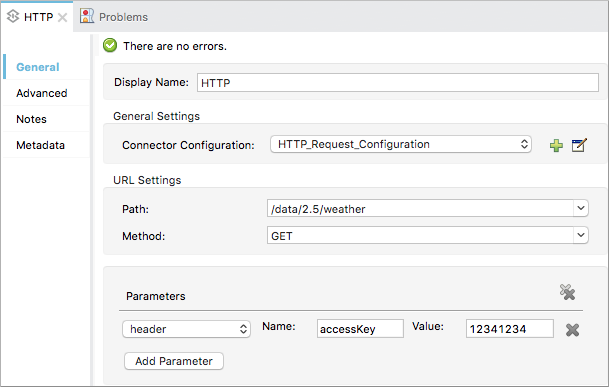
APIs, such as the OpenWeatherMap, require that you pass custom headers along with your requests, such as your developer key. Just like with the query parameters, you can also add headers to your request on the HTTP connector. For example, if the API you are consuming requires that you register for a developer key, then pass that key as a header on your requests using the header name accessKey, you can add a property to set this header, as shown below.
Custom Headers in Studio
In the HTTP connector’s properties editor click the Add Parameter button, this creates a few new fields that correspond to a new parameter. By default this creates a query-param, but you can pick other types of parameters from the dropdown menu, for this example pick header. For the header’s name, type accessKey and for its value, provide your key.
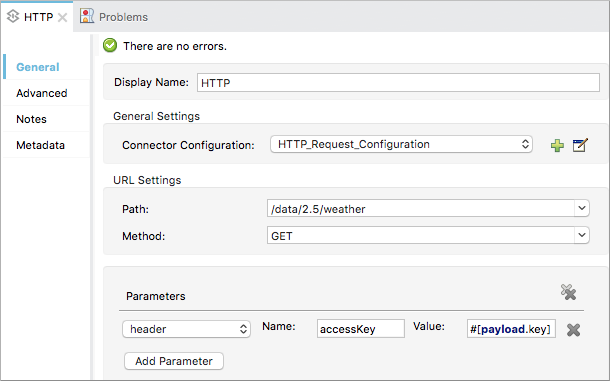
Alternatively, you can use the field Value to reference a variable incoming element of the Mule message, for example #[payload.key], assuming there is an element named key in the message payload.
You can also use a property placeholder, then define the value in your mule-app.properties file.
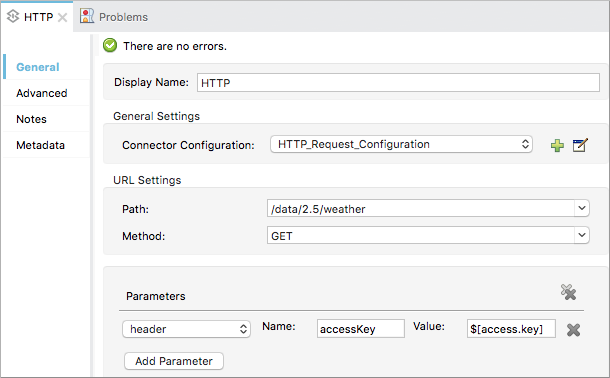
If you’re referencing a RAML file in your Connector Configuration, after you select the path and method, the required headers for the type of request you want to make are displayed.
Custom Headers in Standalone XML
<http:request config-ref="HTTP_Request_Configuration" path="/data/2.5/weather " method="GET" doc:name="HTTP">
<http:request-builder>
<http:header headerName="accessKey" value="12341234"/>
</http:request-builder>
</http:request>xmlYou can also configure the value of the custom header using a MEL expression if you want to define the value dynamically (see image below).
<http:request config-ref="HTTP_Request_Configuration" path="/data/2.5/weather " method="GET" doc:name="HTTP">
<http:request-builder>
<http:header headerName="accessKey" value="#[payload.key]"/>
</http:request-builder>
</http:request>xmlYou can also use a property placeholder, then define the value in your mule-app.properties file.
<http:request config-ref="HTTP_Request_Configuration" path="/data/2.5/weather " method="GET" doc:name="HTTP">
<http:request-builder>
<http:header headerName="accessKey" value="${access.key}"/>
</http:request-builder>
</http:request>xmlWorking with Security Requirements
If you work with complex authentication protocols such as OAuth, you can build your own Anypoint Connector to consume the API.
HTTPS
If the REST API you are consuming requires incoming requests arrive via HTTPS, you can configure a global HTTPS connector in your Mule application, then reference the connector in your outbound endpoint. In this example, you create a Java keystore file (JKS) and configure TLS.
Configure the HTTP connector for HTTPS:
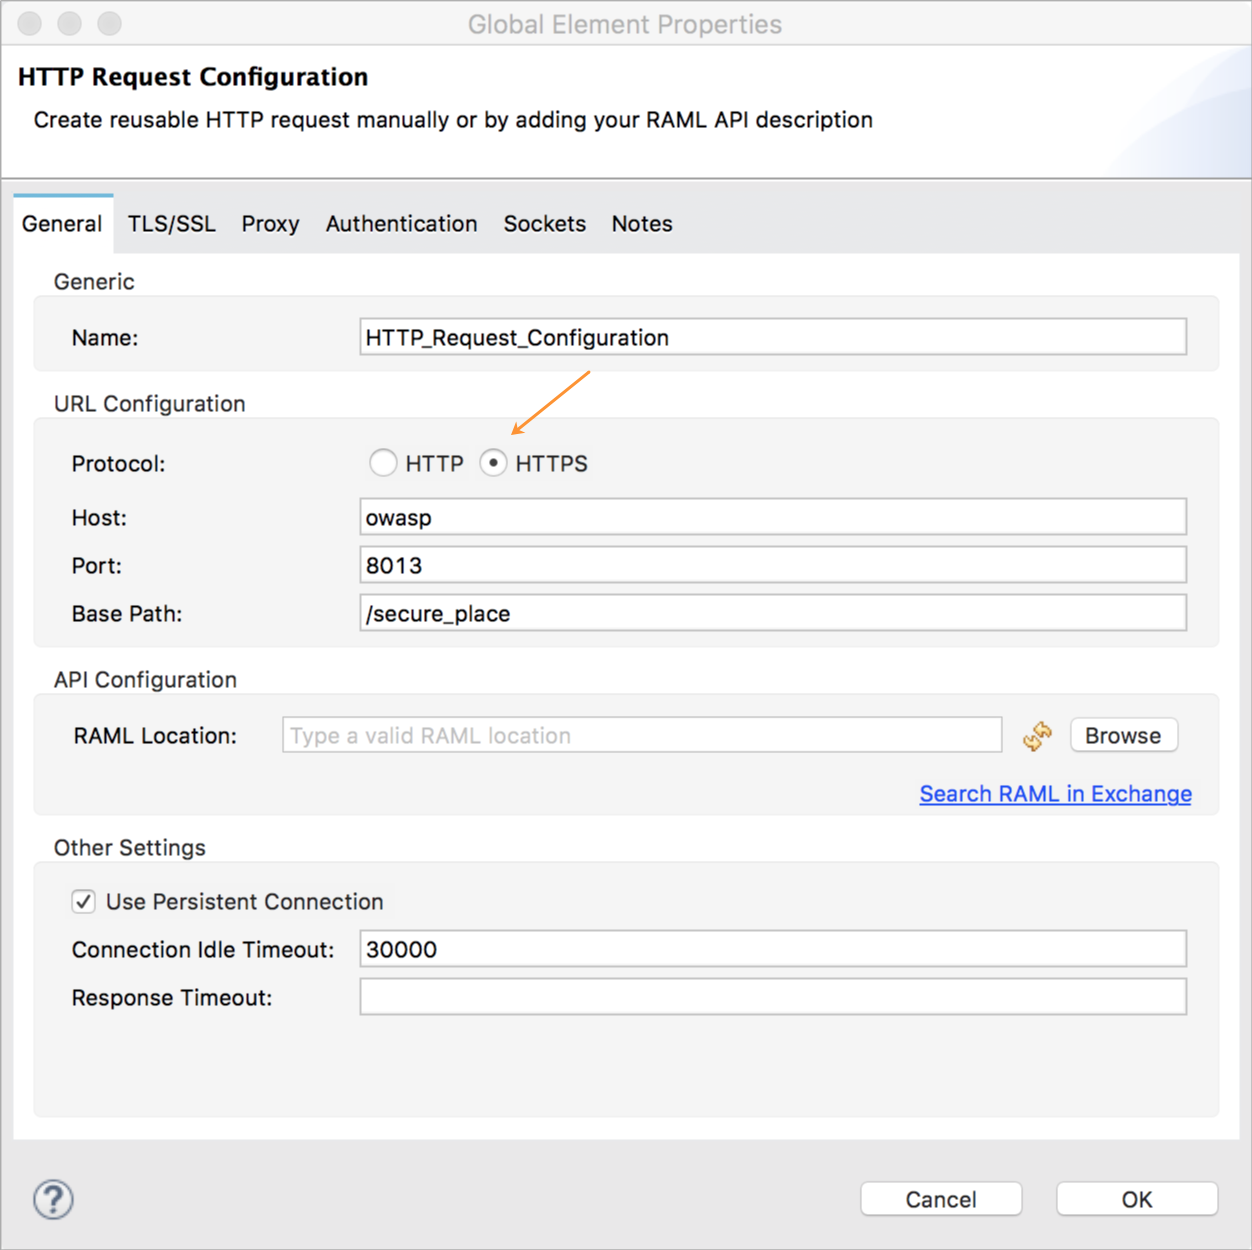
Create a keystore file to certify the communication. This can be done using the Java keytool in the bin directory of the Java installation. Navigate to this directory on your machine using the command line, then execute the following command to create a keystore file:
keytool -genkey -alias mule -keyalg RSA -keystore keystore.jks
You are prompted to create two passwords; remember the passwords. The command creates a jks file in the local directory called keystore.jks.
-
If you are using Studio, drag
keystore.jksinto theappname/src/main/resourcesdirectory in Studio Package Explorer. -
If you use a standalone XML in Mule Runtime, place this in the
MULE_HOME/confdirectory if to be used across multiple applications, or in theyourappname/src/main/resourcesdirectory if you are using this just within this application.
Now, you can reference this keystore in a global HTTPS connector, which, in turn, is referenced by the HTTP outbound endpoint within your flow.
HTTPS in Studio
-
Open the Properties Editor of the HTTP connector that you have configured to use HTTPS, and click
 next to the connector configuration field.
 -
On the TLS/SSL tab, select Use TLS Config.
-
In Key Store Configuration, select a type of key store configuration from the drop-down. For example, select JKS (Java Key Store).
The default type is JKS (Java Key Store).
-
Enter the passwords you created when creating your keystore file in Path, Key Password, and Password, then click OK.
If you placed your keystore in the
appname/src/main/resourcesdirectory, specify the name of the keystore as the value of the path. Otherwise, if the keystore is located in the MULE_HOME/conf directory, specify"/keystore.jks"as the path.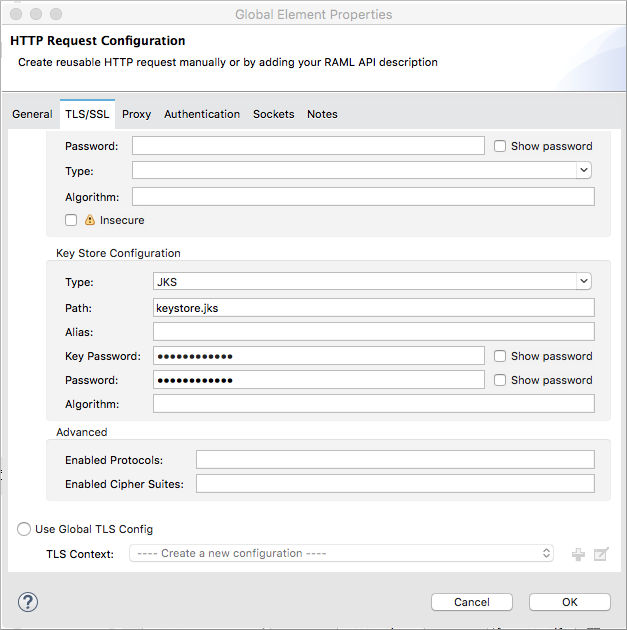
HTTPS in Standalone XML
<http:request-config name="HTTP_Request_Configuration" host="api.openweathermap.org" port="80" doc:name="HTTP Request Configuration">
<tls:context>
<tls:key-store path="keystore.jks" password="yourpassword" keyPassword="yourkeypassword"/>
</tls:context>
</http:request-config>xmlBasic Authentication
If the REST API that you are consuming requires that you pass basic authentication credentials, you can provide them within the outbound HTTP endpoint configuration.
Basic Authentication in Studio
-
Click
 next to the connector configuration field, then select the Authentication tab.
 -
Under Protocol, select Basic.
The fields for providing your username and password appear. Your application passes these credentials with the API call at runtime.
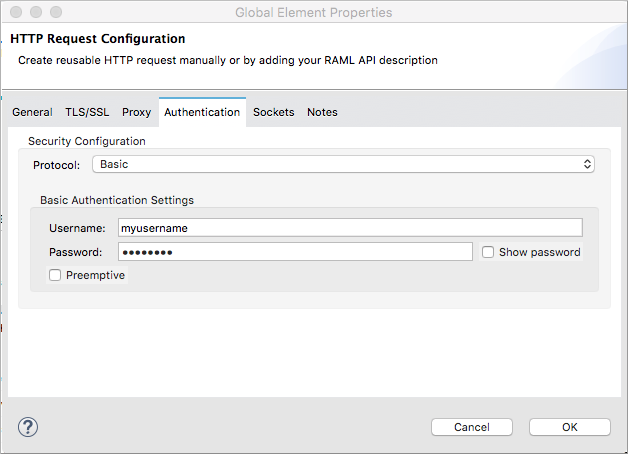
You can use property placeholders for credentials and define the properties in your
mule-app.propertiesfile.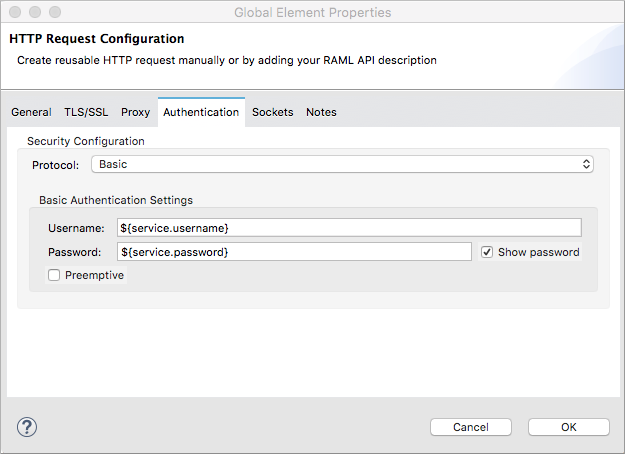
-
Navigate to your
mule-app.propertiesfile undersrc/main/appin the Package Explorer.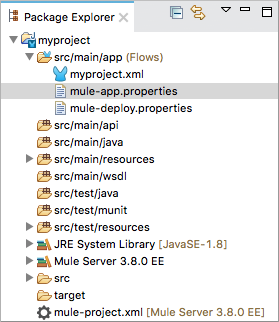
-
Define the placeholders here, as shown below.

Basic Authentication in Standalone XML
Add the user and password attributes to your http:outbound-endpoint configuration, as shown below.
<http:request-config name="HTTP_Request_Configuration" host="api.openweathermap.org" port="80" doc:name="HTTP Request Configuration">
<http:basic-authentication username="myUsername" password="myPassword"/>
</http:request-config>xmlRather than hardcode the values of your credentials, you can define them as property placeholders.
<http:request-config name="HTTP_Request_Configuration" host="api.openweathermap.org" port="80" doc:name="HTTP Request Configuration">
<http:basic-authentication username="${service.username}" password="${service.password}"/>
</http:request-config>xmlOpen (or create, if you don’t have one) the mule-app.properties file in your application’s src/main/app folder, then define the properties in the file:
service.username=myusername service.password=mypasswordtext
Tips
Follow redirects
If you make a request to an API using GET, and the API responds with a redirectLocation header, configure your HTTP connector to follow redirects, pushing the request to the redirect URL. This applies to GET requests only, as you cannot automatically follow redirects for a POST request.
-
In Studio, click the Follow Redirects checkbox on the Advanced tab of the HTTP connector’s Properties Editor.
-
In XML, add the attribute
followRedirects=``"true".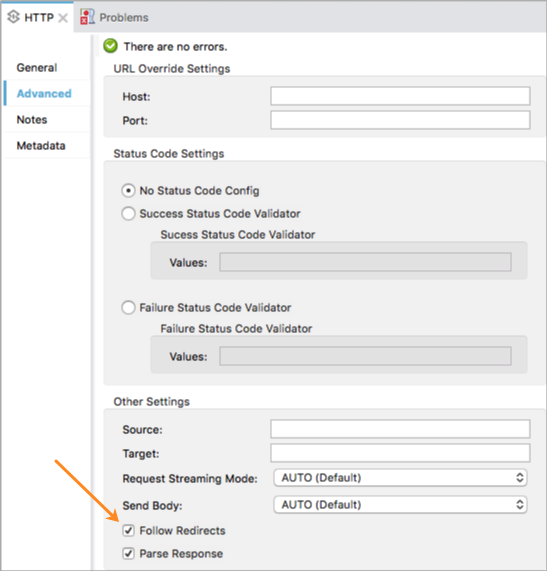
POST requests and the API schema
If you are calling a REST API with a POST request, you need to obtain the API schema for the POST and match that format in the payload of the Mule message that you send to the API with your request. A good way to do this is to insert a Transform Message component before the HTTP outbound endpoint in your flow, then define the output format in the properties editor.
