DataWeave Quickstart Guide
| Follow this guide to explore data transformation in DataWeave using an example t-shirt service that sends XML order requests to a different service that expects JSON - you can achieve this very simply via the Transform Message component, its DataWeave editor and interactive GUI. |
The Transform Message component in Anypoint Studio gives you the tools to leverage the DataWeave language, allowing you to map and connect to anything, regardless of data type or structure.
This DataWeave Quickstart Guide introduces the key functional features of the Transform Message component and DataWeave:
-
Type Transformation
-
Graphical UI for Data Mapping
-
Sample-based Output Preview
-
Navigating I/O Mapping
-
Filter and groupBy Operators
Overview
Design an example DataWeave transformation between two web services, one that handles SOAP requests and responses, and the other, an HTTP service whose resources are modeled in RAML. By the end of this guide you should understand how to:
-
Use DataWeave to transform XML data into JSON
-
Send a JSON input to a REST web service
| To follow the steps of this Quickstart, you need to download and extract the two files in the dw-quickstart-bundle.zip |
| For advanced examples that involve writing DataWeave code, see DataWeave Examples. |
The objective of this example is to send an HTTP request to a web service that places t-shirt orders based on information derived from a sales service (which outputs data in an XML structure). The service that accepts order requests requires a JSON input structure with values for the following set of keys:
-
size
-
email
-
name
-
address1
-
address2 (optional)
-
city
-
stateOrProvince
-
postalCode
-
country
The order processing service is defined in this example using RAML, a lightweight API-modeling language whose format is supported by the HTTP connector as a way of providing metadata into Studio.
The raw data from the sales service follows this structure:
<?xml version='1.0' encoding='UTF-8'?>
<order>
  <product>
    <price>5</price>
    <model>MuleSoft Connect 2016</model>
  </product>
  <item_amount>3</item_amount>
  <payment>
    <payment-type>credit-card</payment-type>
    <currency>USD</currency>
    <installments>1</installments>
  </payment>
  <buyer>
    <email>mike@hotmail.com</email>
    <name>Michael</name>
    <address>Koala Boulevard 314</address>
    <city>San Diego</city>
    <state>CA</state>
    <postCode>1345</postCode>
    <nationality>USA</nationality>
  </buyer>
  <shop>main branch</shop>
  <salesperson>Mathew Chow</salesperson>
</order>|
This XML format won’t work as a raw input to our web service, because the web service requires the data be serialized as JSON. Further, as you might have already guessed, only a subset of these fields are needed to complete an order, or they may need to be renamed and used to infer some other required values. You can setup the metadata structure and mapping in the following two sections. |
Phase 1 - Define Input and Output Metadata
| The Transform Message component picks up all of the available metadata about the input and output on either side of the component in the flow — this metadata awareness feature helps you build the transformation interactively through the UI. |
It is always recommended you set up the other components of your flow before you configure the Transform Message component.
-
In Anypoint Studio click File > New > Mule Project to create a new project, give the project a name, and click Finish.
-
If you haven’t already, download and extract the dw-quickstart-bundle.zip and drag both files in it to the
src/main/resourcesfolder of your new Mule project. -
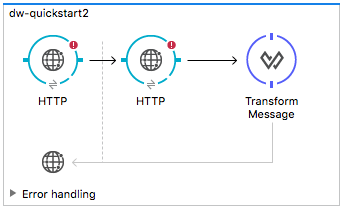
Drag an HTTP Connector from the palette onto your empty canvas, followed by a Transform Message component, then another HTTP Connector.
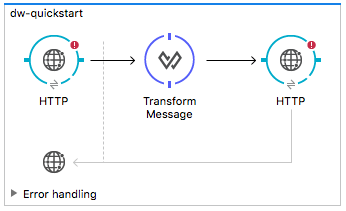
-
Click on the first HTTP Connector to open its properties editor, then click the green plus sign icon to create an HTTP connector configuration. In the popup, leave the default values for all fields—just click OK.
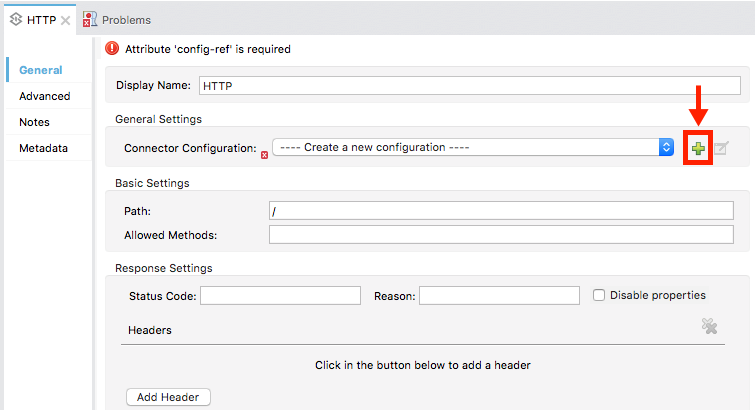
-
In the Path field in the properties window above, write
place-order. Once the Mule application is deployed, the desired endpoint becomes reachable at0.0.0.0:8081/place-order -
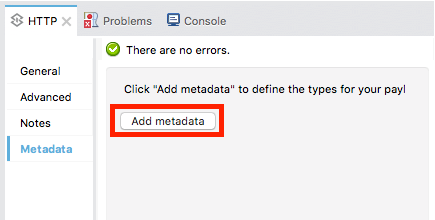
Select the Metadata tab from the HTTP connector’s properties window and click the Add Metadata button.
-
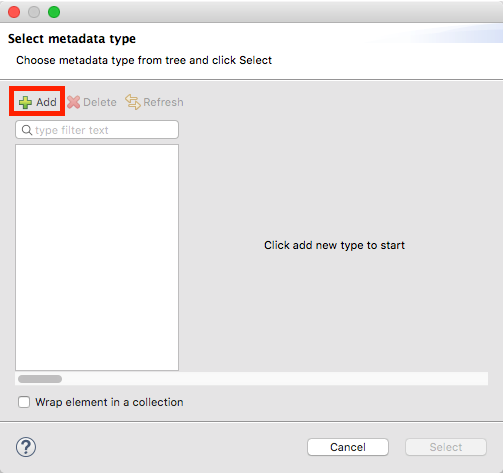
Click the Edit icon that appears next to the dropdown.

-
Click the green plus sign to Add a new metadata type.
-
Name the metadata type
XML-order-inputand click Create type.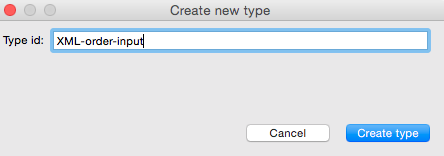
-
Select XML as the type, choose Example from the dropdown and point it to the location of the
dw-tshirt-inputsample.xmlfile, which you can extract from the bundle you downloaded at the start of this guide (dw-quickstart-bundle.zip). Then click Select to use this metadata type.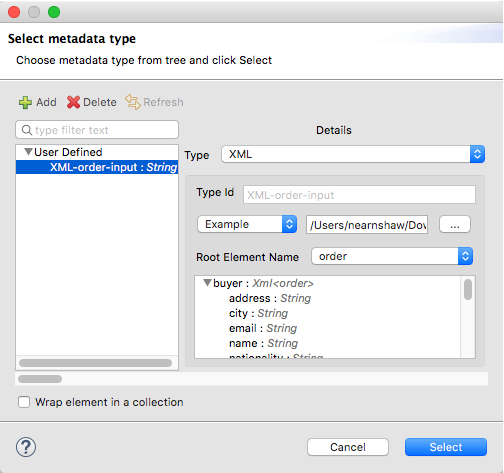
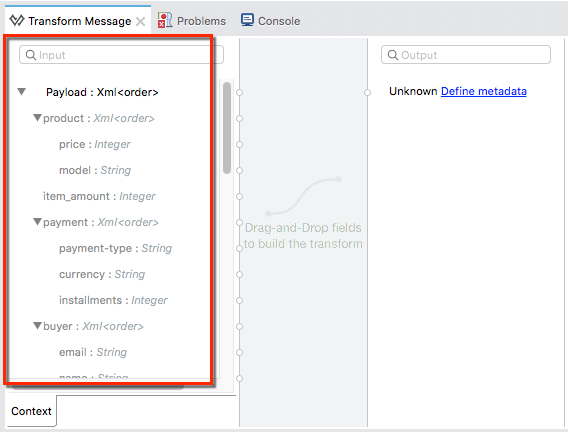
Now if you select the Transform Message component by clicking it in the flow, the input section should show the fields that are expected in the incoming payload through the Transform Message.
-
Click on the second HTTP connector in the flow to open its properties editor. Click the green plus sign to create a new configuration for the HTTP connector. In the Global Element Properties popup, change the Port field to 8082 (it must be changed since port 8081 is already taken by the other HTTP connector).
-
In the global configuration popup, find the "RAML Location" field, and give the proper path to the
t-shirt.ramlfile, which is available in the bundle you downloaded earlier. You can either type in the file location, or – if you extracted the file into the Mule project folder – locate it through the browse button. Then click Ok.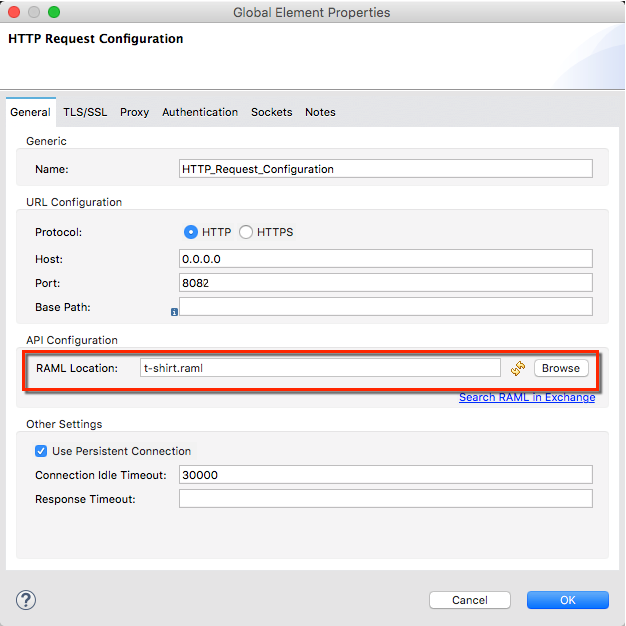
-
Back in the HTTP connector properties window, set "Path" to /orders and use POST as the "Method", picking out of the options described in the RAML you attached.
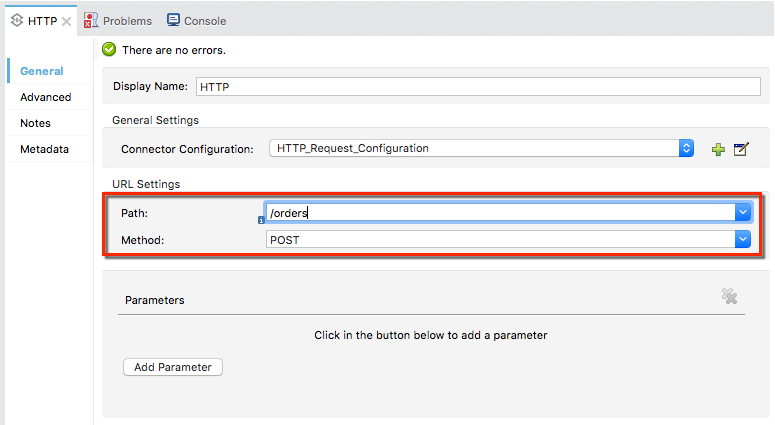
Note that if you click on the Transform Message component, the output section now reflects the data structure that’s described in the RAML file for POST-ing to
/orders.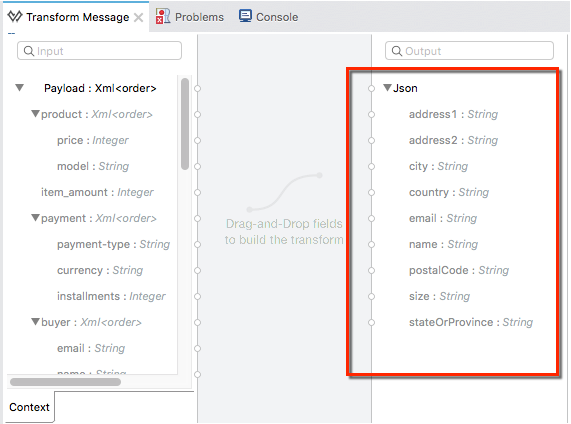
| In this example we need to convert XML input into JSON output. Because this difference is defined and known in the metadata of both the input and output, DataWeave handles the conversion implicitly. |
Optional: Create a Mock Service from RAML File
Using the same RAML definition that you assigned to the second HTTP connector, you can easily build an API and a mock backend for it with APIkit. In this way, when you run your application, your HTTP connector will be targeting this service and receiving an actual response without any errors being raised.
You can create your DataWeave mapping without going through any of this, just keep in mind that if you deploy your mule project and call its endpoint, you won’t get any response from it.
-
On the package explorer, left click on the
t-shirt.ramlfile in your project and select Mule > Generate Flows from RAML. This automatically generates a new Mule configuration XML that includes a Mule flow per each resource and method described on the RAML.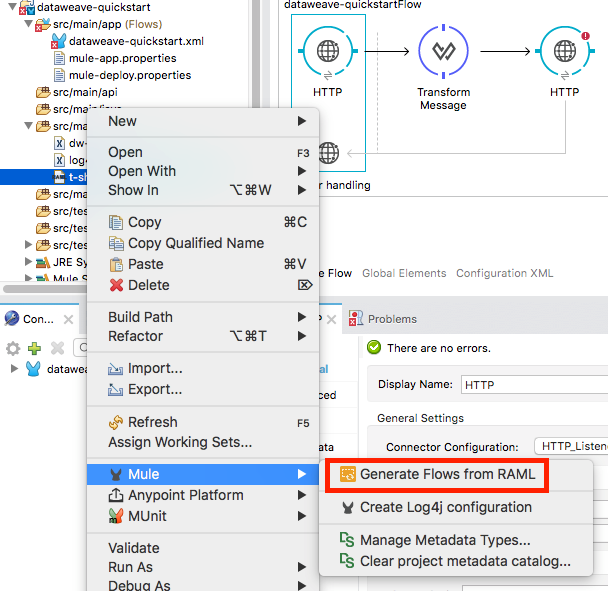
-
Open the
t-shirt.xmlfile that was generated on your project and look for the flow labeledpost:/orders:application/json:t-shirt-config. -
Open the properties for the
Set Payloadelement in that flow, and set its value to#[payload]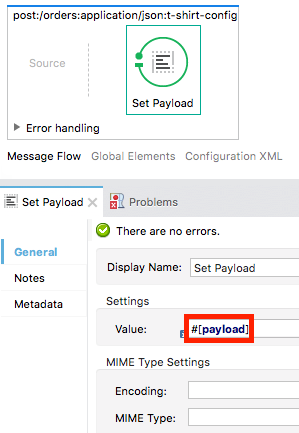
Phase 2 - Map Input Fields to Output Fields
Use the About Transform Message Component to create the actual mapping between the input and output fields. Simply click and drag a field in the input side to a field in the output side. The most obvious task is to match similarly named fields together, thus helping to validate the output data:
-
addressandaddress1 -
cityandcity -
nationalityandcountry. -
emailandemail -
nameandname -
postalCodeandpostCode -
stateandstateOrProvince
Note: The address2 and size fields in the output side should remain unassigned.
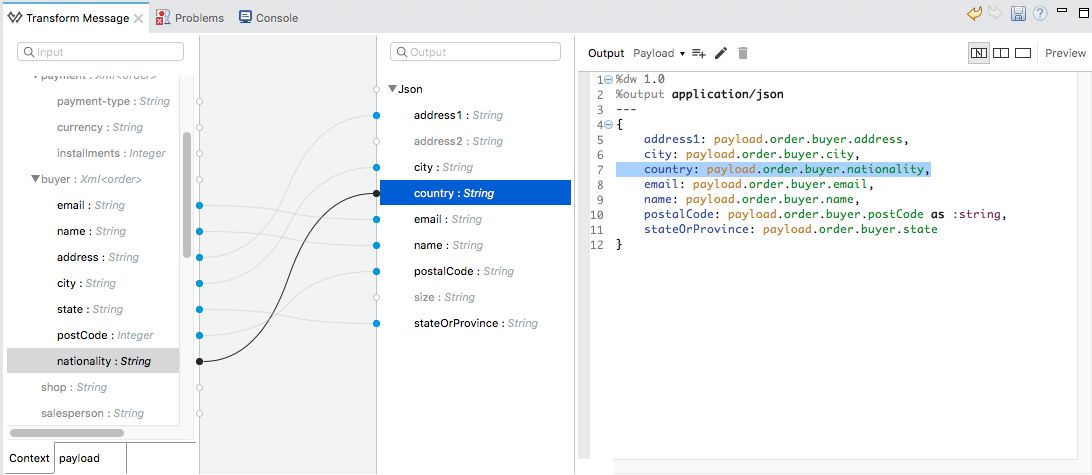
Each of these actions draws a connection in the UI and generates DataWeave code in the text editor. At this point your DataWeave code should look like this:
%dw 1.0
%output application/json
---
{
	address1: payload.order.buyer.address,
	city: payload.order.buyer.city,
	country: payload.order.buyer.nationality,
	email: payload.order.buyer.email,
	name: payload.order.buyer.name,
	postalCode: payload.order.buyer.postCode as :string,
	stateOrProvince: payload.order.buyer.state
}
How to Assign Fixed Values to the Output
The transform that we mapped in the previous section does not account for the fields size or address2 — you can provide these fields with an expression to populate them with the desired value.
-
Double click on the
address2field in the output, seeing how this adds an icon next to theaddress2field, and generates a line of DataWeave code that assigns this field the valuenull.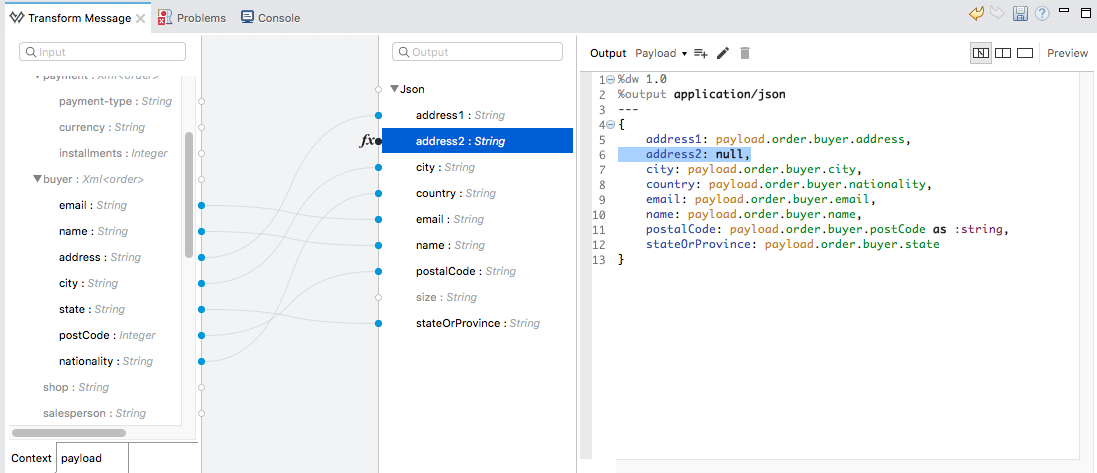
-
Do the same for the
sizefield, then edit the DataWeave code directly to assignsizethe valueM, for example, rather than going with thenullvalue.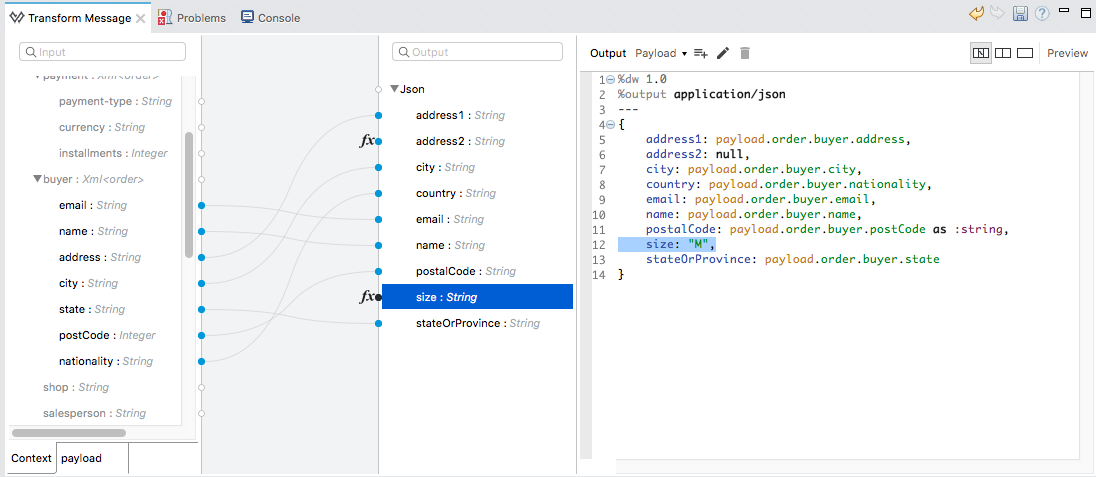
How to Use Conditional Logic in DataWeave
The transformation possibilities are endless. Let’s make the transform we just completed more interesting by modifying the expression that populates the size field, into a conditional expression.
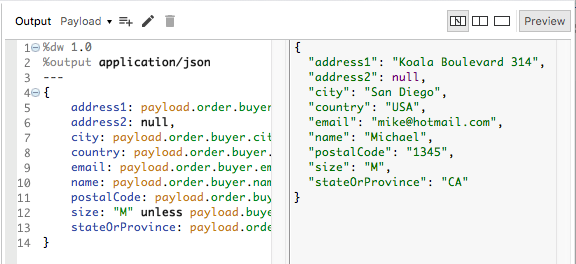
See how the expression that evaluates size has changed—it uses the Unless and Otherwise operators to set the value to M unless the buyer’s name is Homer Simpson, in which case the shirt size, expressed as size becomes XXL.
%dw 1.0
%output application/json
---
{
	address1: payload.order.buyer.address,
	address2: null,
	city: payload.order.buyer.city,
	country: payload.order.buyer.nationality,
	email: payload.order.buyer.email,
	name: payload.order.buyer.name,
	postalCode: payload.order.buyer.postCode as :string,
	size: "M" unless payload.order.buyer.name == "Homer Simpson" otherwise "XXL",
	stateOrProvince: payload.order.buyer.state
}
How to Preview Output in the Transform Message Component
The Transform Message component provides realtime feedback in the editor; a preview of what your output data would look like at run time, which is responsive to changes in the metadata structure in design time.
NOte: The Preview can only show an output preview when given valid input sample data.
-
To open this section click the
Previewbutton on the top right corner of the editor.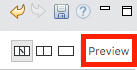
-
As your metadata is based off a sample input you provided before, Studio uses the data in this sample to build out the output sample.
-
You can freely edit the sample data to test what would happen in corner cases. Select the
payloadtab in your input section and replace any values there at will. When doing this, note how these values are populated into the values of the preview in real time, giving you a tangible representation of what the final result of your mapping will be.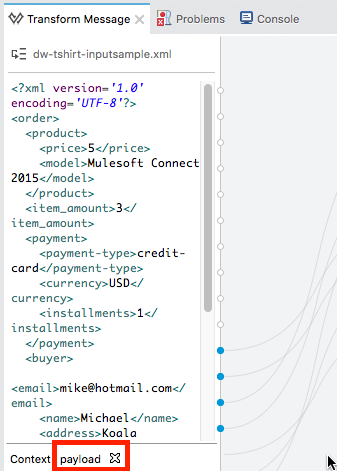
-
Try populating the "state" field in the input sample with TX and note how the "size" field in the output sample is updated in real time.
-
Save your Mule project and Deploy it to Studio’s virtual server to try it out by right-clicking on the project and selecting
Run As > Mule Application. -
Using a tool like Postman (chrome extension), send an HTTP POST request to http://localhost:8081/place-order with a XML body like the one below:
<?xml version='1.0' encoding='UTF-8'?>
<order>
  <product>
    <price>5</price>
    <model>MuleSoft Connect 2016</model>
  </product>
  <item_amount>3</item_amount>
  <payment>
    <payment-type>credit-card</payment-type>
    <currency>USD</currency>
    <installments>1</installments>
  </payment>
  <buyer>
    <email>mike@hotmail.com</email>
    <name>Michael</name>
    <address>Koala Boulevard 314</address>
    <city>San Diego</city>
    <state>TX</state>
    <postCode>1345</postCode>
    <nationality>USA</nationality>
  </buyer>
  <shop>main branch</shop>
  <salesperson>Mathew Chow</salesperson>
</order>
You should get a response with an JSON body that has a single value, this is the order ID for the shirt order you just placed.
Define Input and Output Metadata for Exercise 2
-
Drag two HTTP connectors and a Transform Message component into a new flow.
-
Click the first HTTP Connector to open its properties editor, then in the Connector Configuration select the one that you have already created in prior steps.
-
In the Path field enter
get-products. Once deployed, this generates a reachable endpoint at0.0.0.0:8081/get-products -
Click the second HTTP connector to open its properties editor, then in the Connector Configuration select the one that you have already created in prior steps, which is linked to the RAML file you downloaded.
-
Set the Path to /products and the Method to GET.
-
If you go and click the Transform Message component, note that its input has been populated with the appropriate data structure to send, via a GET request to /products.
-
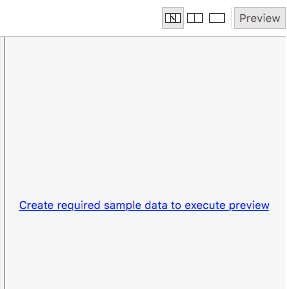
Click the Preview button to open the output preview. As there is no sample data available, you will be prompted to provide a sample.
-
Click the hyperlinked notification. This will open an editor tab in the input section with an empty scaffold of the known input structure, where every field is populated with
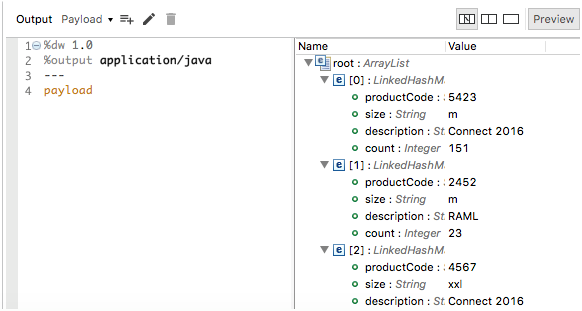
????. You can edit it so that it displays more usable data. Paste the following example in that editor:
[
{
"productCode": "5423",
"size": "m",
"description": "Connect 2016",
"count": 151
},
{
"productCode": "2452",
"size": "m",
"description": "RAML",
"count": 23
},
{
"productCode": "4567",
"size": "xxl",
"description": "Connect 2016",
"count": 329
},
{
"productCode": "1256",
"size": "s",
"description": "RAML",
"count": 0
}
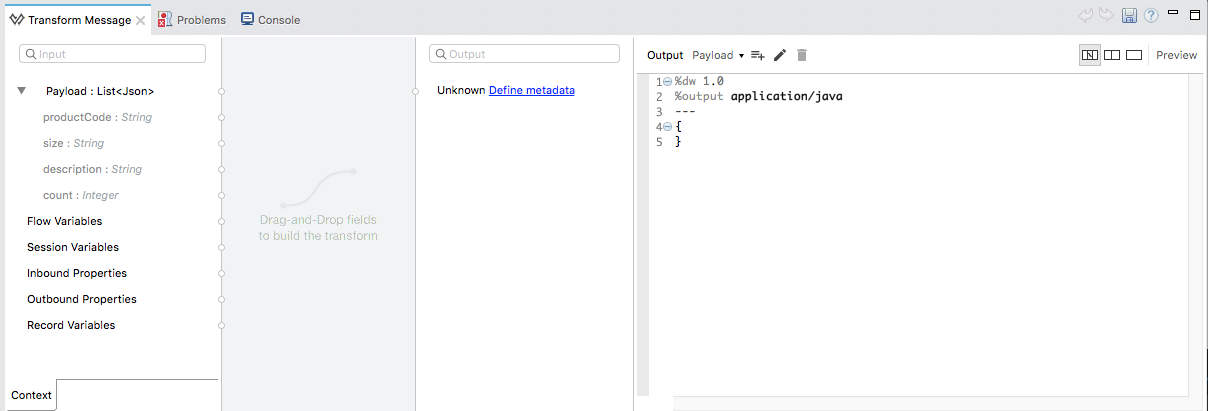
]Type Transformation
As with the other Transform Message component used in the first example of this Quickstart guide, in the input section you can see a tree that describes the data structure. As there’s no metadata about the desired output, there isn’t anything specified in the output section though. In this example we will write the DataWeave code manually to access more advanced features than are offered through the UI.
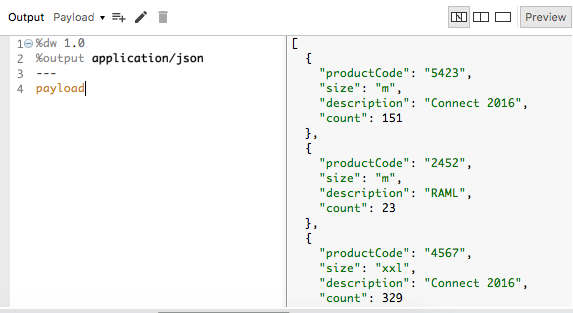
Click your Transform Message component. In the text editor pane, replace the curly brackets '{}' for 'payload'.
This is the simplest transformation you can carry out, it replicates the input structure but changes the format from JSON to Java. Whatever exists in the payload – including any child elements at any depth – is transformed directly into Java without changing any of its structure.
Open the Preview tab and see a tree describing the structure of the data, this is what a Java preview always looks like:
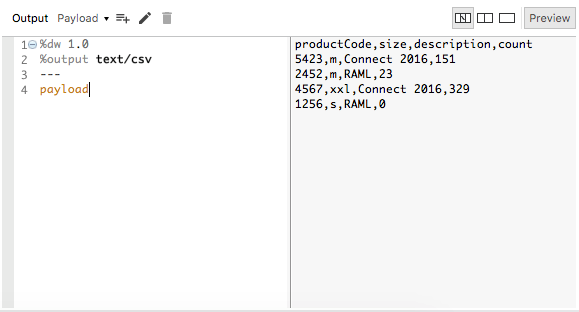
You can easily change the output directive from the default application/java to text/csv or to any other of the supported formats and see the results of that transformation.
Note that in this particular example, the format application/XML won’t work as is because XML requires a parent node, which is absent here.
|
Change the output directive to application/json so that the final result is identical to the sample data in the input. Later on you can transform this in more interesting ways.
map Operator
A simple "payload" can be passed on without modifications if you want to preserve the data structure, however if you need to change any of the specific data fields in the payload, then you need to interact with the payload’s items individually.
-
Place the following code in the DataWeave editor:
%dw 1.0
%output application/json
---
shirts: payload map {
	size: upper $.size,
	description: $.description,
	count: $.count
}
As the input is a collection of elements, each describing a product in inventory, this code uses the map operator to treat each of these instances separately. What’s enclosed in curly brackets right after the map operator is executed once for each element in the collection. Within this operation, the code refers to the currently selected instance via the $ selector. The code in this example merely takes each item of the input and maps it to an identical field, with the exception of the size field, on which it applies the upper operator to change it to upper case.
If you open the Preview pane, you can see what this transform would output, given the sample as an input. The output is an object that contains a single array, each element in that array is one of the elements in the input, kept identical except that the size field appears in upper case.
{
  "shirts": [
    {
      "size": "M",
      "description": "Connect 2016",
      "count": 151
    },
    {
      "size": "M",
      "description": "RAML",
      "count": 23
    },
    {
      "size": "XXL",
      "description": "Connect 2016",
      "count": 329
    },
    {
      "size": "S",
      "description": "RAML",
      "count": 0
    }
  ]
}
filter Operator
The result from the previous step includes a products for which there is zero stock. We can easily filter those cases out using the Filter operator. Modify your DataWeave code to include filter $.count > 0 in the end. Your code should look like this:
%dw 1.0
%output application/json
---
shirts: payload map {
	size: upper $.size,
	description: $.description,
	count: $.count
} filter $.count > 0
The filter operator takes an array as an input validates each element in it against a condition. In this case, the array it takes is the resulting array created by the map operation, since the filter operation is only executed once the map operation is already compiled. Note that the condition uses the $ selector to signal the element of the array that is currently being revised.
| See the Precedence Table to have a clear idea about when each expression is compiled. |
If you open the Preview pane, you can see what this transform would output, given the sample as an input. The output’s array now contains one element less, which was the product that had 0 stock.
{
  "shirts": [
    {
      "size": "M",
      "description": "Connect 2016",
      "count": 151
    },
    {
      "size": "M",
      "description": "RAML",
      "count": 23
    },
    {
      "size": "XXL",
      "description": "Connect 2016",
      "count": 329
    }
  ]
}
groupBy Operator
The elements in the output can be grouped conveniently. The groupBy operator can arrange a collection into a collection of collections where each has the elements that share a common value in one of their fields. Modify your DataWeave code to include groupBy $.size in the end. Your code should look like this:
%dw 1.0
%output application/json
---
shirts: payload map {
	size: upper $.size,
	description: $.description,
	count: $.count
} filter $.count > 0 groupBy $.size
The Group By operator takes an array as an input and focuses on one of its fields to group the elements according to the values in this field. In this case, the array it takes is the resulting array created by the map operation, since the groupBy operation is only executed once the map operation is already compiled. Note that the condition uses the $ selector to signal the element of the array that is currently being revised.
If you open the Preview section, you can see what this transform would output, given the sample as an input. The output now contains an object with a single "shirts" object in it, which contains an array. Each different available value for "size" will have a corresponding element inside the "shirts" object, each holding an array of objects with every product that matches that value for size.
{
  "shirts": {
    "M": [
      {
        "size": "M",
        "description": "Connect 2016",
        "count": 151
      },
      {
        "size": "M",
        "description": "RAML",
        "count": 23
      }
    ],
    "XXL": [
      {
        "size": "XXL",
        "description": "Connect 2016",
        "count": 329
      }
    ]
  }
}
See Also
-
More advanced examples in DataWeave Examples
-
Migrate your old DataMapper transforms automatically by using the DataWeave Migrator Tool