HTTP Request Connector
| The information in this topic refers only to Mule 3 and Studio 6. For information on the Mule 4 and Studio 7 HTTP connector, see Mule 4 HTTP Connector, Receive HTTP Requests, and Authenticate HTTP Requests. |
The HTTP Request Connector provides the most practical way to consume an external HTTP service. When sending HTTP requests, you can choose what method to use (GET, POST, etc) and may include a body, headers, attachments, query parameters, form parameters and URI parameters. The response is then received by the connector and is passed on to the next element in your flow.
This connector can also implement HTTPS protocol and encrypt your communications via TLS, it can also implement authentication via basic authentication, OAuth, NTLM or digest.
The request connector is especially handy when consuming a RESTful API that is described in a RAML file. If you reference the API’s RAML file in the connector’s configuration, it proactively offers you the set of available resources and operations contained in the RAML file, as well as enforce the policies described in the file. It also exposes the API metadata to Studio, which can then be used by other elements such as DataWeave to autocomplete fields and make configuration much easier.
The connector can also send HTTP requests to addresses that aren’t associated to any RAML file – you can simply assign an address, select an HTTP method and optionally add additional parameters to your request.
|
Mule 3.7 and newer provides support for HTTP request Server Name Indication (SNI), which is handled in the HTTP connector’s backend. |
Basic Usage
In Studio, to use this connector as an HTTP Request Connector (and not an HTTP Listener Connector), place it into the Process section of a flow (that is, anywhere except the beginning).

Minimum Configuration with the Studio Visual Editor
The following example shows the minimum configuration required for this connector:
In the connector instance, provide a Path and a Method:

Additionally, you must reference a global element, explained below.
Creating a Global Element
Like with most connectors in Studio, a lot of the configuration is encapsulated in a separate reusable object that can then be referenced by as many instances of the connector as you like.
|
Having global elements becomes especially useful when having multiple connectors that must use the same settings, in order to avoid repeating the same configuration in every request. In Studio you can also reference a RAML file in this element, which then provides metadata that makes the rest of the configuration easier. |


Minimum Configuration with the XML Editor
Example global element representation, referenced in the connector instance, inside the Mule flow.
<http:request-config name="HTTP_Request_Configuration" host="example.com" port="8081"/>

<flow name="example1">
    ...
    <http:request config-ref="HTTP_Request_Configuration" path="test" method="POST"/>
</flow>
Minimum Configuration for the Global Element
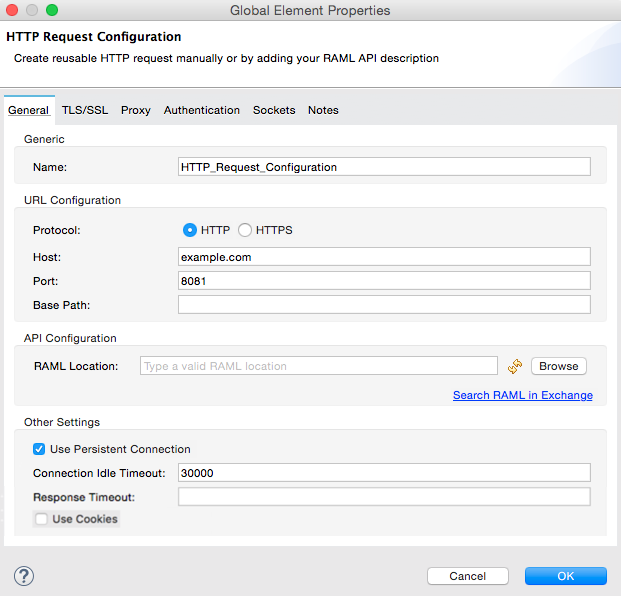
Like with most connectors in Studio, a lot of the configuration is encapsulated in a separate reusable object that sits outside the flow and can then be referenced by as many instances of the connector as you like. This element defines a server connection to a particular network interface and port and handles outbound requests to it and their responses. At the very least, you need to provide a Host and a Port in your global element.
Minimum Configuration for the Connector Instance
After you have defined the request-config, to actually send an HTTP request you need to configure a flow with an <http:request> element. In the connector instance, provide a Path and a Method, as well as a reference to a global element
The above configuration performs a GET request to http://www.example.com/test.
HTTP Connector Basic Configuration With the Studio Visual Editor
You need to provide a path and method for your requests, as well as reference a Connector Configuration global element. Note that the path field doesn’t define the full path, but rather the subpath, within the host and after the optional base path that can be specified in the Connector Configuration global element.
You can also add as many parameters as you want, which can be headers, query parameters or URI parameters.

| Property | Description |
|---|---|
Display Name |
The name of the element in the flow. |
Request Config |
A reference to the Global Element. This field is required. |
Path |
The path where the request is sent (without including the optional base path) configured in the global element. |
Method |
The type of HTTP request to send (GET, POST, DELETE, etc.). Optional, the default is GET. |
Parameters |
You can include additional parameters to the request, such as headers and query params by clicking the green plus sign at the top. If the global element references a RAML file, the relevant parameters display according to the selected resource and method. |
| If you’ve referenced a RAML file in the global element, both the Path and Method fields present you with a drop-down list of available options, based on what the RAML describes. Note that you’re also always free to write your own values in these fields. |
Global Element Basic Configuration
| Property | Description |
|---|---|
Name |
The name that the configuration element is referenced from instances of the connector. |
Protocol |
Choose between HTTP and HTTPS |
Host |
The host to send requests to. This field is required. |
Port |
The port to send requests to. This field is required. |
Base Path |
A base path within the host. Instances of the connector can then specify a subpath within this path. |
RAML Location |
Your connector can point to a RAML file, which makes it a lot easier to configure as Studio proactively offers intelligent suggestions based in the metadata defined in the RAML file. You can reference a RAML file on your local disk, one on an external URI, or you can pick one of the available ones in the Exchange by clicking Search RAML in Exchange. |
Enable Datasense |
The Enable DataSense checkbox allows Studio to use DataSense to expose metadata from the RAML file and interact with it on other elements in Studio. |
| If you complete the RAML Location field first, all other fields automatically populate based on what’s specified in the RAML. |
|
The metadata from the RAML is obtained every time you open your project in Studio and then kept in cache until you close and reopen the project. If the RAML file is modified, you can refresh the cache of it by clicking the Reload RAML button. The metadata exposed by the connector to your flow may not be updated right away. In such a case, click the Refresh Metadata button in the metadata explorer. |
HTTP Connector Basic Configuration With XML Editor
You need to provide a path and method for your requests, as well as reference a Connector Configuration global element. Note that the path field doesn’t define the full path, but rather the subpath, within the host and after the optional base path that can be specified in the Connector Configuration global element.
As child elements of this connector, you can add as many parameters as you want, which may be headers, query parameters or URI parameters.
<http:request config-ref="HTTP_Request_Configuration" path="test" method="POST" doc:name="HTTP"/>| Property | Description |
|---|---|
|
The name of the element in the flow in Studio. |
|
A reference to a reusable Global Element that contains several configuration parameters. This property is required. |
|
The path where the request is sent (without including the base path) configured in the global element. |
|
The type of HTTP request to send (GET, POST, DELETE, etc.). Optional, the default is GET. |
By default, GET, HEAD and OPTIONS methods do not send the payload in the request (the body of the HTTP request is empty). The rest of the methods send the message payload as the body of your request.
Global Element Basic Configuration
Every HTTP Connector must reference a global configuration element that sits outside any flow in your project. This element encapsulates much of the common configuration parameters that can be reused by other connectors in your project and can be referenced by multiple instances of the connector. At the very least, you need to provide a host and a port:
<http:request-config name="HTTP_Request_Configuration" host="example.com" port="8081" doc:name="HTTP Request Configuration"/>| Property | Description | XML Sample |
|---|---|---|
|
Name of the Global Element, used to reference inside connector instance. |
|
|
Choose between HTTP and HTTPS |
|
|
Host to be used by all request elements that reference this config. |
|
|
Port to be used by all request elements that reference this config. |
|
|
The path to which requests are sent. You can then specify subfolders below this path within the connector instance. |
|
Child Element |
Description |
XML Sample |
RAML Location |
If you have access to a RAML file describing the API you’re connecting to, indicate its location here. |
|
The above configuration performs a GET request to http://www.example.com/test.
Below are two connectors sharing the same connector configuration:
<http:request-config name="HTTP_Request_Configuration" host="example.com" port="80" basePath="/api/v2" />

<flow name="test_flow">
    ...
    <http:request config-ref="HTTP_Request_Configuration" path="customer" method="GET" />
    ...
    <http:request config-ref="HTTP_Request_Configuration" path="item" method="POST" />
    ...
</flow>
The first connector in the example sends a GET request to http://www.example.com/api/v2/customer. The second connector sends a POST request to http://www.example.com/api/v2/item.
Mapping Between Mule Messages and HTTP Requests
When an HTTP Request Connector is executed, the Mule message that reaches it is transformed to generate an HTTP Request. Below is an explanation of how each part of the Mule message contributes to generate an HTTP request.
HTTP Request Body
The Mule message payload is converted into a byte array and sent as the HTTP Request’s body. This behavior is carried out always, except in the following scenarios:
-
The Mule message’s Payload is a Map of keys and values
-
The Message has outbound attachments
Generate the Request Body with Content-Type:application/x-form-urlencoded
Whenever the message payload is a Map, the connector automatically generates an HTTP request with the header Content-Type:application/x-www-form-urlencoded. The keys and values of the map in the payload are converted into form parameter keys and values in the body of the HTTP request.
Generate the Request Body with Content-Type: multipart/form-data
Whenever the message contains outbound attachments, the connector automatically generates an HTTP Request with the header Content-Type:multipart/form-data. The payload of the Mule message is ignored, and instead each attachment in the message is converted into a part of the HTTP Request body. If you want to create a different multipart request, then the Content-Type header can be set with a different value by adding custom parameters with the Studio Visual Editor or with the Studio XML Editor.
HTTP Headers
If there are any outbound properties in the Mule message that arrives to the HTTP Request Connector, these are automatically added as HTTP request headers. It’s also possible to add headers explicitly through the HTTP Request Connector’s configuration. See documentation below.
|
By default, the Grizzly libraries used by the HTTP connector limit the HTTP request header section size (request line + headers) to below 8192 bytes. While it is recommended that you keep your HTTP request header section below this limit, you can override this limit by setting For example, to set the HTTP header section size to 16,000 bytes, you could start the Mule runtime with the command |
Adding Custom Parameters with the Studio Visual Editor
The HTTP Request connector allows you to include the following types of parameters:
-
Query params
-
A map of multiple query params
-
URI params
-
A map of multiple URI params
-
Headers
-
A map of multiple headers
Additionally, you can also send form parameters with your request, included in the Mule message payload. You can also include attachments in your request by adding an Attachment processor to your flow.
| Remember that when using Studio, if the API you want to reach has a RAML file, referencing this RAML file in the global element exposes the API’s metadata, and Studio proactively displays all the available properties for each operation in the API. |
Query Parameters
By clicking the Add Parameter button you can add parameters to your request. If you leave the default query-param as the type of parameter, you can add new query parameters and assign names and values to them.

The above configuration performs a GET request to http://www.example.com/test?k1=v1&k2=v2.
| Both the name and value fields allow the use of MEL expressions. |
If query parameters should be set dynamically (for example, while at design time you don’t know how many query parameters are needed in the request), then you can change the parameter type to query-params, which accepts an array, and you can assign it a MEL expression that returns a map of parameters:

For this example, you must first generate a variable named customMap. If you assign that variable a value through the following MEL expression:
#[{'k1':'v1', 'k2':'v2'}]
It generates the same request than the previous example, a GET request to http://www.example.com/test?k1=v1&k2=v2
The query-param and query-params elements can be combined inside a single connector. The parameters resolve for each request (evaluating all the MEL expressions in the context of the current message), and in the order they are specified inside the request builder. This allows to override parameters if necessary. If the same parameter is defined more than once, the latest value is used.
URI Parameters
When parameters should be part of the path, placeholders can be added to the "path" attribute with a name for each of them, and then they must be referenced by a uri-parameter:

If you first type the placeholder into the "path" field, Studio automatically adds the corresponding uri-param below in the parameters section, saving you some of the hassle.
This performs a GET request to http://www.example.com/customer/20.
| Both the name and value fields allow the use of MEL expressions. |
Dynamically Setting URI Parameters
If URI parameters should be set dynamically they can be set through a MEL expression that returns a map of parameters to set:

If any additional uri-param parameters are added automatically while you type the value in the path field, delete these, as they are addressed by the dynamic uri-params field.
|
For this example you need to create a variable named customMap. If you set that variable to the MEL expression #[{'p1':'v1', 'p2':'v2'}], it generates a GET request to http://www.example.com/test/v1/v2.
Just as with query parameters, the uri-param and uri-params elements can be combined inside the connector. They are resolved for each request (evaluating all the MEL expressions in the context of the current message), and in the order they are specified inside the request builder. This allows you to override parameters, if necessary. If the same parameter is defined more than once, the latest value is used.
| In every case, all the placeholders used in the path to reference URI parameters should match the names of the URI parameters inside the request builder (after all MEL expressions were evaluated). |
Headers
You can add HTTP headers to the request just as easily as query parameters:

This performs a GET request to http://www.example.com/test, adding the following headers:
HeaderName1: HeaderValue1
HeaderName2: HeaderValue2| Both the name and value fields allow the use of MEL expressions. |
This is exactly equivalent to setting outbound properties in the Mule message through properties transformers. Outbound properties map as HTTP headers in the request. Thus, you could achieve the same by adding two properties transformers before the HTTP Request connector, one for each of the new headers that need to be set:

In both cases, the headers of the response map as inbound properties of the Mule message after the response is processed.
Dynamically Setting Headers
If headers must be set dynamically (for example, you don’t know at design time how many extra headers are needed in the request), they can be set through a MEL expression that returns a map of headers:

For the above example to work, you first need to generate a variable called customMap. If you set that variable to the following MEL expression:
#[{'TestHeader':'TestValue'}]
It generates a GET request to http://www.example.com/test, adding the following header:
TestHeader: TestValue
Just as with query parameters, the header and headers elements can be combined in the connector. They resolve for each request (evaluating all the MEL expressions in the context of the current message), and in the order they are specified inside the request builder. This allows to override parameters if necessary. If the same parameter is defined more than once, the latest value are used.
Sending Form Parameters in a POST Request
In order to send parameters in a POST request, the payload of the Mule message should be a map with the names and the values of the parameters to send. Hence, one way of sending form parameters in your request is adding a Set Payload element before the HTTP Request connector to set the payload of your message to the form parameters to send:

For example, if you use the Set Payload element to set your payload:
#[{'key1':'value1', 'key2':'value2'}]
A POST request is sent to http://www.example.com/test, with Content-Type: application/x-www-form-urlencoded, and the body is “key1=value1&key2=value2”; just as if a browser would have sent a request after the user submitted a form with these two values.
Adding Custom Parameters with the Studio XML Editor
The HTTP Request connector allows you to include the following types of parameters:
-
Query params
-
A map of multiple query params
-
URI params
-
A map of multiple URI params
-
Headers
-
A map of multiple headers
Additionally, you can also send form parameters with your request, included in the Mule message payload. You can also include attachments in your request by adding an Attachment processor to your flow.
Query Parameters
You can add query parameters by using the request-builder element inside the request:
<http:request-config name="HTTP_Request_Configuration" host="example.com" port="8081" doc:name="HTTP_Request_Configuration"/>

<flow name="test_flow">
    <http:request config-ref="HTTP_Request_Configuration" path="test" method="GET">
        <http:request-builder>
            <http:query-param paramName="k1" value="v1" />
            <http:query-param paramName="k2" value="v2" />
        </http:request-builder>
    </http:request>
</flow>
This performs a GET request to http://www.example.com/test?k1=v1&k2=v2.
| Both the name and value fields allow the use of MEL expressions. |
Dynamically Setting Query Parameters
If query parameters should be set dynamically (for example, you don’t know at design time how many query parameters are needed in the request), they can be set through a MEL expression that returns a map of parameters:
<http:request-config name="HTTP_Request_Configuration" host="example.com" port="8081" doc:name="HTTP_Request_Configuration"/>

<flow name="test_flow">
    <set-variable variableName="customMap" value="#[{'k1':'v1', 'k2':'v2'}]" />
    <http:request config-ref="HTTP_Request_Configuration" path="test" method="GET">
        <http:request-builder>
            <http:query-params expression="##[flowVars.customMap]" />
        </http:request-builder>
    </http:request>
</flow>
This example generates the same request as the previous one, a GET request to http://www.example.com/test?k1=v1&k2=v2.
The query-param and query-params elements can be combined inside the request builder. The parameters resolve for each request (evaluating all the MEL expressions in the context of the current message), and in the order they are specified inside the request builder. This allows you to override parameters, if necessary. If the same parameter is defined more than once, the latest values is used.
<http:request-config name="HTTP_Request_Configuration" host="example.com" port="8081" doc:name="HTTP_Request_Configuration"/>

<flow name="test_flow">
    <set-variable variableName="customMap" value="#[{'k2':'new', 'k3':'v3'}]" />

    <http:request config-ref="HTTP_Request_Configuration" path="test" method="GET">
        <http:request-builder>
            <http:query-param paramName="k1" value="v1" />
            <http:query-param paramName="k2" value="v2" />
            <http:query-params expression="#[flowVars.customMap]" />
        </http:request-builder>
    </http:request>

</flow>
In this example, the parameter k2 defined in the map overrides the k2 query-param defined earlier. The result is a GET request to http://www.example.com/test?k1=v1&k2=new&k3=v3.
URI Parameters
When parameters should be part of the path, placeholders can be added in the path attribute with a name for each of them, and then they must be referenced from the request builder to provide the values, using the uri-param element:
<http:request-config name="HTTP_Request_Configuration" host="example.com" port="8081" doc:name="HTTP_Request_Configuration"/>

<flow name="test_flow">
    <http:request config-ref="HTTP_Request_Configuration"  path="/customer/{customerId}" method="GET">
        <http:request-builder>
            <http:uri-param paramName="customerId" value="20" />
        </http:request-builder>
    </http:request>

</flow>
This performs a GET request to http://www.example.com/customer/20.
| Both the name and value fields allow the use of MEL expressions. |
Dynamically Setting URI Parameters
If URI parameters should be set dynamically, they can be set through a MEL expression that returns a map of parameters to set:
<http:request-config name="HTTP_Request_Configuration" host="example.com" port="8081" doc:name="HTTP_Request_Configuration"/>

<flow name="test_flow">
    <set-variable variableName="customMap" value="#[{'p1':'v1', 'p2':'v2'}]" />

    <http:request config-ref="HTTP_Request_Configuration"  path="test/{p1}/{p2}" method="GET">
        <http:request-builder>
            <http:uri-params expression="#[flowVars.customMap]" />
        </http:request-builder>
    </http:request>
</flow>
This example generates a GET request to http://www.example.com/test/v1/v2.
Just as with query parameters, the uri-param and uri-params elements can be combined inside the request builder. They resolve for each request (evaluating all the MEL expressions in the context of the current message), and in the order they are specified inside the request builder. This allows to override parameters if necessary. If the same parameter is defined more than once, the latest value are used.
<http:request-config name="HTTP_Request_Configuration" host="example.com" port="8081" doc:name="HTTP_Request_Configuration"/>

<flow name="test_flow">
    <set-variable variableName="customMap" value="#[{'p1':'new'}]" />

    <http:request config-ref="HTTP_Request_Configuration"  path="test/{p1}/{p2}" method="GET">
        <http:request-builder>
            <http:query-param paramName="p1" value="v1" />
            <http:query-param paramName="p2" value="v2" />
            <http:query-params expression="#[flowVars.customMap]" />
        </http:request-builder>
    </http:request>
</flow>
In this example, the parameter p1 defined in the map overrides the p1 uri-param defined earlier. The result is a GET request to http://www.example.com/test?p1=new&p2=v2.
| In every case, all the placeholders used in the path to reference URI parameters should match the names of the URI parameters inside the request builder (after all MEL expressions were evaluated). |
Headers
HTTP headers can be added to the request by using the "header" element inside the request-builder:
<http:request-config name="HTTP_Request_Configuration" host="example.com" port="8081" doc:name="HTTP_Request_Configuration"/>

<flow name="test_flow">
    <http:request config-ref="HTTP_Request_Configuration" path="test" method="GET">
        <http:request-builder>
            <http:header headerName="HeaderName1" value="HeaderValue1" />
            <http:header headerName="HeaderName2" value="HeaderValue2" />
        </http:request-builder>
    </http:request>
</flow>
This performs a GET request to http://www.example.com/test, adding the following headers:
HeaderName1: HeaderValue1
HeaderName2: HeaderValue2
| Both the name and value fields allow the use of MEL expressions. |
Another way of sending headers is by setting outbound properties in the Mule message (current behavior of the HTTP transport). Outbound properties map as HTTP headers in the request. Thus, the following example is equivalent to the previous one:
<http:request-config name="HTTP_Request_Configuration" host="example.com" port="8081" doc:name="HTTP_Request_Configuration"/>

<flow name="test_flow">
    <set-property propertyName="HeaderName1" value="HeaderValue1" />
    <set-property propertyName="HeaderName2" value="HeaderValue2" />

    <http:request config-ref="HTTP_Request_Configuration" path="test" method="GET"/>
</flow>
In both cases, the headers of the response map as inbound properties of the Mule message after the response is processed.
Dynamically Setting Headers
If headers must be set dynamically (for example, you don’t know at design time how many extra headers are needed in the request), they can be set through a MEL expression that returns a map of headers:
<http:request-config name="HTTP_Request_Configuration" host="example.com" port="8081" doc:name="HTTP_Request_Configuration"/>

<flow name="test_flow">
    <set-variable variableName="customMap" value="#[{'TestHeader':'TestValue'}]" />

    <http:request config-ref="HTTP_Request_Configuration" path="test" method="GET">
        <http:request-builder>
            <http:headers expression="#[flowVars.customMap]" />
        </http:request-builder>
    </http:request>
</flow>
This example generates a GET request to http://www.example.com/test, adding the following header:
TestHeader: TestValue
Just as with query parameters, the <http:header> and <http:headers> elements can be combined inside the request builder (<http:request-builder>). They resolve for each request (evaluating all the MEL expressions in the context of the current message), and in the order they are specified inside the request builder. This allows you to override parameters if necessary. If the same parameter is defined more than once, the latest value is used.
<http:request-config name="HTTP_Request_Configuration" host="example.com" port="8081" doc:name="HTTP_Request_Configuration"/>

<flow name="test_flow">
    <set-variable variableName="customMap"
      value="#[{'TestHeader2':'TestValueNew', 'TestHeader3':'TestValue3'}]" />

    <http:request config-ref="HTTP_Request_Configuration" path="test" method="GET">
        <http:request-builder>
            <http:header paramName="TestHeader1" paramValue="TestValue1" />
            <http:header paramName="TestHeader2" paramValue="TestValue2" />
            <http:headers expression="#[flowVars.customMap]" />
        </http:request-builder>
    </http:request>
</flow>
In this example, the header TestHeader2 defined in the map overrides the one defined earlier in the request builder. The result is a GET request to http://www.example.com/test with the following headers:
TestHeader1: TestValue1
TestHeader2: TestValueNew
TestHeader3: TestValue3
Sending Form Parameters in a POST Request
In order to send parameters in a POST request, the payload of the Mule message should be a Map with the names and the values of the parameters to send. Hence, one way of sending form parameters in your request is adding a Set Payload element before the HTTP Request Connector to make the payload of your message equal to the form parameters you must send:
<http:request-config name="HTTP_Request_Configuration" host="example.com" port="8081" doc:name="HTTP_Request_Configuration"/>

<flow name="test_flow">
    <set-payload value="#[{'key1':'value1', 'key2':'value2'}]" />

    <http:request config-ref="HTTP_Request_Configuration" path="test" method="POST"/>
</flow>
In this example, a POST request is sent to http://www.example.com/test, with Content-Type: application/x-www-form-urlencoded, and the body is "key1=value1&key2=value2"; just as if a browser had sent a request after the user submitted a form with these two values.
Mapping Between HTTP Responses and Mule Messages
An HTTP response is mapped to the Mule message in exactly the same way that the HTTP request is mapped to a Mule message in the HTTP Listener Connector, except that the following elements don’t apply to HTTP responses:
-
Query parameters
-
URI parameters
-
All inbound properties related to the HTTP request URI
In addition, the HTTP Request Connector adds the following inbound properties to the Mule message when receiving a response:
-
http.status: Status code of the HTTP response -
http.reason: Reason phrase of the HTTP response
Disabling HTTP Response Body Parsing
As with the HTTP Listener Connector, when HTTP responses have a content type of application/x-www-form-urlencoded or multipart/form-data, the HTTP Request Connector automatically carries out a parsing of the message. If you wish, you can disable this parsing functionality by doing the following:
-
XML Editor: set the
parseResponseattribute to false -
Studio UI: Uncheck the Parse Response checkbox in the Advanced tab of the HTTP Request Connector
Round-Robin Requests
Since Mule 3.8, the HTTP request connector connects to its configured hosts using Round Robin DNS. Mule Runtime resolves all IP addresses associated to the specified host and distributes the requests across all returned IPs improving load balancing for the host.
When connecting to resources that require authentication, the external service needs to replicate session information between all the IP addresses under the service’s host. Otherwise, your requests might get rejected with unauthorized messages.
When your external resource does not handle sticky sessions you need to add the service’s hostname to the mule.http.disableRoundRobin system property when starting the Mule Runtime:
./mule -M-Dmule.http.disableRoundRobin=serverhostname.com
This causes the HTTP request connector to not use DNS round robin when connecting to configured host in the system property.
mule.http.disableRoundRobin system property is available since Mule 3.8.4. Make sure you are up to date with the latest update site.
|
HTTP Response Validation with the Studio Visual Editor
When the HTTP Request Connector receives an HTTP response, it validates the response through its status code. By default, it throws an error when the status code is higher or equal to 400. This means that if the server returns a 404 (Resource Not Found) or a 500 (Internal Server Error) the HTTP Request Connector fails and the exception strategy of the flow it is called from is triggered.
You can change the set of valid HTTP response codes by setting one of the following two behaviors:
-
*Success Status Code Validator: * All the status codes defined within this element are considered valid; the request throws an exception for any other status code.
-
Failure *Status Code Validator: * All the status codes defined within this element are considered invalid and an exception is thrown; the request is considered valid with any other status code.
To set a list of status codes accepted as successful responses, do the following:
-
Select the advanced tab of the HTTP Request Connector
-
Select the Success Status Code Validator radio button
-
Fill in the Values field below with
200,201
HTTP Response Validation with the Studio XML Editor
When the HTTP Request Connector receives an HTTP response, it validates the response through its status code. By default, it throws an error when the status code is higher or equal to 400. This means that if the server returns a 404 (Resource Not Found) or a 500 (Internal Server Error) the HTTP Request Connector fails and the exception strategy of the flow it is called from is triggered.
You can change the set of valid HTTP response codes by setting one of the following two behaviors:
-
*Success Status Code Validator: * All the status codes defined within this element are considered valid; the request throws an exception for any other status code.
-
Failure *Status Code Validator: * All the status codes defined within this element are considered invalid and an exception is thrown; the request is considered valid with any other status code.
To set a list of status codes accepted as successful responses, do the following.
For example:
<http:request-config name="HTTP_Request_Configuration" host="example.com" port="8081" doc:name="HTTP_Request_Configuration"/>

<flow name="test_flow">

    ...

    <http:request config-ref="HTTP_Request_Configuration"  path="/" method="GET">
         <http:success-status-code-validator values="200,201"/>
    </http:request>
</flow>
Full XML Code:
<mule xmlns:http="http://www.mulesoft.org/schema/mule/http" xmlns="http://www.mulesoft.org/schema/mule/core" xmlns:doc="http://www.mulesoft.org/schema/mule/documentation"
    xmlns:spring="http://www.springframework.org/schema/beans"
    xmlns:xsi="http://www.w3.org/2001/XMLSchema-instance"
    xsi:schemaLocation="http://www.springframework.org/schema/beans http://www.springframework.org/schema/beans/spring-beans-current.xsd
http://www.mulesoft.org/schema/mule/core http://www.mulesoft.org/schema/mule/core/current/mule.xsd
http://www.mulesoft.org/schema/mule/http http://www.mulesoft.org/schema/mule/http/current/mule-http.xsd">

     <http:listener-config name="HTTP_Listener_Configuration" host="localhost" port="8081" doc:name="HTTP Listener Configuration"/>
    <http:request-config name="HTTP_Request_Configuration" host="example.com" port="8081" doc:name="HTTP_Request_Configuration"/>

    <flow name="test_flow">
        <http:listener config-ref="HTTP_Listener_Configuration" path="/" doc:name="HTTP"/>
        <http:request config-ref="HTTP_Request_Configuration"  path="/" method="GET">
            <http:success-status-code-validator values="200,201"/>
        </http:request>
</flow>

</mule>
In the example above, the list of accepted status codes is defined separated by commas, so only 200 and 201 are considered valid responses. If the HTTP response has any other status value, it’s considered a failure and raises an exception.
To Set a Failure Status Code Validator with the Studio Visual Editor
-
Select the Advanced tab of the HTTP Request Connector
-
Select the Failure Status Code Validator radio button
-
Fill in the Values field below with `500..599 `
To Set a Failure Status Code Validator in XML
<http:request-config name="HTTP_Request_Configuration" host="example.com" port="8081" doc:name="HTTP_Request_Configuration"/>

<flow name="test_flow">
    ...
    <http:request config-ref="HTTP_Request_Configuration"  path="/" method="GET">
         <http:failure-status-code-validator values="500..599"/>
    </http:request>
</flow>
Full XML Code:
<mule xmlns:http="http://www.mulesoft.org/schema/mule/http" xmlns="http://www.mulesoft.org/schema/mule/core" xmlns:doc="http://www.mulesoft.org/schema/mule/documentation"
    xmlns:spring="http://www.springframework.org/schema/beans"
    xmlns:xsi="http://www.w3.org/2001/XMLSchema-instance"
    xsi:schemaLocation="http://www.springframework.org/schema/beans http://www.springframework.org/schema/beans/spring-beans-current.xsd
http://www.mulesoft.org/schema/mule/core http://www.mulesoft.org/schema/mule/core/current/mule.xsd
http://www.mulesoft.org/schema/mule/http http://www.mulesoft.org/schema/mule/http/current/mule-http.xsd">

     <http:listener-config name="HTTP_Listener_Configuration" host="localhost" port="8081" doc:name="HTTP Listener Configuration"/>
    <http:request-config name="HTTP_Request_Configuration" host="example.com" port="8081" doc:name="HTTP_Request_Configuration"/>

    <flow name="test_flow">
        <http:listener config-ref="HTTP_Listener_Configuration" path="/" doc:name="HTTP"/>
        <http:request config-ref="HTTP_Request_Configuration"  path="/" method="GET">
            <http:failure-status-code-validator values="500..599"/>
        </http:request>
    </flow>

</mule>
A range of failure status codes is defined by using two dots .., so in the example above, any value between 500 and 599 is considered a failure and raises an exception. If the HTTP response has any other status value, it’s considered a success.
Changing the Default Behavior for When to Add a Body to the Request
By default, the methods GET, HEAD and OPTIONS sends HTTP requests with an empty body, and the payload of the Mule message won’t be used at all. The rest of the methods sends the message payload as the body of the request. If you need to change this default behavior, you can specify the sendBodyMode attribute in the request, with one of the following possible values:
-
AUTO (default): The behavior depends on the method. Body is not sent for GET, OPTIONS and HEAD, and it is sent otherwise.
-
ALWAYS: The body is always sent.
-
NEVER: The body is never sent.
Studio Visual Editor:
For example, GET requests usually do not contain a body, but some APIs require them to have one. In those cases, enter the Advanced settings panel and set the Send Body field to ALWAYS.
XML Editor:
For example, GET requests usually do not contain a body, but some APIs require them to have one. In those cases, the sendBodyMode attribute should be specified to force this behavior:
<http:request-config name="HTTP_Request_Configuration" host="example.com" port="8081" doc:name="HTTP_Request_Configuration"/>

<flow name="test_flow">
    ...
    <set-payload value="Hello world" />
    <http:request config-ref="HTTP_Request_Configuration" path="test" method="GET" sendBodyMode="ALWAYS"  />
</flow>
This sends a GET request to http://www.example.com/test with "Hello world" as the body.
Configuring Source and Target
By default, the body of your request is taken from the #[payload] of the incoming Mule message and the response is sent onwards as the #[payload] of the output Mule message, you can change this default behavior through the source and target attributes.
Studio Visual Editor:
| Attribute | Description |
|---|---|
source |
Where to take the body of the request from. By default, this is |
target |
Where to place response body. Default: |
For example:

This takes the body of the request from an inbound property named "foo", and places the response of the request in an outbound attachment named "bar".
XML Editor:
| Attribute | Description |
|---|---|
source |
Where to take the body of the request from. Default: |
target |
Where to place response body. Default: |
For example:
<http:request-config name="HTTP_Request_Configuration" host="example.com" port="8081" doc:name="HTTP_Request_Configuration"/>

<flow name="test">
    ...
    <http:request config-ref="HTTP_Request_Configuration" path="test" method="GET"  source="#[message.inboundProperties.foo]" target="#[message.outboundAttachments.bar]" />
</flow>
This takes the body of the request from an inbound property named "foo", and places the response of the request in an outbound attachment named "bar".
Configuring Streaming
By default, if the type of the payload is a stream, streaming is used to send the request. You can change this default behavior by setting the attribute requestStreamingMode, which allows the following values:
-
AUTO (default): The behavior depends on the payload type: if the payload is an InputStream, then streaming is enabled; otherwise it is disabled.
-
ALWAYS: Always enable streaming regardless of the payload type.
-
NEVER: Never stream, even if the payload is a stream.
When streaming, the request does not contain the Content-Length header. Instead, it contains the Transfer-Encoding header: it sends the body in chunks until the stream is fully consumed.
Configuring Streaming on Anypoint Studio
For example, if your input is a file inbound endpoint that set a stream as the payload of the Mule message but you want to disable streaming, enter the Advanced settings panel and set the Enable Streaming field to NEVER.
Configuring Streaming on XML
The following example makes a POST request to http://www.example.com/test, reading a file from the "input" directory, and sending its content as the body of the request. In this case, streaming are used because the file inbound endpoint sets a stream as the payload of the Mule message that is generated. The generated HTTP request is sent using Transfer-Encoding: chunked.
<http:request-config name="HTTP_Request_Configuration" host="example.com" port="8081" doc:name="HTTP_Request_Configuration"/>

<flow name="test">
    <file:inbound-endpoint path="input" responseTimeout="10000" />
    <http:request config-ref="HTTP_Request_Configuration"   path="test" method="POST" />
</flow>
For streaming to be disabled in this case, we need to explicitly set requestStreamingMode equal to "NEVER":
<http:request-config name="HTTP_Request_Configuration" host="example.com" port="8081" doc:name="HTTP_Request_Configuration"/>

<flow name="test">
    <file:inbound-endpoint path="input" responseTimeout="10000" />
     <http:request config-ref="HTTP_Request_Configuration"   path="test" method="POST" requestStreamingMode="NEVER"/>
</flow>
In this case, the request is not streamed.
Streaming the Response
When requesting a large payload, you can choose to stream the response by setting the "streamResponse" and "responseBufferSize" attributes in the HTTP request configuration.
<http:request-config streamResponse="true" responseBufferSize="5"/>By default, the streamResponse attribute is set to false.
When setting this attribute to true, you enable Mule to handle the response as a stream saving it to an in-memory buffer.
The buffer size can be configured using the responseBufferSize attribute, but its default size is 10Kb.
When streaming the response, the worker thread writes the response to the in-memory buffer. If the buffer gets full, the thread will block its execution waiting for the buffer to free space to keep writing the response. To avoid this issue, it’s important for you to consume the response when streaming it.
Sending Multipart Requests
To send a multipart request (for example to upload a file in a POST request), outbound attachments should be set in the Mule message. When the message has attachments, a multipart request is sent where each part is an attachment. In this case the payload is ignored.
Studio Visual Editor:
You can use Attachment transformers to add attachments to your message:

This sends a POST request with ContentType: multipart/form-data and with two parts: one with the first attachment, the other with the second.
XML Editor:
For example:
<http:request-config name="HTTP_Request_Configuration" host="example.com" port="8081" doc:name="HTTP_Request_Configuration"/>

<flow name="test_flow">
    <set-attachment attachmentName="key1" value="value1" contentType="text/plain" />
    <set-attachment attachmentName="key2" value="value2" contentType="text/plain" />
    <http:request path="test" method="POST" config-ref="HTTP_Request_Configuration" />
</flow>
This sends a POST request to http://www.example.com/test, with ContentType: text/plain and with two parts: one with name key1 and content value1, and the other with name key2 and content value2.
|
If the response is a multipart response, then the parts map as inbound attachments in the Mule message, and the payload is null. |
HTTPS Protocol Configuration
You can send your requests through HTTPS protocol by simply setting the protocol attribute to HTTPS . This makes the HTTP Request Connector use the default JVM values for the HTTPS connection, which likely already includes a trust store with certificates for all the major certifying authorities.
See TLS Configuration for more details.
Studio Visual Editor:
In the connector’s Global Configuration Element, on the General tab, select the HTTPS radio button to select the Protocol.
XML Editor:
For example:
<http:request-config name="HTTP_Request_Configuration" host="example.com" port="8081" protocol="HTTPS" doc:name="HTTP_Request_Configuration"/>

<flow name="test_flow">
    ...
    <http:request path="test" method="POST"  config-ref="HTTP_Request_Configuration" />
</flow>
This sends a POST request to http://www.example.com/test, encrypted with the default JVM certificates.
If you want to use a different set of HTTPS certificates, you can customize them by setting the TLS configuration in the HTTP Request Connector’s global configuration element. You can also create a separate TLS global element and reference it through your HTTP Connector.
Studio Visual Editor:
-
In the connector’s Global Configuration Element, in the General tab, select the HTTPS radio button to select the Protocol.
-
Select the TLS/SSL tab
-
Either:
-
Select the Use TLS Config option and provide your credentials in the available fields.
-
Or select the Use Global TLS Config option, then select an existing configuration or create a new one by clicking the green plus sign next to the selection box.
-
|
If you need to temporarily disable certificate validations, you can select the Insecure option. This causes your Mule application to accept all certificates from an SSL endpoint without validating them in the flow. Remember to un-check it back when you finally deploy your application. |
XML Editor:
You can add your TLS credentials as a child element of the http:request-config element:
<http:request-config name="HTTP_Request_Configuration" host="example.com" port="8081" protocol="HTTPS" doc:name="HTTP_Request_Configuration"/>
        <tls:context>
            <tls:trust-store path="your_truststore_path" password="your_truststore_password"/>
            <tls:key-store path="your_keystore_path" password="your_keystore_path" keyPassword="your_keystore_keypass"/>
        </tls:context>
</http:request-config>

<flow name="test_flow">
    ...
    <http:request path="test" method="POST"  config-ref="HTTP_Request_Configuration" />
</flow>
The above example sends a POST request to http://www.example.com/test, encrypted with the provided HTTPS settings.
You can also add your TLS credentials in a separate construct, outside your http:request-config element. In that case, you must name your tls:context and add a tlsContext-ref attribute in your http:request-config.
<http:request-config name="HTTP_Request_Configuration" host="example.com" port="8081" tlsContext-ref="My-TLS_Context" protocol="HTTPS" doc:name="HTTP_Request_Configuration"/>

<tls:context name="My-TLS_Context" doc:name="My-TLS_Context">
        <tls:trust-store path="your_truststore_path" password="your_truststore_password"/>
        <tls:key-store path="your_keystore_path" password="your_keystore_path" keyPassword="your_keystore_keypass"/>
</tls:context>

<flow name="test_flow">
    ...
    <http:request path="test" method="POST"  config-ref="HTTP_Request_Configuration" />
</flow>|
If you need to temporarily disable certificate validations, you can set Remember to set this value to false before deploying your application, or simply remove the tag, since false is its default value. |
Other Attributes
Other attributes in this connector allow you to set up more advanced functionality: response timeout, if redirects are followed and if responses are parsed.
Studio Visual Editor:
These attributes are available in the Advanced tab in the connectors properties editor.
| Attribute | Description |
|---|---|
Response Timeout |
Specifies the time in milliseconds after which, if no response is received, the request is no longer attempted. The minimum value is 500 ms. A lower value can cause random behavior. |
Parse Response |
If true, it parses the response if you receive multipart responses. If set to false, no parsing is done and the raw contents of the response are placed in the payload. By default it’s set to true. |
Follow Redirects |
Defines whether redirects are followed or not. This is set to true by default |
Use Cookies |
When checked, gathers cookies from each response it receives and then send them on subsequent requests. |
XML Editor:
| Attribute | Description |
|---|---|
responseTimeout |
Specifies the time in milliseconds after which, if no response is received, the request is no longer attempted. The minimum value is 500 ms. A lower value can cause random behavior. |
parseResponse |
If true, it parses the response if you receive multipart responses. If set to false, no parsing is done and the raw contents of the response are placed in the payload. This is set to true by default. |
followRedirects |
Defines whether redirects are followed or not. This is set to true by default. |
enableCookies |
When set to |
For example:
<http:request-config name="HTTP_Request_Configuration" host="example.com" port="8081" doc:name="HTTP_Request_Configuration"/>

<flow name="test_flow">
     ...
     <http:request config-ref="HTTP_Request_Configuration" path="test" method="GET"
      followRedirects="true" parseResponse="false" enableCookies="true" responseTimeout="10000" />
</flow>
Sockets Tab in Studio
The Sockets tab in Studio for an HTTP request provides these fields:
| Field | Description |
|---|---|
Connection Timeout |
Number of milliseconds to wait until an outbound connection to a remote server is successfully created. No timeout is configured by default. |
Keep Alive |
Checks socket connections that are open but unused for long periods and closes them if the connection becomes unavailable. This is a property on the socket itself and is used by a server socket to control whether connections to the server are kept alive before they are recycled. |
Receive Buffer Size |
The size of the buffer in bytes used when receiving data, set on the socket itself. |
Send Buffer Size |
The size of the buffer in bytes used when sending data, set on the socket itself. |
Send TCP No Delay |
If set, transmitted data is not collected together for greater efficiency but sent immediately. Defaults to true even though the Socket default is false because optimizing to reduce amount of network traffic over latency is hardly ever a concern today. |
Timeout |
The timeout that applies to the "accept" operation. A value of 0 causes the accept to wait indefinitely (if no connection arrives). |
Linger |
How long in milliseconds the socket takes to close so that any remaining data is transmitted correctly. |
In this example XML, Connection Timeout is set to 30005 milliseconds:
<http:request-config name=“HTTP_Request_Configuration” doc:name=“HTTP Request Configuration”>
       <tcp:client-socket-properties connectionTimeout=“30005”/>
   </http:request-config>
See Also
-
See a full reference of the available XML configurable options in this connector
-
Consult a reference to the deprecated predecessor of this element, the HTTP endpoint HTTP Transport Reference