HTTP Listener Connector
Introduction
The HTTP Listener Connector provides the most practical way to listen for HTTP requests.
The connector can be configured to accept any request, or to accept only those requests addressed to a specific URI. You can choose what methods the connector accepts: GET, POST, etc.
The request body is passed on to the next element of the Mule flow as the message payload of a Mule Message, while headers, query parameters, URI parameters and other elements of the HTTP Request are passed on as inbound properties. These properties are accessible within a Mule message from your Mule application.
This connector can also use HTTPS protocol and encrypt your communications via TLS.
The connector can also be configured to provide response codes and clarifications, both for success and error outcomes, allowing you to present different error messages depending on the case.
In Studio, to instantiate the connector as an HTTP Listener Connector (and not an HTTP Request Connector), you must place it into the Source section of a flow.
Minimum Configuration
Simply configure the connector to listen for incoming HTTP requests that can be expected to reach a given HTTP address. The following example shows the minimum configuration required for this connector:
In the connector component on your flow, the only required fields are the Path (the path-absolute URL defining the resource location), which by default is /, and a configuration reference to a global element, containing the necessary parameters Host and Port.

Global Element
As with most connectors in Studio, much of the configuration is encapsulated in a globally accessible object called a "global element" that can then be referenced by as many instances of the connector as you desire. In this case the global element defines a server connection to a particular network interface and port and handles incoming requests from it.
| The use of global elements is especially useful when having multiple connectors that must use the same settings, as the server connection must only be defined once. |
Configuring a Global Element for the Connector
In the global element, the only required fields are Host and Port, both of which have default values assigned to them:

To listen on a specific port for every network interface on the server, you can use the host to 0.0.0.0. If you set it to localhost then you are only able to listen for incoming requests generated inside the server.
|
<?xml version="1.0" encoding="UTF-8"?>

<mule xmlns:tracking="http://www.mulesoft.org/schema/mule/ee/tracking" xmlns:http="http://www.mulesoft.org/schema/mule/http" xmlns="http://www.mulesoft.org/schema/mule/core" xmlns:doc="http://www.mulesoft.org/schema/mule/documentation"
	xmlns:spring="http://www.springframework.org/schema/beans"
	xmlns:xsi="http://www.w3.org/2001/XMLSchema-instance"
	xsi:schemaLocation="http://www.springframework.org/schema/beans http://www.springframework.org/schema/beans/spring-beans-current.xsd
http://www.mulesoft.org/schema/mule/core http://www.mulesoft.org/schema/mule/core/current/mule.xsd
http://www.mulesoft.org/schema/mule/http http://www.mulesoft.org/schema/mule/http/current/mule-http.xsd
http://www.mulesoft.org/schema/mule/ee/tracking http://www.mulesoft.org/schema/mule/ee/tracking/current/mule-tracking-ee.xsd">
    <http:listener-config name="HTTP_Listener_Configuration" host="localhost" port="8081" basePath="http://www.example.com/test" doc:name="HTTP Listener Configuration"/>

    <flow name="http-listenerFlow">
        <http:listener config-ref="HTTP_Listener_Configuration" path="/" doc:name="HTTP"/>
        <logger message="#[payload]" level="INFO" doc:name="Logger"/>
    </flow>
</mule>
Minimum Configuration for the Connector Global Element
As with most connectors in Studio, much of the configuration is encapsulated in a separate reusable object that sits outside the flow and can then be referenced by as many instances of the connector as you like. This element defines a server connection to a particular network interface and port and handles incoming requests from it.
In the global element, you need to provide a Host and a Port.
To listen on an specific port for every network interface in the server, you can use the host to 0.0.0.0. If you set it to localhost then you can only listen for incoming requests generated inside the server.
|
Minimum Configuration for the Connector Instance
After you have defined the HTTP Listener Connector configuration via creation of a global element, to actually handle an HTTP request you need to configure some basic settings in the connector instance in your flow. The HTTP listener instance is labeled with <http:listener>. In the connector properties tab that appears when you select the connector in Studio, provide a Path.
And don’t forget to reference your global element for the HTTP listener.
The configuration performs a GET request to http://localhost:8081
Full XML Code
<mule xmlns:http="http://www.mulesoft.org/schema/mule/http" xmlns="http://www.mulesoft.org/schema/mule/core" xmlns:doc="http://www.mulesoft.org/schema/mule/documentation"
    xmlns:spring="http://www.springframework.org/schema/beans"
    xmlns:xsi="http://www.w3.org/2001/XMLSchema-instance"
    xsi:schemaLocation="http://www.springframework.org/schema/beans http://www.springframework.org/schema/beans/spring-beans-current.xsd
http://www.mulesoft.org/schema/mule/core http://www.mulesoft.org/schema/mule/core/current/mule.xsd
http://www.mulesoft.org/schema/mule/http http://www.mulesoft.org/schema/mule/http/current/mule-http.xsd">

    <http:listener-config name="HTTP_Listener_Configuration" host="localhost" port="8081" doc:name="HTTP Listener Configuration"/>

   <flow name="basic_flow">
        <http:listener config-ref="HTTP_Listener_Configuration" path="/" doc:name="HTTP"/>
        <logger message="#[payload]"/>
    </flow>

</mule>
Routing Incoming Requests to Different Listeners
You probably want to expose several different flows in your application, the best way to do this is to expose each through a different HTTP Listener Connector, making them all share one single global configuration element. There are several different ways in which you can make sure that each request is routed to the appropriate flow, these are explained in the following sub sections.
Global Routing Configuration
In the connector configuration global element, you can set the Host, Port and Base Path properties to only process requests at a specific address.
By default, the connector configuration has its host set to 0.0.0.0, this address is in fact a shortcut to simultaneously listen on all active IP addresses, (including localhost). In order to deploy a project to CloudHub, you must set the hosts of all the HTTP connectors to 0.0.0.0. Otherwise, your application runs into conflicts with the inner workings of CloudHub.
Keep in mind that if you’re deploying on premises, because of security concerns, it’s always advisable to set a specific host, such as localhost rather than leaving the default 0.0.0.0 to listen to all addresses.
|
-
Create a flow with an HTTP Listener Connector, set its Path to
/ -
Create a Global Element for the Connector, set the Host to
0.0.0.0, leave the Port as the default8081and set the Base Path tomybasepath
-
Complete the flow by adding any other processor after the HTTP Connector, such as a Logger component.
Global Routing Full XML Code
<?xml version="1.0" encoding="UTF-8"?>

<mule xmlns:tracking="http://www.mulesoft.org/schema/mule/ee/tracking" xmlns:http="http://www.mulesoft.org/schema/mule/http" xmlns="http://www.mulesoft.org/schema/mule/core" xmlns:doc="http://www.mulesoft.org/schema/mule/documentation"
	xmlns:spring="http://www.springframework.org/schema/beans"
	xmlns:xsi="http://www.w3.org/2001/XMLSchema-instance"
	xsi:schemaLocation="http://www.springframework.org/schema/beans http://www.springframework.org/schema/beans/spring-beans-current.xsd
http://www.mulesoft.org/schema/mule/core http://www.mulesoft.org/schema/mule/core/current/mule.xsd
http://www.mulesoft.org/schema/mule/http http://www.mulesoft.org/schema/mule/http/current/mule-http.xsd
http://www.mulesoft.org/schema/mule/ee/tracking http://www.mulesoft.org/schema/mule/ee/tracking/current/mule-tracking-ee.xsd">


    <http:listener-config name="HTTP_Listener_Configuration" host="0.0.0.0" port="8081" basePath="mybasepath" doc:name="HTTP Listener Configuration"/>

   <flow name="basic_flow">
        <http:listener config-ref="HTTP_Listener_Configuration" path="/" doc:name="HTTP"/>
         <logger message="#[payload]"/>
    </flow>

</mule>
The example above accepts requests from all hosts, as long as they’re done on the port 8081, so it accepts any of the following:
-
http://localhost:8081/mybasepath -
http://127.0.0.2:8081/mybasepath
Routing Based on Path
In each connector instance in your flow, you can set the connector’s Path to listen only for requests that are made to a specific subpath within the host, port and base path that is configured in the connector configuration element.
Most likely, your application exposes several HTTP services that use the same host and port but different URI paths. You can route the incoming HTTP request to different flows by using an HTTP Listener Connector on each flow, all referencing the same global configuration element (host, port and path) but having different subpaths on each connector instance.
-
Create a flow with an HTTP Listener Connector, set its Path to
account -
Create a Global Element for the connector, set the Host to
localhostand leave the Port as the default8081 -
Complete the flow by adding any other processor after the HTTP Connector, such as a Logger component.
-
Then create a second flow by dragging another HTTP Connector to the blank space below the first flow. In it, reference the same Connector Configuration element as in the other connector. This time, set the path to
employee. -
Complete this second flow by adding any other processor after the HTTP Connector, such as a Logger component.
-
Make sure each HTTP connector references the global element you created. Do this by selecting the configuration from the Connector Configuration dropdown, after selecting each connector instance from the canvas.
Routing Based on Path - Full XML Code
<?xml version="1.0" encoding="UTF-8"?>

<mule xmlns:http="http://www.mulesoft.org/schema/mule/http"
	xmlns="http://www.mulesoft.org/schema/mule/core" xmlns:doc="http://www.mulesoft.org/schema/mule/documentation"
	xmlns:spring="http://www.springframework.org/schema/beans"
	xmlns:xsi="http://www.w3.org/2001/XMLSchema-instance"
	xsi:schemaLocation="http://www.mulesoft.org/schema/mule/http http://www.mulesoft.org/schema/mule/http/current/mule-http.xsd
http://www.springframework.org/schema/beans http://www.springframework.org/schema/beans/spring-beans-current.xsd
http://www.mulesoft.org/schema/mule/core http://www.mulesoft.org/schema/mule/core/current/mule.xsd">

     <http:listener-config name="HTTP_Listener_Configuration" host="localhost" port="8081" doc:name="HTTP Listener Configuration"/>

   <flow name="basic_flow1">
        <http:listener config-ref="HTTP_Listener_Configuration" path="account" doc:name="HTTP"/>
        <logger message="#[payload]" doc:name="Logger"/>
    </flow>
    <flow name="basic_flow2">
        <http:listener config-ref="HTTP_Listener_Configuration" path="employee" doc:name="HTTP"/>
        <logger message="#[payload]" doc:name="Logger"/>
    </flow>
</mule>
In the example above:
-
HTTP requests directed to
http://localhost:8081/accountare routed to the first flow. -
HTTP requests directed to
http://localhost:8081/employeeare routed to the second flow.
| When the Listener global element receives a request that doesn’t match the path defined on any of the HTTP Connector Instances, then it returns an HTTP response with status code 404 (Resource Not Found). |
Using Wildcards in the Path
You can also use wildcards in the value for Path, to listen for all incoming requests to any path within the specified base path. You can also specify a partial path that ends in /*, pointing to any path that begins as defined but that could also be extended with anything else (See example below.)
-
Create a flow with an HTTP Listener Connector, set its Path to
mypath/*
-
Create a Global Element for the Connector, set the Host to
localhostand leave the Port as the default8081 -
Complete the flow by adding any other processor after the HTTP Connector, such as a Logger component.
|
When a request comes in, available listeners based on path are selected by pattern matching on a folder by folder basis and going from left to right. This means that if you specify the following two listeners:
A request to |
Using Wildcard in Path - Full XML Code
<?xml version="1.0" encoding="UTF-8"?>

<mule xmlns:http="http://www.mulesoft.org/schema/mule/http"
	xmlns="http://www.mulesoft.org/schema/mule/core" xmlns:doc="http://www.mulesoft.org/schema/mule/documentation"
	xmlns:spring="http://www.springframework.org/schema/beans"
	xmlns:xsi="http://www.w3.org/2001/XMLSchema-instance"
	xsi:schemaLocation="http://www.springframework.org/schema/beans http://www.springframework.org/schema/beans/spring-beans-current.xsd
http://www.mulesoft.org/schema/mule/core http://www.mulesoft.org/schema/mule/core/current/mule.xsd
http://www.mulesoft.org/schema/mule/http http://www.mulesoft.org/schema/mule/http/current/mule-http.xsd">
    <http:listener-config name="HTTP_Listener_Configuration4" host="localhost" port="8081" doc:name="HTTP Listener Configuration"/>
    <flow name="http-wildcard-in-pathFlow">
        <http:listener config-ref="HTTP_Listener_Configuration4" path="mypath/*" doc:name="HTTP"/>
        <logger message="#[payload]" level="INFO" doc:name="Logger"/>
    </flow>
</mule>
The example above accepts requests from all hosts done on the port 8081, so it accepts any of the following:
Example with Wildcards 2
Another use case for wildcards is to listen for all requests for a resource in a URI, contains an undefined mid-section in its path.
-
Create a flow with an HTTP Listener Connector, set its Path to
account/\*/main-contact -
Create a Global Element for the Connector, set the Host to
localhostand leave the Port as the default8081 -
Complete the flow by adding any other processor after the HTTP Connector, such as a Logger component.
Example with Wildcards 2 - Full XML Code
<?xml version="1.0" encoding="UTF-8"?>

<mule xmlns:http="http://www.mulesoft.org/schema/mule/http"
	xmlns="http://www.mulesoft.org/schema/mule/core" xmlns:doc="http://www.mulesoft.org/schema/mule/documentation"
	xmlns:spring="http://www.springframework.org/schema/beans"
	xmlns:xsi="http://www.w3.org/2001/XMLSchema-instance"
	xsi:schemaLocation="http://www.springframework.org/schema/beans http://www.springframework.org/schema/beans/spring-beans-current.xsd
http://www.mulesoft.org/schema/mule/core http://www.mulesoft.org/schema/mule/core/current/mule.xsd
http://www.mulesoft.org/schema/mule/http http://www.mulesoft.org/schema/mule/http/current/mule-http.xsd">
    <http:listener-config name="HTTP_Listener_Configuration4" host="localhost" port="8081" doc:name="HTTP Listener Configuration"/>
    <flow name="http-wildcard-in-pathFlow">
        <http:listener config-ref="HTTP_Listener_Configuration4" path="account/*/main-contact/" doc:name="HTTP"/>
        <logger message="#[payload]" level="INFO" doc:name="Logger"/>
    </flow>
</mule>
Example with Wildcards 2 - Recap
In the above example, the HTTP Listener receives every HTTP request whose URI starts with /account/ and ends with /main-contact; the segment in between could be anything. It accepts any of the following:
|
If using wildcards leads to a situation where a request’s address happens to match the path of multiple listeners, then the listener with the more specific path is ALWAYS be given priority, regardless of the order in which the connectors are defined. Only one connector handles each request. For example, suppose there are two listeners, one listening on "account/(…)" and the other on "account/(…)/main-contact". If a request arrives for "account/mulesoft/main-contact", even though it matches the criteria of both connectors, only the more specific one handles the request: in this case the one that listens on "account/(…)/main-contact". |
Using a Placeholder in a URI
A common scenario for using wildcards with a placeholder is with a RESTful API. You can make the undefined section of the URI into a variable by adding a placeholder to your connector’s Path. For example, in the path account/{accountId}/main-contact, the section {accountId} contains a placeholder that defines a variable by the name of accountId. As such, it is recognized by the connector as a URI Parameter and mapped into the Mule Flow as an inbound property, which can be easily referenced anywhere in the flow via a simple MEL expression.
-
Create a flow with an HTTP Listener Connector, set its Path to
account/{accountId}/main-contact -
Create a Global Element for the Connector, set the Host to
localhostand leave the Port as the default8081 -
To view the contents of the URI Parameter, add a Logger component and set the its Value field to the following MEL expression:
#[message.inboundProperties.'http.uri.params'.accountId]
Using a Placeholder in a URI - Full XML Code
<?xml version="1.0" encoding="UTF-8"?>

<mule xmlns:http="http://www.mulesoft.org/schema/mule/http"
	xmlns="http://www.mulesoft.org/schema/mule/core" xmlns:doc="http://www.mulesoft.org/schema/mule/documentation"
	xmlns:spring="http://www.springframework.org/schema/beans"
	xmlns:xsi="http://www.w3.org/2001/XMLSchema-instance"
	xsi:schemaLocation="http://www.mulesoft.org/schema/mule/http http://www.mulesoft.org/schema/mule/http/current/mule-http.xsd
http://www.springframework.org/schema/beans http://www.springframework.org/schema/beans/spring-beans-current.xsd
http://www.mulesoft.org/schema/mule/core http://www.mulesoft.org/schema/mule/core/current/mule.xsd">
     <http:listener-config name="HTTP_Listener_Configuration" host="localhost" port="8081" doc:name="HTTP Listener Configuration"/>

   <flow name="basic_flow">
        <http:listener config-ref="HTTP_Listener_Configuration" path="account/{accountId}/main-contact" doc:name="HTTP"/>
        <logger message="#[message.inboundProperties.'http.uri.params'.accountId]" doc:name="Logger"/>
    </flow>
</mule>
In the example above, the listener accepts the same set of requests as in the example before it:
The difference is that the undefined section of the URI is now populated into a map in the inbound properties of the Mule Message that contains all the URI parameters in the request (http.uri.params). You can easily reference the value of this section of the URI through the MEL expression #[message.inboundProperties.'http.uri.params'.accountId].
Upon receiving the first of the two sample requests shown above, the URI parameter is mapped into the Mule Message and the http.uri.params inbound property contains a map that holds the key accountId, matched with the value mulesoft . You have access to this information in any part of the flow after passing through the Connector.
Routing Based on HTTP Methods
You can configure a connector so that it only accepts requests that match a reduced list of HTTP methods (GET, POST, DELETE, etc). For example, you can create two different connectors that share one same path but that accept different types of requests – like one only accepting GET and the other only accepting POST – incoming requests would then be routed accordingly depending on their method.
-
Create a flow with an HTTP Listener Connector, set its Path to
requestsand the Allowed Methods field toGET -
Create a Global Element for the Connector, set the Host to
localhost, leave the Port as the default8081and set the Base Path tomypath -
Complete the flow by adding any other processor after the HTTP Connector, such as a Set Payload transformer. Set the Value field of the set payload transformer to
foo -
Create a second flow with another HTTP Listener Connector, set its Path to
requestsas well, but set the Allowed Methods field to POST. Assign it the existing Connector Configuration global element you already created for the previous connector by picking it out of the drop down list in the field. -
Complete the flow by adding any other processor after the HTTP Connector, such as a Set Payload transformer. Set the Value field of the set payload transformer to
bar.
Routing Based on HTTP Methods - Full XML Code
<?xml version="1.0" encoding="UTF-8"?>

<mule xmlns:http="http://www.mulesoft.org/schema/mule/http" xmlns:tracking="http://www.mulesoft.org/schema/mule/ee/tracking" xmlns="http://www.mulesoft.org/schema/mule/core" xmlns:doc="http://www.mulesoft.org/schema/mule/documentation"
	xmlns:spring="http://www.springframework.org/schema/beans"
	xmlns:xsi="http://www.w3.org/2001/XMLSchema-instance"
	xsi:schemaLocation="http://www.springframework.org/schema/beans http://www.springframework.org/schema/beans/spring-beans-current.xsd
http://www.mulesoft.org/schema/mule/core http://www.mulesoft.org/schema/mule/core/current/mule.xsd
http://www.mulesoft.org/schema/mule/http http://www.mulesoft.org/schema/mule/http/current/mule-http.xsd
http://www.mulesoft.org/schema/mule/ee/tracking http://www.mulesoft.org/schema/mule/ee/tracking/current/mule-tracking-ee.xsd">
<http:listener-config name="HTTP_Listener_Configuration" host="localhost" port="8081" basePath="mypath" doc:name="HTTP Listener Configuration"/>
    <flow name="GET_flow">
        <http:listener config-ref="HTTP_Listener_Configuration" path="requests" doc:name="HTTP" allowedMethods="GET"/>
        <set-payload doc:name="Set Payload" value="foo"/>
    </flow>

    <flow name="POST_flow">
        <http:listener config-ref="HTTP_Listener_Configuration" path="requests" doc:name="HTTP" allowedMethods="POST" parseRequest="false"/>
        <set-payload doc:name="Set Payload" value="bar"/>
    </flow>
</mule>
In the above example, requests done to the same address are handled by one flow or the other based on the type of the request:
-
If you send a GET request to
http://localhost:8081/mypath/requests, the request is handled by GET_flow and the response isfoo. -
If you send a POST request to
http://localhost:8081/mypath/requests, the request is handled by POST_flow and the response isbar. -
If you send a DELETE request to
http://localhost:8081/mypath/requests, then neither of the Listener instances accepts this request, and the Listener global element returns an HTTP response with status code 405 Method Not Allowed.
| To send HTTP requests with methods other than GET, you can use a browser extension such as Postman (Google Chrome), or the curl command line utility. From there you can easily configure the HTTP method to use on your requests. |
Mapping Between HTTP Requests and Mule Messages
As with any other connector in Mule, each message received by the HTTP Listener Connector generates a Mule Message that is then processed through the remaining blocks in the flow where it’s at. The diagram below illustrates the main parts of an HTTP request and how you can refer to them after it has been transformed into a Mule Message.

If the Path of the connector is defined as {domain}/login, then mydomain is considered a URI Parameter. It can be referenced by the following expression:#[message.inboundProperties.'http.uri.params'.domain]
|
The Request Body
The HTTP request body is transformed by the connector into the payload of a Mule Message. The payload type is always InputStream, unless the Content-Type header of the request is either application/x-www-form-urlencoded or multipart/form-data. In both these cases, Mule parses the request to generate a Mule Message that is much simpler to consume.
Requests with a x-www-form-urlencoded Type Body
A typical use case is having a web page with an HTML form in it. When submitting this form, the page generates an HTTP Request with the header Content-Type: application/x-www-form-urlencoded and the form fields as key-value pairs encoded in the request body. The HTTP Connector takes the request body, automatically parses its content into a key-value map and sets it as the Mule message payload.
Below is an example of an HTTP request produced by submitting a form:
POST /submitform HTTP/1.1

User-Agent: Mule/3.6
Content-Type: application/x-www-form-urlencoded
Content-Length: 32

firstname=Aaron&lastname=Aguilar+Acevedo&yearborn=1999
Studio Visual Editor
-
Create a flow with an HTTP Listener Connector, set the Path to
submitform -
Create a Global Element for the Connector, set the Host to
localhostand leave the Port as the default8081 -
After the HTTP Connector, add a Choice router.
-
On the first choice of the router, add a Set Payload element. Set its Value field to the following expression:
Sorry #[payload.'firstname'], you're too young to register.
Notice that this expression refers to one of the form parameters included in the request:
firstname. After being received by the connector, it exists in the mule message payload as an item in a map. -
On the Choice router, configure the condition for that path to be the following expression:
#[server.dateTime.year-18 < payload.'yearborn']
Once again, this expression refers to one of the incoming form parameters,
yearborn. -
Complete the flow by adding another Set Payload element in the default path of the Choice router. Set its Value field to:
Registration has been carried out successfully! Welcome #[payload.'firstname'] #[payload.'lastname']!
XML Editor
For example:
-
Create an
<http:listener>global configuration, set the host to localhost and the port to 8081 -
Create a flow with an
<http:listener>connector. Reference your connector to the global element you just created, set the path tosubmitform.<http:listener-config name="HTTP_Listener_Configuration" host="localhost" port="8081" doc:name="HTTP Listener Configuration"/> <flow name="RegisterUser"> <http:listener config-ref="HTTP_Listener_Configuration" path="submitform" doc:name="HTTP"/> </flow> -
After the HTTP Connector, add a Choice scope with two alternative paths. Set the first to be executed when the following MEL expression is true:
#[server.dateTime.year-18 < payload.'yearborn']Note that
yearbornis one of the form parameters that is expected from incoming requests.<choice doc:name="Choice"> <when expression="#[server.dateTime.year-18 < payload.'yearborn']"> </when> <otherwise> </otherwise> </choice> -
Add a set-payload element on each alternative path, one to return a rejection notice, the other to return a success message. In both, refer to the fields of the incoming form parameters to construct the message.
<choice doc:name="Choice"> <when expression="#[server.dateTime.year-18 < payload.'yearborn']"> <set-payload value="Sorry #[payload.'firstname'], you're too young to register." doc:name="Too young"/> </when> <otherwise> <set-payload value="Registration has been carried out successfully! Welcome #[payload.'firstname'] #[payload.'lastname']!" doc:name="Success"/> </otherwise> </choice>
Requests with a x-www-form-urlencoded Type Body - Full XML Code
<?xml version="1.0" encoding="UTF-8"?>
<mule xmlns:http="http://www.mulesoft.org/schema/mule/http"
xmlns="http://www.mulesoft.org/schema/mule/core" xmlns:doc="http://www.mulesoft.org/schema/mule/documentation"
xmlns:spring="http://www.springframework.org/schema/beans"
xmlns:xsi="http://www.w3.org/2001/XMLSchema-instance"
xsi:schemaLocation="
http://www.mulesoft.org/schema/mule/http http://www.mulesoft.org/schema/mule/http/current/mule-http.xsd http://www.springframework.org/schema/beans http://www.springframework.org/schema/beans/spring-beans-current.xsd
http://www.mulesoft.org/schema/mule/core http://www.mulesoft.org/schema/mule/core/current/mule.xsd">
<http:listener-config name="HTTP_Listener_Configuration" host="localhost" port="8081" doc:name="HTTP Listener Configuration"/>
<flow name="RegisterUser">
<http:listener config-ref="HTTP_Listener_Configuration" path="submitform" doc:name="HTTP"/>
<choice doc:name="Choice">
<when expression="#[server.dateTime.year-18 < payload.'yearborn']">
<set-payload value="Sorry #[payload.'firstname'], you're too young to register." doc:name="Too young"/>
</when>
<otherwise>
<set-payload value="Registration has been carried out successfully! Welcome #[payload.'firstname'] #[payload.'lastname']!" doc:name="Success"/>
</otherwise>
</choice>
</flow>
</mule>The above example expects to receive a POST request from http://localhost:8081/submitform with a body that contains the following form parameters: firstname, lastname, yearborn
POST /submitform HTTP/1.1

User-Agent: Mule/3.6
Content-Type: application/x-www-form-urlencoded
Content-Length: 32

firstname=Aaron&lastname=Aguilar+Acevedo&yearborn=1999|
To send an HTTP request that contains form parameters, the easiest way is to use a browser extension such as Postman (Google Chrome), or the curl command line utility. 
|
When the request is received by the connector, it creates a Mule Message that contains a Map type payload with the following key/value pairs in it:
firstname: Aaron
lastname: Aguilar Acevedo
yearborn: 1999
Notice how, in the case of the lastname parameter, whilst the value is encoded on the HTTP request (Aguilar+Acevedo), the connector automatically decodes it for you when placing it in the Mule Message.
|
On any of the remaining blocks on the flow, you can easily access the value of the elements in the Map payload by using MEL expressions to refer to their corresponding keys.
In the example above, the value matching the yearborn key is obtained via the expression #[payload.'yearborn']. Depending on its value, one of two different paths is followed. The first path sets the payload to a message that rejects the registration, referencing the value matching the firstname key through a similar MEL expression; the second path accepts the registration and welcomes the user by name, referencing the firstname and lastname values.
Requests with a multipart/form-data Type Body
In some cases, submitting a form may also imply uploading a file. In these cases, the Content-Type for the HTTP request is multipart/form-data. In this case, the HTTP Connector takes the request body in and makes it into an attachment on the Mule message, it also automatically parses the content and outputs it as a key-value map within this attachment. The payload of the Mule message is Null. This same behavior applies to all kinds of multipart HTTP request.
Suppose the following HTML form is submitted:
<form action="http://server.com/cgi/handle"
        enctype="multipart/form-data"
        method="post">

    What is your name? <INPUT type="text" name="name"><BR>
    What is your quest? <INPUT type="file" name="quest"><BR>
    What is your favorite color? <INPUT type="text" name="color"><BR>
    <INPUT type="submit" value="Send"> <INPUT type="reset">

</form>
This is what an HTTP request originated by the form above looks like:
POST /accounts HTTP/1.1
Host: localhost:8081
Cache-Control: no-cache
User-Agent: Mule/3.6
Content-Type: multipart/form-data; boundary=AaB03x

 --AaB03x
Content-Disposition: form-data; name="name"

MuleSoft
 --AaB03x
Content-Disposition: form-data; name="quest"; filename="myquest.png"
Content-Type: image/png


 --AaB03x
Content-Disposition: form-data; name="color"

blue
 --AaB03x
When the HTTP Connector receives a request like this, it puts the form values into an inbound attachment and the message payload is left as a null payload. As the content of each form field is not of a simple type, these are represented as Data Handlers. Internally, each Data Handler contains a DataSource with the field’s content.
Once data is put in the Mule message, you can access it elsewhere in the flow.
-
You can access the content of the
namefield through the expression#[message.inboundAttachments.‘name’.dataSource.content] -
You can access the Content-Disposition header of the
namefield through the expression#[message.inboundAttachments.‘name’.dataSource.getHeader(‘Content-Disposition’)]
Disabling HTTP Request Body Parsing
As shown in the last two examples, when the content type of the request is application/x-www-form-urlencoded or multipart/form-data, then the HTTP Listener automatically performs a message parsing. You can easily disable this parsing functionality if you want to.
In Studio’s visual editor, you can uncheck the Parse Request box in the Advanced tab. On the XML editor you can set the parseRequest attribute to "false".
<http:listener config-ref="HTTP_Listener_Configuration" path="/" parseRequest="false"/>HTTP Headers
HTTP Headers are converted by the HTTP Connector into inbound properties in the Mule Message.
Below is an HTTP Request that contains a couple of headers:
GET /account HTTP/1.1
Host: www.mulesoft.org
Server: Mule/3.6
The above HTTP Request is transformed into a Mule Message with the following inbound properties:
Host = www.mulesoft.org
Server = Mule/3.6
In your Mule flow, you can access these headers through the following MEL expressions:
#[message.inboundProperties.’Host’]
 #[message.inboundProperties.’Server’]
HTTP Custom Properties Request Line
Besides headers and a body, an HTTP request is also composed of a request line. The HTTP request line is the content on the first line of the HTTP Request, it mainly contains the URI that is typed into the address bar when requesting content via a browser. For example:
POST /mydomain/login/?user=aaron&age=32 HTTP/1.1
Do not encode characters & and = in query parameters. For example:Incorrect http://localhost:8081/api/v1/encode?param1%3Dusername%26param2%3DA Correct http://localhost:8081/api/v1/encode?param1=username¶m2=A |
This content is transformed into a set of inbound properties in the Mule Message, as shown below:

| Property Name | Description | Default Value | Example Value |
|---|---|---|---|
http.method |
The HTTP Request method |
- |
|
http.request.uri |
The whole HTTP Request Line URI |
- |
/ |
http.version |
The HTTP protocol version |
- |
HTTP/1.1 |
http.request.path |
The HTTP Request Line, minus query parameters |
- |
|
http.query.string |
The query string from the URI, without parsing |
- |
|
http.query.params |
A Map with all the query parameters from the URI, parsed and URL decoded |
Empty map |
|
http.uri.params |
When the HTTP Listener has URI parameter placeholders in its path, this Map is created with the holder name as key and the value is extracted from the request path * * |
Empty map |
For this to be generated, the Listener path must be defined as |
http.listener.path |
Value of the path attribute of the HTTP Listener that accepted the request. In case the global element had a base path configured, it is also included |
- |
/ |
http.scheme |
The HTTP protocol scheme |
- |
HTTPS if the listener-config associated has TLS configuration (SSL). HTTP otherwise. |
http.remote.address |
The HTTP Request called remote address |
||
http.client.cert |
The client certificate when using 2-way |
Generating the HTTP Response
Once the request has been processed by the various elements in your flow, the message is returned back to the HTTP connector to provide the requester with a response. You can set up this response so that it contains the desired body, attachment, headers and status.

HTTP Response Body
The HTTP Response body generates from the resulting payload of the Mule Message after executing the flow. So whatever the payload is, the HTTP connector tries to generate a byte array with it and send it as the HTTP response body. The only exceptional scenarios are when the payload is a Map or there are attachments in the message.
Sending a x-www-form-urlencoded Type Body
When the Mule message that reaches the end of the flow has a payload of type Map, then the HTTP Connector automatically generates an application/x-www-form-urlencoded response body. It also adds the header Content-Type: application/x-www-form-urlencoded.
Sending a multipart/form-data Type Body
When the Mule message that reaches the end of the flow contains outbound attachments, the HTTP Connector creates a multipart/form-data HTTP response body, using the message outbound attachments. The message payload is not used at all. You can also change the multipart type that you are returning by manually setting the response header Content-Type in the HTTP Listener Connector (see how to do it below).
HTTP Response Headers
The response message sent by the HTTP Listener Connector can also include HTTP headers. These can be added to the response in two different ways, as explained in the following sections.
HTTP Response Headers from Outbound Properties
When using an HTTP Listener Connector, whenever there are outbound properties included in the Mule Message that arrives to the end of the flow, each outbound property is transformed into an HTTP response header. It’s easy to add properties to the Mule Message by using the Property Transformer.
| As an exception to this rule, if an incoming outbound property is named "Connection", "Host", "Transfer-Encoding", it will not be transformed into a header. |
Studio Visual Editor
-
Create a flow with an HTTP Listener Connector, set its Path to
/ -
Create a Global Element for the Connector, set the Host to
localhostand leave the Port as the default8081 -
Add two Property transformers in your flow after the HTTP Listener Connector.
-
Configure the first to set the property date to the expression
#[server.dateTime] -
Configure the second to set the property expires to the expression
#[server.dateTime.plusHours(1)]
XML Editor
For example:
<http:listener-config name="HTTP_Listener_Configuration" host="localhost" port="8081"  doc:name="HTTP Listener Configuration"/>

    <flow name="HTTP_flow">
        <http:listener config-ref="HTTP_Listener_Configuration" path="/" doc:name="HTTP"  parseRequest="false"/>
        <set-property propertyName="date" value="#[server.dateTime]" doc:name="Property"/>
        <set-property propertyName="expires" value="#[server.dateTime.plusHours(1)]" doc:name="Property"/>
    </flow>
Settings Headers Explicitly - Full XML Code
<?xml version="1.0" encoding="UTF-8"?>

<mule xmlns:http="http://www.mulesoft.org/schema/mule/http" xmlns="http://www.mulesoft.org/schema/mule/core" xmlns:doc="http://www.mulesoft.org/schema/mule/documentation"
    xmlns:spring="http://www.springframework.org/schema/beans"
    xmlns:xsi="http://www.w3.org/2001/XMLSchema-instance"
    xsi:schemaLocation="http://www.springframework.org/schema/beans http://www.springframework.org/schema/beans/spring-beans-current.xsd
http://www.mulesoft.org/schema/mule/core http://www.mulesoft.org/schema/mule/core/current/mule.xsd
http://www.mulesoft.org/schema/mule/http http://www.mulesoft.org/schema/mule/http/current/mule-http.xsd">

    <http:listener-config name="HTTP_Listener_Configuration" host="localhost" port="8081"  doc:name="HTTP Listener Configuration"/>

    <flow name="HTTP_flow">
        <http:listener config-ref="HTTP_Listener_Configuration" path="/" doc:name="HTTP"  parseRequest="false"/>
        <set-property propertyName="date" value="#[server.dateTime]" doc:name="Property"/>
        <set-property propertyName="expires" value="#[server.dateTime.plusHours(1)]" doc:name="Property"/>
    </flow>
</mule>
In the example above, two headers are added to every response to a request to the app. Both headers take their values from dateTime MEL expressions.
Disabling this Behavior
| If you wish, you can prevent outbound properties from being passed on as headers in the response. |
Studio Visual Editor
In the HTTP Listener Connector’s properties editor, on the Response Settings section, tick the box labeled Disable Properties to prevent response messages from including outbound properties as headers.
Keep in mind that this only affects responses when the execution of the flow is successful. If an exception is raised, then the fields in the Response Settings section won’t be taken into account. Instead, the fields in the Error Response Settings are used. If you want to avoid properties from turning into headers in error response messages, tick the box labeled Disable Properties in the Error Response Settings section.
XML Editor
Add a http:response-builder as a child element of the http:listener, in this child element, set the attribute disablePropertiesAsHeaders="true" to prevent response messages from including outbound properties as headers.
Keep in mind that this only affects responses when the execution of the flow is successful. If an exception is raised, then the http:response-builder element won’t be taken into account. Instead the http:error-response-builder is used. If you want to avoid properties from turning into headers in error response messages, set the attribute disablePropertiesAsHeaders="true" in the http:error-response-builder child element.
For example:
<http:listener-config name="HTTP_Listener_Configuration" host="localhost" port="8081"  doc:name="HTTP Listener Configuration"/>

    <flow name="HTTP_flow">
        <http:listener config-ref="HTTP_Listener_Configuration" path="/" doc:name="HTTP"  parseRequest="false">
            <http:response-builder disablePropertiesAsHeaders="true"/>
            <http:error-response-builder disablePropertiesAsHeaders="true"/>
        </http:listener>
        <logger message="#[payload]" level="INFO" doc:name="Logger"/>
    </flow>
Disable Outbound Properties as Headers in Response - Full XML Code
<mule xmlns:http="http://www.mulesoft.org/schema/mule/http" xmlns="http://www.mulesoft.org/schema/mule/core" xmlns:doc="http://www.mulesoft.org/schema/mule/documentation"
    xmlns:spring="http://www.springframework.org/schema/beans"
    xmlns:xsi="http://www.w3.org/2001/XMLSchema-instance"
    xsi:schemaLocation="http://www.springframework.org/schema/beans http://www.springframework.org/schema/beans/spring-beans-current.xsd
http://www.mulesoft.org/schema/mule/core http://www.mulesoft.org/schema/mule/core/current/mule.xsd
http://www.mulesoft.org/schema/mule/http http://www.mulesoft.org/schema/mule/http/current/mule-http.xsd">

    <http:listener-config name="HTTP_Listener_Configuration" host="localhost" port="8081"  doc:name="HTTP Listener Configuration"/>

    <flow name="HTTP_flow">
        <http:listener config-ref="HTTP_Listener_Configuration" path="/" doc:name="HTTP"  parseRequest="false">
            <http:response-builder disablePropertiesAsHeaders="true"/>
            <http:error-response-builder disablePropertiesAsHeaders="true"/>
        </http:listener>
        <logger message="#[payload]" level="INFO" doc:name="Logger"/>
    </flow>
</mule>
HTTP Response Headers from the Listener Configuration
Another way to add HTTP headers to your response is by setting them directly in the HTTP Listener Connector response configuration.
Studio Visual Editor
-
Create a flow with an HTTP Listener Connector, set its Path to
/ -
Create a Global Element for the Connector, set the Host to
localhostand leave the Port as the default8081 -
In the HTTP Listener Connector’s properties editor, on the Response Settings section, click the Add Header button twice to add two headers
-
In the first header, set the name to date and the value to the expression
#[server.dateTime] -
In the second header, set the name to expires and the value to the expression
#[server.dateTime.plusHours(1)] -
In the Error Response Settings section, click the Add Header button once to add one header
-
Set the header’s name to cache-control and its value to
no-cache -
Complete the flow by adding any other processor after the HTTP Connector, such as a Logger component.
XML Editor
For example:
<http:listener-config name="HTTP_Listener_Configuration" host="localhost" port="8081"  doc:name="HTTP Listener Configuration"/>

<flow name="HTTP_flow">
    <http:listener config-ref="HTTP_Listener_Configuration" path="/" doc:name="HTTP"  parseRequest="false">
        <http:response-builder disablePropertiesAsHeaders="true">
            <http:header headerName="date" value="#[server.dateTime]"/>
            <http:header headerName="expires" value="#[server.dateTime.plusHours(1)]"/>
        </http:response-builder>
        <http:error-response-builder disablePropertiesAsHeaders="true">
            <http:header headerName="cache-control" value="no-cache"/>
        </http:error-response-builder>
    </http:listener>
    <logger message="#[payload]" level="INFO" doc:name="Logger"/>
</flow>
Full XML Code
<mule xmlns:http="http://www.mulesoft.org/schema/mule/http" xmlns="http://www.mulesoft.org/schema/mule/core" xmlns:doc="http://www.mulesoft.org/schema/mule/documentation"
    xmlns:spring="http://www.springframework.org/schema/beans"
    xmlns:xsi="http://www.w3.org/2001/XMLSchema-instance"
    xsi:schemaLocation="http://www.springframework.org/schema/beans http://www.springframework.org/schema/beans/spring-beans-current.xsd
http://www.mulesoft.org/schema/mule/core http://www.mulesoft.org/schema/mule/core/current/mule.xsd
http://www.mulesoft.org/schema/mule/http http://www.mulesoft.org/schema/mule/http/current/mule-http.xsd">

     <http:listener-config name="HTTP_Listener_Configuration" host="localhost" port="8081"  doc:name="HTTP Listener Configuration"/>

    <flow name="HTTP_flow">
        <http:listener config-ref="HTTP_Listener_Configuration" path="/" doc:name="HTTP"  parseRequest="false">
            <http:response-builder disablePropertiesAsHeaders="true">
                <http:header headerName="date" value="#[server.dateTime]"/>
                <http:header headerName="expires" value="#[server.dateTime.plusHours(1)]"/>
            </http:response-builder>
            <http:error-response-builder disablePropertiesAsHeaders="true">
                <http:header headerName="cache-control" value="no-cache"/>
            </http:error-response-builder>
        </http:listener>
        <logger message="#[payload]" level="INFO" doc:name="Logger"/>
    </flow>
</mule>
In the example above, when the flow is successfully executed, the HTTP Listener Connector adds the same two headers that are added in the previous example. In case the flow is not executed successfully, then those two headers aren’t added, instead the header cache-control is added to the response.
| Remember that a flow is considered to execute successfully if there are no exceptions raised during the flow execution or if all exceptions are handled by catch-exception-strategies. |
You can also use a map to define response headers, which is useful when you don’t know the number of headers or what header names are needed in advance.
Studio Visual Editor
-
Create a flow with an HTTP Listener Connector, set its Path to
/ -
Create a Global Element for the Connector, set the Host to
localhostand leave the Port as the default8081 -
In the HTTP Listener Connector’s properties editor, in the Response Settings section, click the Add Header button once
-
In the dropdown menu, select headers and assign it the expression
#[flowVars.headersOut], which references a variable that contains a map of headers -
Add a Variable transformer to your flow, after the HTTP Connector, to create the variable that you just referenced
-
Set the variable’s name to
headersOutand its value to a map through the following MEL expression:#[['date': server.dateTime, 'expires' : server.dateTime.plusHours(1)]]
XML Editor
For example:
<http:listener-config name="HTTP_Listener_Configuration" host="localhost" port="8081"  doc:name="HTTP Listener Configuration"/>

    <flow name="HTTP_flow">
        <http:listener config-ref="HTTP_Listener_Configuration" path="/" doc:name="HTTP"  parseRequest="false">
            <http:response-builder >
                <http:headers expression="#[flowVars.headersOut]"/>
            </http:response-builder>
        </http:listener>
        <set-variable variableName="headersOut" value="#[['date': server.dateTime, 'expires' : server.dateTime.plusHours(1)]]" doc:name="Variable"/>
 </flow>
Using Map to Define Response Headers - Full XML Code
<?xml version="1.0" encoding="UTF-8"?>

<mule xmlns:http="http://www.mulesoft.org/schema/mule/http"
	xmlns="http://www.mulesoft.org/schema/mule/core" xmlns:doc="http://www.mulesoft.org/schema/mule/documentation"
	xmlns:spring="http://www.springframework.org/schema/beans"
	xmlns:xsi="http://www.w3.org/2001/XMLSchema-instance"
	xsi:schemaLocation="
http://www.mulesoft.org/schema/mule/http http://www.mulesoft.org/schema/mule/http/current/mule-http.xsd http://www.springframework.org/schema/beans http://www.springframework.org/schema/beans/spring-beans-current.xsd
http://www.mulesoft.org/schema/mule/core http://www.mulesoft.org/schema/mule/core/current/mule.xsd">

<http:listener-config name="HTTP_Listener_Configuration" host="localhost" port="8081"  doc:name="HTTP Listener Configuration"/>

    <flow name="HTTP_flow">
        <http:listener config-ref="HTTP_Listener_Configuration" path="/" doc:name="HTTP"  parseRequest="false">
            <http:response-builder >
                <http:headers expression="#[flowVars.headersOut]"/>
            </http:response-builder>
        </http:listener>
        <set-variable variableName="headersOut" value="#[['date': server.dateTime, 'expires' : server.dateTime.plusHours(1)]]" doc:name="Variable"/>
    </flow>
    </mule>
In the example above, headers are not set individually, but rather taken from a map that could potentially be dynamically created and have any length and include any headers.
HTTP Response Status Code and Reason Phrase
You can configure your connector so that it responds to calls with a custom response, depending on the success or failure of the execution of the flow; you can also dynamically set these values depending on the case. For example, you can set different error status code numbers depending on what exception was raised, by having each error handler method set the value of this variable to its corresponding value.
Status Code and Reason Phrase from Outbound Properties
The status code and reason phrase are defined in the HTTP headers http.status and http.reason . As seen above, you can add headers to your response by creating outbound properties with the corresponding names, these are transformed into HTTP headers by the HTTP Listener Connector when the flow is done executing.
Studio Visual Editor
-
Create a flow with an HTTP Listener Connector, set its Path to
/ -
Create a Global Element for the Connector, set the Host to
localhostand leave the Port as the default8081 -
Add two Property transformers in your flow after the HTTP Listener Connector.
-
Configure the first to set the property http.status to
500 -
Configure the second to set the property http.reason to
Request successfully executed!
XML Editor
For example:
<http:listener-config name="HTTP_Listener_Configuration" host="localhost" port="8081"  doc:name="HTTP Listener Configuration"/>

<flow name="HTTP_flow">
    <http:listener config-ref="HTTP_Listener_Configuration" path="/" doc:name="HTTP"  parseRequest="false"/>
    <set-property propertyName="http.status" value="500" doc:name="Property"/>
    <set-property propertyName="http.reason" value="Request successfully executed!" doc:name="Property"/>
</flow>
Full XML Code
<mule xmlns:http="http://www.mulesoft.org/schema/mule/http" xmlns="http://www.mulesoft.org/schema/mule/core" xmlns:doc="http://www.mulesoft.org/schema/mule/documentation"
    xmlns:spring="http://www.springframework.org/schema/beans"
    xmlns:xsi="http://www.w3.org/2001/XMLSchema-instance"
    xsi:schemaLocation="http://www.springframework.org/schema/beans http://www.springframework.org/schema/beans/spring-beans-current.xsd
http://www.mulesoft.org/schema/mule/core http://www.mulesoft.org/schema/mule/core/current/mule.xsd
http://www.mulesoft.org/schema/mule/http http://www.mulesoft.org/schema/mule/http/current/mule-http.xsd">

    <http:listener-config name="HTTP_Listener_Configuration" host="localhost" port="8081"  doc:name="HTTP Listener Configuration"/>

    <flow name="HTTP_flow">
        <http:listener config-ref="HTTP_Listener_Configuration" path="/" doc:name="HTTP"  parseRequest="false"/>
        <set-property propertyName="http.status" value="500" doc:name="Property"/>
        <set-property propertyName="http.reason" value="Request successfully executed!" doc:name="Property"/>
    </flow>
</mule>
In the example above, the outbound properties http.status and http.reason are transformed into headers in the HTTP response that are accepted as the status code and reason.
Status Code and Reason Phrase from the Listener Configuration
The HTTP Listener Connector itself also includes a feature that lets you set up these values. You can set up different headers separately for the event of a successful flow execution and in case of a failure.
Studio Visual Editor
-
Create a flow with an HTTP Listener Connector, set the Path to
login -
Create a Global Element for the Connector, set the Host to
localhostand leave the Port as the default8081 -
In the HTTP Connector’s properties editor, in the Response Settings section, set the Status Code to 500 and the Reason to
Login Successful -
In the Error Response Settings section, set the Status Code to
#[errorStatusCode]and the reason to#[errorReasonPhrase] -
After the HTTP Connector, add a Message Filter. Click the edit button next to the Nested Filter field and assign it the following value:
#[message.inboundProperties.'http.query.params'.user == 'mule'] -
After the filter, add a Set Payload element and set its Value field to
Log in Successful! -
Add a Rollback Exception Strategy to the Error Handling section of your flow.
-
Add two Variable transformers in this exception strategy. Configure the first to set the variable
errorStatusCodeto404, the second to seterrorReasonPhrasetoRequested user does not exist
XML Editor
For example:
-
Create an
<http:listener>global configuration, set the host to localhost and the port to 8081<http:listener-config name="HTTP_Listener_Configuration" host="localhost" port="8081" doc:name="HTTP Listener Configuration"/> -
Create a flow with an
<http:listener>connector. Reference your connector to the global element you just created, set the path tologin. Add two child elements to the connector:http:response-builderandhttp:error-response-builder.<flow name="customResponseFlow"> <http:listener config-ref="HTTP_Listener_Configuration" path="login" doc:name="HTTP"> <http:response-builder reasonPhrase="Log in Successful" statusCode="500"/> <http:error-response-builder statusCode="#[errorStatusCode]" reasonPhrase="#[errorReasonPhrase]"/> </http:listener> </flow> -
After the HTTP connector, add a message filter, set it to evaluate the expression
#[message.inboundProperties.'http.query.params'.user == 'mule']<message-filter throwOnUnaccepted="true" doc:name="Fail if person does not exists"> <expression-filter expression="#[message.inboundProperties.'http.query.params'.user == 'mule']"/> </message-filter> -
Add a set payload after your filter to add a success message to the response’s body:
<set-payload value="Log in Successful!" doc:name="Set Payload"/> -
Add a rollback exception strategy to deal with the request in case the filter is not successfully passed:
<rollback-exception-strategy doc:name="Rollback Exception Strategy"> </rollback-exception-strategy> -
Inside your rollback strategy, add two set variable elements, one to set the value of
errorStatusCodeand the other to set the value oferrorReasonPhrase. Note that these are the variables you set up in the HTTP Listener’serror-response-builder.<rollback-exception-strategy doc:name="Rollback Exception Strategy"> <set-variable variableName="errorStatusCode" value="404" doc:name="Set status code"/> <set-variable variableName="errorReasonPhrase" value="Requested user does not exist" doc:name="Set reason phrase"/> </rollback-exception-strategy>
Status Code and Reason - Full XML Code
<?xml version="1.0" encoding="UTF-8"?>
<mule xmlns:http="http://www.mulesoft.org/schema/mule/http" xmlns="http://www.mulesoft.org/schema/mule/core" xmlns:doc="http://www.mulesoft.org/schema/mule/documentation"
xmlns:spring="http://www.springframework.org/schema/beans"
xmlns:xsi="http://www.w3.org/2001/XMLSchema-instance"
xsi:schemaLocation="http://www.springframework.org/schema/beans http://www.springframework.org/schema/beans/spring-beans-current.xsd
http://www.mulesoft.org/schema/mule/core http://www.mulesoft.org/schema/mule/core/current/mule.xsd
http://www.mulesoft.org/schema/mule/http http://www.mulesoft.org/schema/mule/http/current/mule-http.xsd">
<http:listener-config name="HTTP_Listener_Configuration" host="localhost" port="8081" doc:name="HTTP Listener Configuration"/>
<flow name="customResponseFlow">
<http:listener config-ref="HTTP_Listener_Configuration" path="login" doc:name="HTTP">
<http:response-builder reasonPhrase="Log in Successful" statusCode="500"/>
<http:error-response-builder statusCode="#[errorStatusCode]" reasonPhrase="#[errorReasonPhrase]"/>
</http:listener>
<message-filter throwOnUnaccepted="true" doc:name="Fail if person does not exists">
            <expression-filter expression="#[message.inboundProperties.'http.query.params'.user == 'mule']"/>
        </message-filter>
<set-payload value="Log in Successful!" doc:name="Set Payload"/>
<rollback-exception-strategy  doc:name="Rollback Exception Strategy">
        <set-variable variableName="errorStatusCode" value="404" doc:name="Set status code"/>
        <set-variable variableName="errorReasonPhrase" value="Requested user does not exist" doc:name="Set reason phrase"/>
</rollback-exception-strategy>
</flow>
</mule>The above example expects to receive requests in the address http://localhost:8081/login/, these requests must contain a query parameter named user. Depending on the value of this parameter, one of two things may occur:
-
When
user=mulethe filter evaluates to true, a set payload element sets the message payload to a success message, the HTTP Connector then sets the Status Code and Reason as500 Log in Successful! -
When
user=anythingElsethe filter evaluates to false, the exception strategy is then called. In it, the variables that are assigned to the Error Status Code and the Error Reason in the HTTP Connector are assigned the values404 Requested user does not exist
|
Note that in either case, the request response is not displayed as the response body, so it won’t be visible if you make your request through a browser window. To be able to view the status code and explanation of a an HTTP request, you can use a browser extension such as Postman (Google Chrome), or the curl command line utility. |
| If status code or reason phrase are defined as outbound properties and they are also defined in the HTTP Listener Connector, then the later takes precedence. |
HTTP Listener Streaming
In order to know the length of an HTTP request body, HTTP requests and responses contain a header named Content-Length, which describes the expected length of the body. Using this value, the consumer of the HTTP message can know where the body ends. This implies that the body length must be known in advance, before writing the body, which is not always the case. For example, if we want to send the content of a file through HTTP, we would like to avoid having to read the whole file in memory in order to send it. Instead, we would like to stream the file content through the HTTP connection. In that case, the Transfer-Encoding header is used to send the HTTP message body in chunks, saving us from having to know the body length in advance. Each chunk is separated by a predefined line separator, which contains the length of the particular chunk.
HTTP Listener Request with Transfer-Encoding:chunked
When a client sends an HTTP request with a Transfer-Encoding:chunked header, the HTTP Listener Connector automatically decodes the entity body chunks into an InputStream.
HTTP Listener Response with Transfer-Encoding:chunked
The HTTP Listener Connector manually adds the Content-Length and Transfer-Encoding:chunked headers when necessary, based on the payload of the MuleMessage that is used to generate the HTTP response.
-
If the payload is an InputStream, the the HTTP Listener Connector adds a
Transfer-Encoding:chunkedheader to the response, to avoid loading the whole InputStream into memory. -
In any other case, the HTTP Listener Connector computes the length of the payload and sets the value of the
Content-Lengthheader accordingly. -
If the Content-Length or Transfer-Encoding headers are manually set by the user in the Response settings of the HTTP Listener Connector, then these are honored.
The user can override this behavior by using the responseStreamingMode attribute in the HTTP Listener Connector. Possible values for responseStreamingMode are:
-
AUTO (default): which provides the behavior depicted above.
-
ALWAYS: the listener always sends the response adding the
Transfer-Encoding:chunkedheader -
NEVER: the listener always computes the
Content-Lengthheader and avoids chunking.
Notice that when setting this attribute to ALWAYS or NEVER, the HTTP Listener Connector honors this configuration and ignore any attempts to set the Content-Length or Transfer-Encoding headers manually .
HTTPS Protocol Configuration
You can set the connector to work with HTTPS protocol rather than HTTP protocol. This is set up at a global element level, all connector instances that reference a global element configured to use HTTPS works with this protocol.
If your connector’s TLS/SSL configuration includes a trust store, then this implicitly enforces that incoming requests require client authentication. If your configuration includes both a trust store and a key store, then it is implementing two-way TLS.
See TLS Configuration for more details.
Studio Visual Editor
-
Create a flow with an HTTP Listener Connector, set its Path to
/ -
Create a Global Element for the Connector, set the Host to
localhostand leave the Port as the default8081. Select the HTTPS Radio button. -
Select the TLS/SSL tab. Select the corresponding radio button and either provide your trust store / key store credentials, or add a reference to a global TLS configuration that contains these
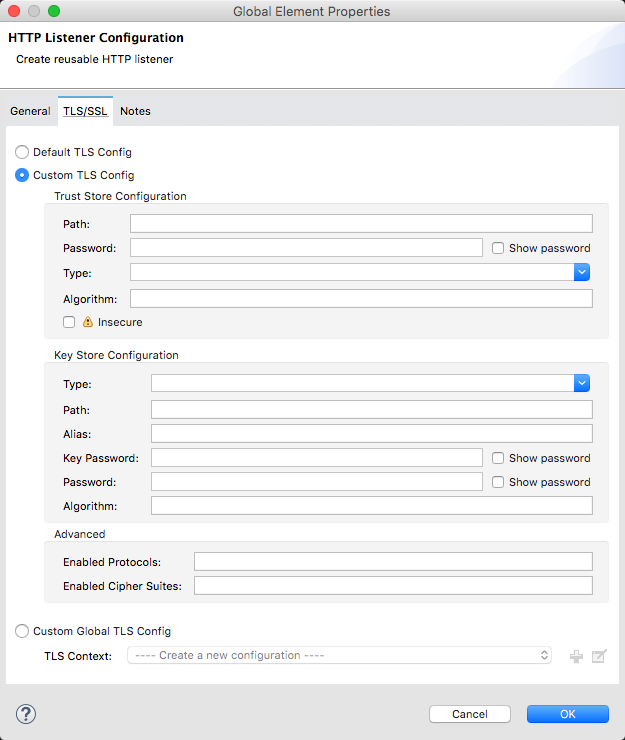
-
Complete the flow by adding any other processor after the HTTP Connector, such as a Logger component.
XML Editor
For example:
<http:listener-config name="HTTP_Listener_Configuration" protocol="HTTPS" host="localhost" port="8081"  doc:name="HTTP Listener Configuration">
        <tls:context>
            <tls:trust-store path="mytrustpath" password="mytrustpass"/>
            <tls:key-store path="mykeypath" password="mypass" keyPassword="mykeypass"/>
        </tls:context>
    </http:listener-config>

    <flow name="customResponseFlow">
        <http:listener config-ref="HTTP_Listener_Configuration1" path="/" doc:name="HTTP"/>
        <logger level="INFO" doc:name="Logger"/>
    </flow>
HTTPS Protocol Configuration - Full XML Code
<?xml version="1.0" encoding="UTF-8"?>

<mule xmlns:tls="http://www.mulesoft.org/schema/mule/tls" xmlns:http="http://www.mulesoft.org/schema/mule/http" xmlns="http://www.mulesoft.org/schema/mule/core" xmlns:doc="http://www.mulesoft.org/schema/mule/documentation"
    xmlns:spring="http://www.springframework.org/schema/beans"
    xmlns:xsi="http://www.w3.org/2001/XMLSchema-instance"
    xsi:schemaLocation="http://www.springframework.org/schema/beans http://www.springframework.org/schema/beans/spring-beans-current.xsd
http://www.mulesoft.org/schema/mule/core http://www.mulesoft.org/schema/mule/core/current/mule.xsd
http://www.mulesoft.org/schema/mule/http http://www.mulesoft.org/schema/mule/http/current/mule-http.xsd
http://www.mulesoft.org/schema/mule/tls http://www.mulesoft.org/schema/mule/tls/current/mule-tls.xsd">

    <http:listener-config name="HTTP_Listener_Configuration" host="localhost" port="8081"  doc:name="HTTP Listener Configuration">
        <tls:context>
            <tls:trust-store path="aaa" password="bbb"/>
            <tls:key-store path="aaa" password="bbb" keyPassword="ccc"/>
        </tls:context>
    </http:listener-config>

    <flow name="HTTP_flow">
        <http:listener config-ref="HTTP_Listener_Configuration" path="/" doc:name="HTTP"  parseRequest="false">
            <http:response-builder >
                <http:headers expression="#[flowVars.headersOut]"/>
            </http:response-builder>
        </http:listener>
        <set-variable variableName="headersOut" value="#[['Cache-Control': 'no-cache', 'Content-Length' : 32]]" doc:name="Variable"/>
        <set-payload value="foo" doc:name="Set Payload"/>
    </flow>
</mule>
If you’re using a 2-way TLS authenticated connection, the client certificate is exposed using the inbound property http.client.cert.You can access the client principal through: inboundProperties['http.client.cert'].getSubjectDN()
|
Authentication
You can implement Basic Auth on the incoming requests that arrive through the HTTP Listener Connector. To do this, you must add an additional XML element in your flow after your HTTP connector, referencing a Spring security component, as in the example below:
<spring:beans>
    <ss:authentication-manager alias="authenticationManager">
      <ss:authentication-provider>
        <ss:user-service id="userService">
          <ss:user name="user" password="password" authorities="ROLE_ADMIN" />
          <ss:user name="anon" password="anon" authorities="ROLE_ANON" />
        </ss:user-service>
      </ss:authentication-provider>
    </ss:authentication-manager>
  </spring:beans>

  <mule-ss:security-manager>
      <mule-ss:delegate-security-provider name="memory-provider" delegate-ref="authenticationManager" />
  </mule-ss:security-manager>

  <http:listener-config name="HTTP_Listener_Configuration" host="localhost" port="8081" doc:name="HTTP Listener Configuration" />

  <flow name="SpringExample">
    <http:listener config-ref="HTTP_Listener_Configuration" path="/" doc:name="HTTP"/>
    <http:basic-security-filter realm="mule-realm"/>
  </flow>
See Configuring the Spring Security Manager for more details.
Connection Attributes Configuration
You can customize HTTP incoming connections by:
-
Setting the maximum time a connection can be idle
-
Enabling/disabling persistent HTTP connections
Studio Visual Editor
In the global configuration element setup window, the checkbox marked Use Persistent Connection defines if a connection established with a client processes several request or just once. Default value is true, so multiple requests are handled by a single connection.

If the box is checked, then you can also set up the Connection Idle Timeout, which defines the number of milliseconds that a connection can remain idle before it is closed. Default value is 30 seconds.
XML Editor
In the global configuration element, the attribute connectionIdleTimeout can be used to define the number of milliseconds that a connection can remain idle before it is closed. Default value is 30 seconds.
In the global configuration element, the attribute usePersistentConnections defines if a connection established with a client is used to process several request or just once. Default value is true, so multiple requests are handled by a single connection.
For example:
<http:listener-config name="HTTP_Listener_Configuration" host="localhost" port="8081" doc:name="HTTP Listener Configuration" usePersistentConnections="true" connectionIdleTimeout="9000" />Performance
The HTTP Listener Connector uses dedicated threads to receive the socket connection and then hand off the message to the threads executing the rest of the synchronous flow. The default value for these dedicated threads for the HTTP connector is 128. Meaning that when we select the Use default worker threading profile the maxThreadsActive 1 value is set to 128.

Although this default configuration is usually enough, it is possible to tune the max thread value 2
Worker Threading Profile
Attributes of the Worker Threading Profile (worker-threading-profile) parameter:
| Name | Type | Description | Required | Default |
|---|---|---|---|---|
Max Active Thread |
Integer |
The maximum number of threads to use. |
No |
16 |
Max Idle Threads |
Integer |
The maximum number of idle or inactive threads that can be in the pool before they are destroyed. |
No |
1 |
Thread TTL |
Long |
Determines how long an inactive thread is kept in the pool before being discarded. |
No |
60000 |
Pool Exhausted Action |
WAIT, DISCARD, DISCARD_OLDEST, ABORT, RUN |
When the maximum pool size or queue size is bounded, this value determines how to manage incoming tasks. Possible values are: * * * * * |
No |
|
Thread Wait Timeout |
Long |
How long the thread waits in milliseconds when the pool exhausted action is |
No |
30000 |
Max Buffer Size |
Integer |
Determines how many requests to queue when the pool is at maximum usage capacity and the pool exhausted action is WAIT. The buffer throttles for thread creation before requests are processed. Do not use maxBufferSize without reading these warnings. Any * If fewer than * If * If a request cannot be queued, a new thread is created unless this exceeds |
No |
0 |
Studio Visual Editor
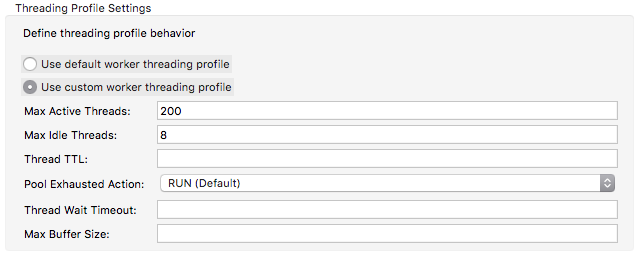
XML or Standalone Editor
<http:listener-config name="HTTP" host="0.0.0.0" port="8081">
        <http:worker-threading-profile maxThreadsIdle="8" maxThreadsActive="200"/>
</http:listener-config>
The HTTP connector can also be configured to use a non-blocking processing strategy.
See Also
-
To send HTTP requests, see HTTP Request Connector
-
See a full reference of the available XML configurable options in this connector
-
To update all applications that use the old HTTP endpoint based connector, see Migrating to the New HTTP Connector
-
Consult a reference to the deprecated predecessor of this element, HTTP Transport Reference