Shared Resources
|
This version of Mule reached its End of Life on May 2, 2023, when Extended Support ended. Deployments of new applications to CloudHub that use this version of Mule are no longer allowed. Only in-place updates to applications are permitted. MuleSoft recommends that you upgrade to the latest version of Mule 4 that is in Standard Support so that your applications run with the latest fixes and security enhancements. |
When you deploy Mule on premises, you can define global configurations such as default error handlers, shared properties, scheduler pools, and connector configurations to be shared among all applications deployed under the same domain. To do so, create a Mule domain and then reference it from each application. As a result, each app now associated with the Mule domain can access shared resources in the domain.
Note that Mule apps are associated with only one domain at a time.
Sharing resources allows multiple development teams to work in parallel using the same set of connector configurations, enabling the teams to:
-
Expose multiple services within the domain through the same port.
-
Share the connection to persistent storage.
-
Share services between Mule applications through a well-defined interface.
-
Ensure consistency between Mule applications upon any changes because the configuration is only set in one place.
To share the metadata, keep the Mule domain project open in Anypoint Studio. Otherwise, you must enter the metadata manually on the linked Mule projects.
Limitations
Defining flows, subflows, or any message processors as shared resources is not supported. Domains are not meant to share behavior. They are meant to share resources only.
Architecture
A Mule domain project in Anypoint Studio has the following key files:
| File Name | Description |
|---|---|
|
This is the shared resources configuration file. This file must have the |
|
This is the dependencies file descriptor. It is a Maven POM file with required plugins for domains projects. |
|
This file is a descriptor for the domain artifact. |
When you package the Mule domain project into a deployable JAR file, you can find the following files:
| File Name | Description |
|---|---|
|
This is the shared resources configuration file. This file must have the |
|
A Maven-like repository with all the dependencies of the domain. |
|
Artifact Maven descriptor file. |
|
Internal Mule file used for dependency management. |
|
This file is a descriptor for the domain artifact. |
Create a New Domain
To create a new domain in Anypoint Studio:
-
In the top menu bar select, File > New > Mule Domain Project.

-
Fill in the same fields as you would with a regular Mule Project:

-
Provide a name for the project, and select a Mule version.
-
Shared Resources Configuration
You can configure your domain project by defining one or more shared resources in your mule-domain-config.xml file. You can edit this file in Anypoint Studio using either the XML editor or the graphic interface.
Configure Shared Resources by Editing the Configuration XML
Configure shared resources by adding module or connector configurations to your domain’s configuration XML.
The following example configures an HTTP Listener as a shared resource:
<?xml version="1.0" encoding="UTF-8"?>
<domain:mule-domain
        xmlns="http://www.mulesoft.org/schema/mule/core"
        xmlns:domain="http://www.mulesoft.org/schema/mule/ee/domain"
        xmlns:xsi="http://www.w3.org/2001/XMLSchema-instance"
        xmlns:doc="http://www.mulesoft.org/schema/mule/documentation"
        xsi:schemaLocation="
               http://www.mulesoft.org/schema/mule/core http://www.mulesoft.org/schema/mule/core/current/mule.xsd
               http://www.mulesoft.org/schema/mule/ee/domain http://www.mulesoft.org/schema/mule/ee/domain/current/mule-domain-ee.xsd">

    <!-- Example configuration for an HTTP Listener-->
    <http:listener-config name="HTTP_Listener_config" doc:name="HTTP Listener config" >
      <http:listener-connection host="0.0.0.0" port="8081" />
    </http:listener-config>

</domain:mule-domain>
Configure Shared Resources by Using the Global Elements Tab
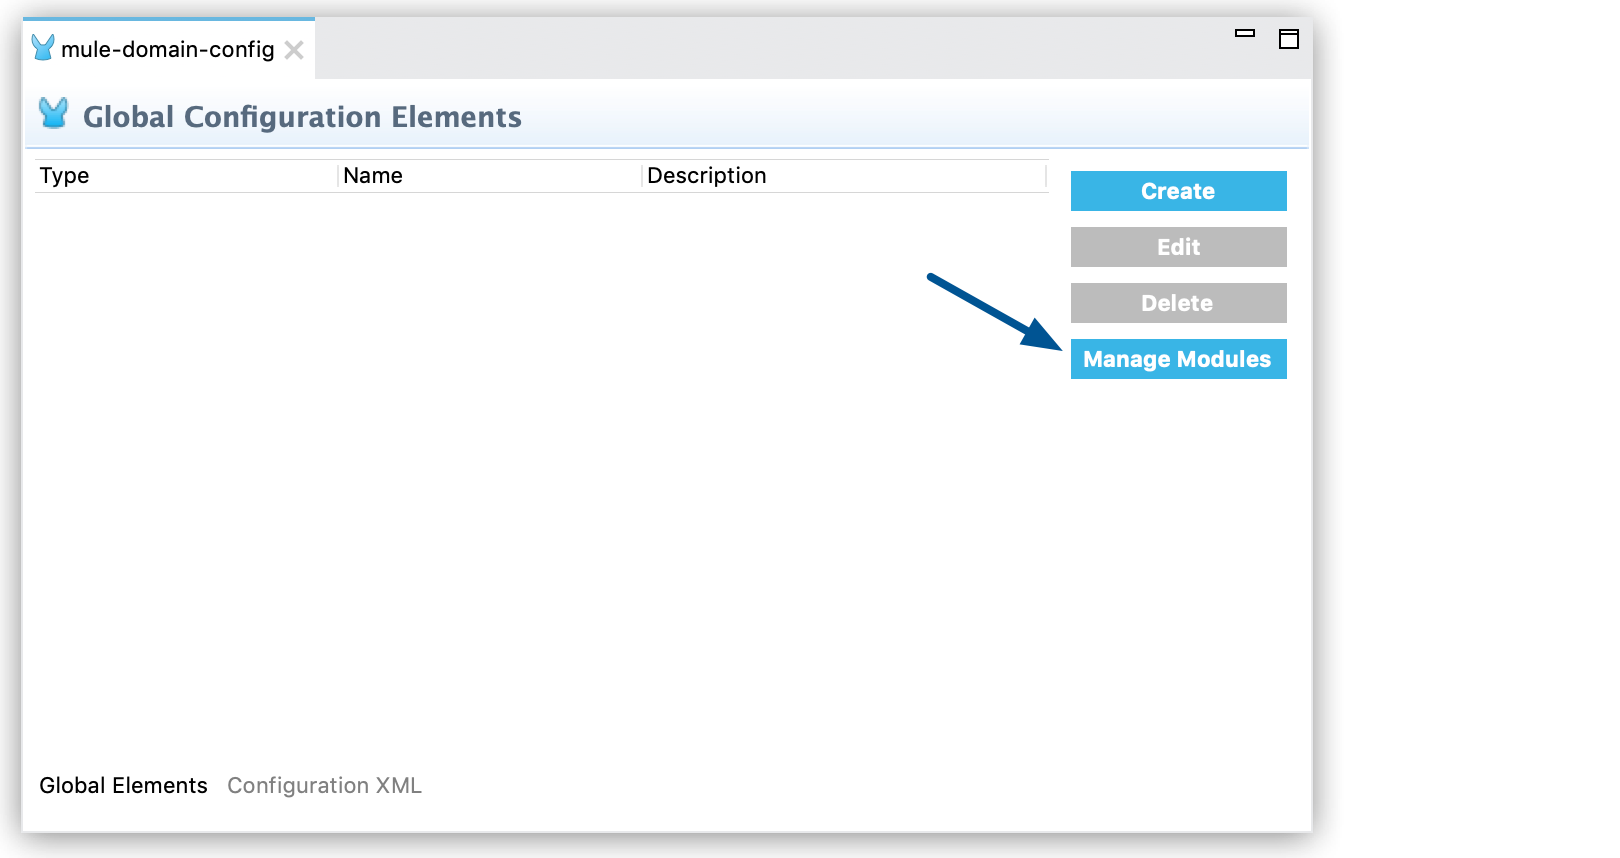
Configure shared resources by using the Global Elements tab in Anypoint Studio to first add a module to your domain project and then create a global element.
For example, to add Anypoint Connector for HTTP (HTTP Connector) to your domain project:
-
In the Global Elements tab, click Manage Modules:
-
Click Add Module:

-
Search for the module you want to add and click Add >:

-
Click Finish.
After you add the HTTP connector to the domain project, you can create a global element to use as a shared resource:
-
In the Global Elements tab, click Create:

-
Select the HTTP Connector and complete the configuration process:

-
Define the configurable parameters of your global element in the Global Element Properties window.
Associate Applications with a Domain
Mule apps can be associated with only one domain at a time. You can associate an existing Mule app with a domain either by using Studio or by editing your project’s pom.xml file directly. If you don’t set a domain dependency, Mule applications use the default domain.
Consider the following when working with Mule 4.2.2 and later versions:
-
The version honors semantic versioning.
For example, if you set the version to 1.0.1, a domain with version 1.0.2 and later works, but a domain with version 1.0.0 does not. -
If different domains are deployed with the same group ID, artifact ID, and version, the reference in the
pom.xmlfile might be ambiguous.
To avoid this issue, add the name of the domain folder in the Mule application’smule-artifact.jsonfile:
{
  "domain": "mymuledomain-1.0.1-mule-domain"
  ...
}
Associate a Mule App with a Domain Using Studio
To associate a Mule application with a domain from Studio, follow these steps:
-
In the Project Explorer or Package Explorer view, right-click the Mule application.
-
In the menu that opens, click Properties.
-
From Properties, click Mule Project.
-
In the Domain field, select a domain for your project.

Note that when you select a domain, the Mule runtime engine for your project matches the domain’s Mule runtime engine automatically.
After completing these steps, Studio includes the domain in the pom.xml for your project, for example:
<dependencies>
  ...
  <dependency>
      <groupId>com.mycompany</groupId>
      <artifactId>mymuledomain</artifactId>
      <version>1.0.0-SNAPSHOT</version>
      <classifier>mule-domain</classifier>
      <scope>provided</scope>
  </dependency>
</dependencies>Reference Shared Resources
The following mule-domain-config.xml example defines HTTP listener and HTTP request configurations as shared resources.
<?xml version="1.0" encoding="UTF-8"?>
<mule-domain xmlns="http://www.mulesoft.org/schema/mule/domain"
             xmlns:core="http://www.mulesoft.org/schema/mule/core"
             xmlns:http="http://www.mulesoft.org/schema/mule/http"
             xmlns:xsi="http://www.w3.org/2001/XMLSchema-instance"
             xsi:schemaLocation="
               http://www.mulesoft.org/schema/mule/core http://www.mulesoft.org/schema/mule/core/current/mule.xsd
                     http://www.mulesoft.org/schema/mule/http http://www.mulesoft.org/schema/mule/http/current/mule-http.xsd
               http://www.mulesoft.org/schema/mule/domain http://www.mulesoft.org/schema/mule/domain/current/mule-domain.xsd">

    <http:listener-config name="HTTP_Listener_Configuration">
        <http:listener-connection host="0.0.0.0" port="8080"/>
    </http:listener-config>

    <http:request-config name="domainLevel">
        <http:request-connection host="localhost" port="9090"/>
    </http:request-config>

</mule-domain>
Any Mule application associated with the domain can make use of the shared resources by referencing them within the configuration in the same way that you reference a resource within the project itself. In the example that follows, the HTTP Listener connector references the shared resource named HTTP_Listener_Configuration.
<mule>
   <flow name="httpService">
      <http:listener config-ref="HTTP_Listener_Configuration" path="/" doc:name="HTTP"/>
      <set-payload value="success" />
   </flow>
</mule>
In Studio’s visual editor, you can simply pick the shared resource out of the dropdown list in the Connector Configuration field of the connector’s properties editor:

Deploy with Shared Resources
By default, when you deploy either a Mule application associated with a domain or a domain associated with any Mule application, Anypoint Studio deploys both. You can change this default behavior by changing the run configuration for the domain. You can also deploy a set of Mule applications in your workspace together, even if they don’t share the same domain.
| Mule domain projects cannot be installed using Runtime Manager. |
Deploy from Anypoint Studio
The following steps describe how to deploy your domain project and the associated Mule applications from Studio:
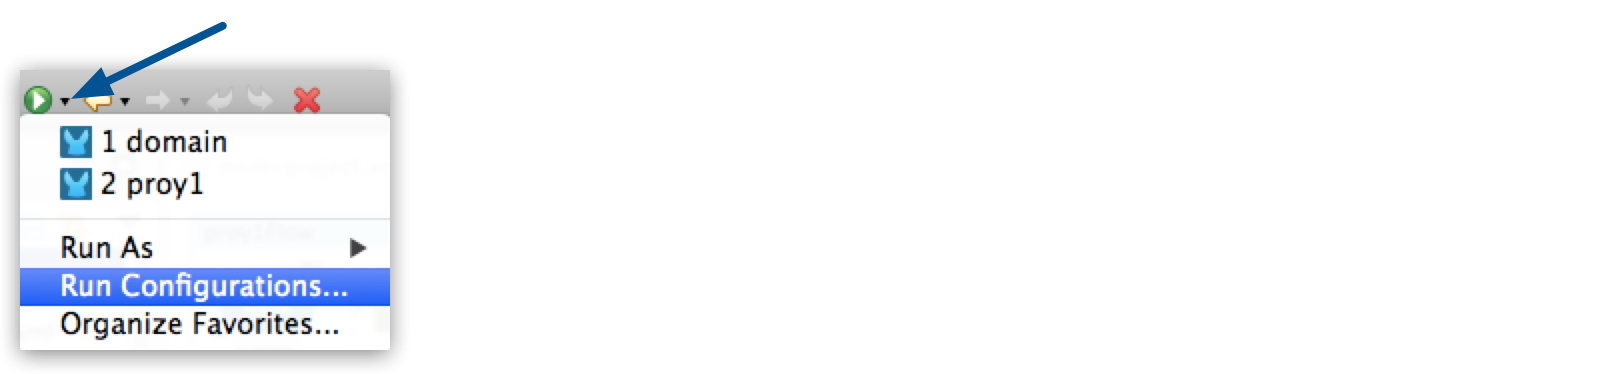
-
Open the drop-down menu next to the play button and select Run Configurations.
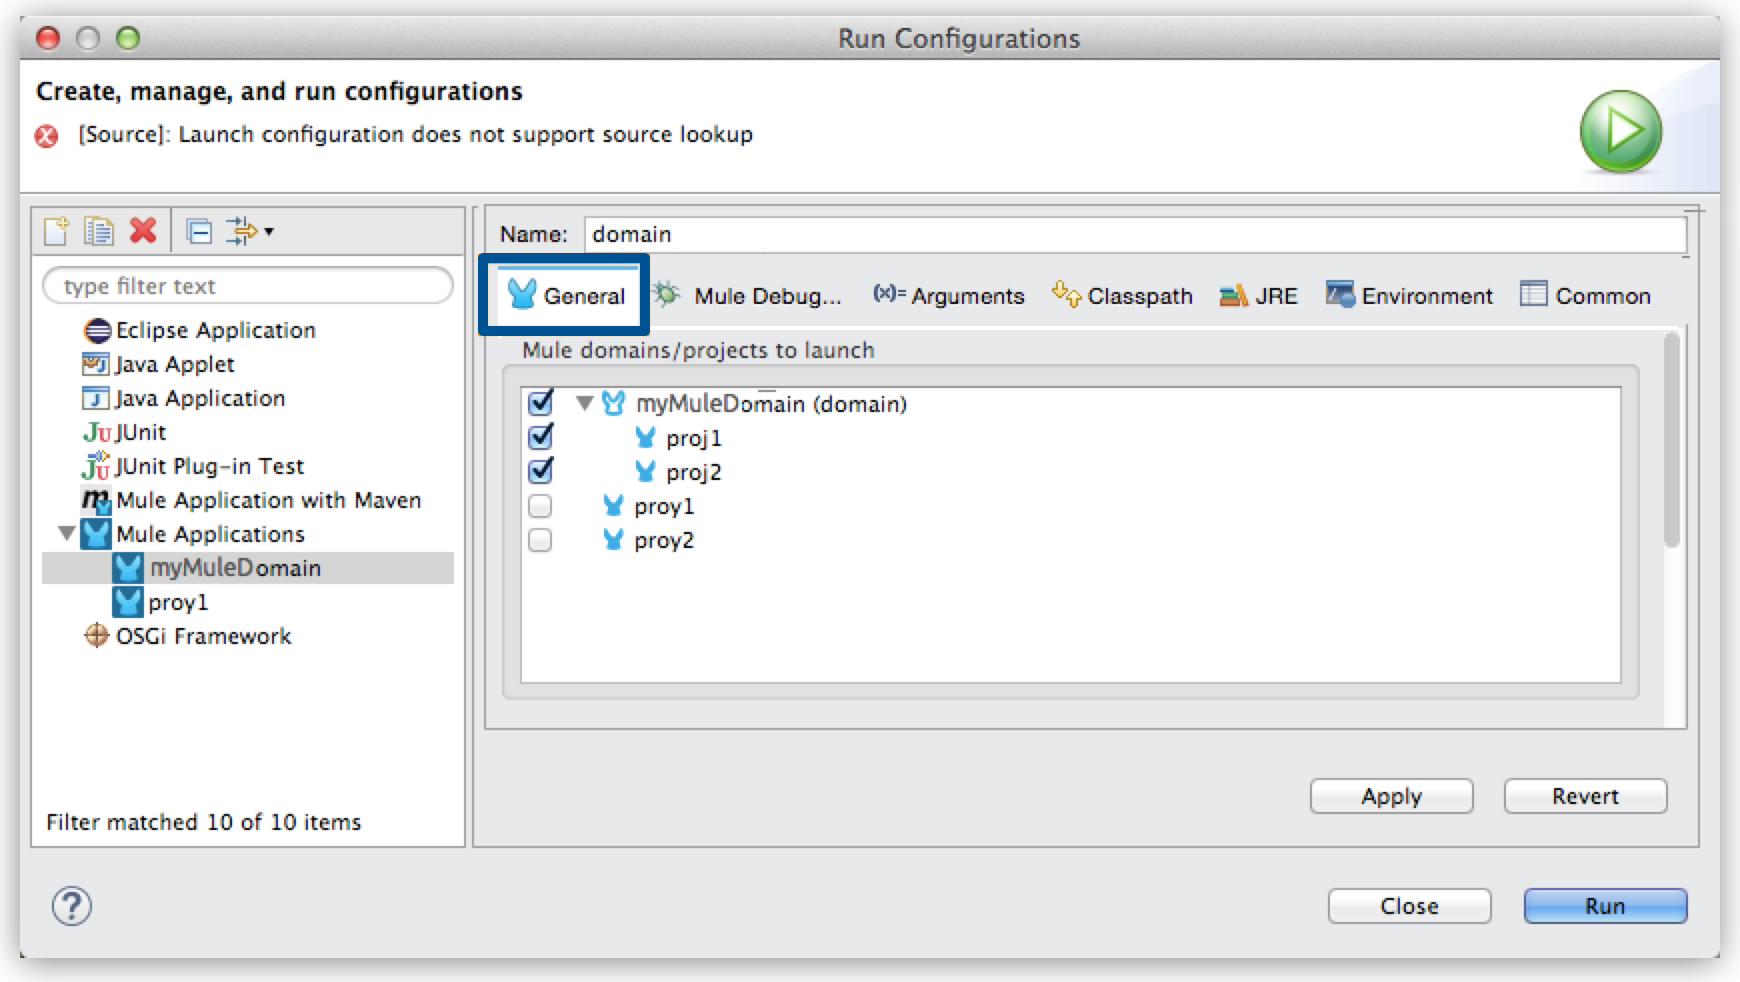
-
Select the General tab and then select the boxes next to the projects that you want to always deploy together with the Mule application that is currently selected in the navigation menu to the right.
Deploy Outside Anypoint Studio
The following steps describe how to deploy your domain project and the Mule applications outside Studio, to a standalone Mule runtime engine:
-
In Studio, select File > Export.
-
Select Mule > Anypoint Studio Project to Mule Deployable Archive (includes Studio metadata).
This process creates a JAR file that you can deploy to a standalone Mule runtime engine.
-
Copy the exported domain’s JAR file to
MULE_HOME/domains. -
Export each Mule application that you want to deploy with the associated domain.
-
Copy the exported JAR files for each Mule application that references the domain into the
MULE_HOME/appsfolder. -
Start Mule via the command console.
When Mule starts, it first deploys any domains found in the
MULE_HOME/domainsfolder, then it deploys the Mule applications in theMULE_HOME/appsfolder, so that all domains are fully started before the Mule applications start.
Deploying Domains Using Mule Maven Plugin
You can deploy domains to your local Mule instances using the Mule Maven plugin. See Deploy a Domain for instructions.