Requires downtime
Migrate Applications Managed by API Manager
You migrate your existing Mule 3 applications that are managed by API Manager to Mule 4 using the following steps:
-
Based on how your existing Mule 3 application is configured, carefully review the prerequisites to prepare for your migration.
-
Determine your migration approach
Based on several factors, such as whether the migration requires taking downtime, removing applied policies, migrating contracts, or creating an instance for the migration.
-
Migrate your application.
Prepare to Migrate Your Mule 3 Applications
Before you migrate your existing API-managed Mule 3 applications to Mule 4, carefully review the following guidelines and determine:
-
How your Mule 3 application is managed: basic endpoint, integration application, or complex proxy
To migrate your application in this scenario, first review how to migrate API gateways to prepare, and then migrate to Mule 4.
-
How your application is secured: default or custom policies
If you applied custom policies to your Mule 3 API, follow Migrating API Policies. If you have applied an out-of-the-box proxy, you can recreate the proxy by using the API Manager UI.
-
Whether you have classified your API
If you have not classified your API, first classify an API Instance into an Environment.
Determine Your Migration Approach
You migrate your API Manager-managed Mule 3 application by creating a new API instance. Before migrating to Mule 4, carefully consider the following factors to determine the approach that best suits your requirements:
| Migration Factor | Create API Instance |
|---|---|
No |
|
Requires removing applied policies |
No |
Requires migrating contracts |
Yes |
Provides API metrics continuity on API Instance |
No |
Perform the Migration
You can migrate your Mule 3 application using:
Migrate Using a New API Instance
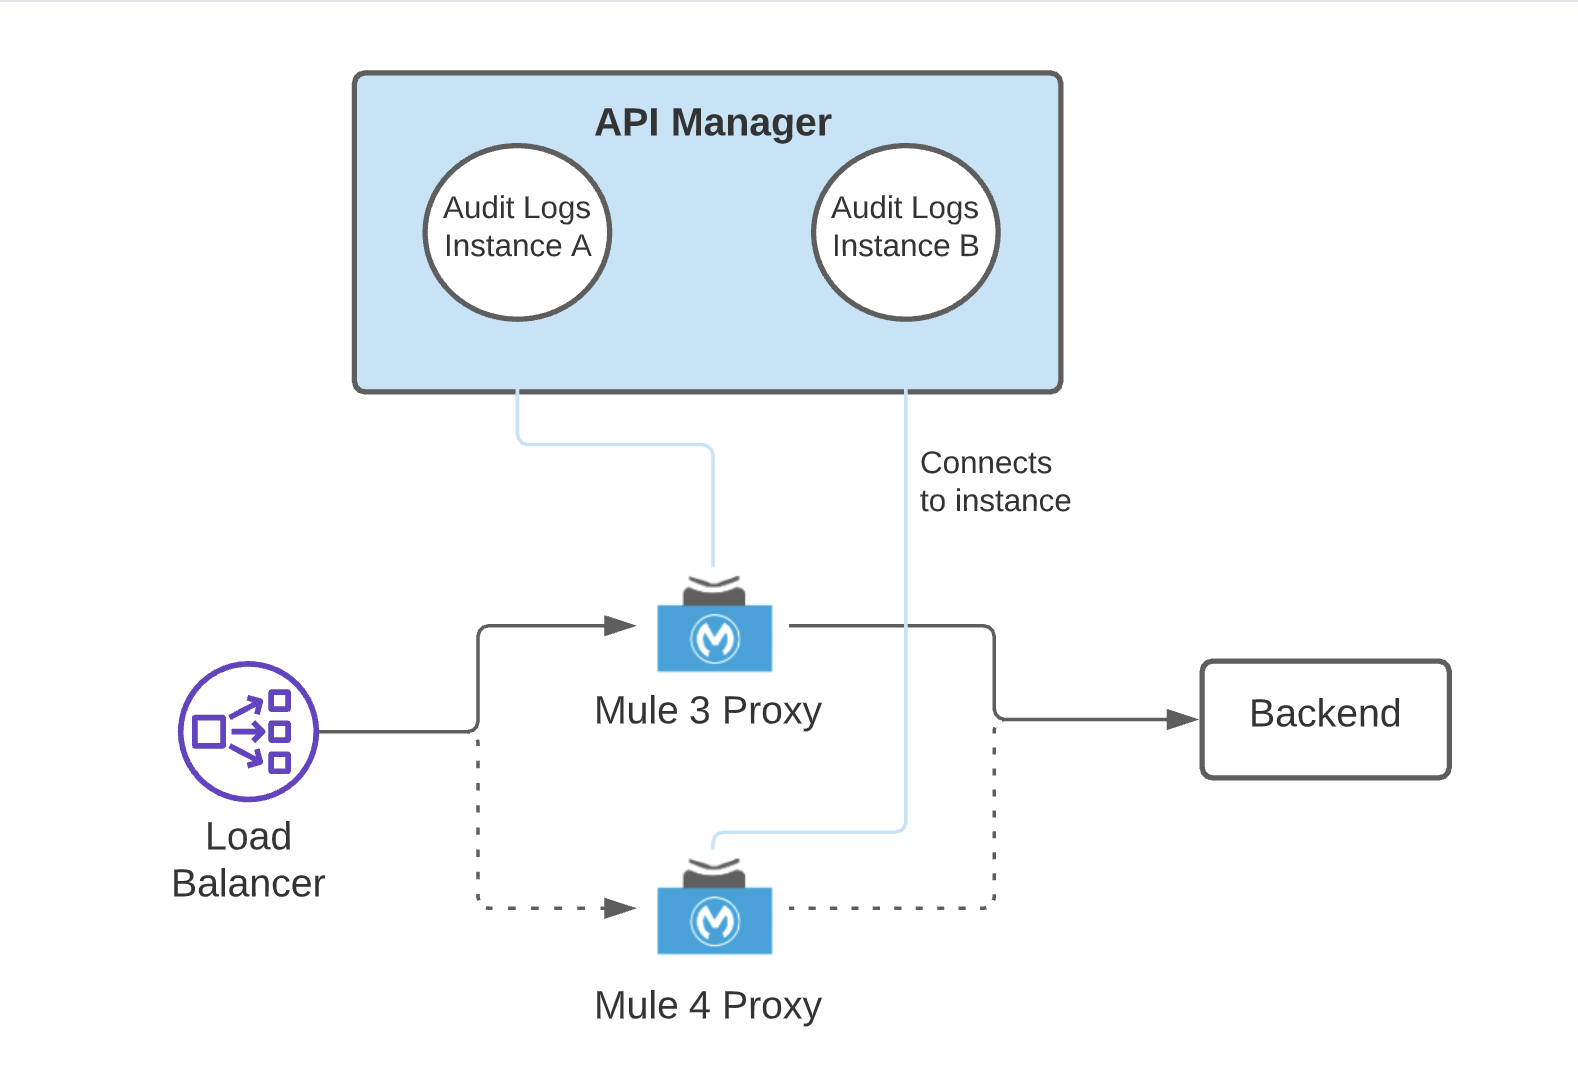
Use the high-level proposal illustrated in the following diagram to use a new API instance for configuring an independent Mule runtime instance on Mule 4:

If your Mule application is not a proxy, this same proposal applies to your migration procedure, without the backend component.
To migrate your Mule 3 API to Mule 4 using a new API instance:
-
From the API Administration page in API Manager, select Manage API > Create new API.
Use an instance label to identify this new API instance.
-
On the Endpoint Configuration window, select
Mule 4in Mule version and save. -
From the left navigation pane in API Manager, apply alerts, SLA tiers, and policies to your API.
-
If your API uses contract-based policies, for example Client ID Enforcement policy, migrate the contracts of the API instance.
-
If you completed configuring your API, start your Mule 4 application and try sending it requests.
-
After successfully validating your application, undeploy your Mule 3 application.
Migrate Contracts
Before migrating your application by creating a new API instance, migrate existing API contracts to your new Mule 4 environment.
Task Prerequisite
Before you migrate your contracts, ensure that you have the following roles:
-
Organization Administrator of the root organization
-
Application Owner of every application that has a contract with the source API
To migrate contracts using the Anypoint Platform UI:
-
Go to API Manager > Client Applications and select the application.
Ensure that the
APIoption is selected in the Contracts field. -
On the right navigation, scroll down to the Owners field and add your name.
-
From Exchange, select your API instance and request access.
-
From API Manager, grant yourself the access.
To automate the request approval process:
-
Add owners for the application:
curl 'https://anypoint.mulesoft.com/apiplatform/repository/v2/organizations/<ROOT_ORG_ID>/applications/<CLIENT_APP_ID>/owners' \ -H 'Content-Type: application/json;charset=UTF-8' \ -H 'Authorization: Bearer <AUTH_TOKEN>' \ --data-raw '{"id":"<YOUR_USER_ID"}' -
Request access to the API instance:
curl 'https://anypoint.mulesoft.com/exchange/api/v2/organizations/<ORG_ID>/applications/<CLIENT_APP_ID>/contracts' \ -H 'authorization: bearer <TOKEN>' \ -H 'content-type: application/json' \ --data-raw '{"apiId":"<API_INSTANCE_ID>","environmentId":"<ENVIRONMENT_ID>","instanceType":"api","acceptedTerms":true,"organizationId":"<ORG_ID>","groupId":"<GROUP_ID>","assetId":"<ASSET_ID>","version":"<ASSET_VERSION>","versionGroup":"<VERSION_GROUP>"}' -
Approve contracts:
curl 'https://anypoint.mulesoft.com/apimanager/xapi/v1/organizations/<ORGANIZATION_ID>/environments/<ENV_ID>/apis/<API_ID>/contracts/<CONTRACT_ID>/approve' \
  -H 'Authorization: Bearer <TOKEN>' \
  -H 'Content-Type: application/json;charset=UTF-8' \
  --data-raw '{}'
Migrating to the Latest Mule 3 Version
If you are not ready to migrate to Mule 4 and you need to migrate to the latest version of Mule 3, see xref:release-notes::mule-runtime/updating-mule-versions.adoc[Upgrading Mule Runtime Engine(Versions 3.x to 3.n).
Carefully review the release notes for the Mule version to which you are migrating. When you start the new Mule runtime with the same application pointing to the same API instance, your existent API is instantly managed with the latest Mule 3.x version. You do not need to perform any additional steps in API Manager.


