Technical Guidelines for Connector Certifications
-
Set up your development environment using these sections from Getting Started with the Mule SDK:
-
Create or migrate your connector:
-
If you are a partner or developer, create a Mule 4 connector.
-
Run this command:
mvn org.mule.extensions:mule-extensions-archetype-maven-plugin:generate -
Complete the configuration through the console:
-
Provide the name of your extension, for example:
cookbook -
When you receive a request for the
groupId, accept the default. -
Specify the
artifactIdof your extension, for example:cookbook-connector -
Specify the version of your extension.
If this is your first connector, use
1.0.0. If not, create the major version from your last connector. For example, the latest version of AS/400 Connector isv1.0.2for Mule 3. For Mule 4, the connector version isv2.0.0. -
When you receive a request for the main package of your extension, accept the default.
-
-
-
If you want to migrate existing Mule 3 connectors to Mule 4, use a migration tool:
-
Change your Devkit
versionas follows:<parent> <groupId>org.mule.tools.dmt</groupId> <artifactId>mule-dmt</artifactId> <version>1.0.0</version> </parent>
Note that
0.9.0is a beta version of the Migration tool. See the FAQ for details. -
Use the
mvn clean package -Dmaven.test.skipcommand.The generated Mule 4 extension appears in the target folder.
-
If the migration tool reports errors indicating that it cannot auto-migrate parts of your connector, resolve these errors before continuing.
-
-
-
Update your
pom.xmlfile:-
Locate these
<parent/>settings:<parent> <groupId>org.mule.extensions</groupId> <artifactId>mule-modules-parent</artifactId> <version>1.0.0</version> </parent>
-
Change the settings to this:
<parent> <groupId>org.mule.connectors</groupId> <artifactId>mule-certified-parent</artifactId> <version>1.1.0</version> </parent>
-
-
Add one of the following sets of annotations to your
Extension.java:-
For MuleSoft Certified Connectors (Free):
Example: Annotations for Azure Storage@Extension(name = “Azure Storage”, category = CERTIFIED, vendor = “Whishworks") @RequiresEnterpriseLicense(allowEvaluationLicense = true) -
For MuleSoft Certified Connectors (Additional Fee):
Example: Annotations for SAP Hybris@Extension(name = “SAP Hybris”, category = CERTIFIED, vendor = “Admios") @RequiresEnterpriseLicense @RequiresEntitlement(name = “sap-hybris-connector")
-
-
Set the connector icon. See Add a Custom Icon to Your Connector.
-
Add a folder for
demo. -
Add
License.mdif it is not in the root folder already:About MuleSoft Certified Connectors MuleSoft Certified Connectors are developed by MuleSoft’s partners and developer community. These connectors have been reviewed and certified by MuleSoft. To purchase the [Connector Name] Connector or to receive assistance or support for it, contact [Partner Name] directly at [Contact Information]. MuleSoft disclaims any support obligation for MuleSoft Certified Connectors. By installing this connector, you consent to MuleSoft sharing your contact information with the developer of this connector so that you can receive more information about it directly from the developer. Your license termsYou can develop or add operations to your connector by following the Mule SDK documentation.
After you complete the preceding steps, the structure of your connector is ready for Mule 4.
-
Add unit, functional, and integration test cases for your connectors by following Testing Your Module.
Note that your connector needs test coverage of at least 65%.
-
Add your connector to Connectivity Assets Manager.
You can use your existing account for Connectivity Assets Manager. If you do not have an account, contact MuleSoft.
FAQ
Is there a kit or tool for migrating DevKit to Mule 4 SDK?
-
Yes. The migration tool will be available for its GA in Q2, 2018. You can use the beta version in the meantime.
<parent>
  <groupId>org.mule.tools.dmt</groupId>
  <artifactId>mule-dmt</artifactId>
  <version>1.0.0</version>
</parent>
Where is a sample SDK connector project?
-
The steps described in this guide let you create a structure of a connector project. Until Cookbook Connector is updated, you can use Slack Connector as an example. See mulesoft/slack-connector.
How can I import a project into Studio 7, and how can I test and add it to Studio?
-
Functionality for importing a connector project into Studio 7 is not available at this time.
You can install your connector to Studio 7 using this command to create a connector for use in Studio 7:
mvn clean installSee Installation Example for detailed steps.
Can a module recognize that it is being executed from Studio as opposed to on premises or in Runtime Manager, or are there any related concerns?
Background: If a connector has a custom license code based on the target AS/400 server serial numbers, the license check is performed dynamically as the connection is established. MuleSoft allows customers to evaluate the connector within Studio without a license. However, the connector does not work when running on premises or in Runtime Manager.
Answer:
-
Custom license code will not be enforced in Runtime Manager. MuleSoft recommends that you use the license validation supported natively by Mule 4 SDK. You can find more information in Module Licensing.
-
In your
xxxExtension.java, add the following annotations to use the license validation from Mule 4 SDK. This example uses SAP Hybris Connector built by Admios:Example: MuleSoft Certified Connectors (Additional Fee)@RequiresEnterpriseLicense @RequiresEntitlement(name = “sap-hybris-connector")
Installation Example
This example supplements the FAQ, How can I import a project into Studio 7, and how can I test and add it to Studio?.
You can install your connector to Studio 7 using this command to create a connector for use in Studio 7:
-
Run
mvn clean install.This example shows the
cookbookconnector installation to a local Maven repository:[INFO] No primary artifact to install, installing attached artifacts instead. [INFO] Installing /Users/me/Downloads/mule4SampleConnector/cookbook-connector/pom.xml to /Users/me/.m2/repository/org/mule/extension/cookbook-connector/1.0.0/cookbook-connector-1.0.0.pom [INFO] Installing /Users/me/Downloads/mule4SampleConnector/cookbook-connector/target/temporal-extension-model.json to /Users/me/.m2/repository/org/mule/extension/cookbook-connector/1.0.0/cookbook-connector-1.0.0-extension-model-4.0.0.json [INFO] Installing /Users/me/Downloads/mule4SampleConnector/cookbook-connector/target/cookbook-connector-1.0.0-mule-plugin.jar to /Users/me/.m2/repository/org/mule/extension/cookbook-connector/1.0.0/cookbook-connector-1.0.0-mule-plugin.jar [NOTE] --- [INFO] BUILD SUCCESS [NOTE] --- [INFO] Total time: 35.057 s [INFO] Finished at: 2018-01-11T17:10:50-08:00 [INFO] Final Memory: 49M/476M [NOTE] --- -
Create a Mule project in Studio 7, and open
pom.xmlfor this project in Studio 7.
-
Add a dependency setting (
<dependency/>) for your connector to thepom.xml.For example, the following
<dependency/>enables Studio 7 to find thecookbook-connectorinstalled in a local Maven repository:<dependency> <groupId>org.mule.extension</groupId> <artifactId>cookbook-connector</artifactId> <version>1.0.0</version> <classifier>mule-plugin</classifier> </dependency>
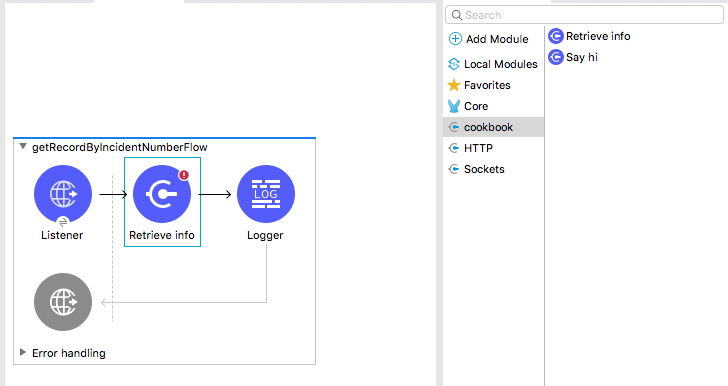
Your connector will now appear the palette. This example shows a Cookbook connector in the Studio palette: