NetSuite OpenAir Connector
Select
Anypoint Connector for NetSuite OpenAir is a closed source enterprise connector which provides a connection between OpenAir and third-party software. The OpenAir connector is a SOAP-based connector developed with Anypoint Connector DevKit 3.8.1.
Read through this user guide to understand how to set up and configure a basic flow using the connector. Track feature additions, compatibility, limitations and API version updates with each release of the connector using the OpenAir Connector Release Notes. Review the connector operations and functionality using the Connector API Doc Technical Reference and demo applications.
MuleSoft maintains this connector under the Select support policy.
Before You Begin
To use this connector, you need:
-
A NetSuite OpenAir instance
-
A set of valid credentials, including username, password, companyID, api namespace and key.
-
A MuleSoft Enterprise License
This document assumes that you are familiar with Mule, Anypoint Connectors, and Anypoint Studio Essentials. To increase your familiarity with Studio, consider completing one or more Basic Studio Tutorial. This page assumes you understand Mule Concepts, Elements in a Mule Flow, and Global Elements.
|
We recommend you use the NetSuite OpenAir SOAP API Guide as you familiarize yourself with the connector. OpenAir "complex types" are limited to a set of OpenAir operations.
See the OpenAir guide to see the object types. You can see, for example, that object |
To Install this Connector
-
In Anypoint Studio, click the Exchange icon in the Studio taskbar.
-
Click Login in Anypoint Exchange.
-
Search for the connector and click Install.
-
Follow the prompts to install the connector.
When Studio has an update, a message displays in the lower right corner, which you can click to install the update.
To use the OpenAir connector in a production environment, you must have an Enterprise license to use Mule. Contact the MuleSoft Sales Team to obtain either of these. Read more about Installing an Enterprise License.
Hardware and Software Requirements
For hardware and software requirements, visit Mule Hardware and Software Requirements page.
Connector Namespace and Schema
When designing your application in Studio, the act of dragging the connector from the palette onto the Anypoint Studio canvas should automatically populate the XML code with the connector namespace and schema location.
If you are manually coding the Mule application in Studio’s XML editor or other text editor, paste the Namespace and Schema Location into the header of your Configuration XML, inside the <mule> tag.
Namespace
xmlns:openair="http://www.mulesoft.org/schema/mule/openair"
Schema Location
xsi:schemaLocation="
...
http://www.mulesoft.org/schema/mule/openair http://www.mulesoft.org/schema/mule/openair/current/mule-openair.xsd
..."
<mule xmlns:connector="http://www.mulesoft.org/schema/mule/openair"
...
xsi:schemaLocation="http://www.mulesoft.org/schema/mule/openair http://www.mulesoft.org/schema/mule/connector/current/mule-openair.xsd">
...
<flow name="yourFlow">
...
</flow>
</mule>Using the Connector
| See the full list of operations for the latest version of the connector here. |
Configuring the Global Element
To use the OpenAir connector in your Mule application, configure a global OpenAir element that can be used by the OpenAir connector (read more about Global Elements.) The OpenAir connector offers one global configuration, requiring the following credentials: Username, Password, Company ID, API Namespace, and API Key.
| Field | Description |
|---|---|
Username |
Enter the username to log in to OpenAir. |
Password |
Enter the corresponding password. |
Company ID |
Enter the provided companyID. |
API Namespace |
Enter the API Namespace provided by NetSuite OpenAir. |
API Key |
Enter the APIKey provided by NetSuite OpenAir |
Connection Timeout |
Default: 300 |
Read Timeout |
Default: 270 |
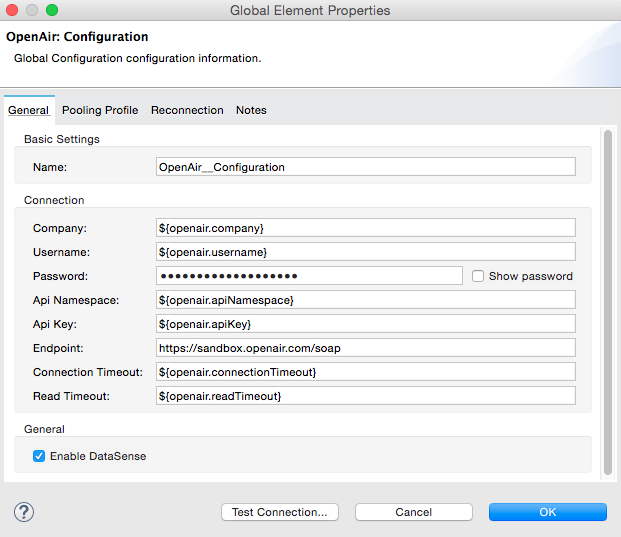
To configure the OpenAir global element:
-
Ensure you have included the following namespace in your configuration file:
xmlns:openair="http://www.mulesoft.org/schema/mule/openair"
-
Create a global OpenAir configuration outside and above your flows, using the following global configuration code:
<openair:config name="OpenAir__Configuration" company="${openair.company}" username="${openair.username}" password="${openair.password}" apiNamespace="${openair.apiNamespace}" apiKey="${openair.apiKey}" doc:name="OpenAir: Configuration"/>
|
To enable the automatic Reconnection feature:
After adding the Reconnection feature, the Configuration XML code should look like this: |
Adding the OpenAir Connector to a Flow
-
Drag and drop the OpenAir connector onto the canvas, then select it to open the properties editor.
-
Configure the connector’s parameters by:
-
Selecting the OpenAir Configuration created earlier.
-
Select the operation from the Operation dropdown e.g. Add.
-
Select the
oaObjectto add to your NetSuite OpenAir instance, and the metadata gets generated consequently. -
Set the "Request Reference" to
#[payload].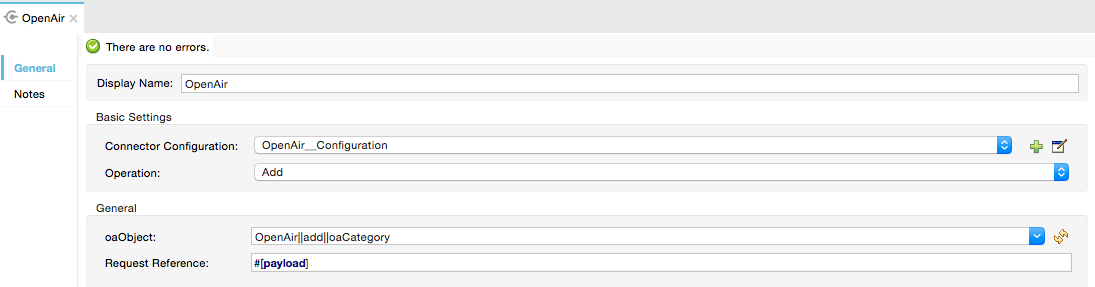
-
-
Save your configurations.
Using the Connector in a Mavenized Mule App
If you are coding a Mavenized Mule application, this XML snippet must be included in your pom.xml file.
<dependency>
  <groupId>com.mule.modules</groupId>
	<artifactId>openair-connector</artifactId>
	<version>x.x.x</version>
</dependency>
Replace x.x.x with the version that corresponds to the connector you are using.
To obtain the most up-to-date pom.xml file information, access the connector in Anypoint Exchange and click Dependency Snippets.
Demo Mule Applications Using Connector
Example Use Case
See the OpenAir connector "Add" operation in action.
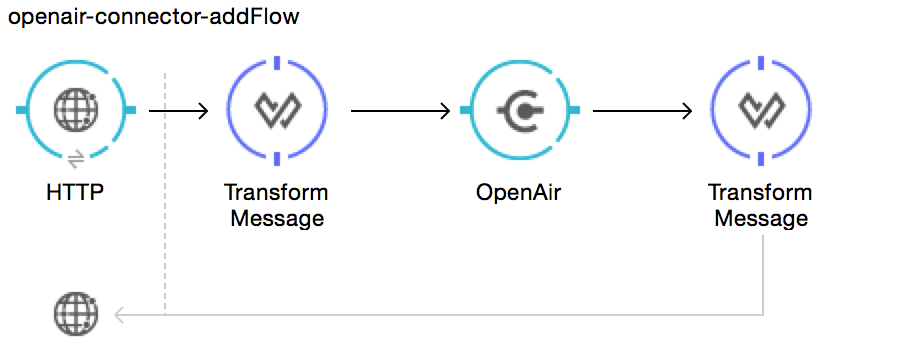
-
Create a new Mule Project in Anypoint Studio.
-
Drag and drop an HTTP Listener onto the canvas and configure it to listen on port 8081.
-
Drag and drop the OpenAir connector into the flow and configure the connector as described above. (The "Add" operation is selected as the demonstrated operation for this use case.)
-
Drag and drop a Transform Message component between the HTTP connector and the OpenAir connector.
-
Inside the component insert the DataWeave code below into the DataWeave editor. The script adds both oaCustomer objects to your NetSuite OpenAir instance.
%dw 1.0 %output application/xml %namespace ns0 http://namespaces.soaplite.com/perl --- { ns0#ArrayOfoaBase: { oaBase: { oaCustomer: { name: "James Bond", company: "MuleSoft" }, oaCustomer: { name: "John Doe", company: "Pepsi" } } } } -
Drag and drop another Transform Message component after the OpenAir connector, and insert the DataWeave script below into the Transform Message component’s DataWeave editor. The script should return the IDs of the newly added OpenAir objects.
%dw 1.0 %output application/json %namespace ns0 http://namespaces.soaplite.com/perl --- { ID1: payload.ns0#ArrayOfUpdateResult.*updateResult[0].id, ID2: payload.ns0#ArrayOfUpdateResult.*updateResult[1].id } -
Save and run the project as a Mule Application by right-clicking the project name in the Package Explorer, selecting Run As > Mule Application.
-
After hitting the HTTP endpoint you configured, your browser should display the following JSON:
{

    "ID1": "411",
    "ID2": "412"
}
Example Use Case Code
Paste this into Anypoint Studio to interact with the example use case application discussed in this guide.
<?xml version="1.0" encoding="UTF-8"?>

<mule xmlns:mulexml="http://www.mulesoft.org/schema/mule/xml"
	xmlns:http="http://www.mulesoft.org/schema/mule/http" xmlns:context="http://www.springframework.org/schema/context"
	xmlns:openair="http://www.mulesoft.org/schema/mule/openair" xmlns:dw="http://www.mulesoft.org/schema/mule/ee/dw"
	xmlns="http://www.mulesoft.org/schema/mule/core" xmlns:doc="http://www.mulesoft.org/schema/mule/documentation"
	xmlns:spring="http://www.springframework.org/schema/beans"
	xmlns:xsi="http://www.w3.org/2001/XMLSchema-instance"
	xsi:schemaLocation="http://www.springframework.org/schema/beans http://www.springframework.org/schema/beans/spring-beans-current.xsd
http://www.mulesoft.org/schema/mule/http http://www.mulesoft.org/schema/mule/http/current/mule-http.xsd
http://www.mulesoft.org/schema/mule/openair http://www.mulesoft.org/schema/mule/openair/current/mule-openair.xsd
http://www.springframework.org/schema/context http://www.springframework.org/schema/context/spring-context-current.xsd
http://www.mulesoft.org/schema/mule/ee/dw http://www.mulesoft.org/schema/mule/ee/dw/current/dw.xsd
http://www.mulesoft.org/schema/mule/core http://www.mulesoft.org/schema/mule/core/current/mule.xsd
http://www.mulesoft.org/schema/mule/xml http://www.mulesoft.org/schema/mule/xml/current/mule-xml.xsd">

	<openair:config name="OpenAir__Configuration" company="${openair.company}" username="${openair.username}" password="${openair.password}" apiNamespace="${openair.apiNamespace}" apiKey="${openair.apiKey}"  connectionTimeout="${openair.connectionTimeout}" readTimeout="${openair.readTimeout}" doc:name="OpenAir: Configuration"/>
	<context:property-placeholder location="openair-credentials.properties" />
	<http:listener-config name="HTTP_Listener_Configuration"
	host="0.0.0.0" port="8081" doc:name="HTTP Listener Configuration" />

	<flow name="openair-connector-addFlow">
		<http:listener config-ref="HTTP_Listener_Configuration"
		path="/" doc:name="HTTP" />
		<dw:transform-message doc:name="Transform Message">
		<dw:set-payload resource="addRequest.dwl" />
		</dw:transform-message>
		<openair:add config-ref="OpenAir__Configuration" oaObject="OpenAir||add||oaCategory"
		doc:name="OpenAir" />
		<dw:transform-message doc:name="Transform Message">
		<dw:set-payload resource="addResponse.dwl" />
		</dw:transform-message>
</flow>
</mule>
See Also
-
Learn more about working with Anypoint Connectors.