Using Anypoint Studio to Configure ServiceNow Connector
Studio editors help you design and update your Mule applications, properties, and configuration files.
To configure a connector in Anypoint Studio:
-
Create a Mule project.
-
Supply your authentication credentials to Anypoint Platform.
-
Add the connector to your Mule project.
-
Configure an input source for the connector’s flow.
-
Configure the connector.
Best Practices
Follow these best practices when you configure an input source and connector in Studio:
-
Configure an associated global element for the input source and connector.
-
Create a YAML or properties file to contain your properties, and then reference the file from the configuration.
-
Configure a reconnection strategy for the input source and target connector.
Add the Connector to Your Project
Add ServiceNow Connector to a Mule project both to automatically populate the XML code with the connector’s namespace and schema location and to add the required dependencies to the project’s pom.xml file.
-
In Studio, create a Mule project.
-
In the Mule Palette view, click (X) Search in Exchange.
-
In Add Modules to Project, type "servicenow" in the search field.
-
Click the ServiceNow Connector name in Available modules.
-
Click Add.
-
Click Finish.
Adding a connector to a Mule project in Studio does not make that connector available to other projects in your Studio workspace.
Configure the Connector
The ServiceNow Connector supports Basic and OAuth2 authentications. Select the authorization type to use from the Connection drop-down list.

Basic Authentication
-
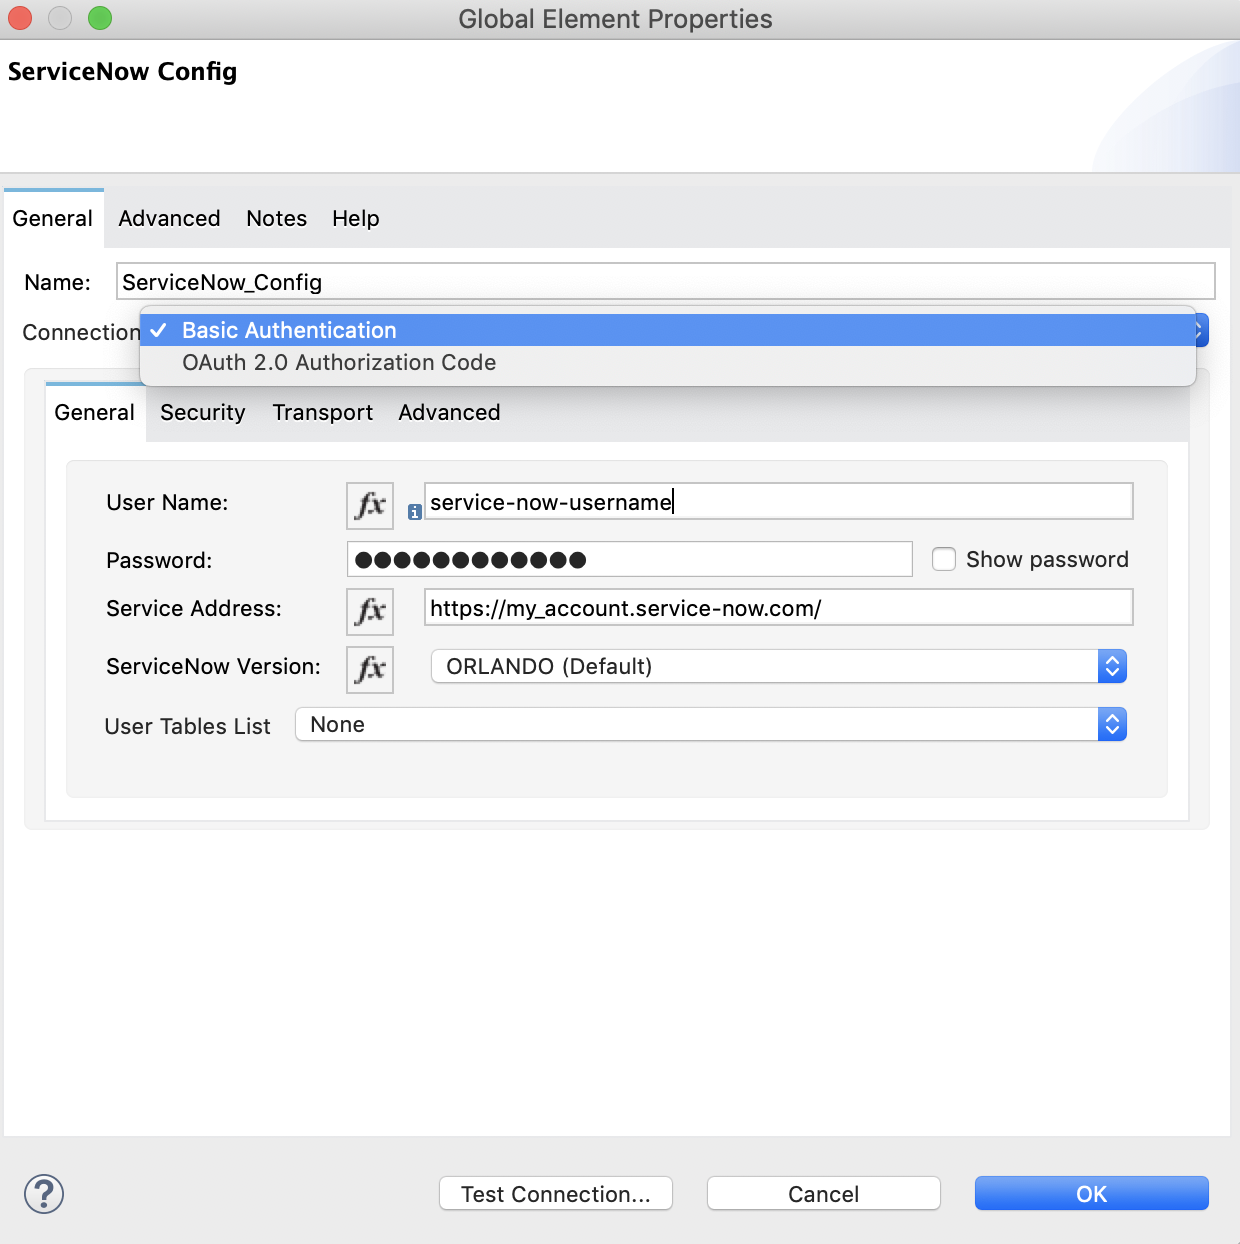
In the ServiceNow Config General tab, select Basic Authentication from the Connection drop-down list.
-
Provide the following values for Basic authentication:
| Field | Description |
|---|---|
Username |
Name used to log in to ServiceNow |
Password |
Password that corresponds to the user name |
Service Address |
The WSDL endpoint |
ServiceNow Version |
The ServiceNow version to use |
User table list |
Custom tables for a user who is logged in |
Basic Authentication HTTP Message Dispatcher Provider
-
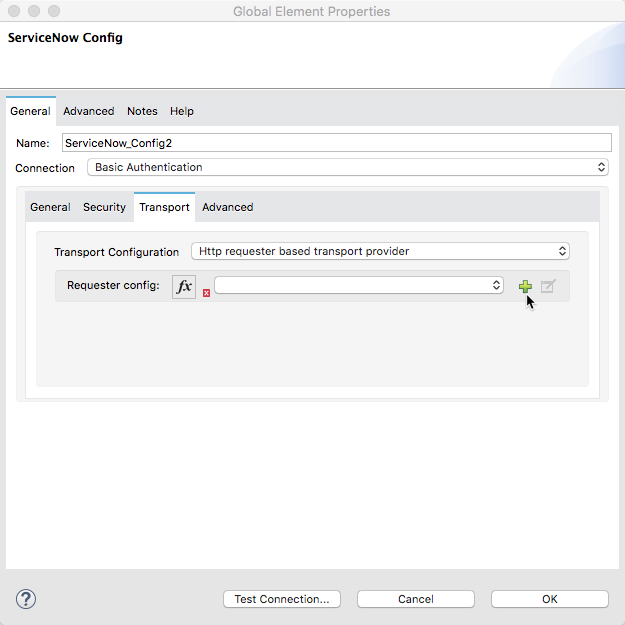
Click the Transport tab.
-
From Transport Configuration, select Basic auth http message dispatcher provider.
-
Enter the following required values:
| Field | Description |
|---|---|
User Name |
Name used to log in to ServiceNow |
Password |
Password that corresponds to the user name |
Basic Authentication HTTP Requester Based Transport Provider
-
Click the Transport tab.
-
From Transport Configuration, select Http requester based transport provider.
-
Select the Requester config or click the green plus sign to create a new one.

-
Specify the required values:
| Field | Description |
|---|---|
Host |
The WSDL endpoint |
Username |
User name for logging in to ServiceNow |
Password |
Password that corresponds to the user name |
OAuth2.0 Authentication
-
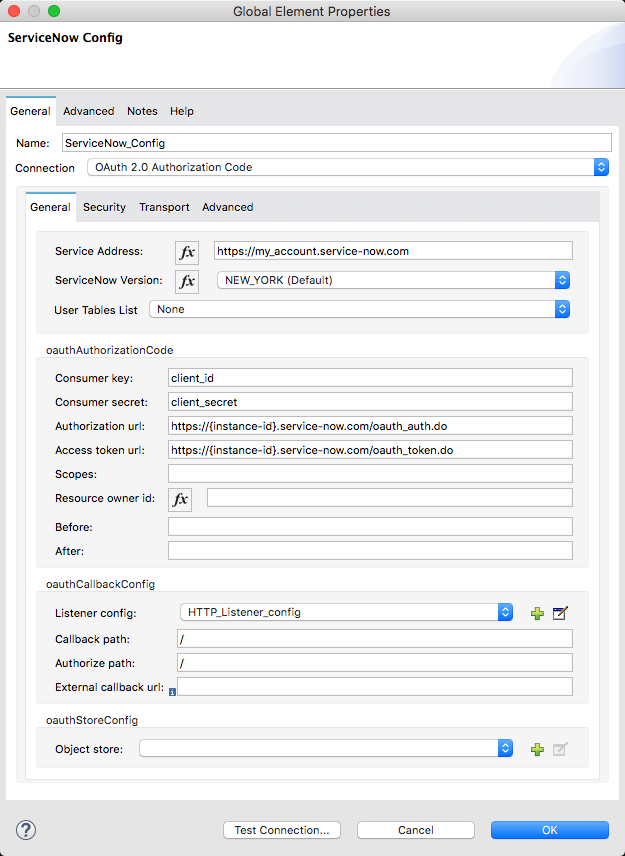
In the ServiceNow Config General tab, select OAuth 2.0 Authorization Code from the Connection drop-down list.
-
Specify the values for the OAuth connection:

| Field | Description |
|---|---|
Service Address |
ServiceNow’s instance endpoint. |
Consumer key |
Client ID from the registered application. |
Consumer secret |
Client secret from the registered application. |
Authorization url |
Endpoint for initiating the OAuth dance. |
Access token url |
Endpoint for retrieving the access token. |
Listener config |
HTTP Listener configuration. |
Callback path |
The path of the access token callback endpoint. |
Authorize path |
The path of the local HTTP endpoint that triggers OAuth dance. |
External callback url |
If the callback endpoint is behind a proxy or should be accessed through a non-direct URL, use this parameter to specify the URL the OAuth provider should use to access the callback. |
Configure an Input Source
Because ServiceNow operations can’t be used as input sources, you must configure the input source by using an HTTP Listener or Scheduler component:
-
HTTP Listener
Start your app using a browser or a command such ascurl. -
Scheduler
Start your app at timed intervals.
In Studio, drag the input operation you choose from the Mule Palette to the canvas.
Next Step
After configuring ServiceNow Connector in Studio, see the Examples to experiment with the connector.


