
Using Anypoint Studio to Configure Web Service Consumer 2.2
Anypoint Studio (Studio) editors help you design and update your Mule applications, properties, and configuration files.
To add and configure a connector in Studio:
When you run the connector, you can view the app log to check for problems, as described in View the App Log.
If you are new to configuring connectors in Studio, see Using Anypoint Studio to Configure a Connector. If, after reading this topic, you need additional information about the connector fields, see the Web Service Consumer Connector Reference.
Create a Mule Project
In Studio, create a new Mule project in which to add and configure the connector:
-
In Studio, select File > New > Mule Project.
-
Enter a name for your Mule project and click Finish.
Add the Connector to Your Mule Project
Add Web Service Consumer Connector to your Mule project to automatically populate the XML code with the connector’s namespace and schema location and add the required dependencies to the project’s pom.xml file:
-
In the Mule Palette view, click (X) Search in Exchange.
-
In Add Dependencies to Project, type
web service consumerin the search field. -
Click Web Service Consumer in Available modules.
-
Click Add.
-
Click Finish.
Adding a connector to a Mule project in Studio does not make that connector available to other projects in your Studio workspace.
Configure a Source
An input source initiates a flow when a specified condition is met.
For example, to configure HTTP Listener, follow these steps:
-
In the Mule Palette view, select HTTP > Listener.
-
Drag Listener to the Studio canvas.
-
On the Listener configuration screen, optionally change the value of the Display Name field.
-
Specify a value for the Path field.
-
Click the plus sign (+) next to the Connector configuration field to configure a global element that can be used by all instances of
HTTP Listenerin the app. -
On the General tab, specify connection information.
-
On the TLS tab, optionally specify TLS information.
-
On the Advanced tab, optionally specify reconnection information, including a reconnection strategy.
-
Click Test Connection to confirm that Mule can connect with the specific server.
-
Click OK.
Add a Connector Operation to the Flow
When you add a connector operation to your flow, you immediately define a specific operation for that connector to perform.
To add the Consume operation to Web Service Consumer Connector, follow these steps:
-
In the Mule Palette view, select Web Service Consumer and then select the Consume operation.
-
Drag the operation onto the Studio canvas to the right of the input source.

Configure a Global Element for the Connector
When you configure a connector, it’s best to configure a global element that all instances of that connector in the app can use. To consume a SOAP web service operation, you need to create a configuration that points to the service that you want to consume.
To configure the global element for Web Service Consumer Connector, follow these steps:
-
Select the name of the connector in the Studio canvas.
-
In the Basic Settings section of the General tab, click the plus sign (+) next to the Connector configuration field to access the global element configuration fields.
-
In the Connection section of the General tab, configure the following parameters:
-
WSDL location
The remote or local WSDL file URL -
Service
The service name -
Port
The port name -
Address
The address of the web server to dispatch requests if the Service and Port parameters did not automatically provide this value.
-
Note that the WSDL location, Service, and Port parameters are mandatory for the configuration to be valid.
The following example shows how to configure the global element to get a list of flights by airline:
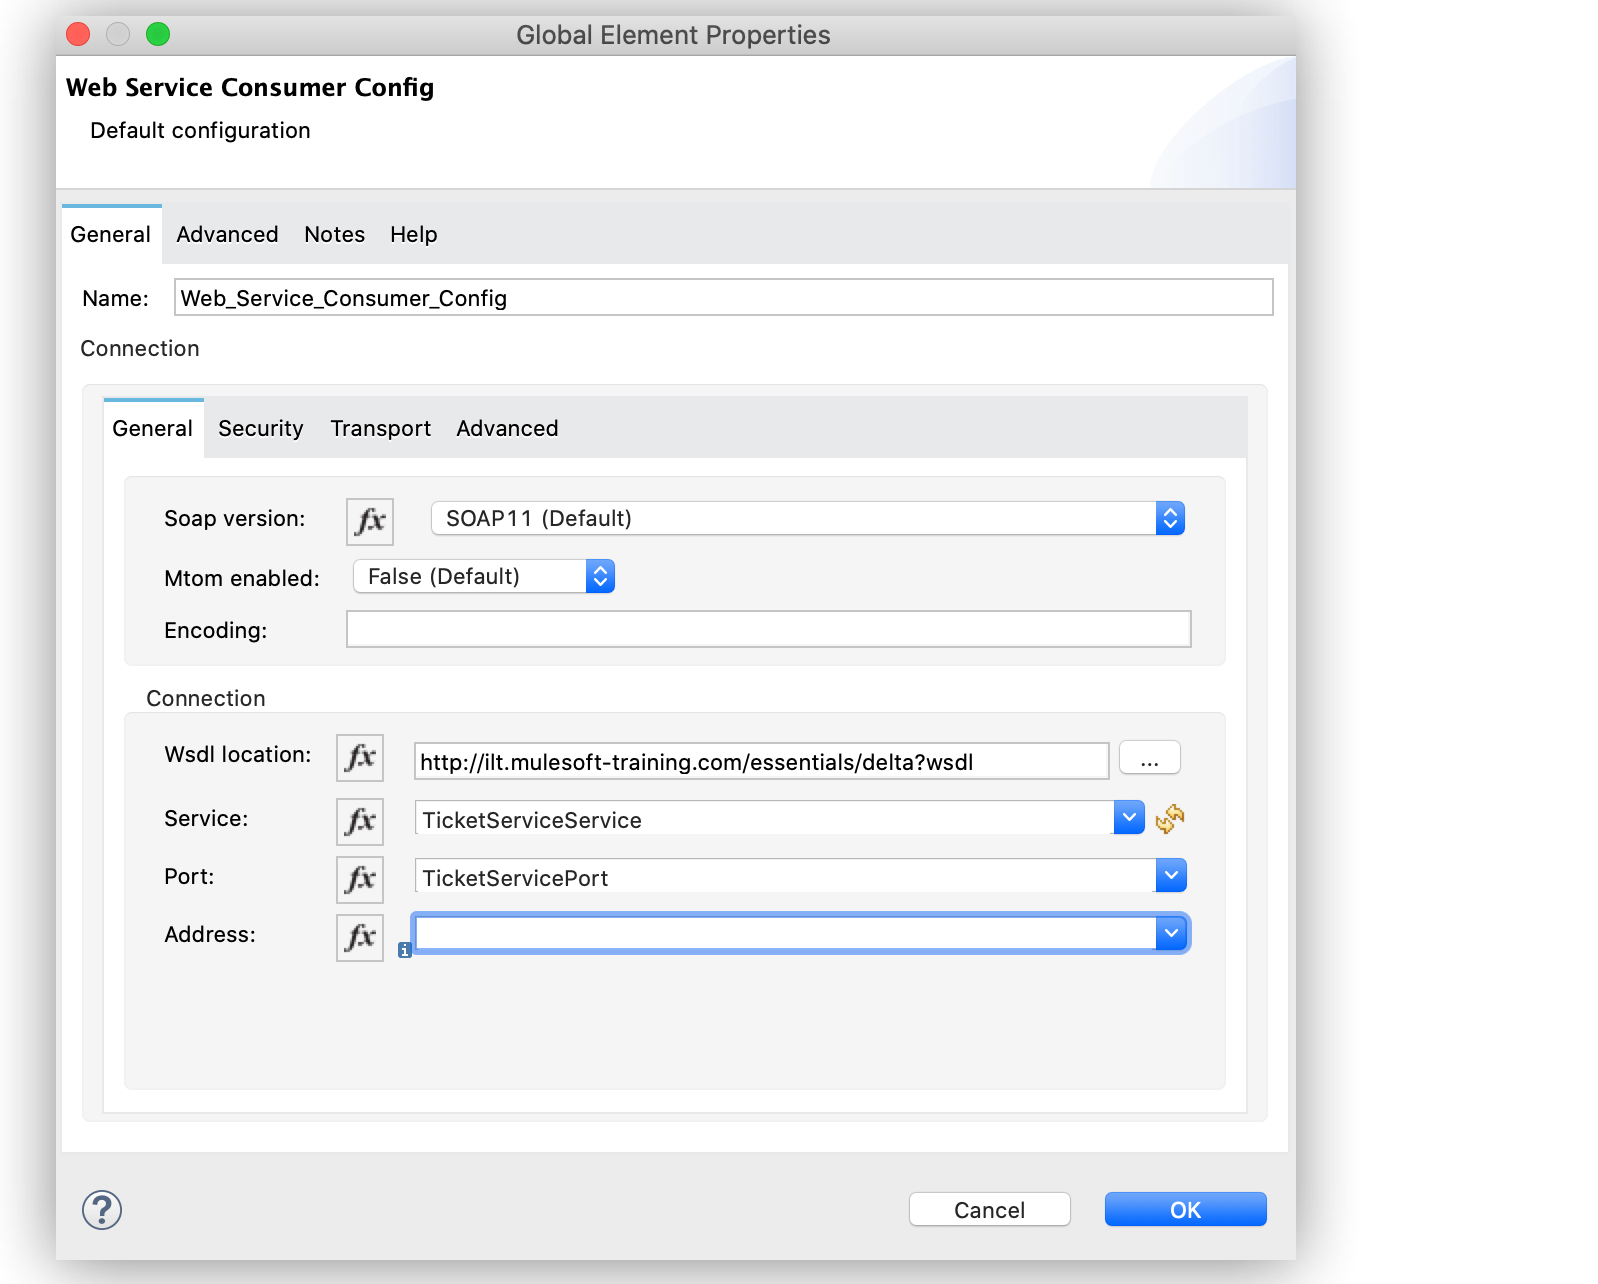
In the Configuration XML tab, the XML looks like this:
<wsc:config name="wsc">
  <wsc:connection
   wsdlLocation="http://ilt.mulesoft-training.com/essentials/delta?wsdl"
   service="TicketServiceService"
   port="TicketServicePort"/>
</wsc:config>
Configure Consume Operation
After you configure a global element for Web Service Consumer Connector, configure the Consume operation parameters, such as Operation, Message (Body, Headers, Attachments) and so on. Additionally, learn about the output of the Consume operation and metadata attributes used to dispatch messages.
Parameters
The Consume operation has two main parameters:
-
Operation
Defines which SOAP operation of the web service to invoke. During the design phase, the parameter defines the input and output types for the Consume operation. The types will change depending on which operation you choose. -
Message
A representation ofSOAP:ENVELOPcomposed of three optional parameters:-
Body
The XML body to include in the SOAP message, with all the required parameters, ornullif no parameters are required -
Headers
The XML headers to include in the SOAP message -
Attachments
The attachments to include in the SOAP request
-
To configure these parameters for the Consume operation, follow these steps:
-
Select the name of the connector in the Studio canvas.
-
In the General section of the Consume operation, define Operation, and in the Message section, define Body, Headers, and Attachments fields:
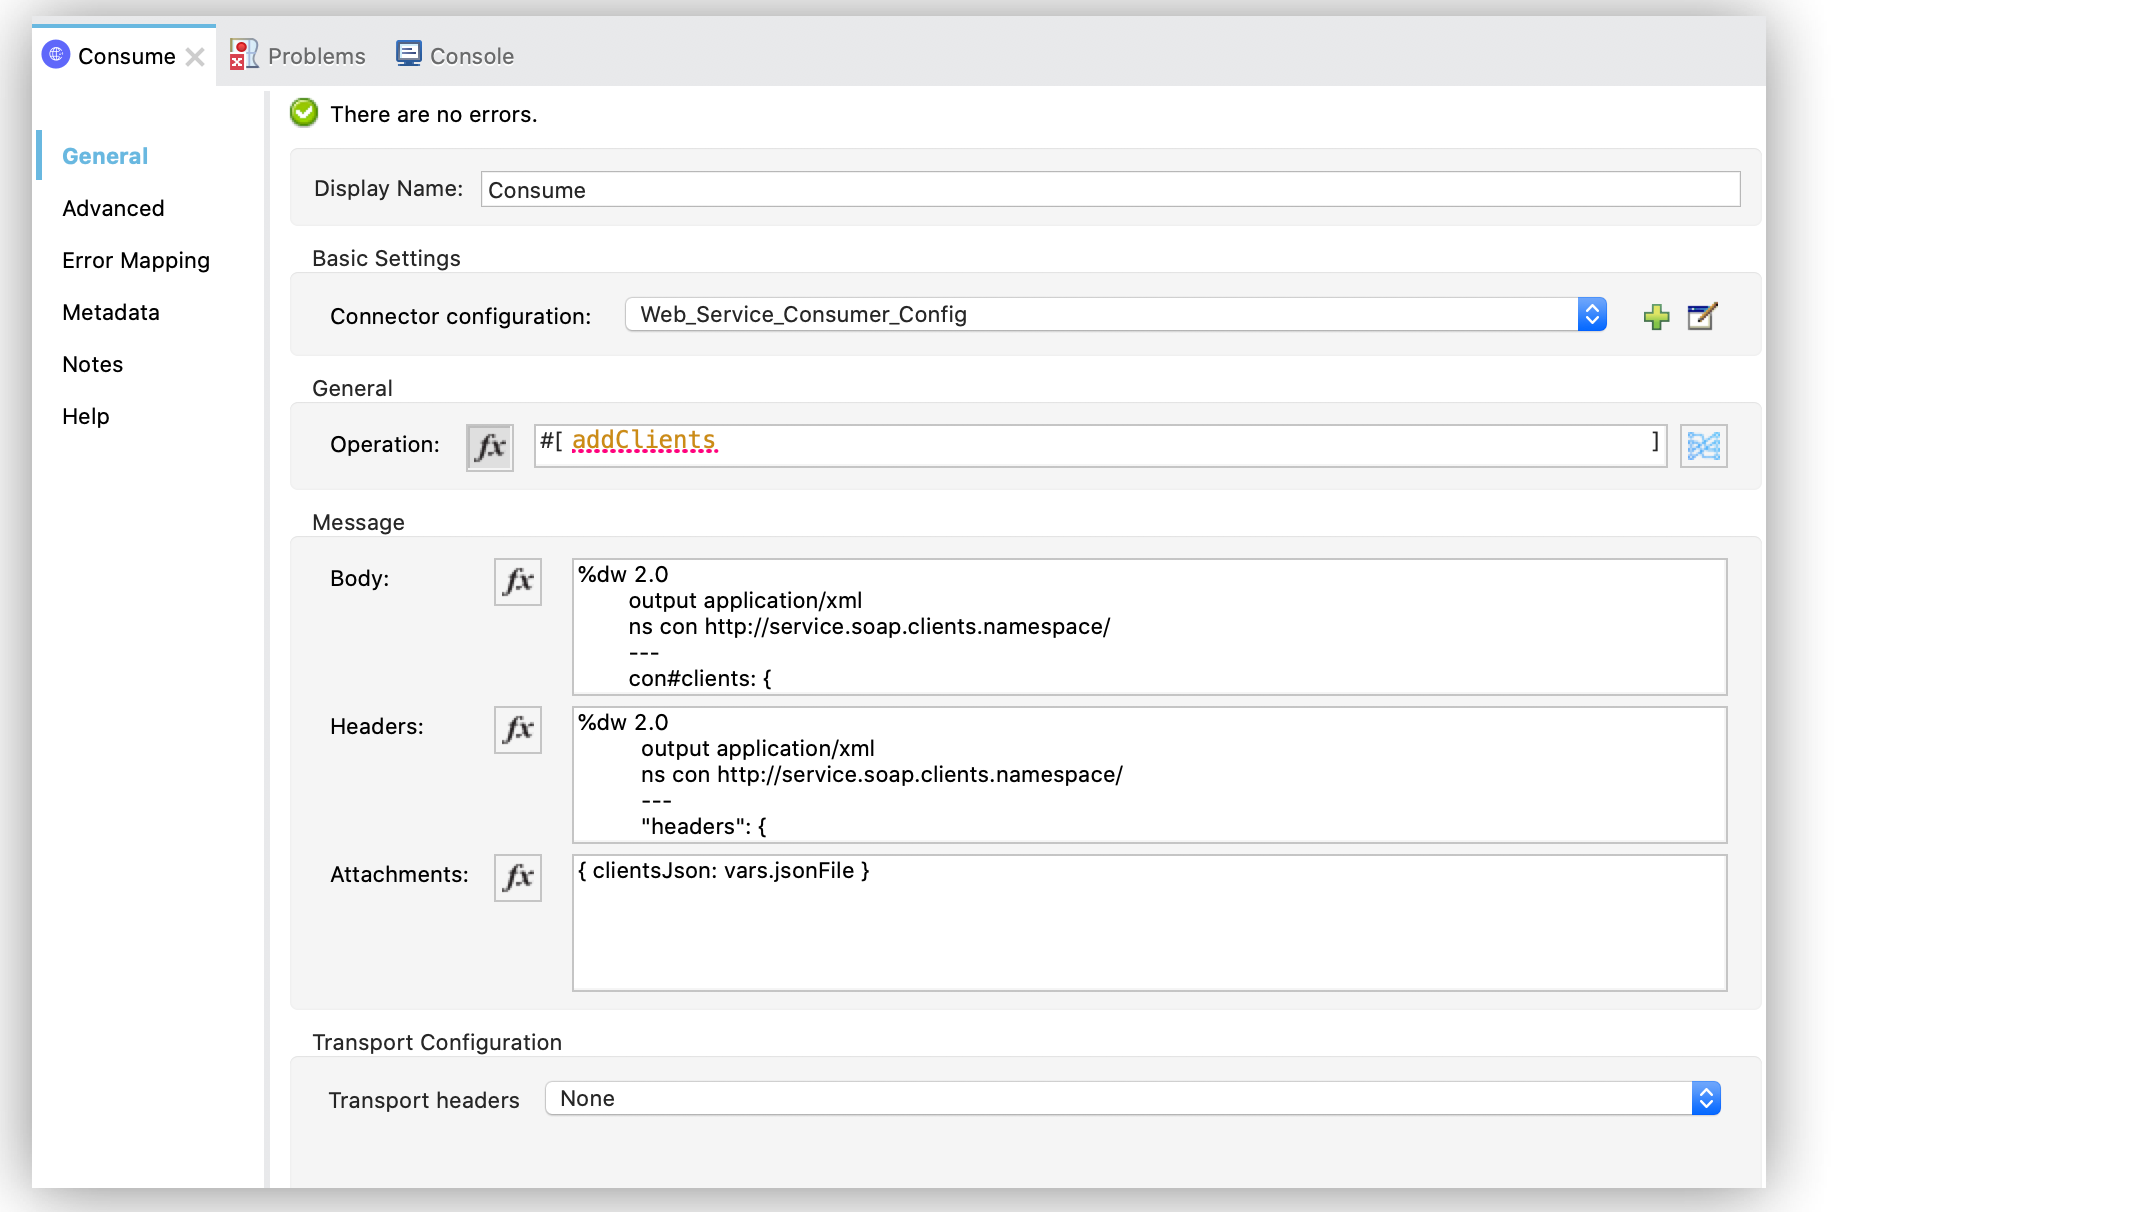
In the Configuration XML tab, a basic configuration for the Consume operation looks like this:
<wsc:consume config-ref="config" operation="addClients">
    <wsc:message>
        <wsc:body>#[payload]</wsc:body>
    </wsc:message>
</wsc:consume>
Body Parameter
The body parameter is the main part of the SOAP message. It accepts embedded DataWeave script values so expects that you can construct the XML request without having a side effect on the message or having to use multiple components to create the request. Some characteristics of the parameter include:
-
The default value is
#[payload], based on the assumption that the incoming payload is the XML entity ready to ship to the service. -
If the body is not valid XML, or if the request cannot be created for some reason, you get a
WSC:BAD_REQUESTerror. -
If you don’t provide body content, the Web Service Consumer Connector attempts to generate one, and this works only for cases where no XML entity is expected in the body.
-
Some web services require to append the XML prolog tag into the envelope’s body XML content, which contains the version and encoding information that identifies the document as being XML.
The following example shows a DataWeave expression inside the body parameter, and how to force the Web Service Consumer Connector to dispatch any payload by enabling the XML prolog option:
-
Select the name of the connector in the Studio canvas.
-
In the Body parameter field of the General tab, add the DataWeave expression.
-
In the Message Customization section of the Advanced tab, enable the option Force XML Prolog into body like this:
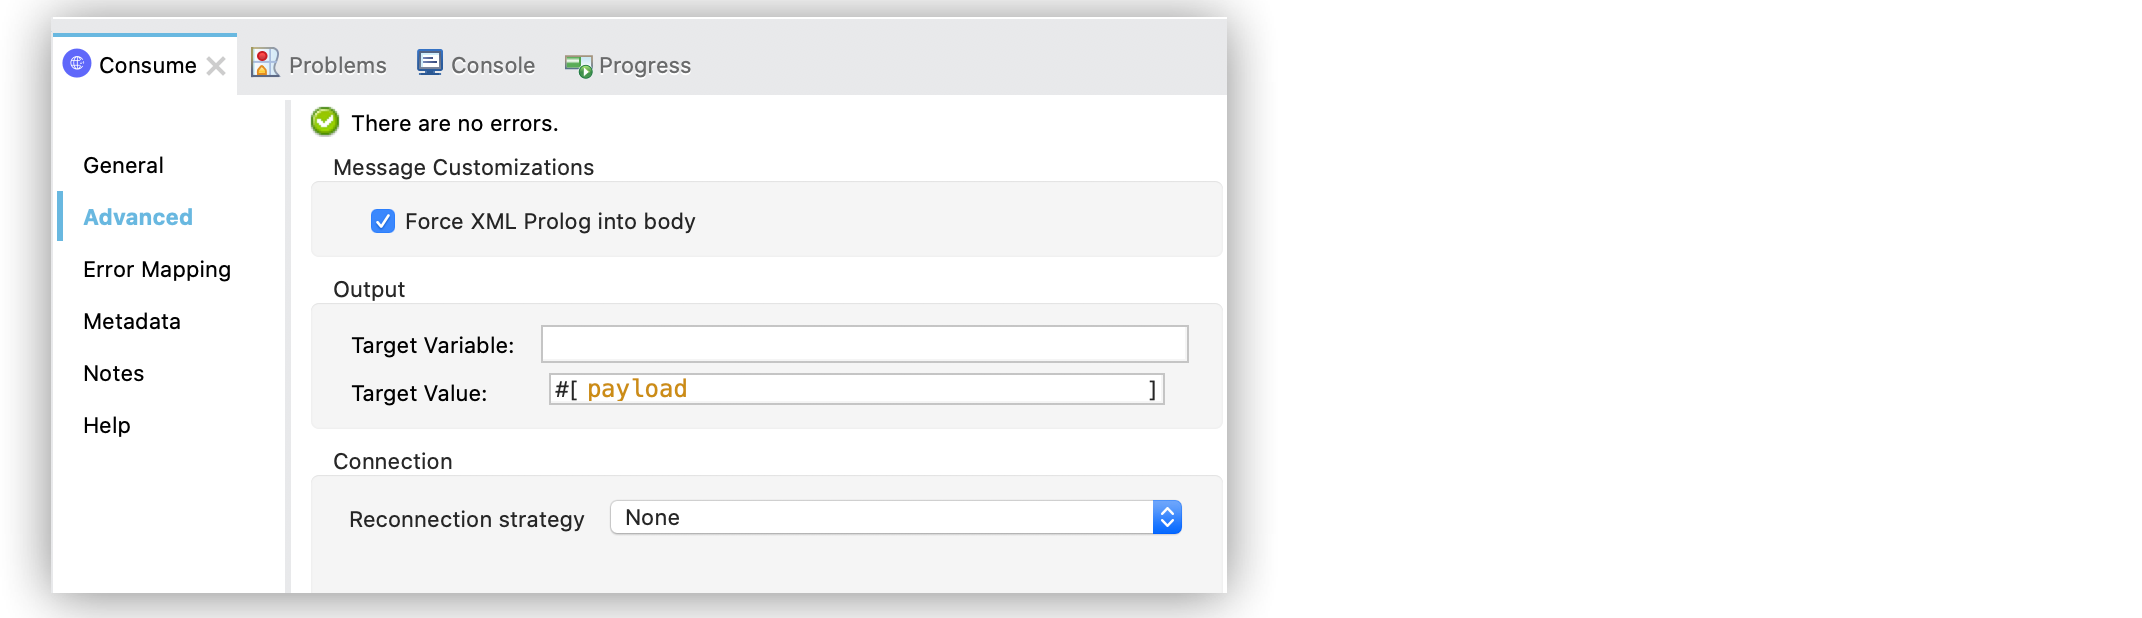
In the Configuration XML tab, the XML looks like this:
<wsc:consume config-ref="config" operation="addClients">
    <wsc:message>
        <wsc:body>
        #[
        %dw 2.0
        output application/xml
        ns con http://service.soap.clients.namespace/
        ---
        con#clients: {
            client: {
                name: "admin1",
                lastname: "textpassword1"
            },
            client: {
                name: "admin2",
                lastname: "textpassword2"
            }
        }]
        </wsc:body>
    </wsc:message>
    <wsc:message-customizations forceXMLProlog="true" />
</wsc:consume>
Headers Parameter
The headers parameter contains application-specific information about the SOAP message, such as authentication, payment, and so on. The parameter is an XML entity, that accepts an embedded DataWeave script as its value.
The following XML example shows a DataWeave expression inside the headers parameter:
<wsc:consume config-ref="config" operation="addClients">
    <wsc:message>
        <wsc:body>#[payload]</wsc:body>
        <wsc:headers>
          #[
          %dw 2.0
          output application/xml
          ns con http://service.soap.clients.namespace/
          ---
          "headers": {
              con#user: "admin",
              con#pass: "textpassword"
          }]
        </wsc:header>
    </wsc:message>
</wsc:consume>
Note that inside the DW script, the root must be "headers", otherwise, the following error returns while running the application:
Invalid input headers XML: It must be an xml with the root tag named \'headers\'.
Attachments Parameter
The attachments parameter enables you to bind attachments to the SOAP message. To create attachments for transport over SOAP, declare a DataWeave script in which each entry represents an attachment and the entry value provides the content of the attachment.
The following XML example shows a DataWeave expression inside the attachments parameter that declares a new attachment called clientsJson. The attachment value content is stored in the jsonFile variable. This variable can be set from a file:read operation:
<wsc:consume config-ref="config" operation="addClients">
    <wsc:message>
        <wsc:body>#[payload]</wsc:body>
        <wsc:attachments>
          #[{ clientsJson: vars.jsonFile } ]
        </wsc:attachments>
    </wsc:message>
</wsc:consume>
Output
The output of the Consume operation represents an incoming SOAP message that contains the same elements that the Message parameter has, and you can access each part of it.
The following XML example stores:
-
The content of the body in a
soap.bodyvariable -
The content of the header called
authin asoap.header.authvariable -
The content of an attachment called
jsonin asoap.attachment.jsonvariable
<flow name="output">
  <wsc:consume config-ref="config" operation="addClients">
      <wsc:message>
          <wsc:body>#[payload]</wsc:body>
      </wsc:message>
  </wsc:consume>
  <set-variable name="soap.body" value="#[payload.body]">
  <set-variable name="soap.header.auth" value="#[payload.headers.auth]">
  <set-variable name="soap.attachment.json" value="#[payload.attachments.json]">
</flow>
Attributes
When your app consumes a web service operation, you might be interested not only in the response content but also in the metadata of the underlying transport used to dispatch the messages. For example, when you use
HTTP, attributes carry HTTP headers bound to the HTTP request (content-length, status, and so on).
The Web Service Consumer Connector uses Mule message attributes to access this information.
View the App Log
To check for problems, you can view the app log as follows:
-
If you’re running the app from Anypoint Platform, the output is visible in the Anypoint Studio console window.
-
If you’re running the app using Mule from the command line, the app log is visible in your OS console.
Unless the log file path is customized in the app’s log file (log4j2.xml), you can also view the app log in the default location MULE_HOME/logs/<app-name>.log.
Next Step
After you configure a global element and connection information, configure the other fields for the connector. See Additional Configuration Information for more configuration steps.