WMQ Connector
The WMQ Connector connects to a WebSphere MQ server using the WMQ protocol. When you place the WMQ icon on the Studio canvas at the start of a flow, it serves as an Inbound Endpoint. If you place the WMQ icon anywhere else in your flow, WMQ functions as an Outbound Endpoint.
In both cases, the WMQ endpoint can be implemented for either a One-Way or a Request-Response exchange pattern.
Installation
You can install a connector in Anypoint Studio using the instructions in To Import an Asset from Exchange.
-
This connector is compatible with Mule 3.8 and later with IBM MQ 8 and 9.
-
Compatible drivers are those of WMQ 7.5, IBM MQ 8 and IBM MQ 9. (tested on drivers 7.5.0.2, 8.0.0.9, 9.0.0.4)
-
This connector was not tested using IBM MQ 8 or 9 on 3.7. This configuration may work, but is not supported.
Configuration
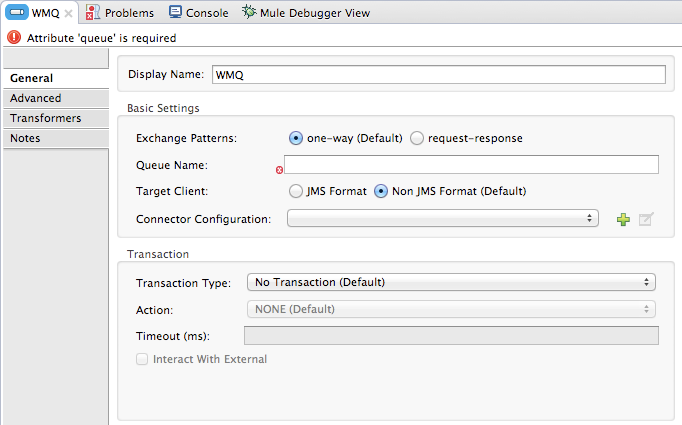
The properties editor for the WMQ endpoint provides fields that cover the complete range of configuration possibilities.
General Tab

| Field | Description |
|---|---|
Display Name |
Enter a display name that describes the endpoint’s role in your flow, such as "WMQ Message Receiver". |
Exchange Pattern |
Click anywhere in the text box labeled Exchange Pattern to display the drop-down list. Chose one of the valid choices: |
Queue Name |
Specify the WMQ queue to which the endpoint will connect |
Target Client |
Click one of the radio buttons to select JMS or non-JMS format. (non-JMS is the default.) |
Connector Configuration |
Click the green "plus" icon (+) to the right of the text box labeled Connector Configuration to specify a global connector to supply connection settings for this endpoint. Studio bundles two global connectors (WMQ and WMQ XA) for use with the WMQ endpoint. Typically, the XA connector is for "multi-resource transactions," (such as., you need your WMQ endpoint to talk to a JDBC connector or a JMS server). The WMQ connector is for transactions handled exclusively by WMQ, or when transactions are not implemented. |
Transaction Type |
By default, no transaction type is specified, but XA, WMQ, and multi-resource transactions are supported. Click anywhere within the Transaction Type text box to display the drop down menu listing all valid options. |
Action |
This field becomes active only if you first select one of the valid transaction types. NONE is the default. The valid choices are NONE, ALWAYS_BEGIN, BEGIN_OR_JOIN, ALWAYS_JOIN, and JOIN_IF_POSSIBLE. Click anywhere within the Action text box to display the drop down menu listing all valid options. |
Timeout |
This attribute is available on both inbound and outbound endpoints, but only when a transaction has been specified. When this field is activated, specify how long (in milliseconds) the outbound endpoint should wait for the WMQ server to acknowledge that the message sent by the endpoint has been placed on the queue. |
Interact with External |
This field becomes active only when XA Transaction has been selected as the Transaction Type. When you check the box, Mule will interact with transactions begun outside of Mule. For instance, Mule will join an external transaction when a) this attribute is set, and b) the Action attribute has been set to BEGIN_OR_JOIN. However, an exception will be thrown when Action has been set to ALWAYS_BEGIN, because the external transaction is already in progress, and, by definition, cannot be started by Mule. |
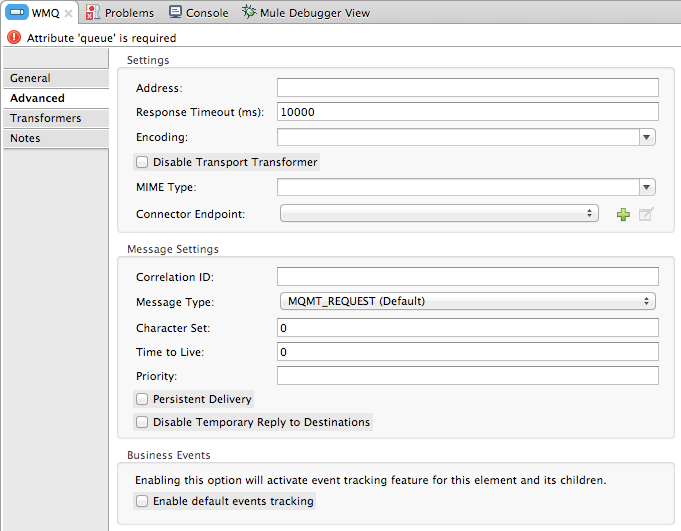
Advanced Tab

| Field | Description |
|---|---|
Address |
The generic address for this endpoint, specified in the form of a URI containing the protocol in use. |
Response Timeout |
The timeout period to wait for a response after making a synchronous endpoint call. |
Encoding |
The type of string encoding (such as |
Disable Transport Transformer |
Check this box to prevent this endpoint from using any default transformer that might already be configured on the endpoint’s associated global connector. |
MIME Type |
Click anywhere within the associated text box to display the list of valid MIME types that can be configured for this endpoint. |
Connector Endpoint |
Click the green "plus" icon (+) to the right of the text box labeled Endpoint Reference to specify a global endpoint to supply settings for this endpoint. Studio bundles the WMQ global endpoint that you can configure and subsequently use as a "write once, use repeatedly" template for all your WMQ endpoint instances. |
Correlation ID |
Enter a Correlation ID string to link two messages (such as, a request message and its response message). Typically, you specify the prefix |
Message Type |
Click anywhere within the text box to display the drop-down menu of all valid choices: MQMT_REQUEST, MQMT_DATAGRAM, MQMT_REPLY, and MQMT_REPORT. Select an option from the list. MQMT_REQUEST is the default. |
Character Set |
Set this attribute to 1 ( |
Time to Live |
Specify a value, in milliseconds for Mule to retain a processed message, starting from the moment it was dispatched to the queue. The default value is |
Priority |
Specify on a scale of 0-9, the priority WMQ should place on delivering the current message. 0-4 fall into the gradated range of "normal" priority, while 5-9 qualify for "expedited" delivery. |
Persistent Delivery |
Check this box so that WMQ simultaneously sends the current message and also logs it to stable (such as, "persistent") storage so that if delivery is unsuccessful, the stored copy of the message can be recovered for another delivery attempt. This attribute is unchecked by default. |
Disable Temporary Reply to Destinations |
Check this box to prevent Mule from waiting for a message receipt acknowledgement from a temporary destination. This attribute is unchecked by default. |
Enable default events tracking |
Enable default business event tracking for this endpoint. |
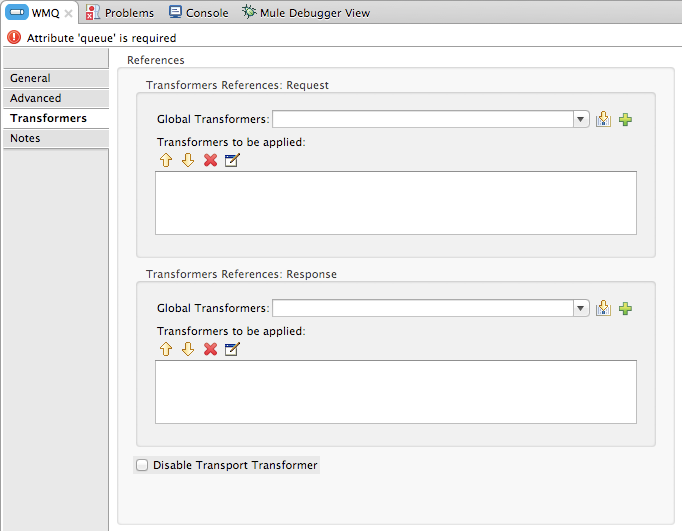
Transformers Tab

| Field | Description |
|---|---|
Global Transformers (Request) |
Click the green plus icon to the right of the text box labeled Global Transformers, then select from the drop-down menu a transformer to be applied when a message is received from the incoming transport. After the Properties pane appears for the transformer you selected, configure the available fields, as necessary. (Most transformers require minimal or no configuration). Click OK to complete the operation. Click the green down arrow next to the plus icon to transfer the connector from the Global Transformers text box to the Transformers to be applied list. After you have placed all the transformers you want to use into the transformers list, arrange the items into the order you want them applied by clicking on a transformer, then click the up and down arrows to re-position the transformer within the list. Repeat until you are satisfied with the sequence. You can also select a transformer you want to edit from the Transformers to be applied list, then click the pencil icon, which is on the same line as the up and down arrows. |
Global Transformers (Response) |
Repeat the process described immediately above, this time creating a sequence of transformers to be applied to the message before it is dispatched via the associated transport. |
See Also
-
See the Mule WMQ Transport Reference for details on setting the properties for a WMQ endpoint using an XML editor.


