Mule Runtime
Amazon EC2 Connector
The Anypoint Connector for Amazon EC2 provides connectivity to the Amazon Elastic Compute Cloud (Amazon EC2) API, enabling you to interface with Amazon EC2 to launch as many or as few virtual servers as you need, configure security and networking, and manage storage. MuleSoft maintains this connector under the Connector Support Policy - Select.
Release Notes: Amazon EC2 Connector Release Notes
Exchange: Amazon EC2 Connector
Before You Begin
To use the Amazon EC2 Connector, you must have the following:
-
Access to Amazon Web Services - EC2.
-
To access AWS with the connector, you need AWS Identity and Access Management (IAM) user account credentials.
-
Anypoint Studio - Enterprise Edition.
Notes: If you or your IAM users forget or lose the secret access key, you can create a new access key. For more information, see the AWS documentation.
Install the Connector
You can install the connector in Anypoint Studio using the instructions in Installing Connectors.
Configuring the Connector Global Element
To use the Amazon EC2 connector in your Mule application, configure a global Amazon EC2 element that can be used by all the Amazon EC2 connectors in your project.
Configuring With Studio Visual Editor
-
Click the Global Elements tab at the base of the canvas.
-
On the Global Mule Configuration Elements screen, click Create.
-
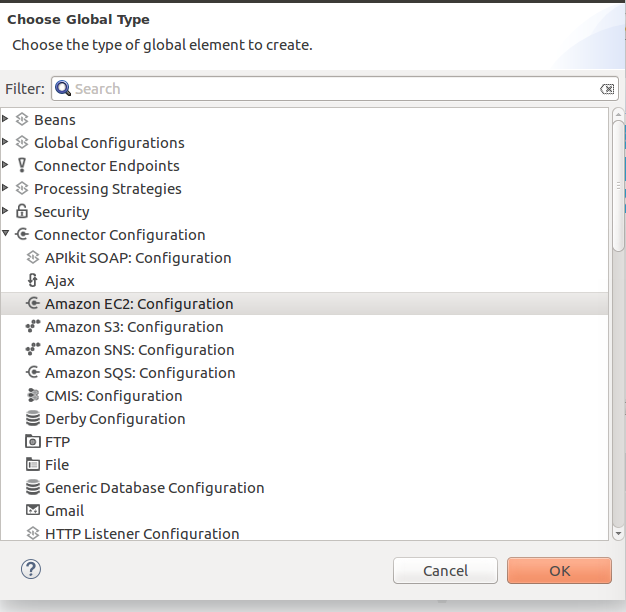
In the Choose Global Type wizard, expand Connector Configuration and select Amazon EC2: Configuration and click Ok.
-
Configure the parameters according to instructions below.
Parameter Description Name
Enter a name for the configuration to reference it.
Access Key
Alphanumeric text string that uniquely identifies the user who owns the account.
Secret Key
Key that plays the role of a password.
Try Default AWS Credentials Provider Chain
Checkbox that controls whether temporary credentials should be used.
In the image above, the placeholder values refer to a configuration file placed in the
srcfolder of your project. See Learn how to configure properties.
You can either enter your credentials into the global configuration properties, or reference a configuration file that contains these values. For simpler maintenance and better re-usability of your project, Mule recommends that you use a configuration file. Keeping these values in a separate file is useful if you need to deploy to different environments, such as production, development, and QA, where your access credentials differ. See Deploying to Multiple Environments for instructions on how to manage this.
-
Keep the Pooling Profile and the Reconnection tabs with their default entries.
-
Click Test Connection to confirm that the parameters of your global configuration are accurate, and that Mule is able to successfully connect to your instance of Amazon EC2. Read more about this in Testing Connections.
-
Click OK to save the global connector configurations.
Configuring With the XML Editor or Standalone
Ensure that you have included the Amazon EC2 namespaces in your configuration file.
<?xml version="1.0" encoding="UTF-8"?>

<mule xmlns:http="http://www.mulesoft.org/schema/mule/http"
xmlns:ec2="http://www.mulesoft.org/schema/mule/ec2"
xmlns="http://www.mulesoft.org/schema/mule/core"
xmlns:doc="http://www.mulesoft.org/schema/mule/documentation"
xmlns:spring="http://www.springframework.org/schema/beans"
xmlns:xsi="http://www.w3.org/2001/XMLSchema-instance"
xsi:schemaLocation="http://www.springframework.org/schema/beans
http://www.springframework.org/schema/beans/spring-beans-current.xsd
http://www.mulesoft.org/schema/mule/core http://www.mulesoft.org/schema/mule/core/current/mule.xsd
http://www.mulesoft.org/schema/mule/http http://www.mulesoft.org/schema/mule/http/current/mule-http.xsd
http://www.mulesoft.org/schema/mule/ec2 http://www.mulesoft.org/schema/mule/ec2/current/mule-ec2.xsd">

<!-- Put your flows and configuration elements here -->

</mule>
Follow these steps to configure an Amazon EC2 connector in your application:
Create a global Amazon EC2 configuration outside and above your flows, using the following global configuration code.
<ec2:config name="Amazon_EC2__Configuration" accessKey="${amazon.accesskey}"
     secretKey="${amazon.secretkey}" doc:name="Amazon EC2: Configuration"/>
EC2 Connector Operations
See the full list of operations for the latest version of the connector EC2 Connector Reference.
The Amazon EC2 connector supports the following list of operations:
AMIs Operations
-
CreateImage
-
DeregisterImage
-
DescribeImageAttribute
-
DescribeImages
-
ModifyImageAttribute
-
ResetImageAttribute
Elastic IP Addresses Operations
-
AllocateAddress
-
AssociateAddress
-
DescribeAddresses
-
DescribeMovingAddresses
-
DisassociateAddress
-
MoveAddressToVpc
-
ReleaseAddress
-
RestoreAddressToClassic
Elastic Network Interfaces Operations - Amazon VPC
-
AssignIpv6Addresses
-
AssignPrivateIpAddresses
-
AttachNetworkInterface
-
CreateNetworkInterface
-
DeleteNetworkInterface
-
DescribeNetworkInterfaceAttribute
-
DescribeNetworkInterfaces
-
DetachNetworkInterface
-
ModifyNetworkInterfaceAttribute
-
ResetNetworkInterfaceAttribute
-
UnassignIpv6Addresses
-
UnassignPrivateIpAddresses
Instances Operations
-
AssociateIamInstanceProfile
-
DescribeIamInstanceProfileAssociations
-
DescribeInstanceAttribute
-
DescribeInstances
-
DescribeInstanceStatus
-
DisassociateIamInstanceProfile
-
GetConsoleOutput
-
GetConsoleScreenshot
-
GetPasswordData
-
ModifyInstanceAttribute
-
MonitorInstances
-
RebootInstances
-
ReplaceIamInstanceProfileAssociation
-
ReportInstanceStatus
-
ResetInstanceAttribute
-
RunInstances
-
StartInstances
-
StopInstances
-
TerminateInstances
-
UnmonitorInstances
Security Groups Operations
-
AuthorizeSecurityGroupEgress
-
AuthorizeSecurityGroupIngress
-
CreateSecurityGroup
-
DeleteSecurityGroup
-
DescribeSecurityGroupReferences
-
DescribeSecurityGroups
-
DescribeStaleSecurityGroups
-
RevokeSecurityGroupEgress
-
RevokeSecurityGroupIngress
Volumes and Snapshots Operations - Amazon EBS
-
AttachVolume
-
CopySnapshot
-
CreateSnapshot
-
CreateVolume
-
DeleteSnapshot
-
DeleteVolume
-
DescribeSnapshotAttribute
-
DescribeSnapshots
-
DescribeVolumeAttribute
-
DescribeVolumes
-
DescribeVolumesModifications
-
DescribeVolumeStatus
-
DetachVolume
-
EnableVolumeIO
-
ModifySnapshotAttribute
-
ModifyVolume
-
ModifyVolumeAttribute
-
ResetSnapshotAttribute
Connector Namespace and Schema
When designing your application in Studio, the act of dragging the connector from the palette onto the Anypoint Studio canvas should automatically populate the XML code with the connector namespace and schema location.
Namespace: http://www.mulesoft.org/schema/mule/ec2
Schema Location: http://www.mulesoft.org/schema/mule/ec2/current/mule-ec2.xsd
If you are manually coding the Mule application in Studio’s XML editor or other text editor, paste these into the header of your Configuration XML, inside the <mule> tag.
<mule xmlns="http://www.mulesoft.org/schema/mule/core"
      xmlns:xsi="http://www.w3.org/2001/XMLSchema-instance"
      xmlns:ec2="http://www.mulesoft.org/schema/mule/ec2"
      xsi:schemaLocation="
               http://www.mulesoft.org/schema/mule/core
               http://www.mulesoft.org/schema/mule/core/current/mule.xsd
               http://www.mulesoft.org/schema/mule/ec2
               http://www.mulesoft.org/schema/mule/ec2/current/mule-ec2.xsd">

      <!-- here go your global configuration elements and flows -->

</mule>
Using the Connector in a Mavenized Mule App
If you are coding a Mavenized Mule application, this XML snippet must be included in your pom.xml file.
<dependency>
    <groupId>org.mule.modules</groupId>
    <artifactId>mule-module-ec2</artifactId>
    <version>x.x.x</version>
</dependency>
Replace x.x.x with the version that corresponds to the connector you are using.
Use Cases and Demos
Listed below are the few common use cases for the connector:
Starting an Amazon EC2 instance |
By using Amazon EC2, Amazon EBS-backed AMI can be started which you’ve previously stopped. |
Stopping an Amazon EC2 instance |
By using Amazon EC2, Amazon EBS-backed instance can be stopped. |
Creating an EBS volume |
By using Amazon EC2, an EBS volume can be created which can be attached to an instance in the same Availability Zone. |
Attaching an EBS volume to an Amazon EC2 instance |
By using Amazon EC2, an EBS volume can be attached to a running or stopped Amazon EC2 instance. |
Demo Mule Application Using the Connector
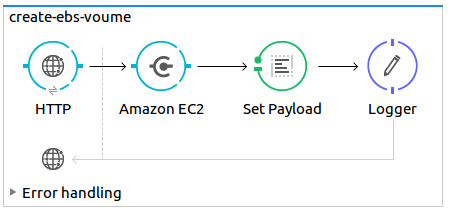
This demo creates an EBS volume that can be attached to an EC2 instance in the same Availability Zone.
-
Create a new Mule Project in Anypoint Studio.
-
Add the following properties to the
mule-app.propertiesfile to hold your Amazon EC2 credentials and place it in the project’ssrc/main/appdirectory.amazon.accesskey=<Access Key> amazon.secretkey=<Secret Key> amazon.region=<Region> -
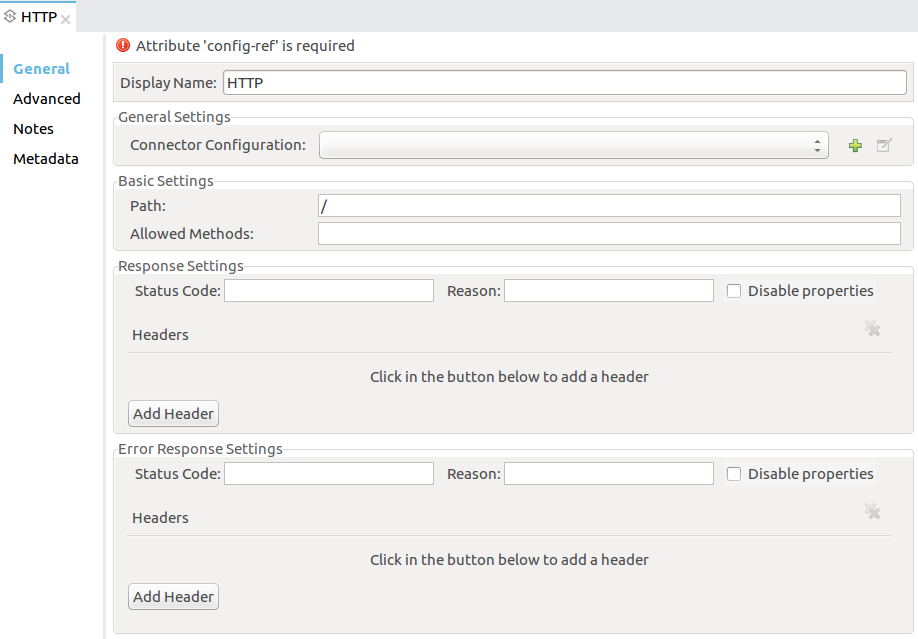
Drag an HTTP connector onto the canvas and configure the following parameters:
Parameter Value Display Name
HTTP
Connector Configuration
If no HTTP element has been created yet, click the plus sign to add a new HTTP Listener Configuration and click OK (leave the values to its defaults).
Path
/
-
Drag the Amazon EC2 Connector next to the HTTP endpoint component.
-
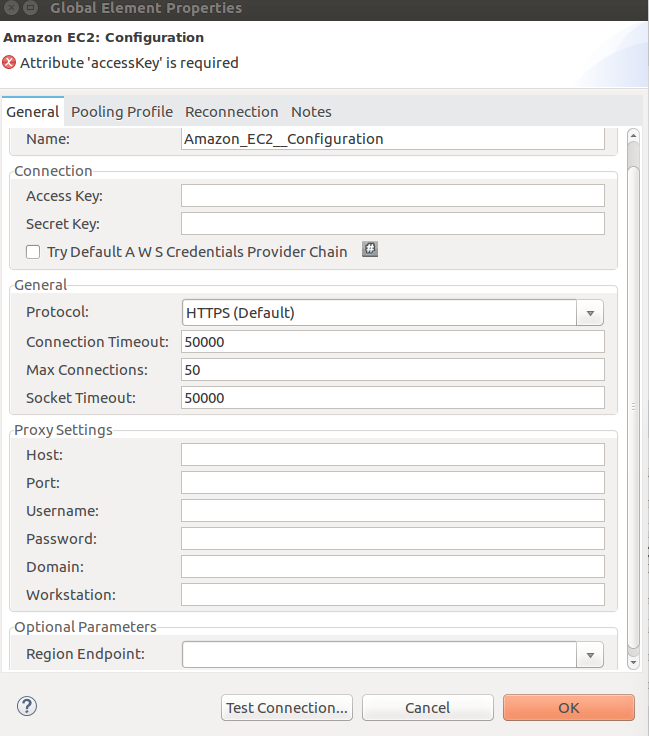
Configure the EC2 connector by adding a new Amazon EC2 Global Element. Click the plus sign next to the Connector Configuration field.
-
Configure the global element according to the table below:
Parameter Description Value Name
Enter a name for the configuration to reference it.
<Configuration_Name>
Access Key
Alphanumeric text string that uniquely identifies the user who owns the account.
${amazon.accesskey}Secret Key
Key that plays the role of a password.
${amazon.secretkey}Region Endpoint
Region to be set for the Amazon EC2 Client.
${amazon.region} -
Your configuration should look like this:
-
The corresponding XML configuration should be as follows:
<ec2:config name="Amazon_EC2__Configuration" accessKey="${amazon.accesskey}" secretKey="${amazon.secretkey}" region="${amazon.region}" doc:name="Amazon EC2: Configuration"/>
-
-
Click Test Connection to confirm that Mule can connect with the EC2 instance. If the connection is successful, click OK to save the configurations. Otherwise, review or correct any incorrect parameters, then test again.
-
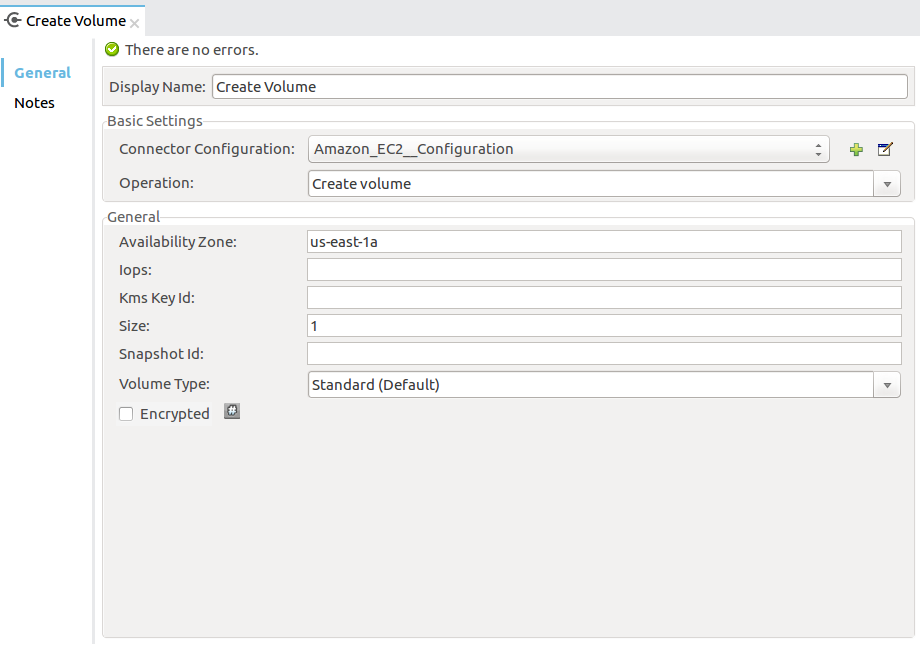
Back in the properties editor of the Amazon EC2 connector, configure the remaining parameters:
Parameter Value Basic Settings
Display Name
Create Volume (or any other name you prefer)
Connector Configuration
Amazon_EC2__Configuration (the reference name to the global element you have created)
Operation
Create volume
General
Availability Zone
us-east-1a (or any other availability zone to which you have access)
Size
5 (The size of the volume, in GiBs)
Volume Type
Standard (the default Volume Type)
-
Check that your XML looks like this:
<ec2:create-volume config-ref="Amazon_EC2__Configuration" availabilityZone="us-east-1a" size="1" doc:name="Create Volume"/> -
Add a Set Payload transformer after the Amazon EC2 connector to send the response to the client (here, the browser). Configure the SetPayload transformer according to the table below.
Parameter Value Display Name
Payload (or any other name you prefer)
Value
#[payload.volume.volumeId](here we just want to print the volume ID of the EBS volume we created)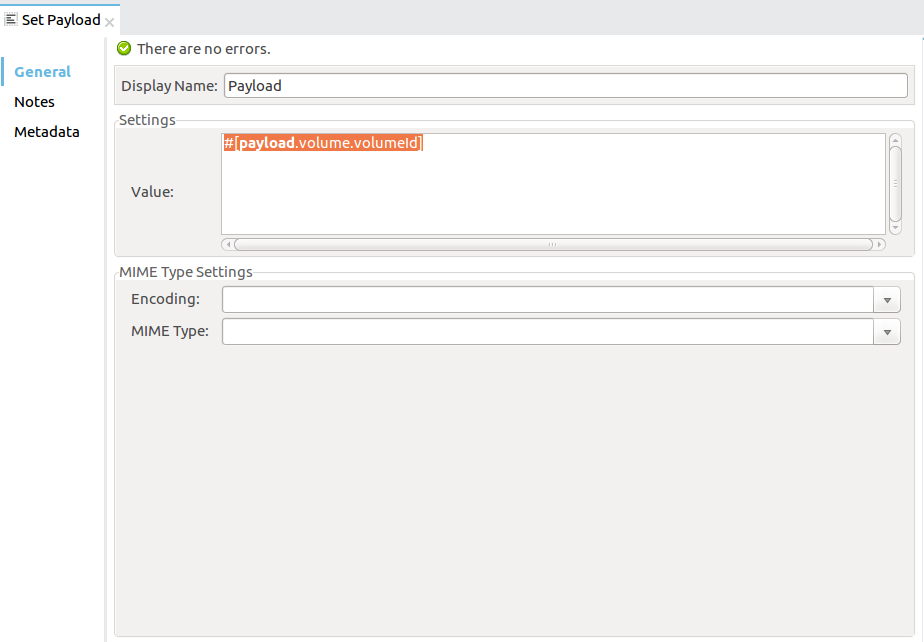
-
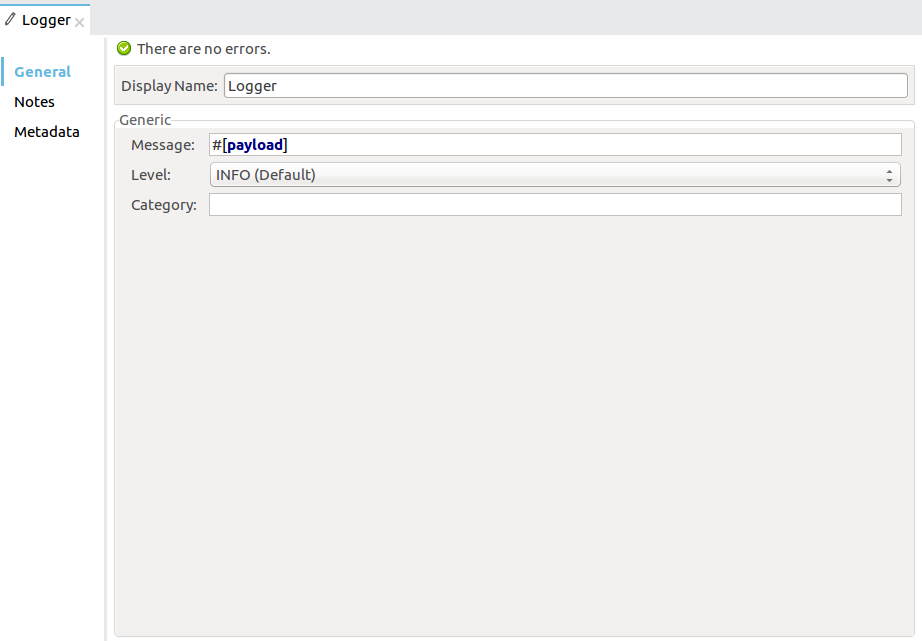
Add a Logger component after the Set Payload transformer to print the Volume Id that is being transformed by the Set Payload transformer from the Create Volume operation in the Mule Console. Configure the Logger according to the table below.
Parameter Value Display Name
Logger (or any other name you prefer)
Message
#[payload]
Level
INFO
-
Save and Run the project as a Mule Application. Right-click the project in Package Explorer and click Run As > Mule Application.
-
Open a browser and check the response after entering the URL
http://localhost:8081/createVolume. You should see the generated Volume ID in the browser and the console.
Demo Mule Application XML Code
Paste this code into your XML Editor to quickly load the flow for this example use case into your Mule application.
<?xml version="1.0" encoding="UTF-8"?>

<mule xmlns:ec2="http://www.mulesoft.org/schema/mule/ec2"
	xmlns:http="http://www.mulesoft.org/schema/mule/http" xmlns:tracking="http://www.mulesoft.org/schema/mule/ee/tracking"
	xmlns="http://www.mulesoft.org/schema/mule/core" xmlns:doc="http://www.mulesoft.org/schema/mule/documentation"
	xmlns:spring="http://www.springframework.org/schema/beans" xmlns:xsi="http://www.w3.org/2001/XMLSchema-instance"
	xsi:schemaLocation="http://www.springframework.org/schema/beans http://www.springframework.org/schema/beans/spring-beans-current.xsd
http://www.mulesoft.org/schema/mule/core http://www.mulesoft.org/schema/mule/core/current/mule.xsd
http://www.mulesoft.org/schema/mule/ee/tracking http://www.mulesoft.org/schema/mule/ee/tracking/current/mule-tracking-ee.xsd
http://www.mulesoft.org/schema/mule/http http://www.mulesoft.org/schema/mule/http/current/mule-http.xsd
http://www.mulesoft.org/schema/mule/ec2 http://www.mulesoft.org/schema/mule/ec2/current/mule-ec2.xsd">

	<http:listener-config name="HTTP_Listener_Configuration"
		host="0.0.0.0" port="8081" doc:name="HTTP Listener Configuration" />
	<ec2:config name="Amazon_EC2__Configuration" accessKey="${amazon.accesskey}" secretKey="${amazon.secretkey}"
	doc:name="Amazon EC2: Configuration" />
	<flow name="create-ebs-volume">
		<http:listener config-ref="HTTP_Listener_Configuration"
			path="/createVolume" doc:name="HTTP" />
		<ec2:create-volume config-ref="Amazon_EC2__Configuration"
			availabilityZone="us-east-1a" size="1" doc:name="Create Volume" />
		<set-payload value="#[payload.volume.volumeId]" doc:name="Payload" />
		<logger message="#[payload]" level="INFO" doc:name="Logger" />
	</flow>
</mule>
Download Demo Applications
You can download a fully functional example from Mule Amazon EC2 Connector on github.io.
See Also
-
Read more about Anypoint Connectors.


