Building, Implementing, and Testing an OData V2 API
Build an OData v2 REST API with APIkit for OData and the MySQL walkthrough: generate flows from RAML types, connect to a sample database, and exercise HTTP and OData endpoints. The OData MySQL example packages a working Maven project you import into Anypoint Studio.
Before You Begin
Install this software to create and use an OData REST API with APIkit:
-
OData Plugin
-
Mule runtime engine 4.1.1 or later
-
Anypoint Studio 7.1.4 or later
Additionally, you must download the OData example entity data model.
Implement an OData v2 API Using the APIkit OData Extension
This section walks through implementing an OData-enabled REST API:
-
In Studio, select File > New > Mule Project.
-
In the Project Name field, type the name of your Mule project.
-
Click Finish.
-
Copy the
odata.ramlfile you downloaded in the prerequisites section to the/src/main/resources/apidirectory in your project. -
In the project explorer, right-click
odata.ramland select Mule > Generate OData API from RAML Types.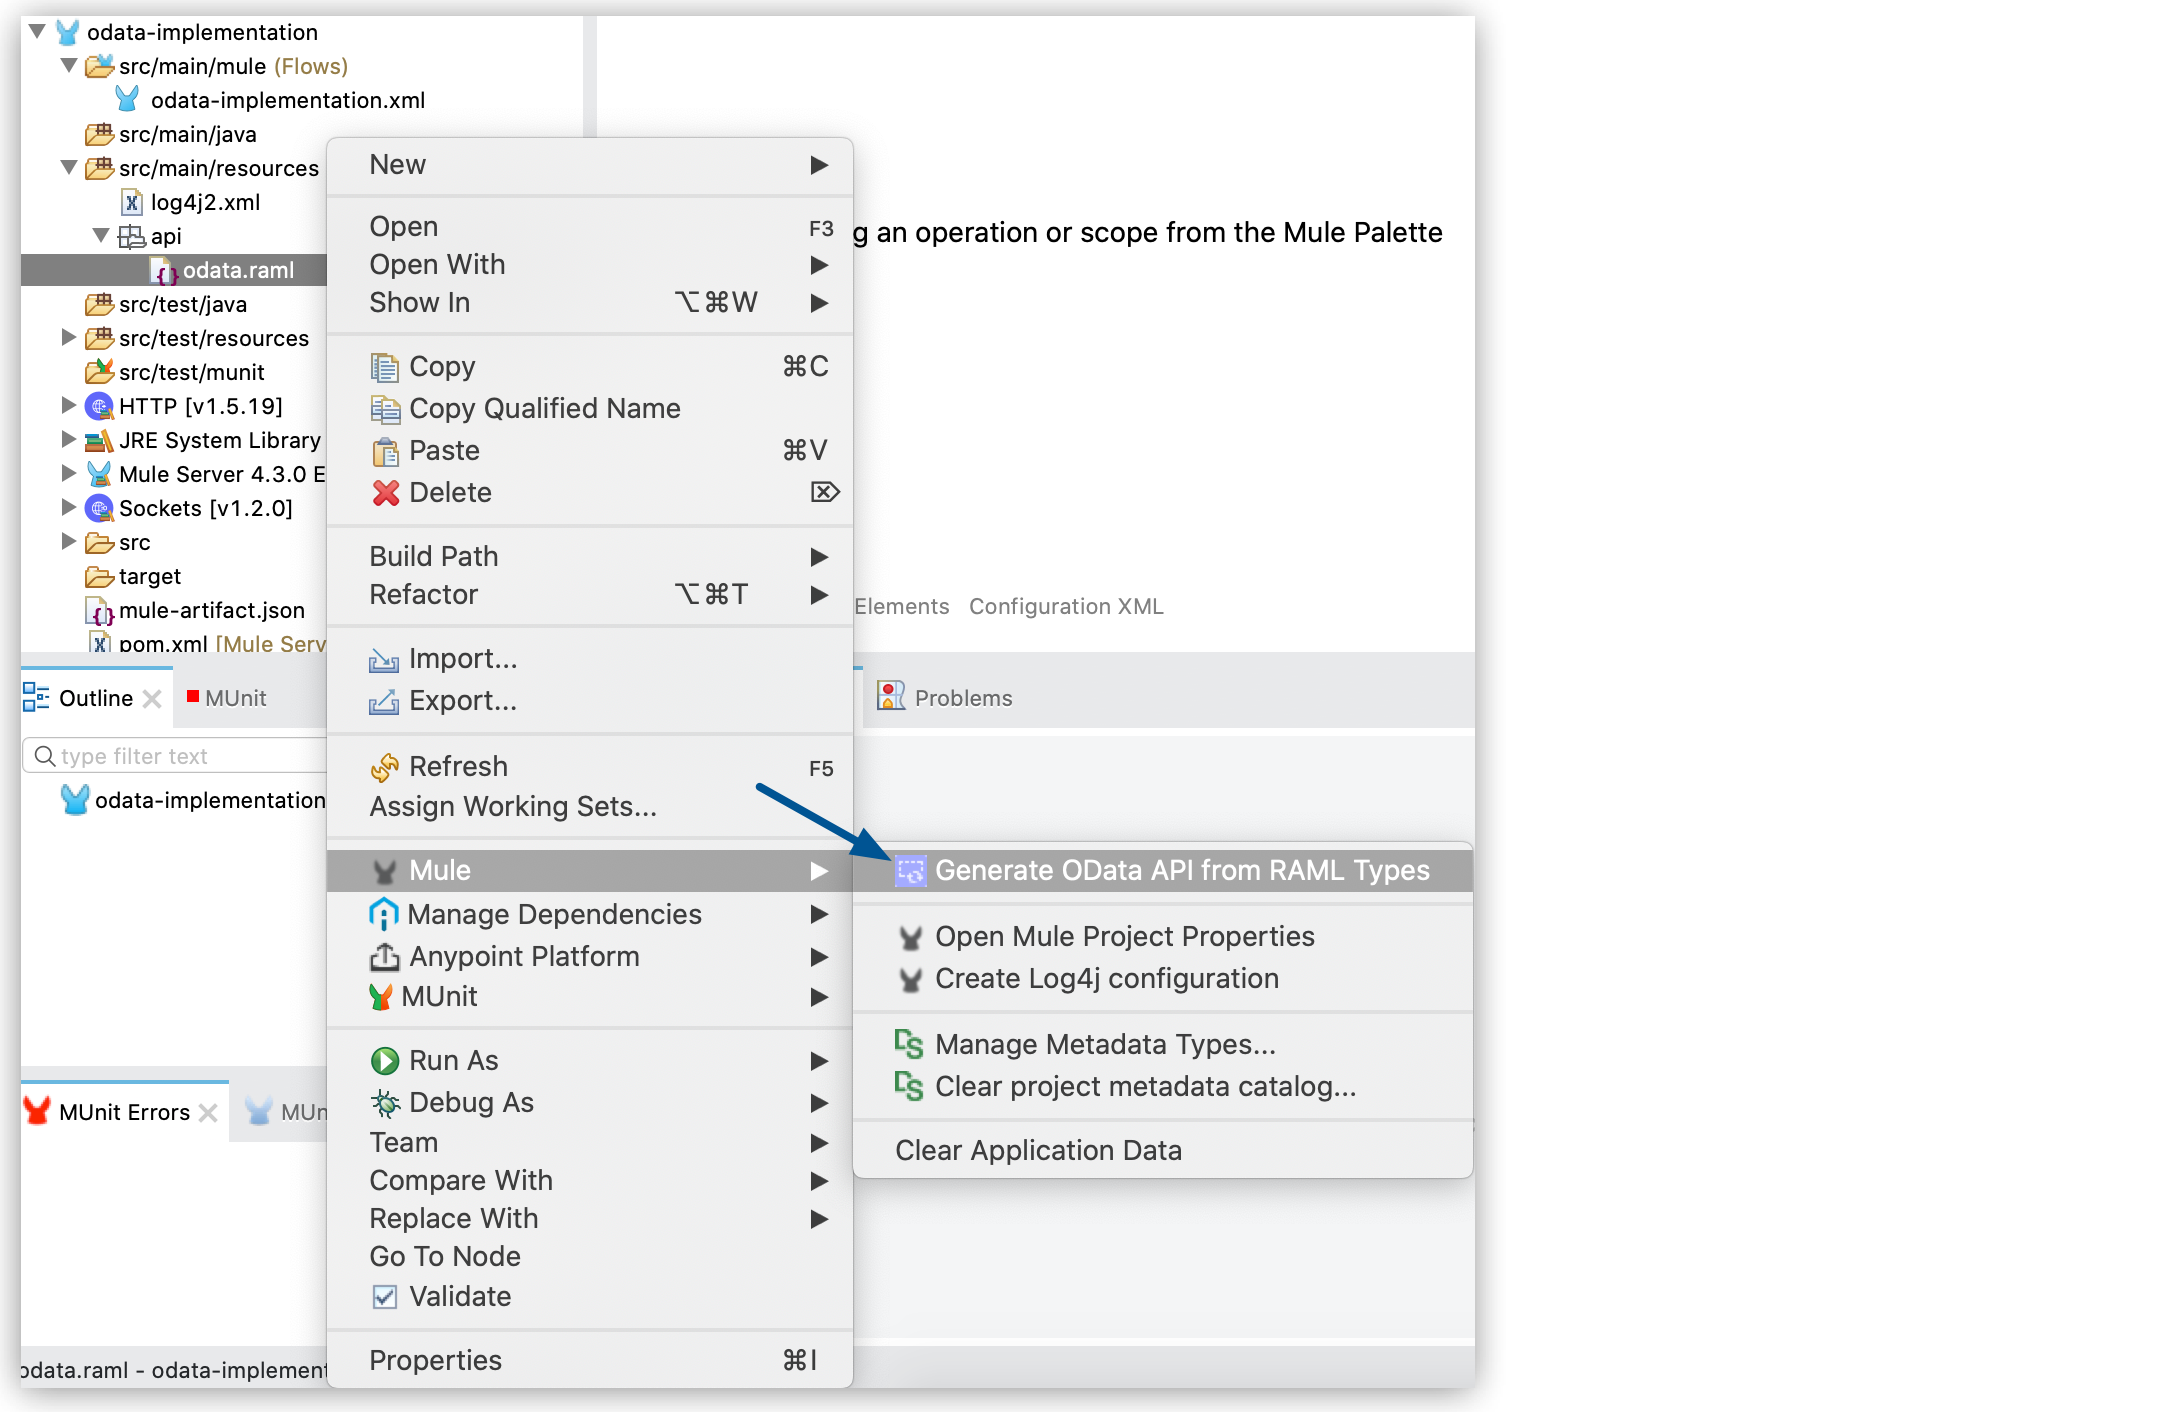
-
The OData extension generates the necessary files for your OData API implementation:
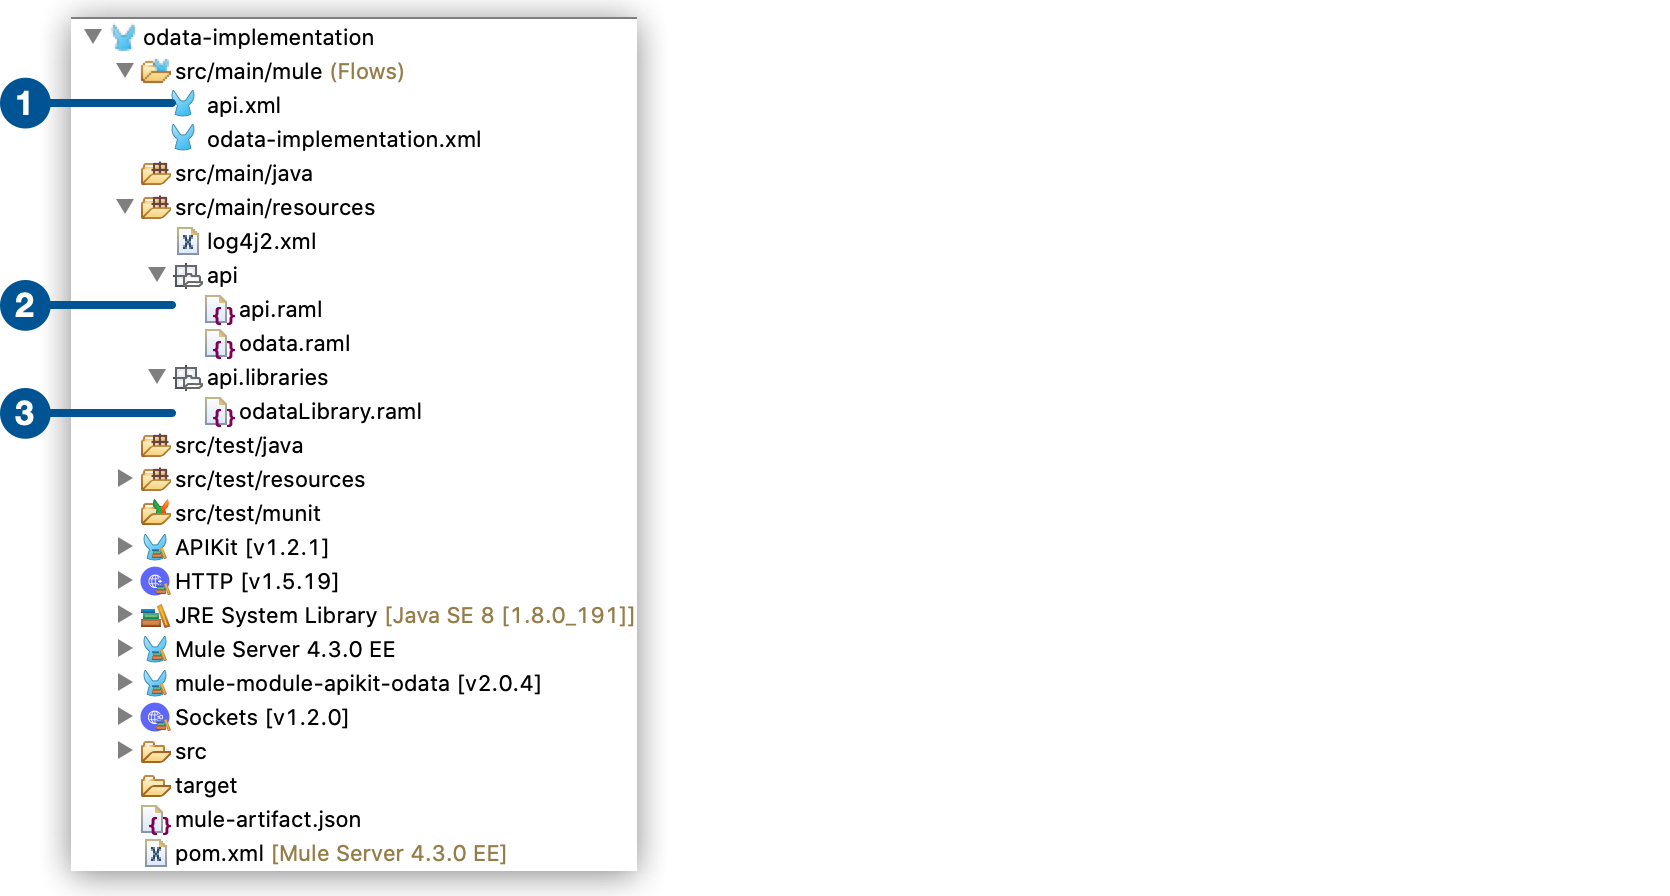
| 1 | Mule configuration file with the flows for the API implementation |
| 2 | Generated RAML definition |
| 3 | Generated RAML libraries |
-
Add the necessary logic for your API implementation in the flows.
OData MySQL Example
The OData MySQL example is a fully functional OData API packaged as a Maven project. In this example, the data source, the app, and the service are local.
First, you install a MySQL database and load tables using a provided script. Next, you import the compressed project into Studio, which includes a MySQL database driver. You can examine the flows to see how to implement the endpoints you need by accessing the data. Then you run the project and call the REST and OData services.
Install and Populate a MySQL Database
-
Install a MySQL database and launch MySQL.
-
Download the MySQL project example apikit-odata-example-main.jar.
-
Run the
example.sqlscript located insrc/main/resourcesusing MySQL commands to load data into a database namedapikit-odata-example.
Implement the OData API
-
In Studio, Select File > Import.
-
Select Anypoint Studio > Packaged mule application (.jar) > Next.
-
Browse for the
apikit-odata-example-main.jarfile and click Finish. -
In Studio, edit the
mule-configuration.propertiesfile in thesrc/main/resourcesfolder, and set the following properties to access the local MySQL database:ds.db.port=3306 ds.db.user=<your MySQL user name> ds.db.host=<your MySQL host name> ds.db.database=apikit-odata-example ds.db.password=<your MySQL password> -
Run the API locally by right-clicking the project, and selecting Run As > Mule Application.
You can now access the REST and OData Service.
Access the REST and OData Service
To run the API locally:
-
Right-click the project, and select Run As > Mule Application.
-
Access the REST and OData Service by using the following URLs:
-
REST API:
/api -
OData API:
/api/odata.svcThe following examples cover a few of the many REST calls and OData queries you can use.
-
Retrieve a List of Customers
Call the REST API to retrieve the list of customers:
http://localhost:8081/api/customers
The response is:
{
  "entries": [
    {
      "ContactName": "Maria Anders",
      "ContactTitle": "Sales Representative",
      "CompanyName": "Alfreds Futterkiste",
      "CustomerID": ""
    },
    {
      "ContactName": "Maria Anders",
      "ContactTitle": "Sales Representative",
      "CompanyName": "Alfreds Futterkiste",
      "CustomerID": "ALFKI"
    },
  ]
}
Access a Description of the OData Service
Get information about the collections behind this service:
http://localhost:8081/api/odata.svc
The response is:
<service xmlns="http://www.w3.org/2007/app" xmlns:atom="http://www.w3.org/2005/Atom" xmlns:app="http://www.w3.org/2007/app" xml:base="http://localhost:8081">
  <workspace>
    <atom:title>Default</atom:title>
    <collection href="customers">
      <atom:title>customers</atom:title>
    </collection>
    <collection href="orders">
      <atom:title>orders</atom:title>
    </collection>
  </workspace>
</service>
Get OData Service Metadata
The service metadata exposes the structure of OData service resources, operations, and EDM for a given service.
Get the metadata for HTTP services:
http://localhost:8081/api/odata.svc/$metadata
The response aligns with the odata.raml EDM you used to build the HTTP Services API example:
<edmx:Edmx xmlns:edmx="http://schemas.microsoft.com/ado/2007/06/edmx" Version="1.0">
<edmx:DataServices xmlns:m="http://schemas.microsoft.com/ado/2007/08/dataservices/metadata" m:DataServiceVersion="2.0">
<Schema xmlns="http://schemas.microsoft.com/ado/2008/09/edm" Namespace="odata2.namespace">
<EntityType Name="customers">
<Key>
<PropertyRef Name="CustomerID"/>
</Key>
<Property Name="CompanyName" Type="Edm.String" Nullable="true" MaxLength="40" Unicode="false"/>
<Property Name="ContactName" Type="Edm.String" Nullable="true" MaxLength="30" Unicode="false"/>
<Property Name="ContactTitle" Type="Edm.String" Nullable="true" MaxLength="30" Unicode="false"/>
<Property Name="CustomerID" Type="Edm.String" Nullable="false" MaxLength="5" Unicode="false"/>
</EntityType>
<EntityType Name="orders">
<Key>
<PropertyRef Name="OrderID"/>
<PropertyRef Name="ShipName"/>
</Key>
<Property Name="Freight" Type="Edm.Decimal" Nullable="true" Precision="3" Scale="3" Unicode="false"/>
...
Create a Customer Entity Using OData Service
Create a POST request with the following body:
<?xml version="1.0" encoding="utf-8" standalone="yes"?>
<entry xmlns:d="http://schemas.microsoft.com/ado/2007/08/dataservices" xmlns:m="http://schemas.microsoft.com/ado/2007/08/dataservices/metadata" xmlns="http://www.w3.org/2005/Atom">
<content type="application/xml">
    <m:properties>
    <d:CustomerID>BOTTM</d:CustomerID>
    <d:CompanyName>Bottom-Dollar Markets</d:CompanyName>
    <d:ContactName>Elizabeth Lincoln</d:ContactName>
    <d:ContactTitle>Accounting Manager</d:ContactTitle>
    </m:properties>
</content>
</entry>
The request must have the following headers:
Content-Type: application/xml
Accept: application/xml
Call the REST API to create a customer entity:
http://localhost:8081/api/odata.svc/customers
Query the Data Source
Issue OData queries to get the list of customers in XML and JSON format:
http://localhost:8081/api/odata.svc/customers
http://localhost:8081/api/odata.svc/customers?$format=json
Issue an OData query to get the tenth customer in the customer list:
http://localhost:8081/api/odata.svc/customers?$format=json&$top=1&$skip=10&$inlinecount=allpages
The response is:
{
    "d": {
        "results": [
            {
                "__metadata": {
                    "uri": "http:/localhost:8081/api/odata.svc/customers('BOTTM')",
                    "type": "odata2.namespace.customers"
                },
                "CompanyName": "Bottom-Dollar Markets",
                "ContactName": "Elizabeth Lincoln",
                "ContactTitle": "Accounting Manager",
                "CustomerID": "BOTTM"
            }
        ],
        "__count": "98"
    }
}
Implement Endpoints for an OData API
You can implement API endpoints such as the get:/customers:config and get:/orders:config flows using Anypoint Studio. The output format of the flows must be JSON. For more information, see the complete functioning example.
Declare Input Variables for a GET
-
Declare a variable for the APIkit OData Service variable that contains the fields of your entity in a list of strings (List<String>). For example:
var entityFields = vars.odata.fields -
Declare a variable for the APIkit OData Service variable that filters into 'http.query.params'. For example:
var filters = attributes.queryParams -
Declare a variable for the APIkit OData Service variable that contains the keys of your entity. For example:
var keys = vars.odata.keyNames -
Declare a variable for the APIkit OData Service variable that contains the table name. For example:
var remoteEntityName = vars.odata.remoteEntityName
Declare Input Variables for a POST
-
Declare a variable for the APIkit OData Service inbound property that contains the entity’s name:
var remoteEntityName = vars.odata.remoteEntityName -
Declare a variable for transforming your payload into something like this: { myKey1: 'myValue1', myKey2: 'myValue2'}.
var valuesFromPayload = { keys: payload pluck $$, values: payload pluck "'$'" } -
Declare two variables, and use 'joinBy' to transform your keys and values into comma-separated-values (CSV). For example:
var columns = ( (valuesFromPayload.keys map "`$`" ) joinBy ", ") // myKey1, myKey2
var values = (valuesFromPayload.values joinBy ", ") // 'myValue1', 'myValue2'