CloudHub to CloudHub 2.0 Application Migration
After your Anypoint Virtual Private Cloud (VPC) upgrade is complete, you can migrate all associated applications. Migration involves creating an equivalent CloudHub 2.0 application for every CloudHub application, and linking them.
The current CloudHub application runs without disruption until the upgrade completes. Then, you can use the same CloudHub URL for your CloudHub 2.0 application.
| During the application upgrade process, MuleSoft doesn’t provide any out-of-the-box entitlements. Work with your account representative to remain compliant with entitlements and finish the upgrade on time. |
Eligibility
To link a CloudHub application with a CloudHub 2.0 application and gradually switch traffic using the application migration tool, first upgrade the CloudHub VPC to a CloudHub 2.0 private space by using the VPC upgrade tool.
You can use the application upgrade tool only in CloudHub 2.0 private spaces that were upgraded from a CloudHub VPC.
Upgrade Your CloudHub Application to CloudHub 2.0 via Anypoint Platform
-
From Anypoint Platform, select Runtime Manager > Applications.
-
Select the CloudHub application to upgrade and go to Settings.
If your application is eligible for the upgrade, the upgrade tooling is available on the Settings page.
-
Click Upgrade to CloudHub 2.0, then click Start Upgrade.
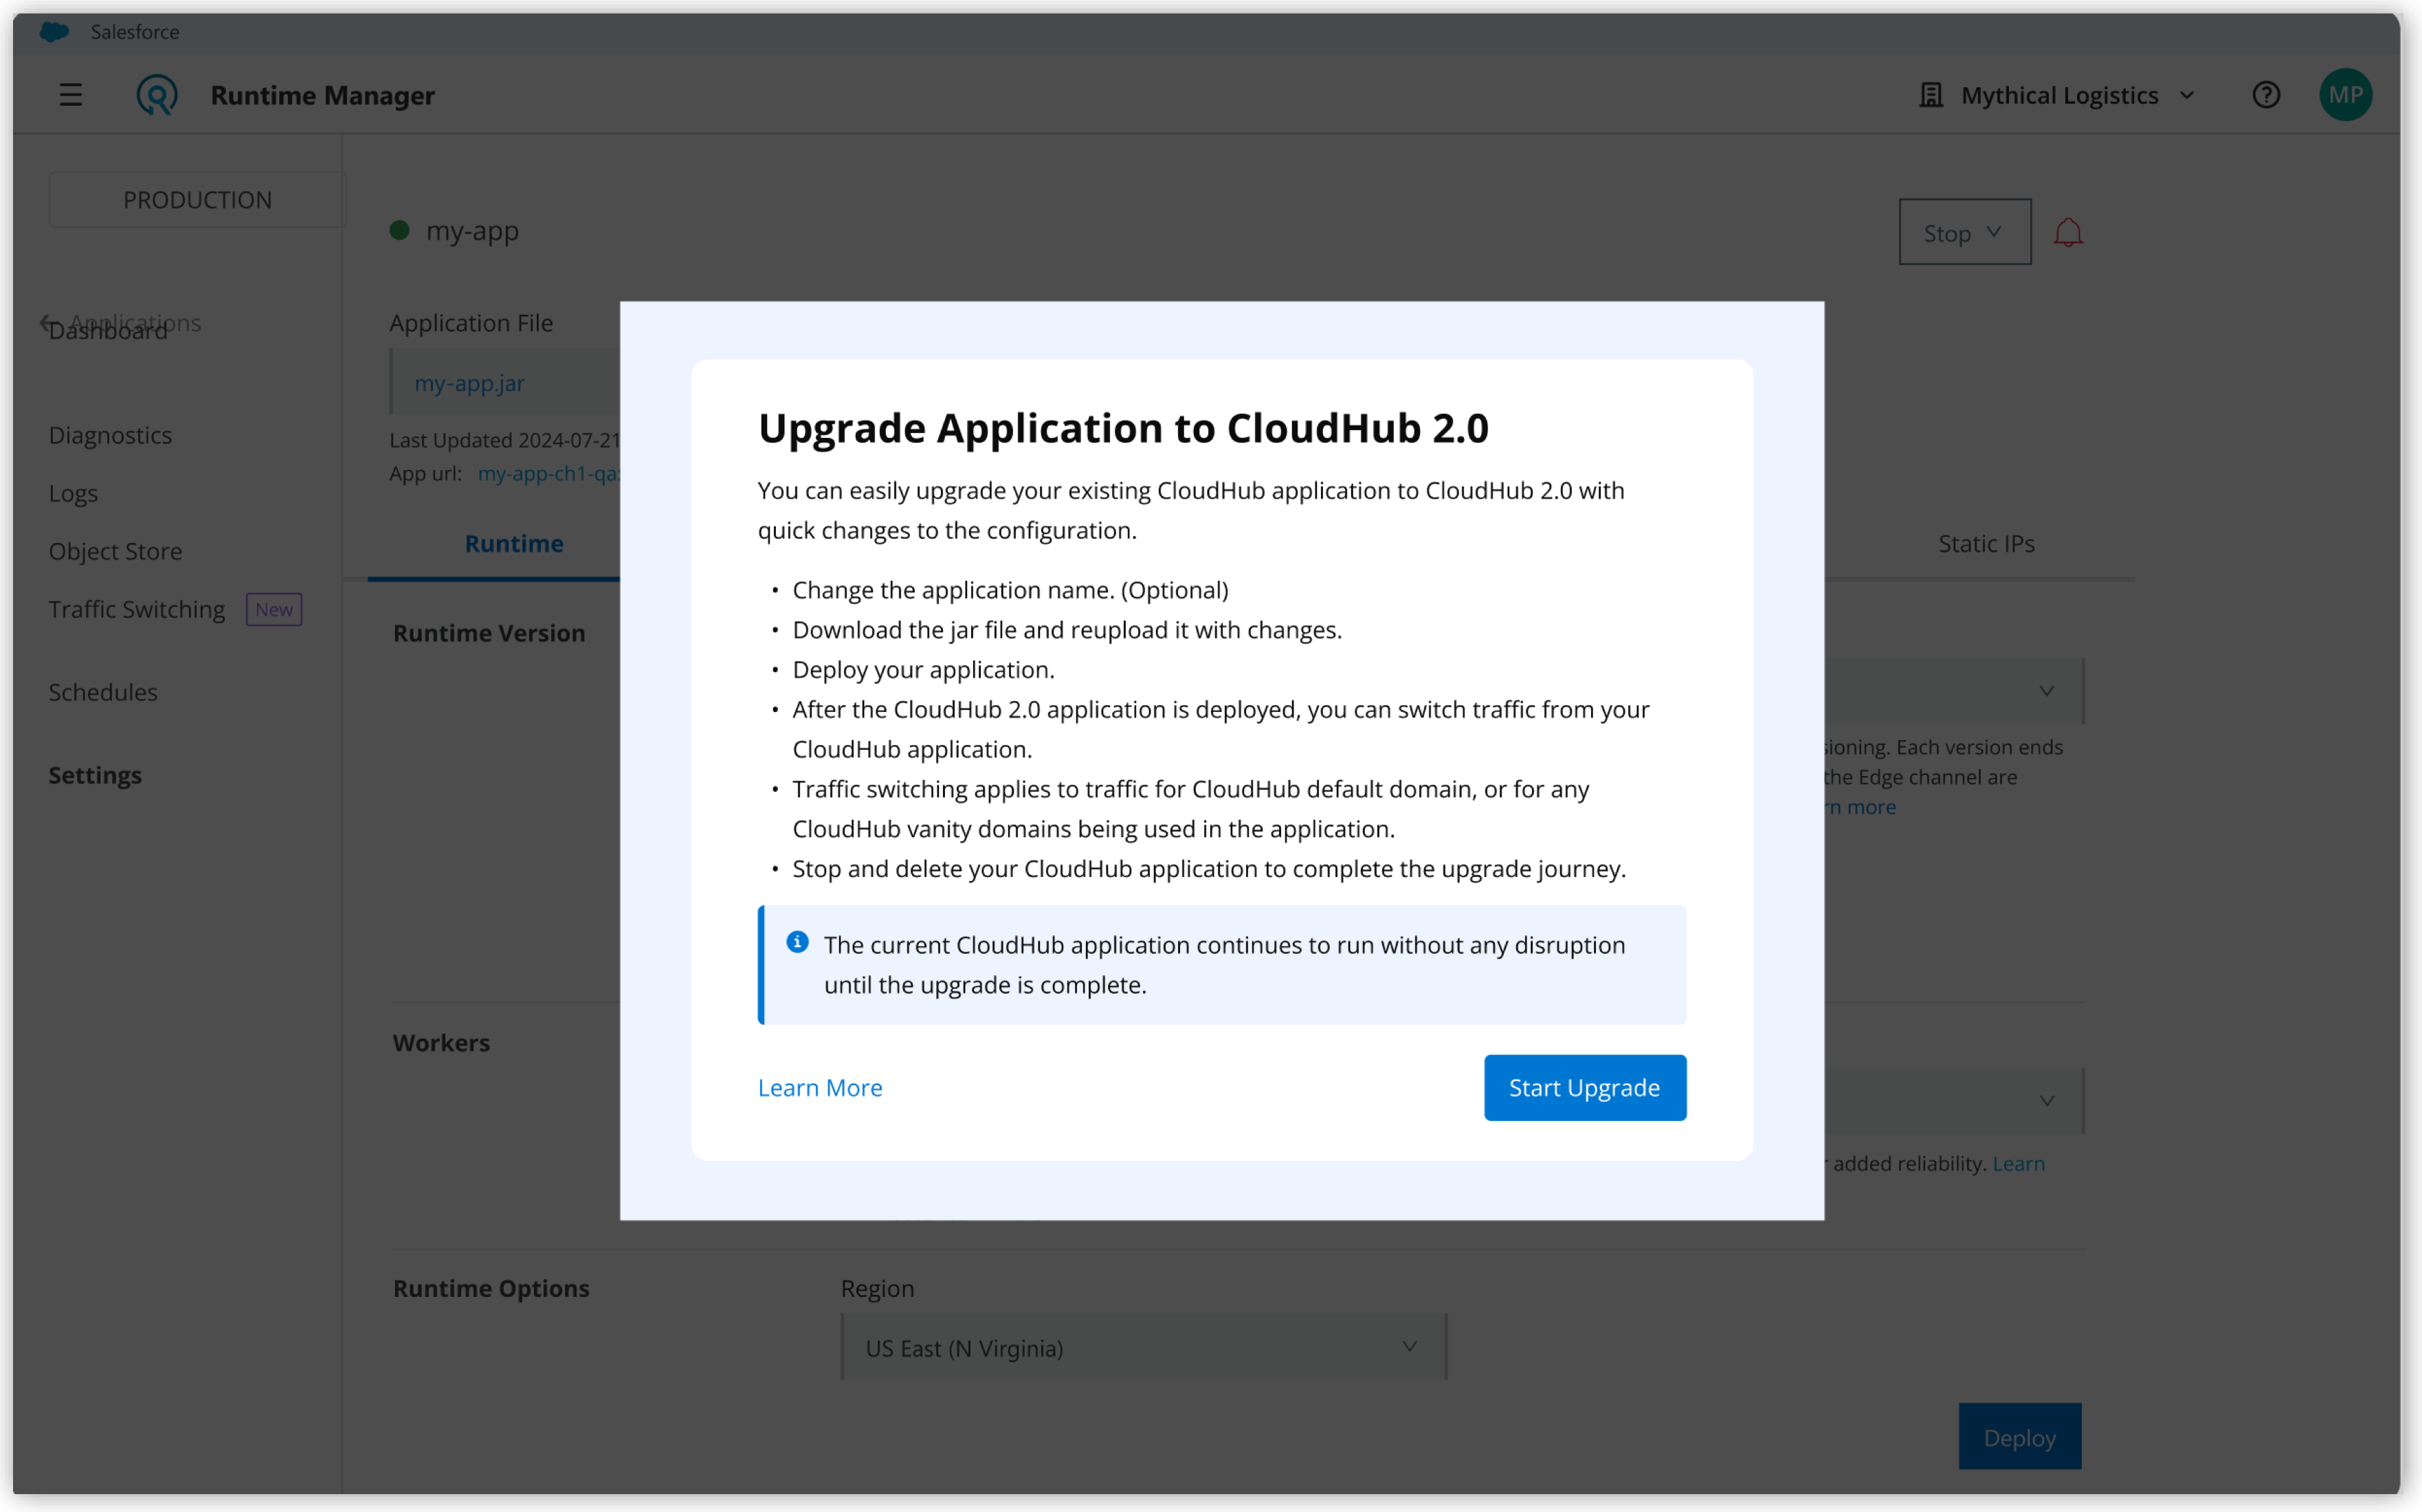
The Upgrade Application to CloudHub 2.0 page opens.
-
The Application Name field shows the inherited CloudHub application name by default.
To use a different name for your CloudHub 2.0 application, change it by editing the field.
-
The Upgrading From field shows the name of the CloudHub application the new application is migrated from.
You can’t edit this field. The Deployment Target field shows the preselected private space for the application deployment based on the upgraded CloudHub VPC.
You can’t edit this field.
-
-
For Application File, you can either:
-
Upload your application file: Download the application asset from the link under Application File, make the necessary changes, and upload it to deploy your new application to the CloudHub 2.0 private space.
-
Import file from Exchange: Import the CloudHub application you want to upgrade.
-
-
In the Ingress tab, specify the Endpoint configuration:
-
Select a Host from the dropdown list.
If you’re using the anypoint.dns.netendpoint without a TLS context, the Ingress tab doesn’t show it as a possible endpoint. -
Select a specific subdomain from the dropdown list.
-
Add a specific path.
-
Optionally, provide a specific path rewrite.
-
Select whether you want to provide internal or external access to your endpoint.
-
-
Follow the steps to deploy an application to CloudHub 2.0.
|
If you use a different name for the CloudHub 2.0 application, make sure you put the CloudHub application name in the Ingress tab settings in the subdomain field of the endpoint configuration. If you configure URLs incorrectly, traffic doesn’t reach the CloudHub 2.0 application during traffic switching. In applications with inbound traffic, the Shared Load Balancer (SLB) handles traffic switching if your Ingress configuration includes the default CloudHub application endpoint in the format: |
| The Host dropdown list shows only the domains initially added under the certificates of the underlying VPC’s DLB configuration. If you add a new certificate to the original VPC’s DLB after the application upgrade starts, add it manually under the Domain & TLS tab of your newly created private space for that domain to appear on the Host dropdown list. |
Considerations and Limitations
The upgrade process doesn’t automatically map some configuration settings to the new CloudHub 2.0 application.
Application Properties
The upgrade process doesn’t carry over application properties to CloudHub 2.0. Reconfigure these properties manually for a successful upgrade:
-
The upgrade process copies your CloudHub app’s properties during the CloudHub 2.0 application configuration. These properties don’t persist unless you edit at least one property or add a new property. Editing a single property, or adding a new one, causes the edited or new property and all other copied properties to persist.
-
The upgrade process copies the protected properties added during CloudHub 1.0 with
**as their displayed value. Change this displayed value manually to the correct protected value within your CloudHub 2.0 application settings.
Managing Migrated Apps via Mule Maven Plugin (MMP)
To manage a migrated app using the Mule Maven plugin (MMP), copy the public URL configured in Runtime Manager during the migration. If the endpoints specified in the publicUrl field of your pom.xml file don’t match the ones configured in the UI, the Ingress configuration is lost.
Next Steps After Application Upgrade
After the upgrade process deploys your CloudHub 2.0 application, test the app by directing traffic to it and verifying network connectivity and the app behavior.
To avoid updating your client applications that connect to CloudHub, retain the domains from CloudHub on CloudHub 2.0. To link your applications, apply either of these options:
You can also use APIs for application linking using the upgradeData object while creating CloudHub 2.0 deployments, and for traffic switching using the newly introduced endpoint.
|
- Customer-Managed
-
Switch the application’s DNS to point to CloudHub 2.0.
- MuleSoft-Managed
-
Carry over vanity URLs while incrementally switching percentage of traffic from CloudHub to CloudHub 2.0.
| Restart your DLB before initiating the traffic switching. |
| To switch application traffic, you must have the CloudHub Network Administrator permission. Without this permission, the traffic switching fails. For more information about assigning permissions, see Permissions by Product in Anypoint Platform. |
| The CloudHub application must remain in STARTED state until the link between CloudHub and CloudHub 2.0 is successfully established. Stopping the CloudHub application before the link is established can cause traffic disruptions. |
To gradually switch traffic from CloudHub to CloudHub 2.0:
-
In Runtime Manager, go to Finish Upgrade.
-
Select the percentage of traffic to direct from CloudHub to CloudHub 2.0, and click Save Changes.
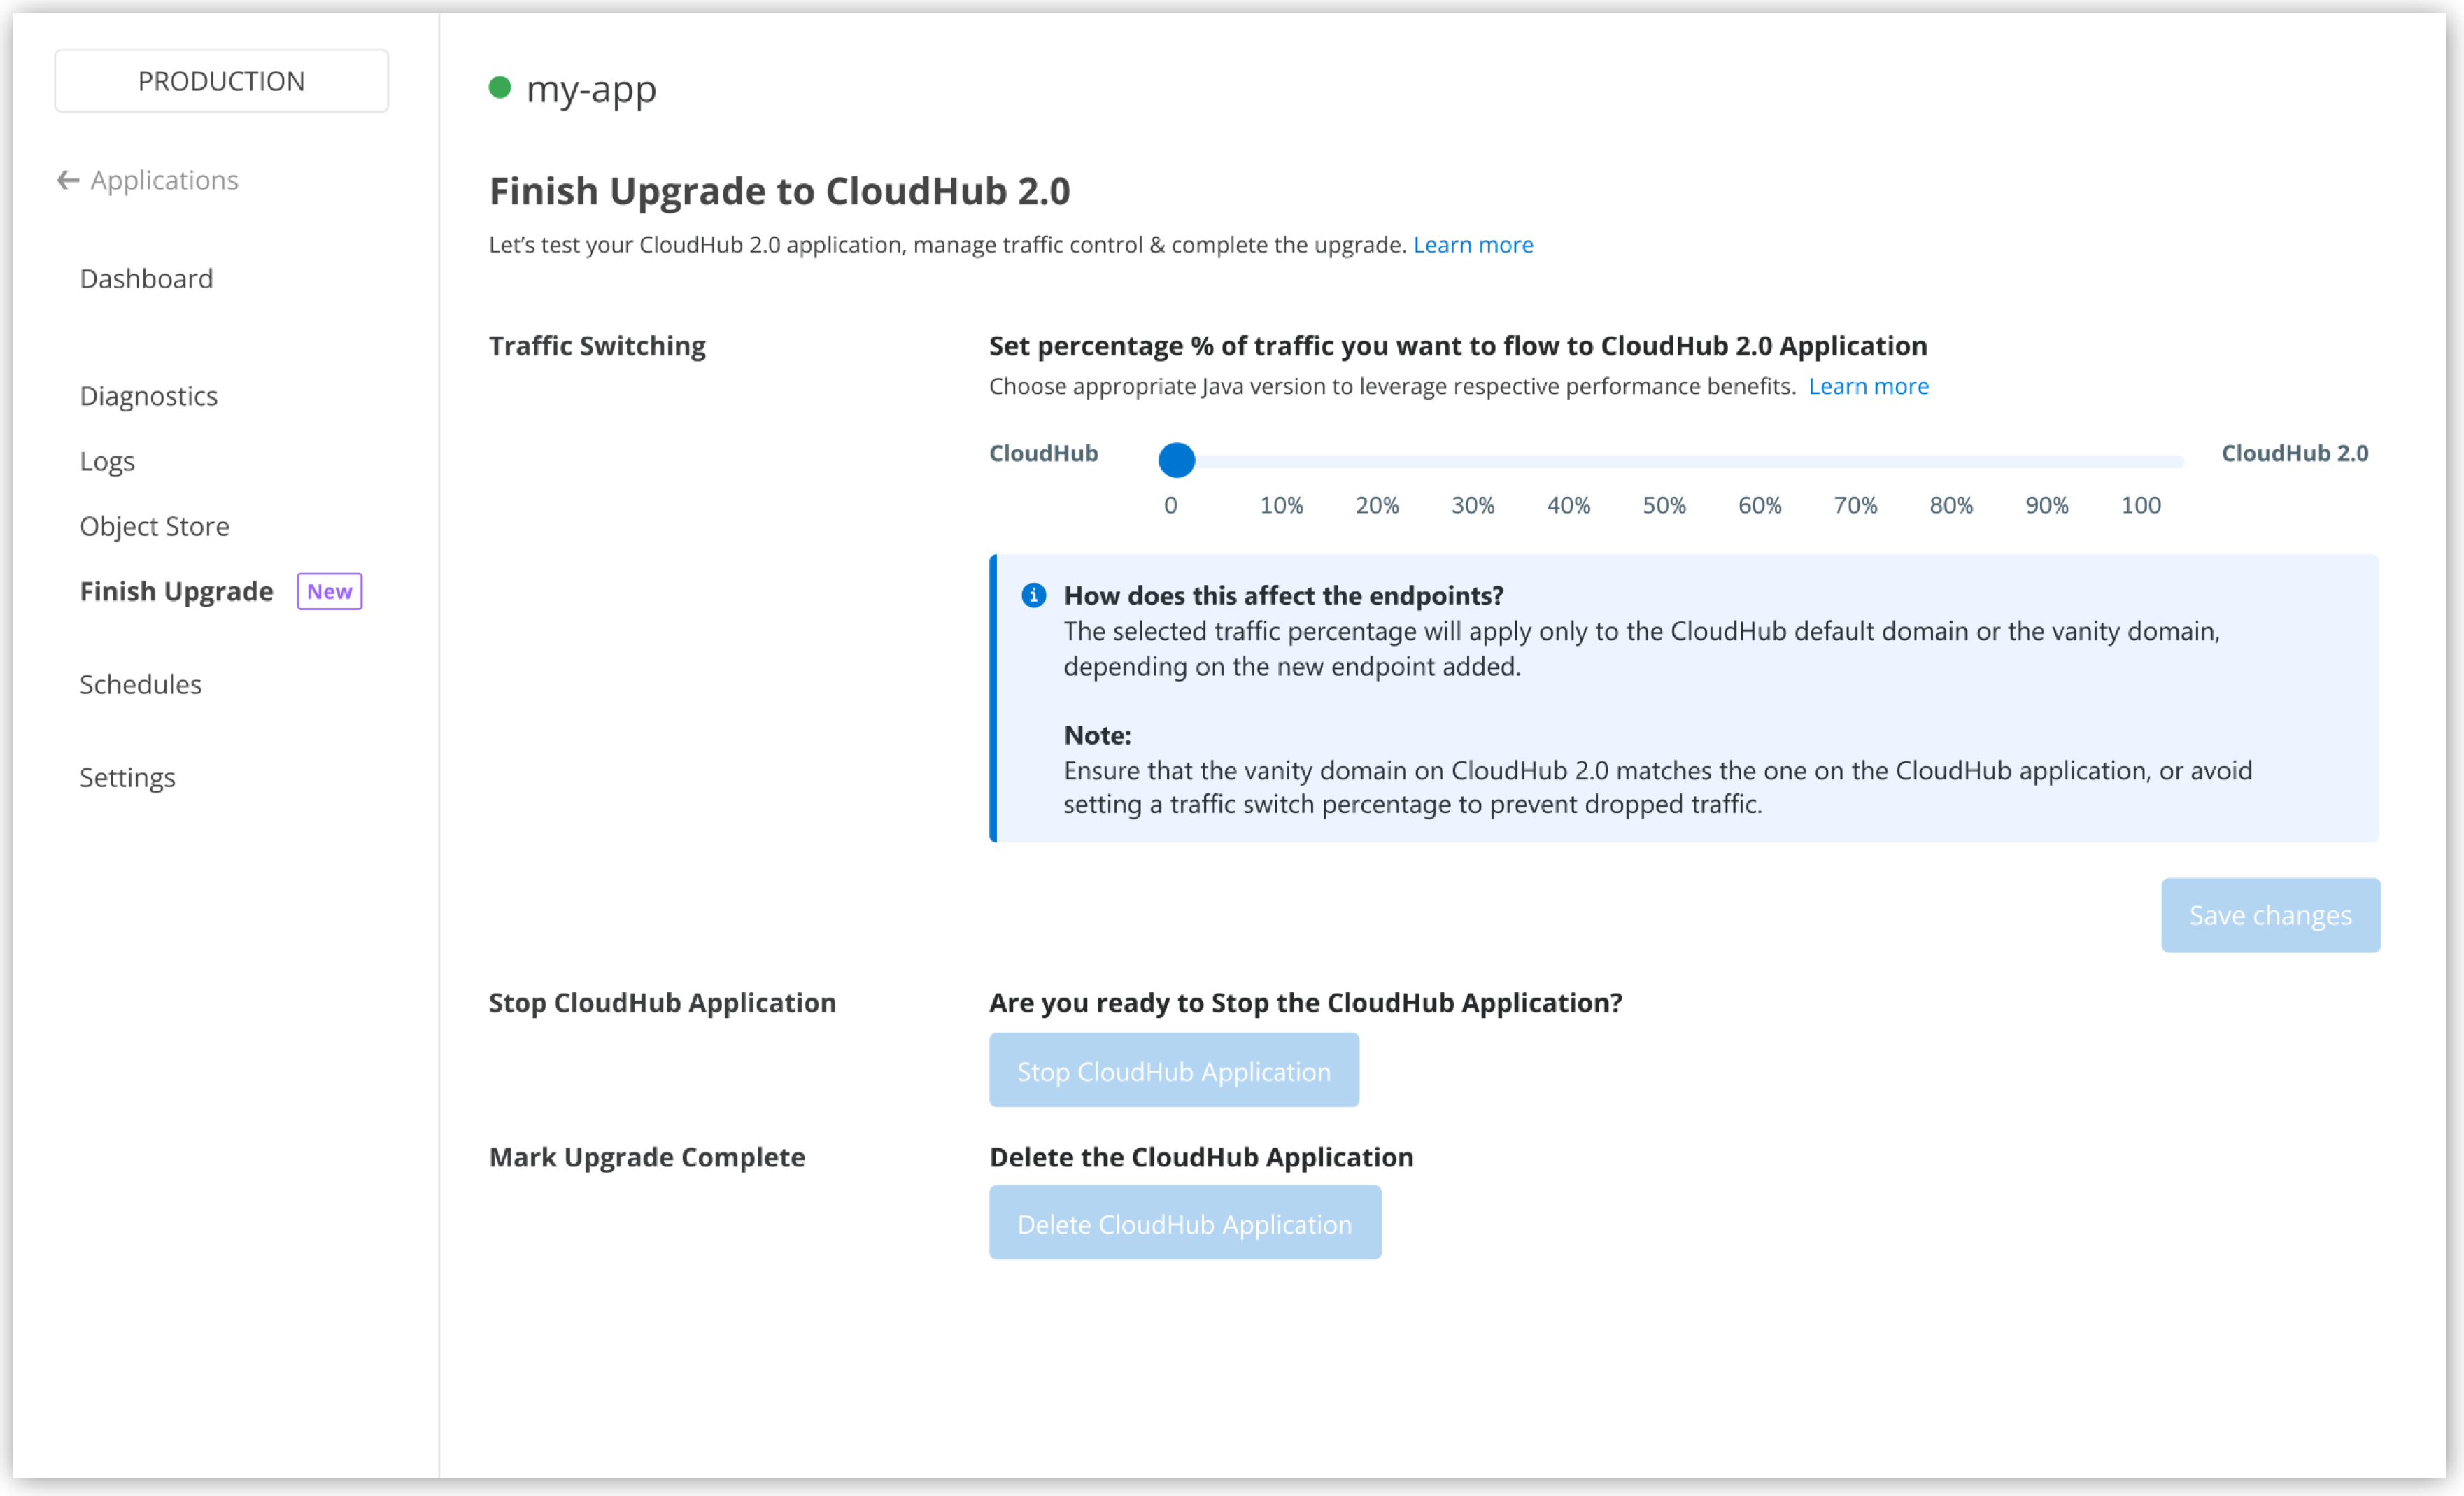
| You can roll back to CloudHub if there are failures during this stage. |
Understanding the Traffic Source
The traffic source determines which type of DNS record the process updates to manage the traffic flow between your CloudHub and CloudHub 2.0 applications during the migration process. Understanding this concept helps you anticipate how the system manages traffic based on your application’s existing and new endpoint configurations.
CloudHub receives traffic from two main sources:
-
Shared Load Balancer (SLB): This source is typically associated with the default endpoints of your CloudHub application. In applications with inbound traffic, the SLB handles traffic switching if your Ingress configuration includes the default CloudHub application endpoint in the format:
<app_name>.<region>.cloudhub.io. -
Dedicated Load Balancer (DLB): This source is usually associated with vanity domains configured for your CloudHub application. If the default CloudHub endpoint is missing, and you have configured a vanity domain or an
anypointdns.netendpoint, the DLB switches the traffic.
During traffic switching, CloudHub needs to know the traffic source to correctly switch traffic between CloudHub and CloudHub 2.0. If you change your application’s endpoint configuration, the inferred traffic source also changes. For example, if you initially have only vanity domains (DLB) and then add a CloudHub default endpoint, CloudHub infers the traffic source as the SLB.
|
If your CloudHub 1.0 application has the default endpoint configured, traffic switches at the SLB. To switch traffic from the DLB instead, remove the CloudHub 1.0 default endpoint, apply changes, and then change the traffic switch percentage. |
To ensure successful traffic switching, follow specific configurations depending on the type of load balancer you want to use and the type of traffic you expect.
DLB with HTTPS Traffic Switching
For applications using a DLB and expecting HTTPS traffic:
-
Enable the Last-Mile Security setting in the Ingress tab of the deployment settings for the CloudHub 2.0 application.
-
Enable Upstream TLS 1.2 or higher in your DLB settings.
-
Make sure that vanity domains on CloudHub 2.0 match those on the CloudHub application to prevent dropped traffic.
DLB with HTTP Traffic Switching
For applications using a DLB and expecting HTTP traffic:
-
Add a firewall rule allowing HTTP from the local private network.
| The CloudHub DLB routes requests from clients to Mule apps deployed within the VPC. The DLB sends requests to a Mule application and uses the HTTP Host header to find the certificate endpoint that matches the request. Then, the DLB uses the URL mapping rules for that endpoint to send the request to the Mule application. If the request doesn’t match any certificate configured on the DLB, the DLB uses the "default" certificate endpoint to match the request against its URL mapping rules. During traffic switching, CloudHub 2.0 doesn’t contain mapping rules for this unmatched host within the default certificate. |
Managing API Policies During Traffic Switching
When you apply API policies to your new application, they begin with a clean internal status.
Policies Unchanged by the App Migration
These policies don’t rely on internal status and their behavior remains consistent:
-
http-basic-authentication
-
cors
-
client id enforcement
-
Header injection
-
Header removal
-
ip-allowlist
-
ip-blocklist
-
ldap-authentication
-
message-logging
-
json-threat-protection
-
xml-threat-protection
Policies Affected by Internal Status (Caching)
These policies rely on internal status to cache data:
-
external-oauth2-access-token-enforcement
-
openam-access-token-enforcement
-
openidconnect-access-token-enforcement
-
pingfederate-access-token-enforcement
-
mule-http-caching-policy
-
jwt-validation
When transitioning to the new application, these policies can either trigger additional requests to the origin servers or have different cached values depending on which application receives the requests.
Policies Affected by Internal Status (Request Counting)
These policies track the number of processed requests and can sometimes exhibit unexpected behavior during the transition to the new application:
-
rate-limiting
-
rate-limiting-sla-based
-
spike-control
If there’s a hard change in traffic from one application to the other, policy counters behave as if they were reset. In a balanced round-robin traffic distribution, the effective number of requests can sometimes double because each application maintains an independent counting mechanism.
During the CloudHub to CloudHub 2.0 application migration, traffic gradually shifts, and both applications are active simultaneously. If your API Manager policies are integrated with your original CloudHub application, the system can’t share or migrate these configurations in real time. To maintain consistent policy enforcement, configure equivalent policies on your CloudHub 2.0 application’s API instance during traffic switching.
Autodiscovery connects a deployed Mule application with an API defined in API Manager. Throughout the migration, both your CloudHub and CloudHub 2.0 applications link to the same API.
Complete the Application Upgrade
After traffic fully redirects to the CloudHub 2.0 application, stop your CloudHub application within 30 days and mark the upgrade as complete.
If you change your CloudHub application after it stops, the changes aren’t replicated in your new CloudHub 2.0 application. Make any required changes to the CloudHub 2.0 application settings.
After your CloudHub application stops, delete it within 30 days.
|
After the CloudHub application stops, traffic switches to the linked CloudHub 2.0 application. To roll back the application upgrade, restart your CloudHub application and configure the traffic switching percentage. After you delete the CloudHub application, the migration is complete. You then can’t create another CloudHub application with the same application name. |
Complete or delete all CloudHub applications in a given upgraded VPC to release entitlements.
Perform DLB Failover
After the VPC upgrade and CloudHub application migration to CloudHub 2.0, perform a DLB failover to retain domains during the transition from CloudHub to CloudHub 2.0. This ensures client application compatibility.
To perform a DLB failover:
-
For each DLB linked to your upgraded VPC, go to the DLB settings page and click Failover to CloudHub 2.0.
This fails over the
anypointdns.netdomain to CloudHub 2.0, removes any additional DLB hop, and redirects traffic to your new CloudHub 2.0 private space URL. -
After the traffic failover completes, stop and delete the CloudHub DLB linked to the VPC.
If there are failures during this stage, restart the DLB to point anypointdns.net to CloudHub while the DLB is in a stopped state. After you delete the DLB, you can’t roll back to CloudHub.
|
For the final steps after VPC upgrade and CloudHub application migration, see CloudHub to CloudHub 2.0 Migration Completion.