
Using Anypoint Studio to Configure Commerce Cloud B2C Shop Connector 2.1
Anypoint Studio (Studio) editors help you design and update your Mule applications, properties, and configuration files.
To add and configure a connector in Studio:
When you run the connector, you can view the app log to check for problems, as described in View the App Log.
If you are new to configuring connectors in Studio, see Using Anypoint Studio to Configure a Connector. If, after reading this topic, you need additional information about the connector fields, see the Commerce Cloud B2C Shop Connector Reference.
Before You Begin
To avoid dependency errors, update your Maven settings.xml file if needed. See Maven Reference for more information (Ignore if already done).
Create a Mule Project
In Studio, create a new Mule project in which to add and configure the connector:
-
In Studio, select File > New > Mule Project.
-
Enter a name for your Mule project and click Finish.
Add the Connector to Your Mule Project
Add Anypoint Connector for Salesforce Commerce Cloud B2C Shop APIs (B2C Shop Connector) to your Mule project to automatically populate the XML code with the connector’s namespace and schema location and add the required dependencies to the project’s pom.xml file:
-
In the Mule Palette view, click (X) Search in Exchange.
-
In Add Modules to Project, type
commerce cloud b2c shopin the search field. -
Click Commerce Cloud B2C Shop Connector in Available modules.
-
Click Add.
-
Click Finish.
Adding a connector to a Mule project in Studio does not make that connector available to other projects in your Studio workspace.
Configure a Source
A source initiates a flow when a specified condition is met. You can configure one of these sources to use with Commerce Cloud B2C Shop Connector:
-
HTTP > Listener
Initiates a flow each time it receives a request on the configured host and port -
Scheduler
Initiates a flow when a time-based condition is met
For example, to configure an HTTP listener, follow these steps:
-
In the Mule Palette view, select HTTP > Listener.
-
Drag Listener to the Studio canvas.
-
On the Listener configuration screen, optionally change the value of the Display Name field.
-
Specify a value for the Path field.
-
Click the plus sign (+) next to the Connector configuration field to configure a global element that can be used by all instances of HTTP Listener in the app.
-
On the General tab, specify connection information for the connector.
-
On the TLS tab, optionally specify the TLS information for the connector. For TLS configuration information, see TLS Configuration.
-
On the Advanced tab, optionally specify reconnection information, including a reconnection strategy. For Reconnection strategy details, see Reconnection Strategies.
-
Click Test Connection to confirm that Mule can connect with the specified server.
-
Click OK.
Add a Connector Operation to the Flow
When you add a connector operation to your flow, you immediately define a specific operation for that connector to perform.
To add an operation for B2C Shop Connector, follow these steps:
-
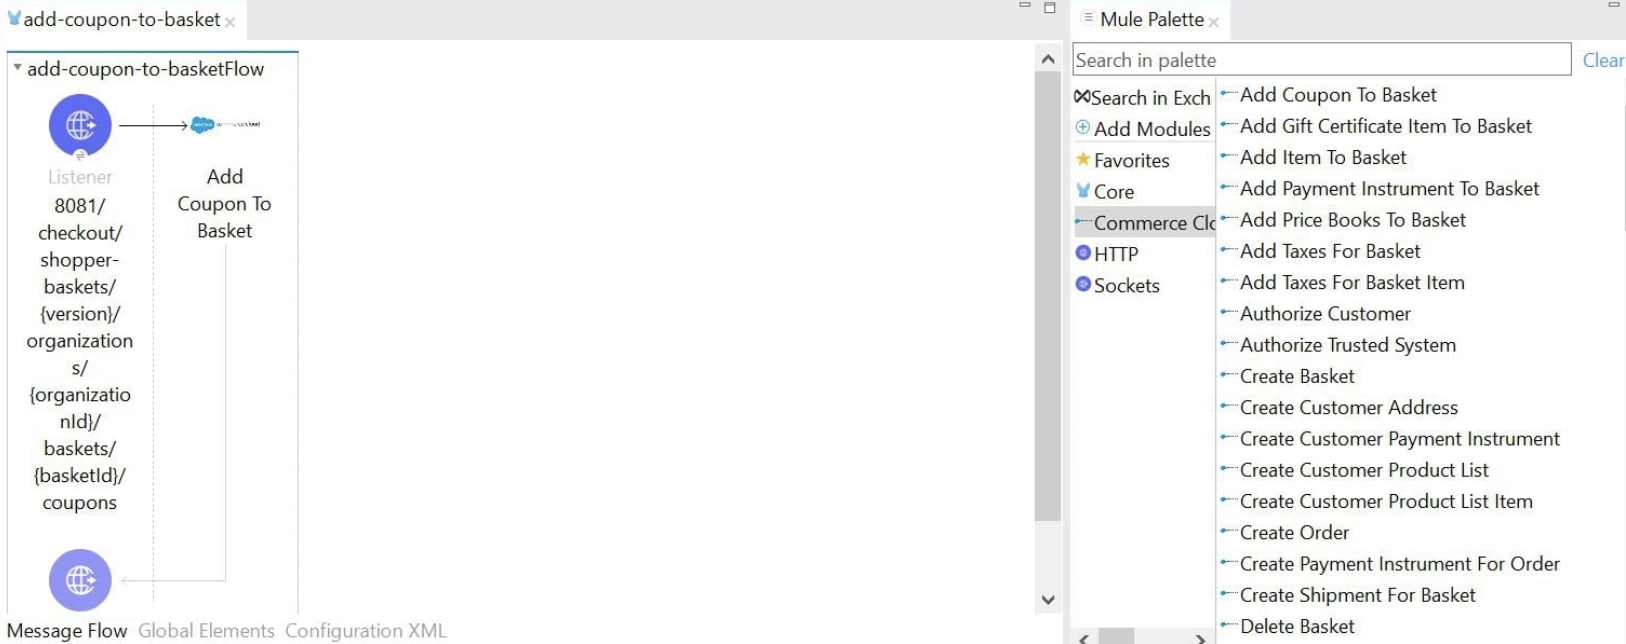
In the Mule Palette view, select Commerce Cloud B2C Shop Connector and then select the desired operation.
-
Drag the operation onto the Studio canvas to the right of the input source.
Configure a Global Element for the Connector
When you configure a connector, it’s best to configure a global element that all instances of that connector in the app can use. Configuring a global element requires you to provide the authentication credentials that the connector requires to access the target Commerce Cloud B2C Shop Connector system. Commerce Cloud B2C Shop Connector supports two different types of connection provider:
-
Customer Auth Connection Provider
-
OAuth2 Application Connection Provider
To configure the global element for Commerce Cloud B2C Shop Connector, follow these steps:
-
Select the name of the connector in the Studio canvas.
-
In the configuration screen for the operation, click the plus sign (+) next to the Connector configuration field to access the global element configuration fields.
-
On the General tab, configure the connection:
Use OAuth 2.0 to delegate user authentication to the service hosting the user account. For more information, refer to Configuring OAuth 2.0 for Connectors, Configuring OAuth 2.0 for Connectors on CloudHub, or OAuth Support in the SDK.
+ You can reference a configuration file that contains ANT-style property placeholders (recommended), or you can enter your authorization credentials in the global configuration properties. For information about the benefits of using property placeholders and how to configure them, see Anypoint Connector Configuration.
+ . On the Advanced tab, optionally specify reconnection information, including a reconnection strategy.
-
Click Test Connection to confirm that Mule can connect with the specified server.
-
Click OK.
Get the Shopper JWT Token
To get the Shopper JWT Token to use for the Commerce Cloud B2C Shop Connector Customer Auth Config:
-
On the General tab of the Global Element Properties screen, select Commerce Cloud B2C Shop Connector Shopper Token and click OK.
-
Configure the following parameters:
Field Name Value Base URI
Parameter base URI. Each instance or tenant gets its own base URI.
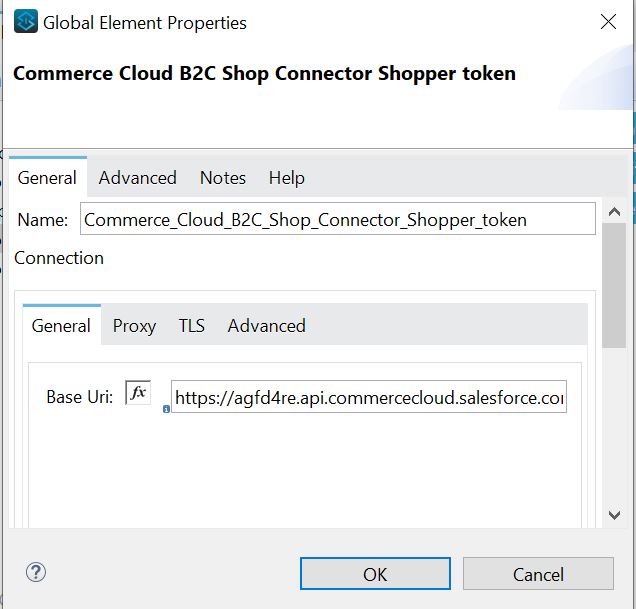
The XML configuration looks like this:
    <commerce-cloud-shopper-api:shopper-token-config name="Commerce_Cloud_B2C_Shop_Connector_Shopper_token" doc:name="Commerce Cloud B2C Shop Connector Shopper token" doc:id="9edebcff-2328-4312-88eb-d8ab4dcbd7cd" >
        <commerce-cloud-shopper-api:shopper-token-connection baseUri="${shopper.baseUri}" />
    </commerce-cloud-shopper-api:shopper-token-config>
Customer Auth Connection Provider Configuration
Before you configure the connection for Commerce Cloud B2C Shop Connector Customer Auth Config, get the Shopper JWT Token.
-
On the General tab of the Global Element Properties screen, select Commerce Cloud B2C Shop Connector Customer Auth Config and click OK.
-
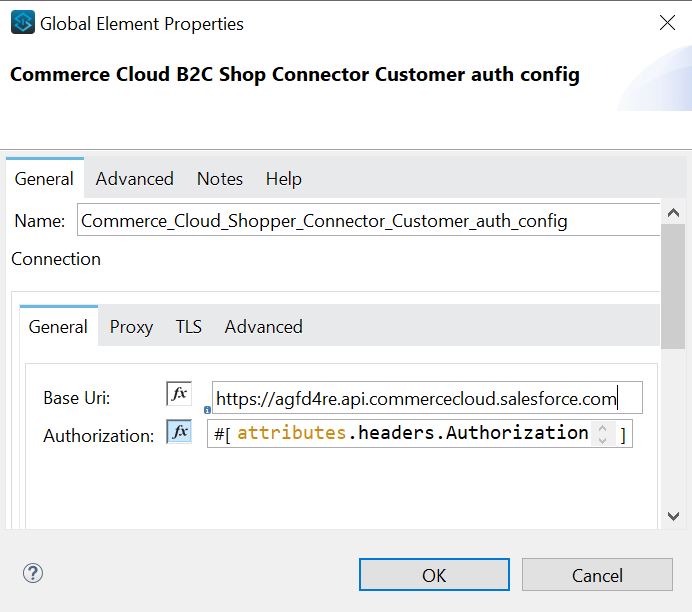
Configure the following parameters:
Field Name Value Base URI
Parameter base URI. Each instance or tenant has its own base URI.
Authorization
Provide the Commerce Cloud B2C Shopper JWT Token as the authorization parameter.
This example adds the base URI to the application properties file and references it using placeholders:
-
Click Test Connection to verify the configuration.
The XML configuration looks like this:
    <commerce-cloud-shopper-api:customer-auth-config name="Commerce_Cloud_Shopper_Connector_Customer_auth_config" doc:name="Commerce Cloud Shopper Connector Customer auth config" doc:id="3513fbf9-98ad-45a0-bd8e-5f01f1f340b2">
        <commerce-cloud-shopper-api:shopper-connection baseUri="${shopper.baseUri}" authorization="#[attributes.headers.Authorization]" />
    </commerce-cloud-shopper-api:customer-auth-config>
OAuth2 Application Connection Provider
Use OAuth 2.0 to delegate user authentication to the service hosting the user account. For more information, refer to Configuring OAuth 2.0 for Connectors, Configuring OAuth 2.0 for Connectors on CloudHub, or OAuth Support in the SDK.
-
On the General tab of the Global Element Properties screen, select Commerce Cloud B2C Shop Connector Config and click OK.
-
Configure the following parameters:
Field Name Value Base Uri
Access API URL
Client Id
ID of the client account created with Salesforce Commerce Cloud
Client Secret
Secret of the client account created with Salesforce Commerce Cloud
Token url
Access token URL
Scopes
Scopes for access
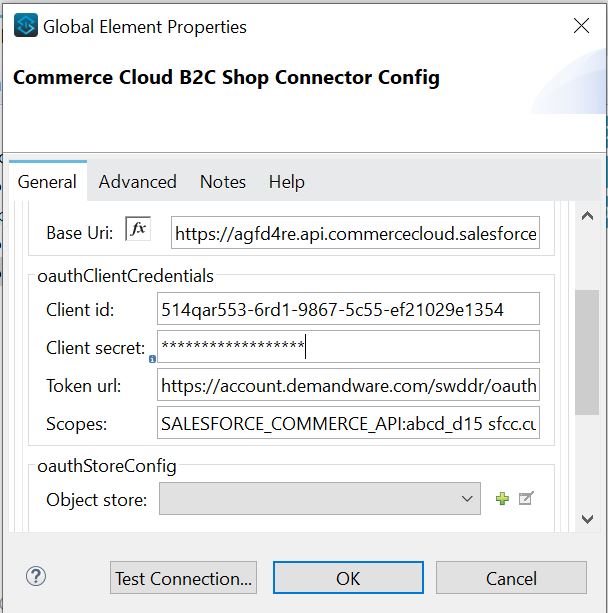
This example adds credentials to the application properties file and references it using placeholders:
-
Click Test Connection to verify the configuration.
The XML code for the OAuth 2.0 application connection provider configuration looks like this:
   <commerce-cloud-shopper-api:config name="Commerce_Cloud_B2C_Shop_Connector_Config" doc:name="Commerce Cloud B2C Shop Connector Config" doc:id="b487e17a-b80a-4cf4-a2f3-d24d47690844" >
		<commerce-cloud-shopper-api:am-oauth2-connection baseUri="${shopper.baseUri}" >
			<commerce-cloud-shopper-api:oauth-client-credentials clientId="${shopper.clientId}" clientSecret="${shopper.clientSecret}" tokenUrl="${shopper.tokenUrl}" scopes="${shopper.scopes}" />
		</commerce-cloud-shopper-api:am-oauth2-connection>
	</commerce-cloud-shopper-api:config>
View the App Log
To check for problems, you can view the app log as follows:
-
If you’re running the app from Anypoint Platform, the app log output is visible in the Anypoint Studio console window.
-
If you’re running the app using Mule from the command line, the app log output is visible in your OS console.
Unless the log file path is customized in the app’s log file (log4j2.xml), you can also view the app log in the default location MULE_HOME/logs/<app-name>.log.
You can configure the location of the log path in the app log file log4j2.xml.