Redis Connector 5.4 の例 - Mule 4
次の例は、Redis Connector を使用して Redis サーバーでキー値を設定する方法と、Redis Connector を Mule アプリケーションのカスタムオブジェクトストアとして使用する方法を示しています。
Redis サーバーでのキー値の設定
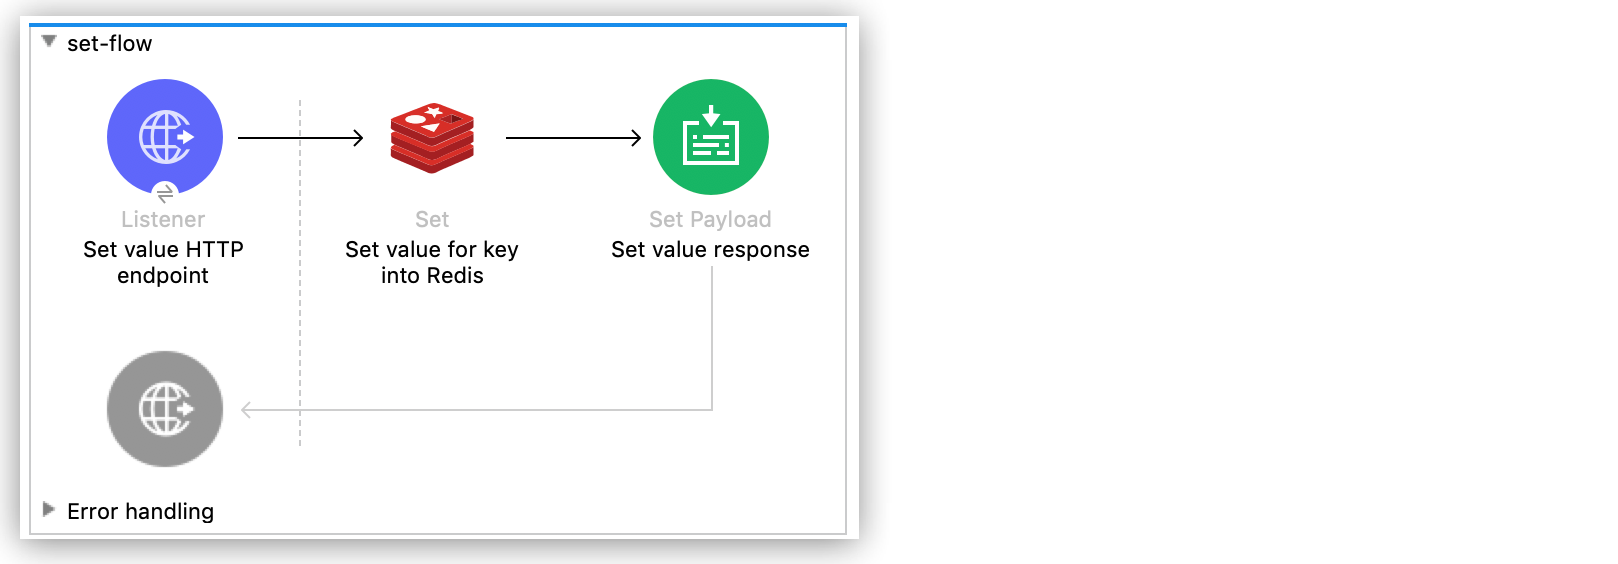
次の画面ショットは、この例のフローを示しています。
Anypoint Studio を使用して Redis サーバーでキー値を設定する手順は、次のとおりです。
-
[File (ファイル)] > [New (新規)] > [Mule Project (Mule プロジェクト)] をクリックして新しい Mule プロジェクトを作成します。
-
新しいプロジェクトの名前を入力して、[Finish (完了)] をクリックします。
-
[Mule Palette (Mule パレット)] ビューで [HTTP] > [Listener (リスナー)] を選択して Studio キャンバスにドラッグします。
HTTP リスナーはフローのエントリポイントであり、キーとその値を提供します。
-
[Connector Configuration (コネクタ設定)] 項目の横にあるプラス記号 (+) をクリックします。
-
デフォルト設定のままにして、[OK] をクリックします。
-
[Path (パス)] 項目を
/ に設定します。 -
[Mule Palette (Mule パレット)] ビューで、
redis を検索し、Set 操作を [Listener (リスナー)] の右側にドラッグします。Set 操作では、Redis サーバーにデータを送信します。
-
Set 操作のプロパティを次のように設定します。
-
[Display Name (表示名)] 項目を
Set value for key into Redis に設定します。 -
[Key (キー)] 項目を
#[payload.key] に設定します。 -
[Value (値)] 項目を
#[payload.value] に設定します。![[General (一般)] タブでの Set 操作のプロパティウィンドウ](_images/redis-set-config.png)
-
-
[Mule Palette (Mule パレット)] ビューで、
payload を検索し、Set Payload コンポーネントを Studio キャンバスの [Set value for key into Redis (Redis へのキーの値の設定)] の右側にドラッグします。Set Payload コンポーネントでは、受信 HTTP 要求の応答を作成します。
-
Set Payload のプロパティを次のように設定します。
-
[Display Name (表示名)] 項目を
Set value response に設定します。 -
[Value (値)] 項目を
Successfully set value: #[payload.value] to key: #[payload.key] に設定します。![[General (一般)] タブでの Set Payload のプロパティウィンドウ](_images/redis-set-response-config.png)
-
-
変更を保存したら、Studio キャンバスを右クリックし、[Run project <project name> (プロジェクト <プロジェクト名> を実行)] を選択してアプリケーションをデプロイします。
-
アプリケーションが実行されている場合は、HTTP クライアントアプリケーションを使用して、コンテンツタイプが
application/x-www-form-urlencoded で本文が url-encoded 形式の POST 要求を localhost:8081/ に送信します。リクエストボディにはキーと値を含めます。
curl -X POST -d "key=test-key" -d "value=test-value" localhost:8081/
この例の XML は次のようになります。
<?xml version="1.0" encoding="UTF-8"?> <mule xmlns:redis="http://www.mulesoft.org/schema/mule/redis" xmlns:tracking="http://www.mulesoft.org/schema/mule/ee/tracking" xmlns:http="http://www.mulesoft.org/schema/mule/http" xmlns="http://www.mulesoft.org/schema/mule/core" xmlns:doc="http://www.mulesoft.org/schema/mule/documentation" xmlns:spring="http://www.springframework.org/schema/beans" xmlns:xsi="http://www.w3.org/2001/XMLSchema-instance" xsi:schemaLocation=" http://www.mulesoft.org/schema/mule/http http://www.mulesoft.org/schema/mule/http/current/mule-http.xsd http://www.springframework.org/schema/beans http://www.springframework.org/schema/beans/spring-beans-current.xsd http://www.mulesoft.org/schema/mule/core http://www.mulesoft.org/schema/mule/core/current/mule.xsd http://www.mulesoft.org/schema/mule/http http://www.mulesoft.org/schema/mule/http/current/mule-http.xsd http://www.mulesoft.org/schema/mule/ee/tracking http://www.mulesoft.org/schema/mule/ee/tracking/current/mule-tracking-ee.xsd http://www.mulesoft.org/schema/mule/redis http://www.mulesoft.org/schema/mule/redis/current/mule-redis.xsd"> <redis:config name="Redis__Configuration" host="${config.host}" connectionTimeout="${config.connectionTimeout}" port="${config.port}" doc:name="Redis: Configuration"/> <http:listener-config name="HTTP_Listener_config" doc:name="HTTP Listener config" basePath="/"> <http:listener-connection host="0.0.0.0" port="8081" /> </http:listener-config> <flow name="set-flow"> <http:listener config-ref="HTTP_Listener_config" path="/" doc:name="Set value HTTP endpoint"/> <redis:set config-ref="Redis__Configuration" key="#[payload.key]" value="#[payload.value]" doc:name="Set value for key into Redis"> <redis:value ><![CDATA[payload.key]]></redis:value> </redis:set> <set-payload value="Successfully set value: #[payload.value] to key: #[payload.key]" doc:name="Set value response"/> </flow> </mule>text
カスタムオブジェクトストアとしての Redis Connector の使用
Studio で Redis Connector を Mule アプリケーションのカスタムオブジェクトストアとして設定する手順は、次のとおりです。
-
Redis 名前空間を
<mule> 要素に追加します。xmlns:redis="http://www.mulesoft.org/schema/mule/redis" -
Redis 名前空間によって参照される Redis スキーマの場所を追加します。
http://www.mulesoft.org/schema/mule/redis http://www.mulesoft.org/schema/mule/redis/current/mule-redis.xstext -
HTTP 名前空間を
<mule> 要素に追加します。xmlns:http="http://www.mulesoft.org/schema/mule/http" -
HTTP 名前空間によって参照される HTTP スキーマの場所を追加します。
http://www.mulesoft.org/schema/mule/http http://www.mulesoft.org/schema/mule/http/current/mule-http.xsdtext -
オブジェクトストア名前空間を
<mule> 要素に追加します。xmlns:os="http://www.mulesoft.org/schema/mule/os" -
オブジェクトストア名前空間によって参照されるオブジェクトストアスキーマの場所を追加します。
http://www.mulesoft.org/schema/mule/os http://www.mulesoft.org/schema/mule/os/current/mule-os.xsdtext -
Studio の XML エディターを使用して、プロジェクトに
<os:config> 要素を追加して、Redis 接続種別 (clustered-connection または nonclustered-connection) を含むように設定します。<os:config name="ObjectStore_Config"> <redis:nonclustered-connection host="${redis.host}"/> </os:config>xml -
プロジェクトに
<os:object-store> 要素を追加して、以前に作成した設定を参照するように設定します。<os:object-store name="Object_store" config-ref="ObjectStore_Config" maxEntries="1" entryTtl="60" expirationInterval="10" expirationIntervalUnit="SECONDS"/>xml -
プロジェクトに
<http:listener-config> 要素を追加し、その属性を設定します。<http:listener-config name="HTTP_Listener_Configuration" host="0.0.0.0" port="8081" doc:name="Listener"/>xml -
プロジェクトに空の
<flow> 要素を追加します。<<flow> name="set-flow"> </flow>xml -
<flow> 要素内に <http:listener> 要素を追加します。<http:listener config-ref="HTTP_Listener_Configuration" path="/" />xml -
<flow> 要素内で、<http:listener> 要素の後に <os:store> 要素を追加して、以前に作成したオブジェクトストアを使用するように <os:store> を設定します。<os:store key="#[attributes.queryParams.key]" objectStore="Object_store" failIfPresent="true" failOnNullValue="false"> <os:value ><![CDATA[#[attributes.queryParams.value]]]></os:value> </os:store>xml完了すると、XML ファイルは次のようになります。
<?xml version="1.0" encoding="UTF-8"?> <mule xmlns:ee="http://www.mulesoft.org/schema/mule/ee/core" xmlns:http="http://www.mulesoft.org/schema/mule/http" xmlns:os="http://www.mulesoft.org/schema/mule/os" xmlns:redis="http://www.mulesoft.org/schema/mule/redis" xmlns="http://www.mulesoft.org/schema/mule/core" xmlns:doc="http://www.mulesoft.org/schema/mule/documentation" xmlns:xsi="http://www.w3.org/2001/XMLSchema-instance" xsi:schemaLocation=" http://www.mulesoft.org/schema/mule/http http://www.mulesoft.org/schema/mule/http/current/mule-http.xsd http://www.mulesoft.org/schema/mule/ee/core http://www.mulesoft.org/schema/mule/ee/core/current/mule-ee.xsd http://www.mulesoft.org/schema/mule/core http://www.mulesoft.org/schema/mule/core/current/mule.xsd http://www.mulesoft.org/schema/mule/redis http://www.mulesoft.org/schema/mule/redis/current/mule-redis.xsd http://www.mulesoft.org/schema/mule/os http://www.mulesoft.org/schema/mule/os/current/mule-os.xsd http://www.mulesoft.org/schema/mule/http http://www.mulesoft.org/schema/mule/http/current/mule-http.xsd"> <http:listener-config name="HTTP_Listener_config"> <http:listener-connection host="0.0.0.0" port="8081" /> </http:listener-config> <os:object-store name="Object_store" config-ref="ObjectStore_Config" maxEntries="1" entryTtl="60" expirationInterval="10" expirationIntervalUnit="SECONDS"/> <os:config name="ObjectStore_Config"> <redis:nonclustered-connection host="${redis.host}"/> </os:config> <flow name="StoreFlow" > <http:listener doc:name="Listener" config-ref="HTTP_Listener_config" path="/store"/> <os:store doc:name="Store" key="#[attributes.queryParams.key]" objectStore="Object_store" failIfPresent="true" failOnNullValue="false"> <os:value ><![CDATA[#[attributes.queryParams.value]]]></os:value> </os:store> </flow> </mule>xml