Salesforce CDP Connector 1.0 の例
次の例は、Salesforce CDP Connector を使用して挿入、クエリ、削除などのストリーミング操作および一括操作を実行する方法を示しています。
-
ストリーミング API のフローは次のとおりです。
-
[Insert Data - Streaming API]
ストリーミング API を介してオブジェクトのエンドポイントにデータを挿入する方法を示します。 -
[Query Data]
カスタム SOQL クエリを使用してストリーミング API を介してデータを照会する方法を示します。 -
[Delete Data - Streaming API]
ストリーミング API を介して特定のオブジェクトのレコードを削除する方法を示します。
-
-
Bulk API のフローは次のとおりです。
-
[Create Job - Bulk API]
Salesforce CDP 取り込み API オブジェクトにデータをアップロードするために必要な一括ジョブを作成する方法を示します。 -
[Upload Job Data - Bulk API]
Salesforce CDP 取り込み API オブジェクトに挿入するデータ、または Salesforce CDP 取り込み API オブジェクトから削除するデータをアップロードする方法を示します。 -
[Close Job - Bulk API]
指定したジョブ ID の状況を更新し、ジョブを終了して処理キューに登録する方法を示します。 -
[Abort Job - Bulk API]
指定したジョブ ID の状況を更新し、ジョブを中止して処理キューには登録しないようにする方法を示します。 -
[Get Job - Bulk API]
指定したジョブ ID の現在の状況を取得する方法を示します。 -
[Delete Job - Bulk API]
指定したジョブ ID を削除または終了する方法を示します。これにより、Salesforce で保存されているジョブデータとメタデータが削除されます。
-
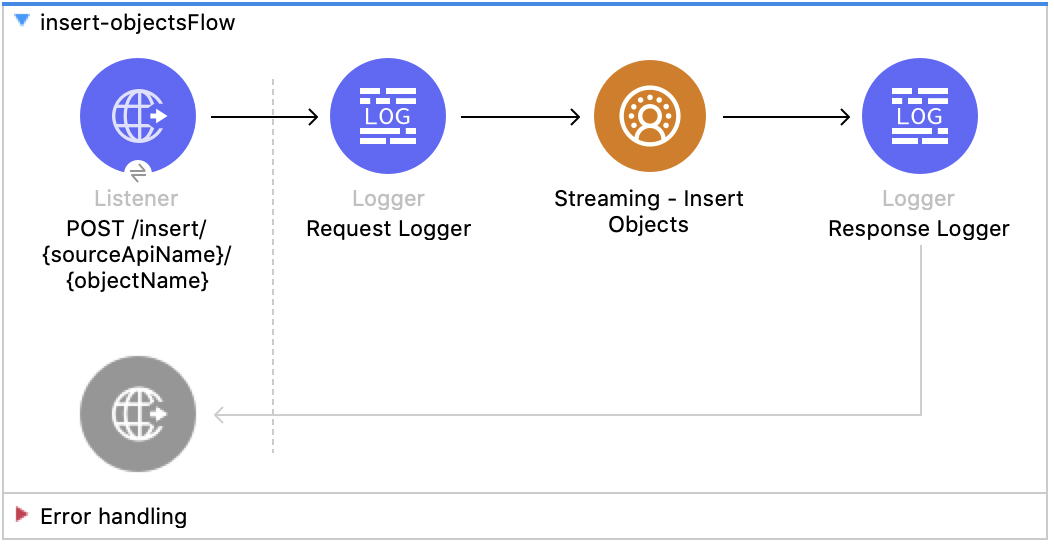
データの挿入 - ストリーミング API
この Mule フローでは、ストリーミング API を介してオブジェクトのエンドポイントにデータを挿入する方法を示します。
この例では、次の操作を使用します。
-
HTTP Listener
ソースとオブジェクト名が URI パラメーターとして含まれる HTTP POST 要求からデータを受け取ります。 -
Logger
Listener から受け取った HTTP 要求を表示します。また、後で Insert Objects 操作からの HTTP 応答を表示します。 -
Streaming Insert
-
JWT を選択したかユーザー名とパスワードを選択したかに基づいて認証します。
-
ソース名、オブジェクト名、ペイロードを受け取ります。
-
Salesforce API をコールして、該当のオブジェクトのエンドポイントにペイロードを挿入します。
-
この例の XML
この例のフローをすばやく Mule アプリケーションに読み込むには、次のコードを Studio XML エディターに貼り付けます。
<?xml version="1.0" encoding="UTF-8"?>

<mule xmlns:sdc="http://www.mulesoft.org/schema/mule/sdc" xmlns:http="http://www.mulesoft.org/schema/mule/http"
	  xmlns="http://www.mulesoft.org/schema/mule/core"
	  xmlns:doc="http://www.mulesoft.org/schema/mule/documentation" xmlns:xsi="http://www.w3.org/2001/XMLSchema-instance" xsi:schemaLocation="http://www.mulesoft.org/schema/mule/core http://www.mulesoft.org/schema/mule/core/current/mule.xsd
http://www.mulesoft.org/schema/mule/http http://www.mulesoft.org/schema/mule/http/current/mule-http.xsd
http://www.mulesoft.org/schema/mule/sdc http://www.mulesoft.org/schema/mule/sdc/current/mule-sdc.xsd">
	<http:listener-config name="HTTP_Listener_config" doc:name="HTTP Listener config" >
		<http:listener-connection host="0.0.0.0" port="8081" />
	</http:listener-config>
    <configuration-properties doc:name="Configuration properties" file="mule-app.properties" />
    <sdc:sdc-config name="Salesforce_CDP_OAuth_JWT_config" doc:name="Salesforce CDP config" >
		<sdc:oauth-jwt-connection consumerKey="${server.consumerKey}" keyStorePath="${server.keyStorePath}" storePassword="${server.keyStorePassword}" subject="${server.userName}" keyAlias="${server.certificateAlias}" audienceUrl="${server.audienceUrl}"/>
	</sdc:sdc-config>
	<sdc:sdc-config name="Salesforce_CDP_OAuth_UsernamePassword_config" doc:name="Salesforce CDP config" >
		<sdc:oauth-user-pass-connection audienceUrl="${server.audienceUrl}" username="${server.userName}" password="${server.password}" clientId="${server.consumerKey}" clientSecret="${server.consumerSecret}"/>
	</sdc:sdc-config>

	<flow name="Insert-objectsFlow" >
		<http:listener doc:name="POST /insert/{sourceApiName}/{objectName}" config-ref="HTTP_Listener_config" path="/insert/{sourceApiName}/{objectName}" allowedMethods="POST"/>
		<logger level="INFO" doc:name="Request Logger" message="#[payload]"/>
		<sdc:insert-objects doc:name="Streaming Insert" config-ref="Salesforce_CDP_OAuth_JWT_config" sourceNameUriParam="#[attributes.uriParams.sourceApiName]" objectNameUriParam="#[attributes.uriParams.objectName]"/>
		<logger level="INFO" doc:name="Response Logger" />
	</flow>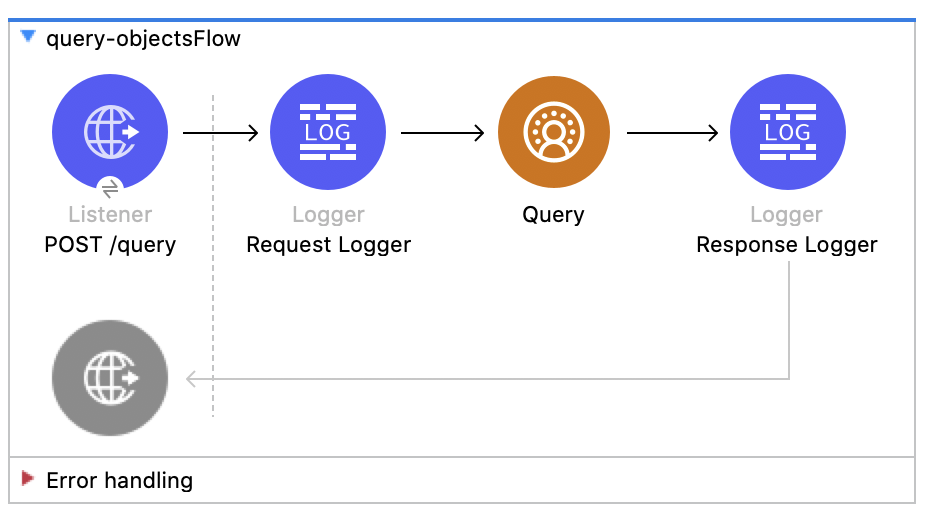
</mule>データの照会
この Mule フローでは、カスタム SOQL クエリを使用して CDP からデータを照会する方法を示します。
この例では、次の操作を使用します。
-
HTTP Listener
ペイロードにクエリが含まれる HTTP POST 要求からデータを受け取ります。 -
Logger
Listener から受け取った HTTP 要求を表示します。また、後で Query 操作からの HTTP 応答を表示します。 -
クエリ
-
JWT を選択したかユーザー名とパスワードを選択したかに基づいて認証します。
-
前の SOQL クエリを受け取ります。
-
クエリを含む Salesforce API をコールして、結果を受け取ります。
-
この例の XML
この例のフローをすばやく Mule アプリケーションに読み込むには、次のコードを Studio XML エディターに貼り付けます。
<?xml version="1.0" encoding="UTF-8"?>

<mule xmlns:sdc="http://www.mulesoft.org/schema/mule/sdc" xmlns:http="http://www.mulesoft.org/schema/mule/http"
	  xmlns="http://www.mulesoft.org/schema/mule/core"
	  xmlns:doc="http://www.mulesoft.org/schema/mule/documentation" xmlns:xsi="http://www.w3.org/2001/XMLSchema-instance" xsi:schemaLocation="http://www.mulesoft.org/schema/mule/core http://www.mulesoft.org/schema/mule/core/current/mule.xsd
http://www.mulesoft.org/schema/mule/http http://www.mulesoft.org/schema/mule/http/current/mule-http.xsd
http://www.mulesoft.org/schema/mule/sdc http://www.mulesoft.org/schema/mule/sdc/current/mule-sdc.xsd">
	<http:listener-config name="HTTP_Listener_config" doc:name="HTTP Listener config" >
		<http:listener-connection host="0.0.0.0" port="8081" />
	</http:listener-config>
    <configuration-properties doc:name="Configuration properties" file="mule-app.properties" />
    <sdc:sdc-config name="Salesforce_CDP_OAuth_JWT_config" doc:name="Salesforce CDP config" >
		<sdc:oauth-jwt-connection consumerKey="${server.consumerKey}" keyStorePath="${server.keyStorePath}" storePassword="${server.keyStorePassword}" subject="${server.userName}" keyAlias="${server.certificateAlias}" audienceUrl="${server.audienceUrl}"/>
	</sdc:sdc-config>
	<sdc:sdc-config name="Salesforce_CDP_OAuth_UsernamePassword_config" doc:name="Salesforce CDP config" >
		<sdc:oauth-user-pass-connection audienceUrl="${server.audienceUrl}" username="${server.userName}" password="${server.password}" clientId="${server.consumerKey}" clientSecret="${server.consumerSecret}"/>
	</sdc:sdc-config>

	<flow name="query-objectsFlow" >
		<http:listener doc:name="POST /query" config-ref="HTTP_Listener_config" path="/query" allowedMethods="POST"/>
		<logger level="INFO" doc:name="Request Logger" message="#[payload]"/>
		<sdc:query doc:name="Query" config-ref="Salesforce_CDP_OAuth_JWT_config"/>
		<logger level="INFO" doc:name="Response Logger" message="#[payload]"/>
	</flow>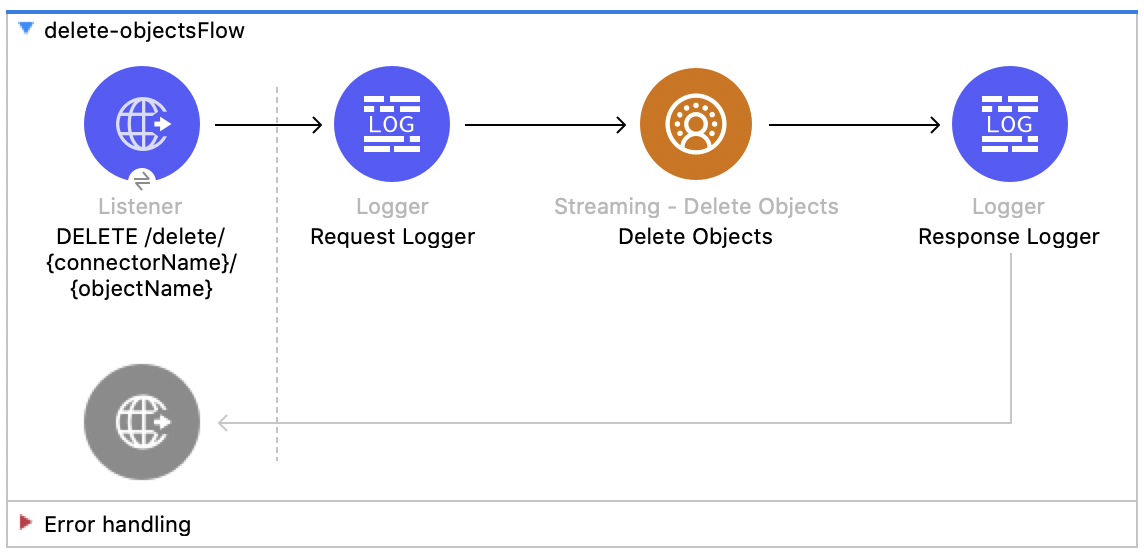
</mule>データの削除 - ストリーミング API
この Mule フローでは、オブジェクトのエンドポイントを使用してストリーミング API を介してデータを削除する方法を示します。
この例では、次の操作を使用します。
-
HTTP Listener
ソース API とオブジェクト名が URI パラメーターとして含まれ、レコード ID がクエリパラメーターとして含まれる HTTP DELETE 要求からデータを受け取ります。 -
Logger
Listener から受け取った HTTP 要求を表示します。また、後で Streaming Delete 操作からの HTTP 応答を表示します。 -
Streaming Delete
-
JWT を選択したかユーザー名とパスワードを選択したかに基づいて認証します。
-
ソース API 参照名、オブジェクト名、レコード ID を受け取ります。
-
Salesforce API をコールして、該当のオブジェクトのエンドポイントを使用してクエリパラメーターからレコードを削除します。
-
この例の XML
この例のフローをすばやく Mule アプリケーションに読み込むには、次のコードを Studio XML エディターに貼り付けます。
<?xml version="1.0" encoding="UTF-8"?>
<mule xmlns:sdc="http://www.mulesoft.org/schema/mule/sdc" xmlns:http="http://www.mulesoft.org/schema/mule/http"
xmlns="http://www.mulesoft.org/schema/mule/core"
xmlns:doc="http://www.mulesoft.org/schema/mule/documentation" xmlns:xsi="http://www.w3.org/2001/XMLSchema-instance" xsi:schemaLocation="http://www.mulesoft.org/schema/mule/core http://www.mulesoft.org/schema/mule/core/current/mule.xsd
http://www.mulesoft.org/schema/mule/http http://www.mulesoft.org/schema/mule/http/current/mule-http.xsd
http://www.mulesoft.org/schema/mule/sdc http://www.mulesoft.org/schema/mule/sdc/current/mule-sdc.xsd">
<http:listener-config name="HTTP_Listener_config" doc:name="HTTP Listener config" >
<http:listener-connection host="0.0.0.0" port="8081" />
</http:listener-config>
<configuration-properties doc:name="Configuration properties" file="mule-app.properties" />
<sdc:sdc-config name="Salesforce_CDP_OAuth_JWT_config" doc:name="Salesforce CDP config" >
<sdc:oauth-jwt-connection consumerKey="${server.consumerKey}" keyStorePath="${server.keyStorePath}" storePassword="${server.keyStorePassword}" subject="${server.userName}" keyAlias="${server.certificateAlias}" audienceUrl="${server.audienceUrl}"/>
</sdc:sdc-config>
<sdc:sdc-config name="Salesforce_CDP_OAuth_UsernamePassword_config" doc:name="Salesforce CDP config" >
<sdc:oauth-user-pass-connection audienceUrl="${server.audienceUrl}" username="${server.userName}" password="${server.password}" clientId="${server.consumerKey}" clientSecret="${server.consumerSecret}"/>
</sdc:sdc-config>
<flow name="delete-objectsFlow" >
<http:listener doc:name="DELETE /delete/{sourceApiName}/{objectName}" config-ref="HTTP_Listener_config" path="/delete/{sourceApiName}/{objectName}" allowedMethods="DELETE"/>
<logger level="INFO" doc:name="Request Logger" />
<sdc:delete-objects doc:name="Streaming Delete" config-ref="Salesforce_CDP_OAuth_JWT_config" idsQueryParams="#[output application/java --- [attributes.queryParams.ids]]" sourceNameUriParam="#[attributes.uriParams.sourceApiName]" objectNameUriParam="#[attributes.uriParams.objectName]"/>
<logger level="INFO" doc:name="Response Logger" />
</flow>
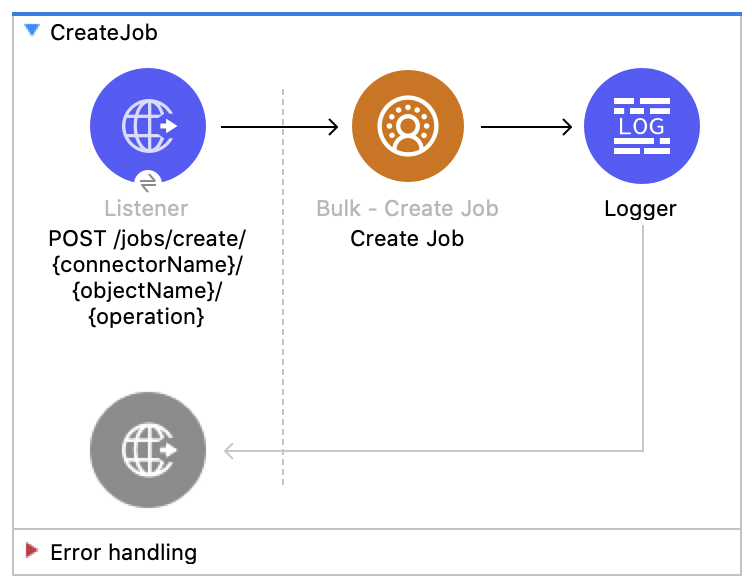
</mule>ジョブの作成 - Bulk API
この Mule フローでは、Salesforce CDP 取り込み API オブジェクトにデータをアップロードする一括ジョブを作成する方法を示します。
この例では、次の操作を使用します。
-
HTTP Listener
ソース API とオブジェクト名が URI パラメーターとして含まれ、レコード ID がクエリパラメーターとして含まれる HTTP POST 要求からデータを受け取ります。 -
Logger
Listener から受け取った HTTP 要求を表示します。また、後で Create Job 操作からの HTTP 応答を表示します。 -
Create Job:
-
JWT を選択したかユーザー名とパスワードを選択したかに基づいて認証します。
-
ソース API 参照名、オブジェクト名、ジョブ操作を受け取ります。ジョブ操作については、リソースページを参照してください。
-
ジョブを作成する Salesforce API をコールして、応答を返します。
-
この例の XML
この例のフローをすばやく Mule アプリケーションに読み込むには、次のコードを Studio XML エディターに貼り付けます。
<?xml version="1.0" encoding="UTF-8"?>

<mule xmlns:salesforce="http://www.mulesoft.org/schema/mule/salesforce" xmlns:ee="http://www.mulesoft.org/schema/mule/ee/core"
	xmlns:file="http://www.mulesoft.org/schema/mule/file"
	xmlns:sdc="http://www.mulesoft.org/schema/mule/sdc" xmlns:http="http://www.mulesoft.org/schema/mule/http" xmlns="http://www.mulesoft.org/schema/mule/core" xmlns:doc="http://www.mulesoft.org/schema/mule/documentation" xmlns:xsi="http://www.w3.org/2001/XMLSchema-instance" xsi:schemaLocation="http://www.mulesoft.org/schema/mule/core http://www.mulesoft.org/schema/mule/core/current/mule.xsd
http://www.mulesoft.org/schema/mule/http http://www.mulesoft.org/schema/mule/http/current/mule-http.xsd
http://www.mulesoft.org/schema/mule/sdc http://www.mulesoft.org/schema/mule/sdc/current/mule-sdc.xsd
http://www.mulesoft.org/schema/mule/file http://www.mulesoft.org/schema/mule/file/current/mule-file.xsd
http://www.mulesoft.org/schema/mule/ee/core http://www.mulesoft.org/schema/mule/ee/core/current/mule-ee.xsd
http://www.mulesoft.org/schema/mule/salesforce http://www.mulesoft.org/schema/mule/salesforce/current/mule-salesforce.xsd">
	<http:listener-config name="HTTP_Listener_config" doc:name="HTTP Listener config" >
		<http:listener-connection host="0.0.0.0" port="8081" />
	</http:listener-config>
	<sdc:sdc-config name="Salesforce_CDP_OAuth_JWT_config" doc:name="Salesforce CDP config" >
		<sdc:oauth-jwt-connection consumerKey="${server.consumerKey}" keyStorePath="${server.keyStorePath}" storePassword="${server.keyStorePassword}" subject="${server.userName}" audienceUrl="${server.audienceUrl}" keyAlias="${server.certificateAlias}" />
	</sdc:sdc-config>
	<configuration-properties doc:name="Configuration properties" file="mule-app.properties" />
	<sdc:sdc-config name="Salesforce_CDP_OAuth_UsernamePassword_config" doc:name="Salesforce CDP config" >
		<sdc:oauth-user-pass-connection clientId="${server.consumerKey}" clientSecret="${server.consumerSecret}" username="${server.userName}" password="${server.password}" audienceUrl="${server.audienceUrl}" />
	</sdc:sdc-config>
	<flow name="CreateJob" >
		<http:listener doc:name="Post /jobs/create" config-ref="HTTP_Listener_config" path="/jobs/create/{sourceApiName}/{objectName}/{operation}"/>
		<sdc:create-bulk-job doc:name="Create Job" config-ref="Salesforce_CDP_OAuth_UsernamePassword_config" sourceNameUriParam="#[attributes.uriParams.sourceApiName]" objectNameUriParam="#[attributes.uriParams.objectName]" operationUriParam="#[attributes.uriParams.operation]"/>
		<logger level="INFO" doc:name="Logger" />
	</flow>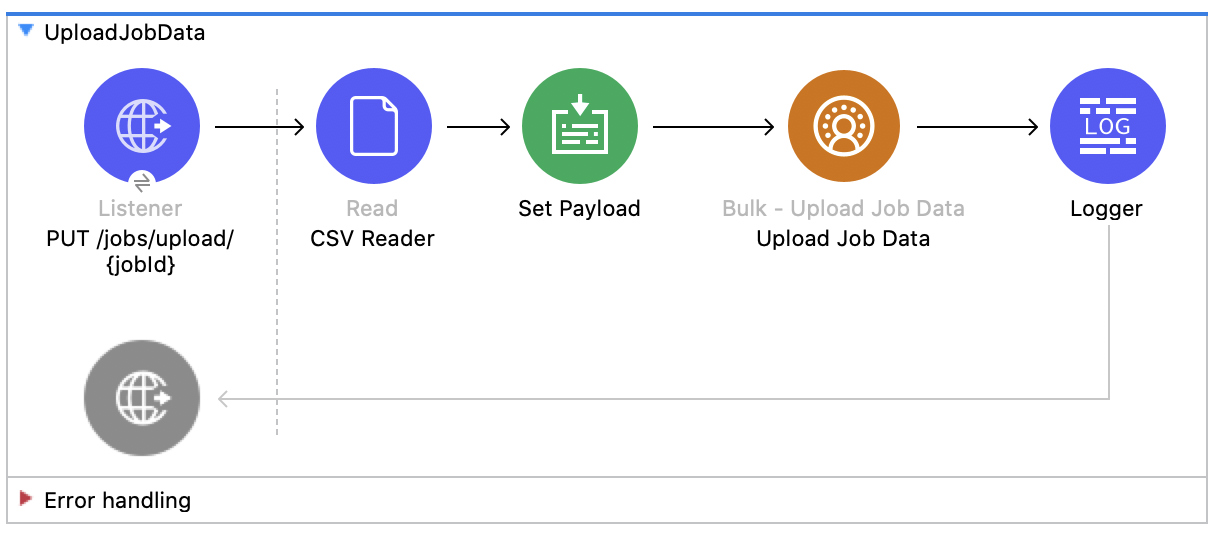
</mule>ジョブデータのアップロード - Bulk API
この Mule フローでは、ジョブ ID で指定した Salesforce CDP 取り込み API オブジェクトに挿入するデータ、またはその Salesforce CDP 取り込み API オブジェクトから削除するデータをアップロードする方法を示します。
この例では、次の操作を使用します。
-
HTTP Listener
URI にジョブ ID が含まれる HTTP POST 要求からデータを受け取ります。 -
CSV Reader
絶対ファイルパスで設定された CSV からデータを読み取ります。 -
Set Payload
Upload Job Data 用の CSV データでペイロードを更新します。 -
Upload Job Data
-
JWT を選択したかユーザー名とパスワードを選択したかに基づいて認証します。
-
HTTP 要求からのジョブ ID と、ペイロードにある CSV データを受け取ります。
-
データを CSV から Salesforce CDP 取り込み API オブジェクトにアップロードし、最終的に HTTP 応答を返します。
-
-
Logger
Upload Job Data 操作からの HTTP 結果を表示します。
この例の XML
この例のフローをすばやく Mule アプリケーションに読み込むには、次のコードを Studio XML エディターに貼り付けます。
<?xml version="1.0" encoding="UTF-8"?>

<mule xmlns:salesforce="http://www.mulesoft.org/schema/mule/salesforce" xmlns:ee="http://www.mulesoft.org/schema/mule/ee/core"
	xmlns:file="http://www.mulesoft.org/schema/mule/file"
	xmlns:sdc="http://www.mulesoft.org/schema/mule/sdc" xmlns:http="http://www.mulesoft.org/schema/mule/http" xmlns="http://www.mulesoft.org/schema/mule/core" xmlns:doc="http://www.mulesoft.org/schema/mule/documentation" xmlns:xsi="http://www.w3.org/2001/XMLSchema-instance" xsi:schemaLocation="http://www.mulesoft.org/schema/mule/core http://www.mulesoft.org/schema/mule/core/current/mule.xsd
http://www.mulesoft.org/schema/mule/http http://www.mulesoft.org/schema/mule/http/current/mule-http.xsd
http://www.mulesoft.org/schema/mule/sdc http://www.mulesoft.org/schema/mule/sdc/current/mule-sdc.xsd
http://www.mulesoft.org/schema/mule/file http://www.mulesoft.org/schema/mule/file/current/mule-file.xsd
http://www.mulesoft.org/schema/mule/ee/core http://www.mulesoft.org/schema/mule/ee/core/current/mule-ee.xsd
http://www.mulesoft.org/schema/mule/salesforce http://www.mulesoft.org/schema/mule/salesforce/current/mule-salesforce.xsd">
	<http:listener-config name="HTTP_Listener_config" doc:name="HTTP Listener config" >
		<http:listener-connection host="0.0.0.0" port="8081" />
	</http:listener-config>
	<sdc:sdc-config name="Salesforce_CDP_OAuth_JWT_config" doc:name="Salesforce CDP config" >
		<sdc:oauth-jwt-connection consumerKey="${server.consumerKey}" keyStorePath="${server.keyStorePath}" storePassword="${server.keyStorePassword}" subject="${server.userName}" audienceUrl="${server.audienceUrl}" keyAlias="${server.certificateAlias}" />
	</sdc:sdc-config>
	<configuration-properties doc:name="Configuration properties" file="mule-app.properties" />
	<sdc:sdc-config name="Salesforce_CDP_OAuth_UsernamePassword_config" doc:name="Salesforce CDP config" >
		<sdc:oauth-user-pass-connection clientId="${server.consumerKey}" clientSecret="${server.consumerSecret}" username="${server.userName}" password="${server.password}" audienceUrl="${server.audienceUrl}" />
	</sdc:sdc-config>
	<flow name="UploadJobData" >
        <http:listener doc:name="Upload Job Data Listener" config-ref="HTTP_Listener_config" path="/jobs/upload/{jobId}"/>
        <file:read doc:name="CSV Reader" path="" target="content"/>
        <set-payload value="#[vars.content]" doc:name="Set Payload" />
        <sdc:upload-data-bulk-job doc:name="Upload Job Data" config-ref="Salesforce_CDP_OAuth_JWT_config" idUriParam="#[attributes.uriParams.jobId]"/>
        <logger level="INFO" doc:name="Logger" message="#[message]"/>
    </flow>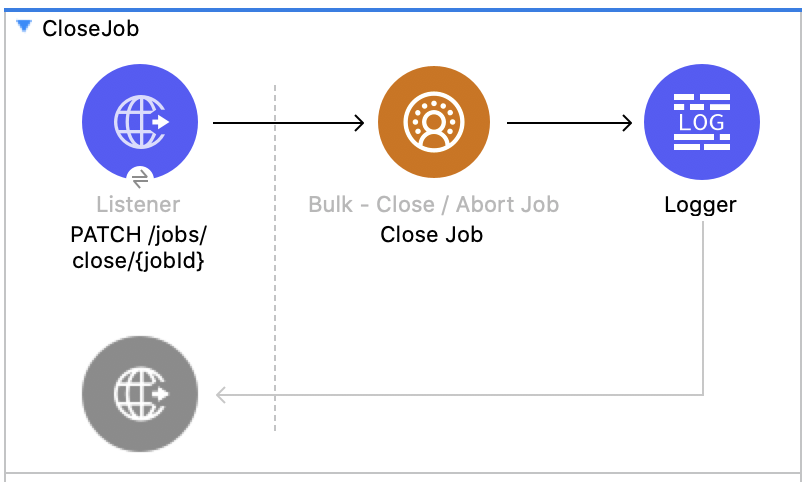
</mule>ジョブの終了 - Bulk API
この Mule フローでは、指定したジョブ ID の状況を更新してジョブを終了する方法を示します。終了したジョブは処理キューに登録されます。
この例では、次の操作を使用します。
-
HTTP Listener
URI パラメーターにジョブ ID が含まれる HTTP GET 要求からデータを受け取ります。 -
Logger
Close Job 操作からの HTTP 応答を表示します。 -
Close Job
-
JWT を選択したかユーザー名とパスワードを選択したかに基づいて認証します。
-
指定されたジョブを受け取ります。
-
UploadComplete 状態を使用して Salesforce API をコールし、該当のジョブを完了した後、HTTP 応答を受け取ります。
-
この例の XML
この例のフローをすばやく Mule アプリケーションに読み込むには、次のコードを Studio XML エディターに貼り付けます。
<?xml version="1.0" encoding="UTF-8"?>

<mule xmlns:salesforce="http://www.mulesoft.org/schema/mule/salesforce" xmlns:ee="http://www.mulesoft.org/schema/mule/ee/core"
	xmlns:file="http://www.mulesoft.org/schema/mule/file"
	xmlns:sdc="http://www.mulesoft.org/schema/mule/sdc" xmlns:http="http://www.mulesoft.org/schema/mule/http" xmlns="http://www.mulesoft.org/schema/mule/core" xmlns:doc="http://www.mulesoft.org/schema/mule/documentation" xmlns:xsi="http://www.w3.org/2001/XMLSchema-instance" xsi:schemaLocation="http://www.mulesoft.org/schema/mule/core http://www.mulesoft.org/schema/mule/core/current/mule.xsd
http://www.mulesoft.org/schema/mule/http http://www.mulesoft.org/schema/mule/http/current/mule-http.xsd
http://www.mulesoft.org/schema/mule/sdc http://www.mulesoft.org/schema/mule/sdc/current/mule-sdc.xsd
http://www.mulesoft.org/schema/mule/file http://www.mulesoft.org/schema/mule/file/current/mule-file.xsd
http://www.mulesoft.org/schema/mule/ee/core http://www.mulesoft.org/schema/mule/ee/core/current/mule-ee.xsd
http://www.mulesoft.org/schema/mule/salesforce http://www.mulesoft.org/schema/mule/salesforce/current/mule-salesforce.xsd">
	<http:listener-config name="HTTP_Listener_config" doc:name="HTTP Listener config" >
		<http:listener-connection host="0.0.0.0" port="8081" />
	</http:listener-config>
	<sdc:sdc-config name="Salesforce_CDP_OAuth_JWT_config" doc:name="Salesforce CDP config" >
		<sdc:oauth-jwt-connection consumerKey="${server.consumerKey}" keyStorePath="${server.keyStorePath}" storePassword="${server.keyStorePassword}" subject="${server.userName}" audienceUrl="${server.audienceUrl}" keyAlias="${server.certificateAlias}" />
	</sdc:sdc-config>
	<configuration-properties doc:name="Configuration properties" file="mule-app.properties" />
	<sdc:sdc-config name="Salesforce_CDP_OAuth_UsernamePassword_config" doc:name="Salesforce CDP config" >
		<sdc:oauth-user-pass-connection clientId="${server.consumerKey}" clientSecret="${server.consumerSecret}" username="${server.userName}" password="${server.password}" audienceUrl="${server.audienceUrl}" />
	</sdc:sdc-config>
	<flow name="CloseJob" >
		<http:listener doc:name="Get /jobs/close/{jobId}" config-ref="HTTP_Listener_config" path="/jobs/close/{jobId}"/>
		<sdc:update-bulk-operation-job doc:name="Close Job" config-ref="Salesforce_CDP_OAuth_JWT_config" idUriParam="#[attributes.uriParams.jobId]" state="UploadComplete"/>
		<logger level="INFO" doc:name="Logger" />
	</flow>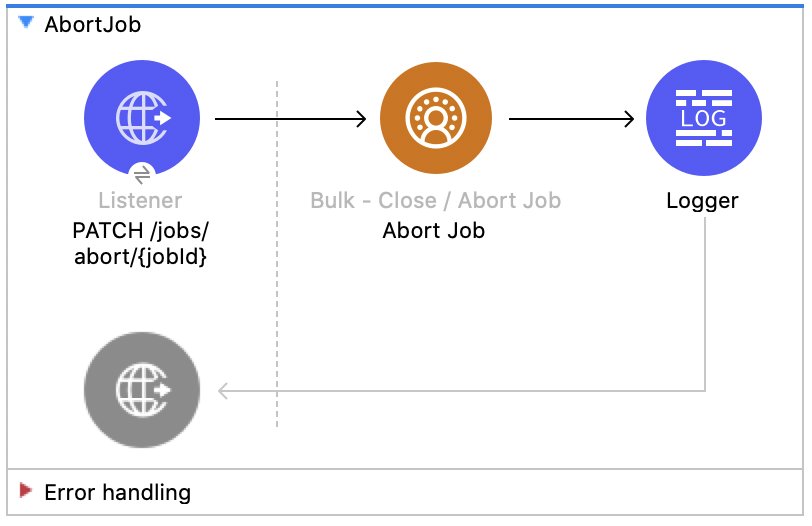
</mule>ジョブの中止 - Bulk API
この Mule フローでは、指定したジョブ ID の状況を更新してジョブを中止する方法を示します。中止したジョブは処理キューに登録されません。
この例では、次の操作を使用します。
-
HTTP Listener
URI パラメーターにジョブ ID が含まれる HTTP GET 要求からデータを受け取ります。 -
Logger
Abort Job 操作からの HTTP 応答を表示します。 -
Abort Job:
-
JWT を選択したかユーザー名とパスワードを選択したかに基づいて認証します。
-
URI パラメーターとして使用されたジョブ ID を受け取ります。
-
aborted 状態を使用して Salesforce API をコールし、該当のジョブを中止した後、HTTP 応答を受け取ります。
-
この例の XML
この例のフローをすばやく Mule アプリケーションに読み込むには、次のコードを Studio XML エディターに貼り付けます。
<?xml version="1.0" encoding="UTF-8"?>

<mule xmlns:salesforce="http://www.mulesoft.org/schema/mule/salesforce" xmlns:ee="http://www.mulesoft.org/schema/mule/ee/core"
	xmlns:file="http://www.mulesoft.org/schema/mule/file"
	xmlns:sdc="http://www.mulesoft.org/schema/mule/sdc" xmlns:http="http://www.mulesoft.org/schema/mule/http" xmlns="http://www.mulesoft.org/schema/mule/core" xmlns:doc="http://www.mulesoft.org/schema/mule/documentation" xmlns:xsi="http://www.w3.org/2001/XMLSchema-instance" xsi:schemaLocation="http://www.mulesoft.org/schema/mule/core http://www.mulesoft.org/schema/mule/core/current/mule.xsd
http://www.mulesoft.org/schema/mule/http http://www.mulesoft.org/schema/mule/http/current/mule-http.xsd
http://www.mulesoft.org/schema/mule/sdc http://www.mulesoft.org/schema/mule/sdc/current/mule-sdc.xsd
http://www.mulesoft.org/schema/mule/file http://www.mulesoft.org/schema/mule/file/current/mule-file.xsd
http://www.mulesoft.org/schema/mule/ee/core http://www.mulesoft.org/schema/mule/ee/core/current/mule-ee.xsd
http://www.mulesoft.org/schema/mule/salesforce http://www.mulesoft.org/schema/mule/salesforce/current/mule-salesforce.xsd">
	<http:listener-config name="HTTP_Listener_config" doc:name="HTTP Listener config" >
		<http:listener-connection host="0.0.0.0" port="8081" />
	</http:listener-config>
	<sdc:sdc-config name="Salesforce_CDP_OAuth_JWT_config" doc:name="Salesforce CDP config" >
		<sdc:oauth-jwt-connection consumerKey="${server.consumerKey}" keyStorePath="${server.keyStorePath}" storePassword="${server.keyStorePassword}" subject="${server.userName}" audienceUrl="${server.audienceUrl}" keyAlias="${server.certificateAlias}" />
	</sdc:sdc-config>
	<configuration-properties doc:name="Configuration properties" file="mule-app.properties" />
	<sdc:sdc-config name="Salesforce_CDP_OAuth_UsernamePassword_config" doc:name="Salesforce CDP config" >
		<sdc:oauth-user-pass-connection clientId="${server.consumerKey}" clientSecret="${server.consumerSecret}" username="${server.userName}" password="${server.password}" audienceUrl="${server.audienceUrl}" />
	</sdc:sdc-config>
	<flow name="AbortJob" >
		<http:listener doc:name="Get /jobs/abort/{jobId}"  config-ref="HTTP_Listener_config" path="/jobs/abort/{jobId}"/>
		<sdc:update-bulk-operation-job doc:name="Abort Job" config-ref="Salesforce_CDP_OAuth_JWT_config" idUriParam="#[attributes.uriParams.jobId]" state="Aborted"/>
		<logger level="INFO" doc:name="Logger" />
	</flow>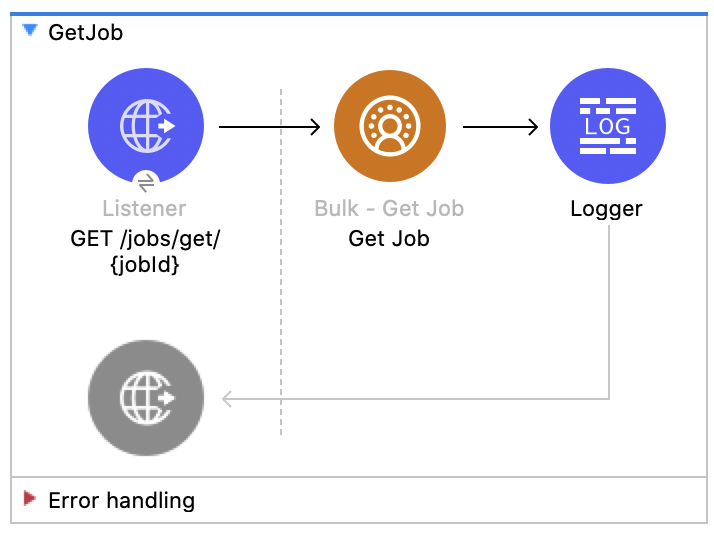
</mule>ジョブの取得 - Bulk API
この Mule フローでは、指定したジョブ ID の現在の状況を取得する方法を示します。
この例では、次の操作を使用します。
-
HTTP Listener
URI パラメーターにジョブ ID が含まれる HTTP GET 要求からデータを受け取ります。 -
Logger
Get Job 操作からの HTTP 応答を表示します。 -
Get Job
-
JWT を選択したかユーザー名とパスワードを選択したかに基づいて認証します。
-
URI パラメーターからジョブ ID を受け取ります。
-
Salesforce API をコールして、ジョブの状況を返します。
-
この例の XML
この例のフローをすばやく Mule アプリケーションに読み込むには、次のコードを Studio XML エディターに貼り付けます。
<?xml version="1.0" encoding="UTF-8"?>

<mule xmlns:salesforce="http://www.mulesoft.org/schema/mule/salesforce" xmlns:ee="http://www.mulesoft.org/schema/mule/ee/core"
	xmlns:file="http://www.mulesoft.org/schema/mule/file"
	xmlns:sdc="http://www.mulesoft.org/schema/mule/sdc" xmlns:http="http://www.mulesoft.org/schema/mule/http" xmlns="http://www.mulesoft.org/schema/mule/core" xmlns:doc="http://www.mulesoft.org/schema/mule/documentation" xmlns:xsi="http://www.w3.org/2001/XMLSchema-instance" xsi:schemaLocation="http://www.mulesoft.org/schema/mule/core http://www.mulesoft.org/schema/mule/core/current/mule.xsd
http://www.mulesoft.org/schema/mule/http http://www.mulesoft.org/schema/mule/http/current/mule-http.xsd
http://www.mulesoft.org/schema/mule/sdc http://www.mulesoft.org/schema/mule/sdc/current/mule-sdc.xsd
http://www.mulesoft.org/schema/mule/file http://www.mulesoft.org/schema/mule/file/current/mule-file.xsd
http://www.mulesoft.org/schema/mule/ee/core http://www.mulesoft.org/schema/mule/ee/core/current/mule-ee.xsd
http://www.mulesoft.org/schema/mule/salesforce http://www.mulesoft.org/schema/mule/salesforce/current/mule-salesforce.xsd">
	<http:listener-config name="HTTP_Listener_config" doc:name="HTTP Listener config" >
		<http:listener-connection host="0.0.0.0" port="8081" />
	</http:listener-config>
	<sdc:sdc-config name="Salesforce_CDP_OAuth_JWT_config" doc:name="Salesforce CDP config" >
		<sdc:oauth-jwt-connection consumerKey="${server.consumerKey}" keyStorePath="${server.keyStorePath}" storePassword="${server.keyStorePassword}" subject="${server.userName}" audienceUrl="${server.audienceUrl}" keyAlias="${server.certificateAlias}" />
	</sdc:sdc-config>
	<configuration-properties doc:name="Configuration properties" file="mule-app.properties" />
	<sdc:sdc-config name="Salesforce_CDP_OAuth_UsernamePassword_config" doc:name="Salesforce CDP config" >
		<sdc:oauth-user-pass-connection clientId="${server.consumerKey}" clientSecret="${server.consumerSecret}" username="${server.userName}" password="${server.password}" audienceUrl="${server.audienceUrl}" />
	</sdc:sdc-config>
	<flow name="GetJob" >
		<http:listener doc:name="Get /jobs/get/{jobId}" config-ref="HTTP_Listener_config" path="/jobs/get/{jobId}"/>
		<sdc:get-bulk-job doc:name="Get Job" config-ref="Salesforce_CDP_OAuth_JWT_config" idUriParam="#[attributes.uriParams.jobId]"/>
		<logger level="INFO" doc:name="Logger" />
	</flow>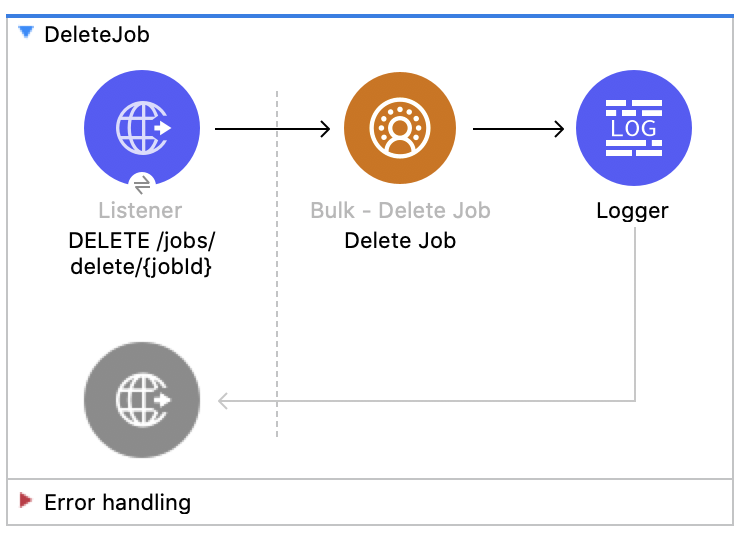
</mule>ジョブの削除 - Bulk API
この Mule フローでは、指定したジョブ ID を削除または終了する方法を示します。これにより、Salesforce で保存されているジョブデータとメタデータが削除されます。
ジョブを削除するには、そのジョブの状況が UploadComplete、JobComplete、Aborted、または Failed である必要があります。
この例では、次の操作を使用します。
-
HTTP Listener
URI パラメーターにジョブ ID が含まれる HTTP DELETE 要求からデータを受け取ります。 -
Logger
Delete Job 操作からの HTTP 応答を表示します。 -
Delete Job
-
JWT を選択したかユーザー名とパスワードを選択したかに基づいて認証します。
-
URI パラメーターで使用されたジョブ ID を受け取ります。
-
Salesforce API をコールして、ジョブを削除します。
-
この例の XML
この例のフローをすばやく Mule アプリケーションに読み込むには、次のコードを Studio XML エディターに貼り付けます。
<?xml version="1.0" encoding="UTF-8"?>

<mule xmlns:salesforce="http://www.mulesoft.org/schema/mule/salesforce" xmlns:ee="http://www.mulesoft.org/schema/mule/ee/core"
	xmlns:file="http://www.mulesoft.org/schema/mule/file"
	xmlns:sdc="http://www.mulesoft.org/schema/mule/sdc" xmlns:http="http://www.mulesoft.org/schema/mule/http" xmlns="http://www.mulesoft.org/schema/mule/core" xmlns:doc="http://www.mulesoft.org/schema/mule/documentation" xmlns:xsi="http://www.w3.org/2001/XMLSchema-instance" xsi:schemaLocation="http://www.mulesoft.org/schema/mule/core http://www.mulesoft.org/schema/mule/core/current/mule.xsd
http://www.mulesoft.org/schema/mule/http http://www.mulesoft.org/schema/mule/http/current/mule-http.xsd
http://www.mulesoft.org/schema/mule/sdc http://www.mulesoft.org/schema/mule/sdc/current/mule-sdc.xsd
http://www.mulesoft.org/schema/mule/file http://www.mulesoft.org/schema/mule/file/current/mule-file.xsd
http://www.mulesoft.org/schema/mule/ee/core http://www.mulesoft.org/schema/mule/ee/core/current/mule-ee.xsd
http://www.mulesoft.org/schema/mule/salesforce http://www.mulesoft.org/schema/mule/salesforce/current/mule-salesforce.xsd">
	<http:listener-config name="HTTP_Listener_config" doc:name="HTTP Listener config" >
		<http:listener-connection host="0.0.0.0" port="8081" />
	</http:listener-config>
	<sdc:sdc-config name="Salesforce_CDP_OAuth_JWT_config" doc:name="Salesforce CDP config" >
		<sdc:oauth-jwt-connection consumerKey="${server.consumerKey}" keyStorePath="${server.keyStorePath}" storePassword="${server.keyStorePassword}" subject="${server.userName}" audienceUrl="${server.audienceUrl}" keyAlias="${server.certificateAlias}" />
	</sdc:sdc-config>
	<configuration-properties doc:name="Configuration properties" file="mule-app.properties" />
	<sdc:sdc-config name="Salesforce_CDP_OAuth_UsernamePassword_config" doc:name="Salesforce CDP config" >
		<sdc:oauth-user-pass-connection clientId="${server.consumerKey}" clientSecret="${server.consumerSecret}" username="${server.userName}" password="${server.password}" audienceUrl="${server.audienceUrl}" />
	</sdc:sdc-config>
	<flow name="DeleteJob" >
		<http:listener doc:name="Delete /jobs/delete/{jobId}" config-ref="HTTP_Listener_config" path="/jobs/delete/{jobId}"/>
		<sdc:delete-bulk-job doc:name="Delete Job" config-ref="Salesforce_CDP_OAuth_JWT_config" idUriParam="#[attributes.uriParams.jobId]"/>
		<logger level="INFO" doc:name="Logger" />
	</flow>
</mule>
この例の実行手順
-
コネクタが設定されていることを確認します。
-
プロジェクトを保存します。
-
ジョブを作成し、結果のジョブ ID をコピーします。
-
コピーしたジョブを使用して、ジョブを終了します ([Close Job - Bulk API]フローを参照)。
-
前の手順でコピーしたジョブ ID を使用して
DELETE を localhost:8081/jobs/delete/{JOB_ID} に送信し、フローをテストします。