Workday Connector 6.0
| For the latest version of the connector, see Workday Connector Overview. |
Workday Connector v6.0
The Anypoint Connector for Workday is a closed source Enterprise connector which provides a connection between Workday and third party software. It implements the Workday v24.0 API modules, and interfaces with the Human Capital Management, Financial Management, Student, and System web services. The Workday connector is a SOAP based connector developed with DevKit 3.7.0. MuleSoft maintains this connector under the Select support policy.
Release Notes: Workday Connector Release Notes
Exchange: Workday Connector
Migration Guide: Workday Connector 6.0 Migration Guide
Before You Begin
To use this connector, you need:
-
A Workday instance with the necessary permissions
-
A set of valid credential, including username, password, tenant name, and host name (optional). The service endpoints are automatically generated based on the credentials.
-
A MuleSoft Enterprise License
This document assumes that you are familiar with Mule, Anypoint Connectors, and Anypoint Studio Essentials. To increase your familiarity with Studio, consider completing one or more Basic Studio Tutorial. This page assumes you understand Mule Concepts, Elements in a Mule Flow, and Global Elements.
This document describes implementation examples within the context of Anypoint Studio, Mule ESB’s graphical user interface, and, also includes configuration details for doing the same in the XML Editor.
Compatibility
The Workday connector 6.0 is compatible with:
| Application/Service | Version |
|---|---|
Mule Runtime |
EE 3.7.0 or later |
Anypoint Studio |
5.2 or later |
Workday API |
v24.0 |
Java |
JDK 7 |
To Install this Connector
-
In Anypoint Studio, click the Exchange icon in the Studio taskbar.
-
Click Login in Anypoint Exchange.
-
Search for the connector and click Install.
-
Follow the prompts to install the connector.
When Studio has an update, a message displays in the lower right corner, which you can click to install the update.
To use the Workday connector 6.0 in a production environment, you must have an Enterprise license to use Mule. Contact the MuleSoft Sales Team to obtain either of these. Read more about Installing an Enterprise License.
Upgrading from an Older Version
-
Uninstall the previous Workday Connectors.
-
Install the Workday Connector as described in the previous section.
-
Make sure updated the Maven dependencies correctly:
Connector Version From To Version until 4.0.1
<groupId>org.mule.modules</groupId>
<artifactId>mule-module-workday</artifactId><groupId>org.mule.modules</groupId>
<artifactId>workday-connector</artifactId>Versions 4.0.1 to 6.0
<groupId>org.mule.modules</groupId>
<artifactId>mule-module-workday-<wd_module_name></artifactId><groupId>org.mule.modules</groupId>
<artifactId>workday-connector</artifactId> -
It’s important to update the flows to:
-
Update the existing data mappings
-
Replace the Workday connector with the newer connector
-
Replace the phased out or deprecated operations
-
-
Make the following changes to the namespace:
From To Namespace:
xmlns:wd-staffing="http://www.mulesoft.org/schema/mule/wd-staffing"
Schema Location:
http://www.mulesoft.org/schema/mule/wd-staffing
http://www.mulesoft.org/schema/mule/wd-staffing/2.0/mule-wd-<wd_module_name>.xsdNamespace:
xmlns:wd-connector="http://www.mulesoft.org/schema/mule/wd-connector"
Schema Location:
http://www.mulesoft.org/schema/mule/wd-connector
http://www.mulesoft.org/schema/mule/wd-connector/current/mule-wd-connector.xsd
Creating a New Project
To use the Workday connector 6.0 in a Mule application project:
-
In Studio, select File > New > Mule Project.
-
Enter a name for your new project and leave the remaining options with their default values.
-
If you plan to use Git, select Create a .gitignore file for the project with default ignores for Studio Projects, and then click Next.
-
Click Finish to create the project.
Configuring the Global Element
To use the Workday connector in your Mule application, you must configure a global Workday element that can be used by all the Workday connectors in the application (read more about Global Elements.) The Workday connector now offers two global configuration types:
-
Configuration: This configuration requires the following credentials: Username (without the tenant name), Password, Tenant Name, and Host Name. Starting from version 6.0 of the connector, the service endpoints are automatically generated by the connector.
-
Configuration Advanced: Apart from what is available in the above configuration, the advanced configuration supports a user defined HTTP Request Configuration which enables the user to adjust both the Connection Idle Timeout and Response Timeout and set up a proxy connection.
Studio Visual Editor
-
Click the Global Elements tab at the base of the canvas.
-
On the Global Mule Configuration Elements screen, click Create.
-
In the Choose Global Type wizard, expand Connector Configuration, and then select Workday Connector: configuration or Workday Connector: configuration (advanced), depending on your Workday implementation.
-
Click OK
-
Enter the global element properties.
-
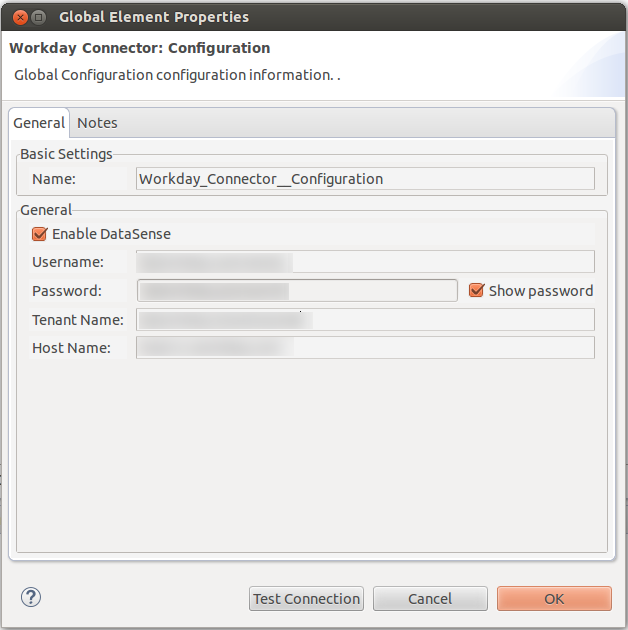
For Workday Connector: Configuration:
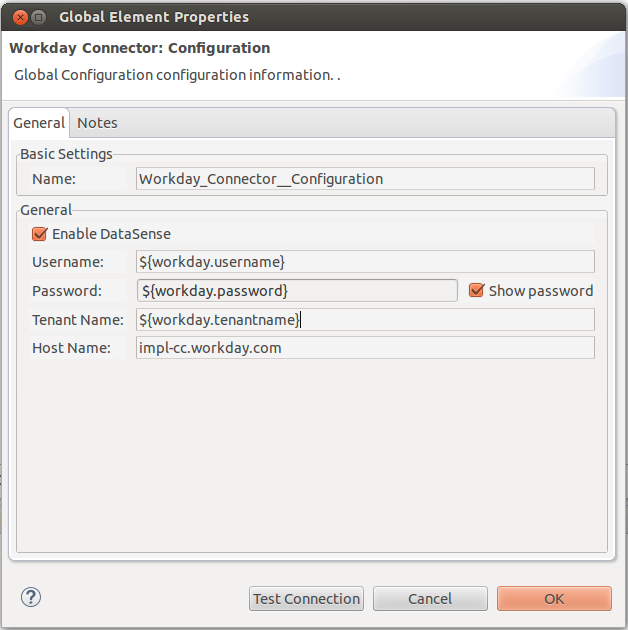
Field Description Name
Enter a name of the configuration to reference it later
Username
Enter the username to log in to Workday.
Password
Enter the corresponding password.
Tenant Name
Enter the Workday Tenant ID. It is usually appended with pt_1, such as acme_pt1.
Host Name
Enter the host name of one of the Workday Cloud Servers. By default, the connector sets the host name to
impl-cc.workday.com.In the image above, the placeholder values refer to a configuration file placed in the
srcfolder of your project (learn about Configuring Properties.) You can either enter your credentials into the global configuration properties, or reference a configuration file that contains these values.For simpler maintenance and better re-usability of your project, Mule recommends that you use a configuration file. Keeping these values in a separate file is useful if you need to deploy to different environments, such as production, development, and QA, where your access credentials differ. See Deploying to Multiple Environments for instructions on how to manage this.
-
For Workday Connector: Configuration (Advanced):
Field Description Name
Enter a name of the configuration to reference it later
Requestor Config
Enter an HTTPRequestor configuration.
Username
Enter the username to log in to Workday.
Password
Enter the corresponding password.
Tenant Name
Enter the Workday Tenant ID. It is usually appended with pt_1, such as acme_pt1.
Host Name
Enter the host name of one of the Workday Cloud Servers. By default, the connector sets the host name to
impl-cc.workday.com.
-
-
Keep the Pooling Profile and the Reconnection tabs with their default entries.
-
Click Test Connection to confirm that the parameters of your global Workday connector are accurate, and that Mule is able to successfully connect to your Workday instance.
-
Click OK to save the global connector configurations.
XML Editor
To configure the Workday global element:
-
Ensure you have included the following namespace in your configuration file:
xmlns:wd-connector="http://www.mulesoft.org/schema/mule/wd-connector"
-
Create a global Workday configuration outside and above your flows, using the following global configuration code:
<wd-connector:config name="Workday_Connector__Configuration" username="${workday.username}" password="${workday.password}" tenantName="${workday.tenantname}" doc:name="Workday Connector: Configuration"/>
Using the Connector
The Workday connector 6.0 is an operation-based connector, which means that when you add the connector to your flow, you need to select a Workday module and an operation for the connector to perform. The Workday connector 6.0 supports the following Workday APIs: Human Resource, Financials, Student, and System.
Adding the Workday Connector 6.0 to a Flow
-
Create a new Mule project in Anypoint Studio.
-
Drag the Workday Connector 6.0 onto the canvas, then select it to open the properties editor.
-
Configure the connector’s parameters:
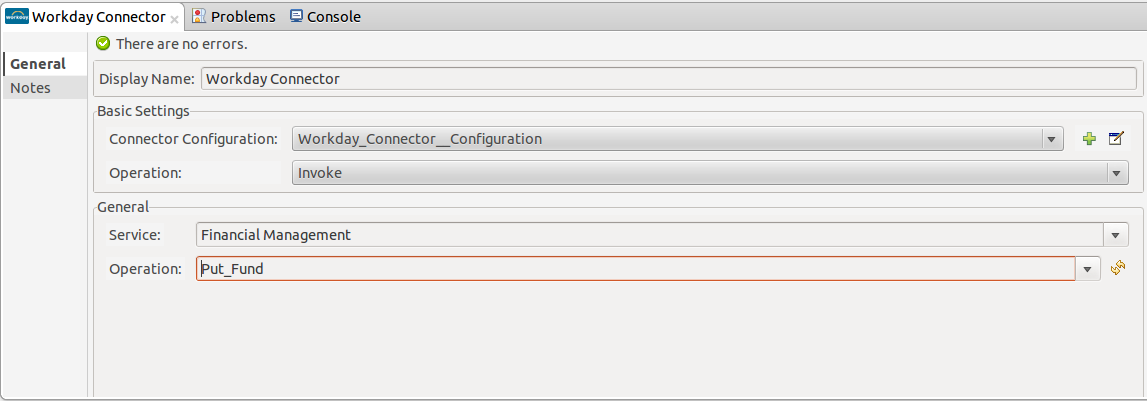
Field
Description
Display Name
Enter a unique label for the connector in your application.
Connector Configuration
Select a global Workday connector 6.0 element from the drop-down.
Operation
Invoke.
Service
Select a Workday service, such as Financial Management.
Operation
Select an operation to perform in the service, such as Put Fund.
-
Save your configurations.
Example Use Cases
To access downloads for any version of the Workday connector, see the samples posted here, or follow along below for a walkthrough of an example Mule application using this connector.
Studio Visual Editor
-
Create a Mule project in your Anypoint Studio.
-
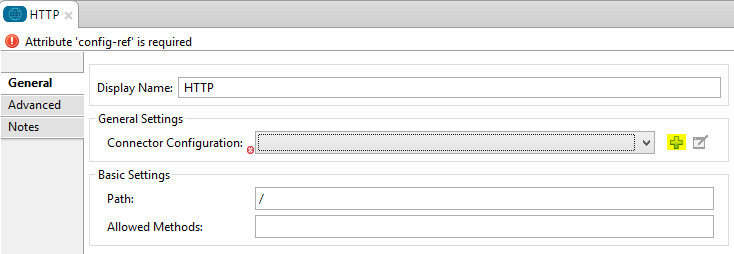
Drag an HTTP connector into the canvas, then select it to open the properties editor console.
-
Add a new HTTP Listener Configuration global element:
-
In General Settings, click the plus + button:
-
Configure the following HTTP parameters:
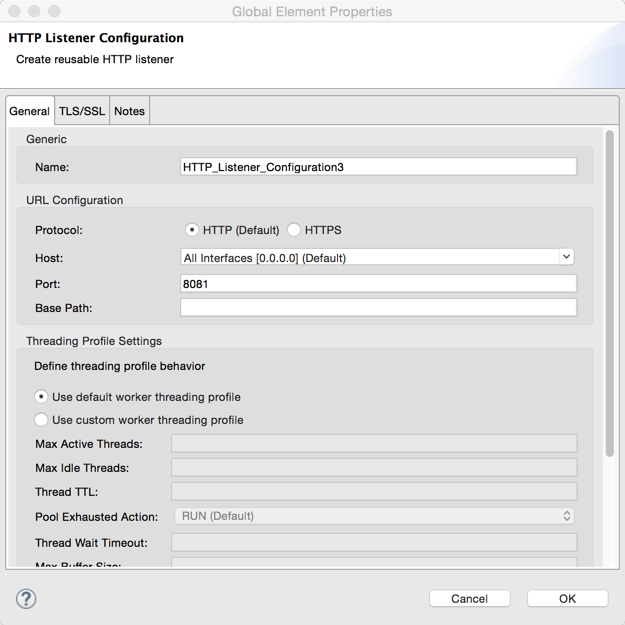
Field Value Port
8081
Host
localhost
Display Name
HTTP_Listener_Configuration
-
-
Add a Set Payload transformer after the HTTP connector, and configure it as follow:
Field Value Display Name
Enter a name for the transformer.
Value
#[['FundName':' I.M.F' , 'FundTypeID' : ' FUND_TYPE-6-3']]" -
Drag the Workday Connector 6.0 into the flow.
-
If you haven’t already created a Workday global element, add one by clicking the plus sign + next to the Connector Configuration field.
-
Configure the global element:
-
Click Test Connection to confirm that Mule can connect with the Workday instance. If the connection is successful, click OK to save the configurations of the global element. If unsuccessful, revise or correct any incorrect parameters, then test again.
-
Back in the properties editor of the connector, configure the remaining parameters:

Field
Description
Display Name
Enter a unique label for the connector in your application.
Connector Configuration
Select a global Workday connector 6.0 element from the dropdown.
Operation
Invoke.
Service
Select a Workday service, such as Financial Management.
Operation
Select an operation to perform in the service, such as Put Fund.
-
Drag a DataWeave component in to the flow, and place it before the Workday Connector.
-
Click the Data Weave component and click the scaffold button.
-
Select the desired fields.
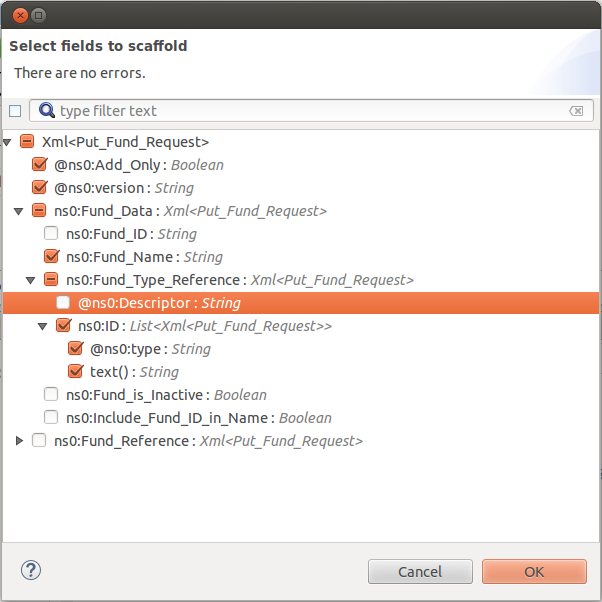
-
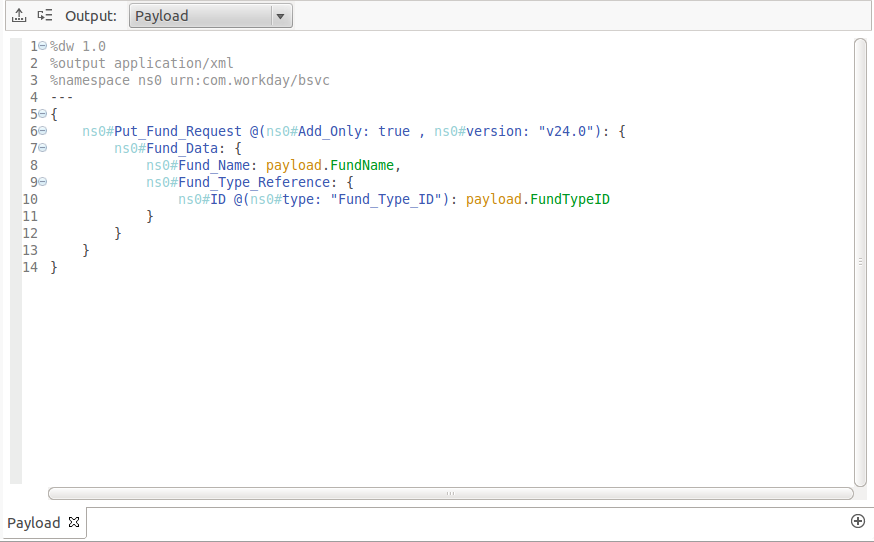
Modify the Weave content as shown in the image below:
-
Save and run the project as a Mule Application.
XML Editor
For this code to work in Anypoint Studio, you must provide the credentials for the Workday instance. You can either replace the variables with their values in the code, or you can add a file named mule.properties in the src/main/properties folder to provide the values for each variable.
|
<context:property-placeholder location="credentials.properties"/>
 <http:listener-config name="HTTP_Listener_Configuration" host="0.0.0.0" port="8081" doc:name="HTTP Listener Configuration"/>

 <wd-connector:config name="Workday_Connector_Configuration" username="${workday.username}" password="${workday.password}" tenantName="${workday.tenantname}" doc:name="Workday Connector: Configuration"/>

 <flow name="demoFlow">
   <http:listener config-ref="HTTP_Listener_Configuration" path="/" doc:name="HTTP"/>
   <set-payload value="#[['FundName':' I.M.F' , 'FundTypeID' : ' FUND_TYPE-6-3']]" doc:name="Set Payload"/>
   <dw:transform-message doc:name="Transform Message"> +
   <dw:set-payload><![CDATA[%dw 1.0
  %output application/xml
  %namespace ns0 urn:com.workday/bsvc
  ---
  {
   ns0#Put_Fund_Request @(ns0#Add_Only: true , ns0#version: "v24.0"): {
     ns0#Fund_Data: {
        ns0#Fund_Name: payload.FundName,
          ns0#Fund_Type_Reference: {
            ns0#ID @(ns0#type: "Fund_Type_ID"): payload.FundTypeID
          }
        }
     }
  }]]></dw:set-payload>
   </dw:transform-message>
   <wd-connector:invoke config-ref="Workday_Connector_Configuration" type="Financial_Management||Put_Fund" doc:name="Workday Connector"/>
 </flow>
See Also
-
Learn more about working with Anypoint Connectors.
-
Refer to the Workday Connector 6.0 Migration Guide to learn how to upgrade to Workday connector v6.0.
-
For more information on Workday v24.0 API , refer to the Workday API documentation.