
Validate Input Parameters and Transform Flight Data
When you scaffold an API specification into an implementation project, APIKit automatically validates incoming requests against your API specification. This validation includes:
-
Path parameter formats: If your API spec defines a pattern (such as
pattern: "^[A-Z]{2}\d+$"), APIKit validates the format automatically. -
Required vs. optional parameters: APIKit ensures required parameters are present.
-
Data types: APIKit validates that parameters match their specified types (string, integer, boolean, and so on).
-
Enum values: If your spec defines allowed values, APIKit validates against that list.
If a request doesn’t match these rules, APIKit returns a 400 Bad Request with an appropriate error message before your flow logic even executes.
While APIKit handles format and structural validation, you need custom validation for:
-
Business logic rules: Validating that a resource exists in your system (for example, "Does this flight code exist in our database?").
-
Cross-field validation: Rules that depend on multiple parameters.
-
External system checks: Validating against external APIs or services.
-
Database lookups: Confirming that identifiers correspond to actual records.
In this section, you add business logic validation to check whether a flight code exists in your database before attempting to query for it. This prevents unnecessary database calls and provides more meaningful error messages to API consumers.
In the American Flights API, the example database stores flights with numeric IDs (1, 2, 3), but the API exposes flight codes like AA123, AA234, and AA345. You need to map these codes to database IDs and validate that the flight exists before querying.
Create the Flight Code to Database ID Mapping
First, create a transform that stores the mapping of flight codes to database IDs.
-
Open the
get:\flights\(flightId):american-flights-api-configflow.Because MuleSoft Vibes generated the API spec, your implementation flows might have different names. You must locate the flow that starts with
get:\flights\(flightId).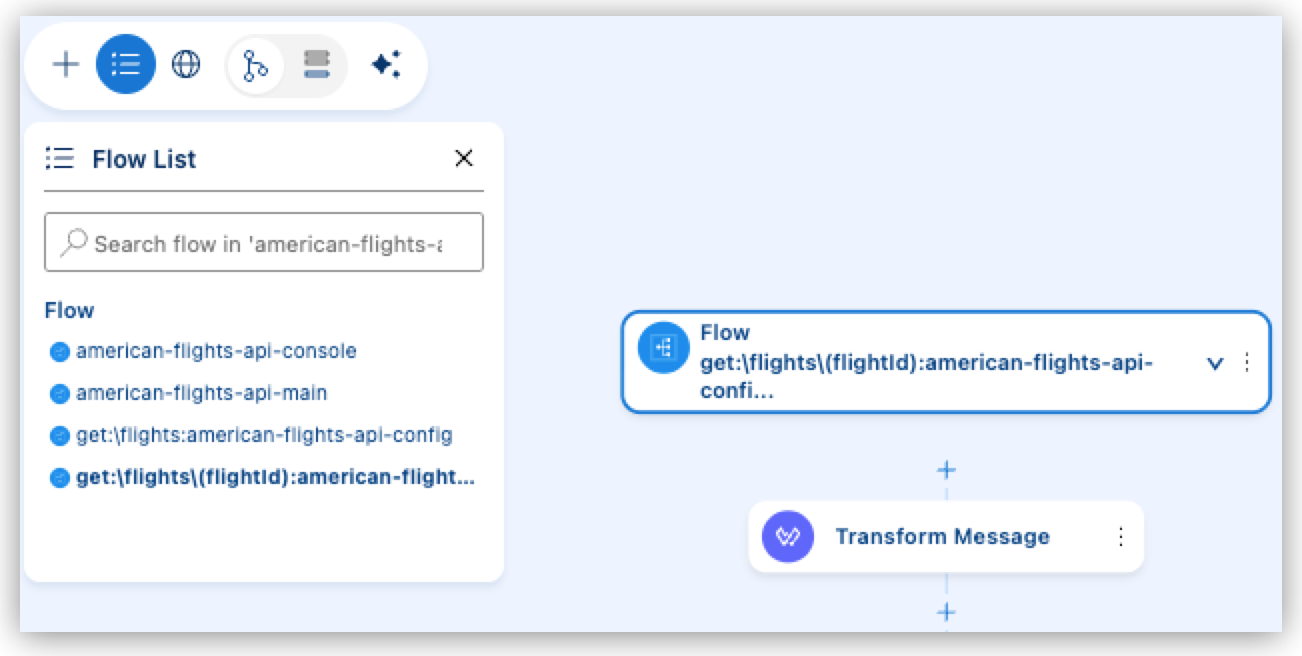
-
If the flow already contains any Transform Message components, select the components and press Delete, or click More actions… (
 ) and select Delete Component.
Delete any existing Transform Messages to start with a clean flow.
-
Click Add Component (+) at the start of the flow and select Core Processors > Components > Transform Message.
-
Click the Transform Message component to open its properties panel.
-
Click Delete Target next to Payload.
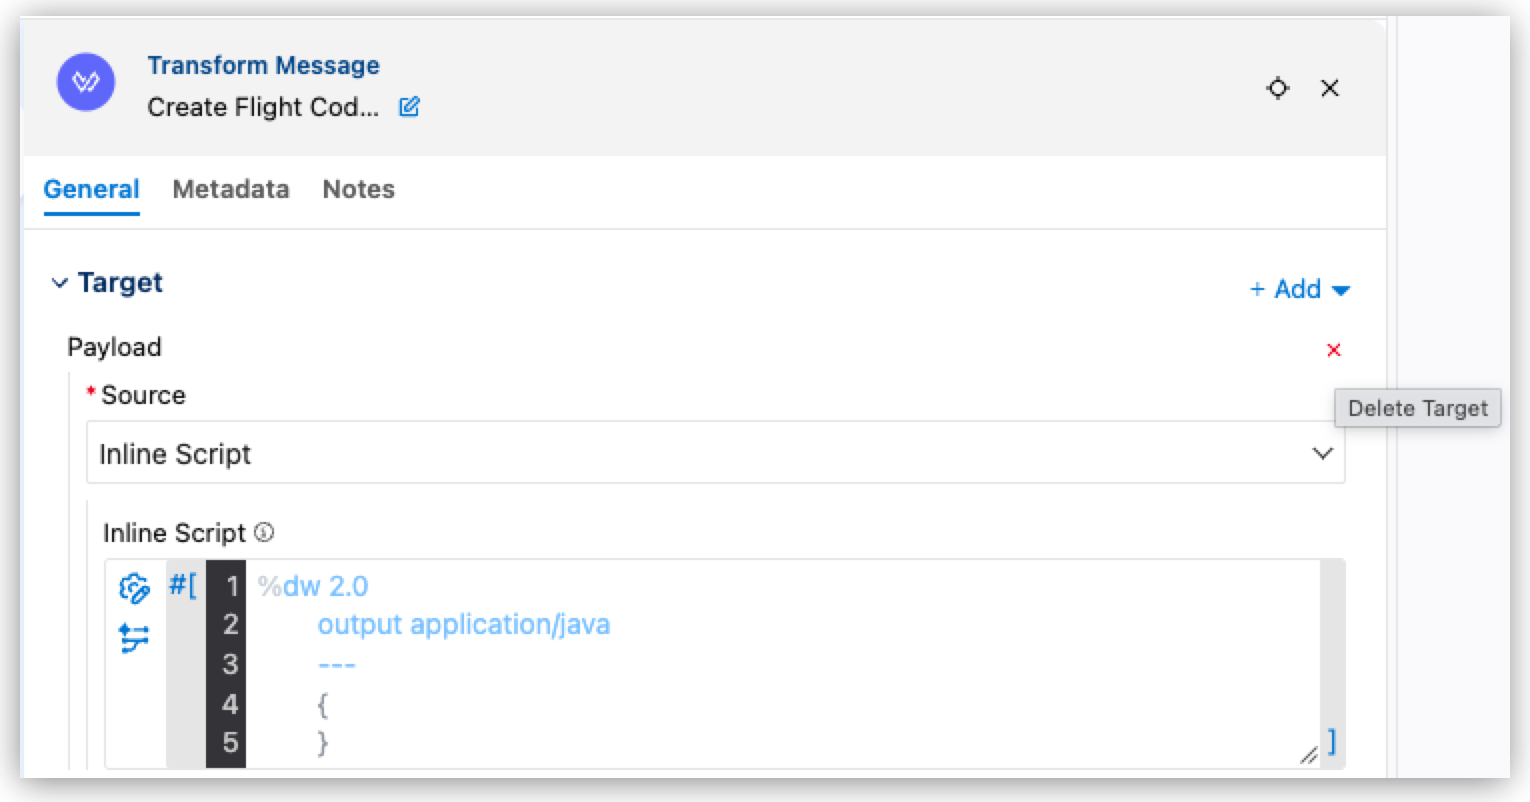
This step ensures the Transform does not modify the payload.
-
Click Edit name (
 ), change it to Create Flight Code Map, then click Apply (
 ).
). -
In the General tab, under Target, click Add (+) and select Variable.
-
Click Edit name (
) next to vars.NewVariable1, set the name toflightCodeMap, then click Apply (). -
In the Inline Script field, replace the content with this DataWeave script:
%dw 2.0
output application/java
---
{
	"AA123": 1,
	"AA234": 2,
	"AA345": 3,
	"AA456": 4,
	"AA567": 5
}
This creates a variable vars.flightCodeMap that maps flight codes to their corresponding database IDs.
| In a production application, you would typically query the database directly rather than maintaining a hardcoded map. This tutorial uses a map to clearly demonstrate the validation logic without requiring additional database queries. |
Look Up the Database Flight ID
Now create a second transform to look up the flight code in the mapping you just created.
-
After the Create Flight Code Map transform, click Add Component (+) and select Core Processors > Components > Transform Message.
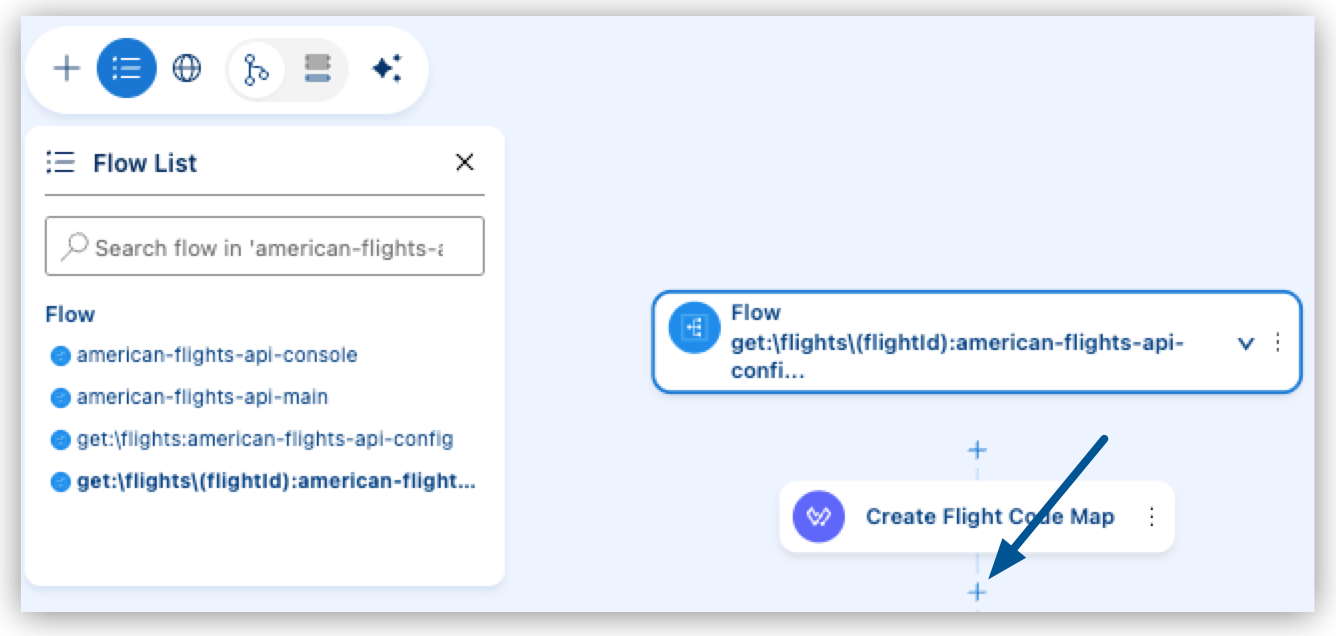
-
Click the Transform Message component to open its properties panel.
-
Click Edit name (
), change it to Lookup DB Flight ID, then click Apply (). -
Click Delete Target next to Payload.
-
In the General tab, under Target, click Add (+) and select Variable.
-
Click Edit name (
) next to vars.NewVariable1, set the name todbFlightId, then click Apply (). -
In the Inline Script field for this variable, paste this code:
%dw 2.0
output application/java
---
vars.flightCodeMap[attributes.uriParams.flightId]
This script looks up the flight code from the request URL in the mapping created in the previous transform and returns the corresponding database ID. If the flight code isn’t in the map, it returns null.
You cannot reference a variable in the same Transform Message where you’re creating it. The variable only becomes available after the transform completes. By splitting the logic into two transforms, vars.flightCodeMap is available for use in the second transform.
|
Add a Choice Router to Validate Flight Existence
Now add logic to check whether the flight code was found in the mapping.
-
After the Lookup DB Flight ID transform, click Add Component (+) and select Core Processors > Flow Control > Choice.
-
Click the When path inside the Choice router.
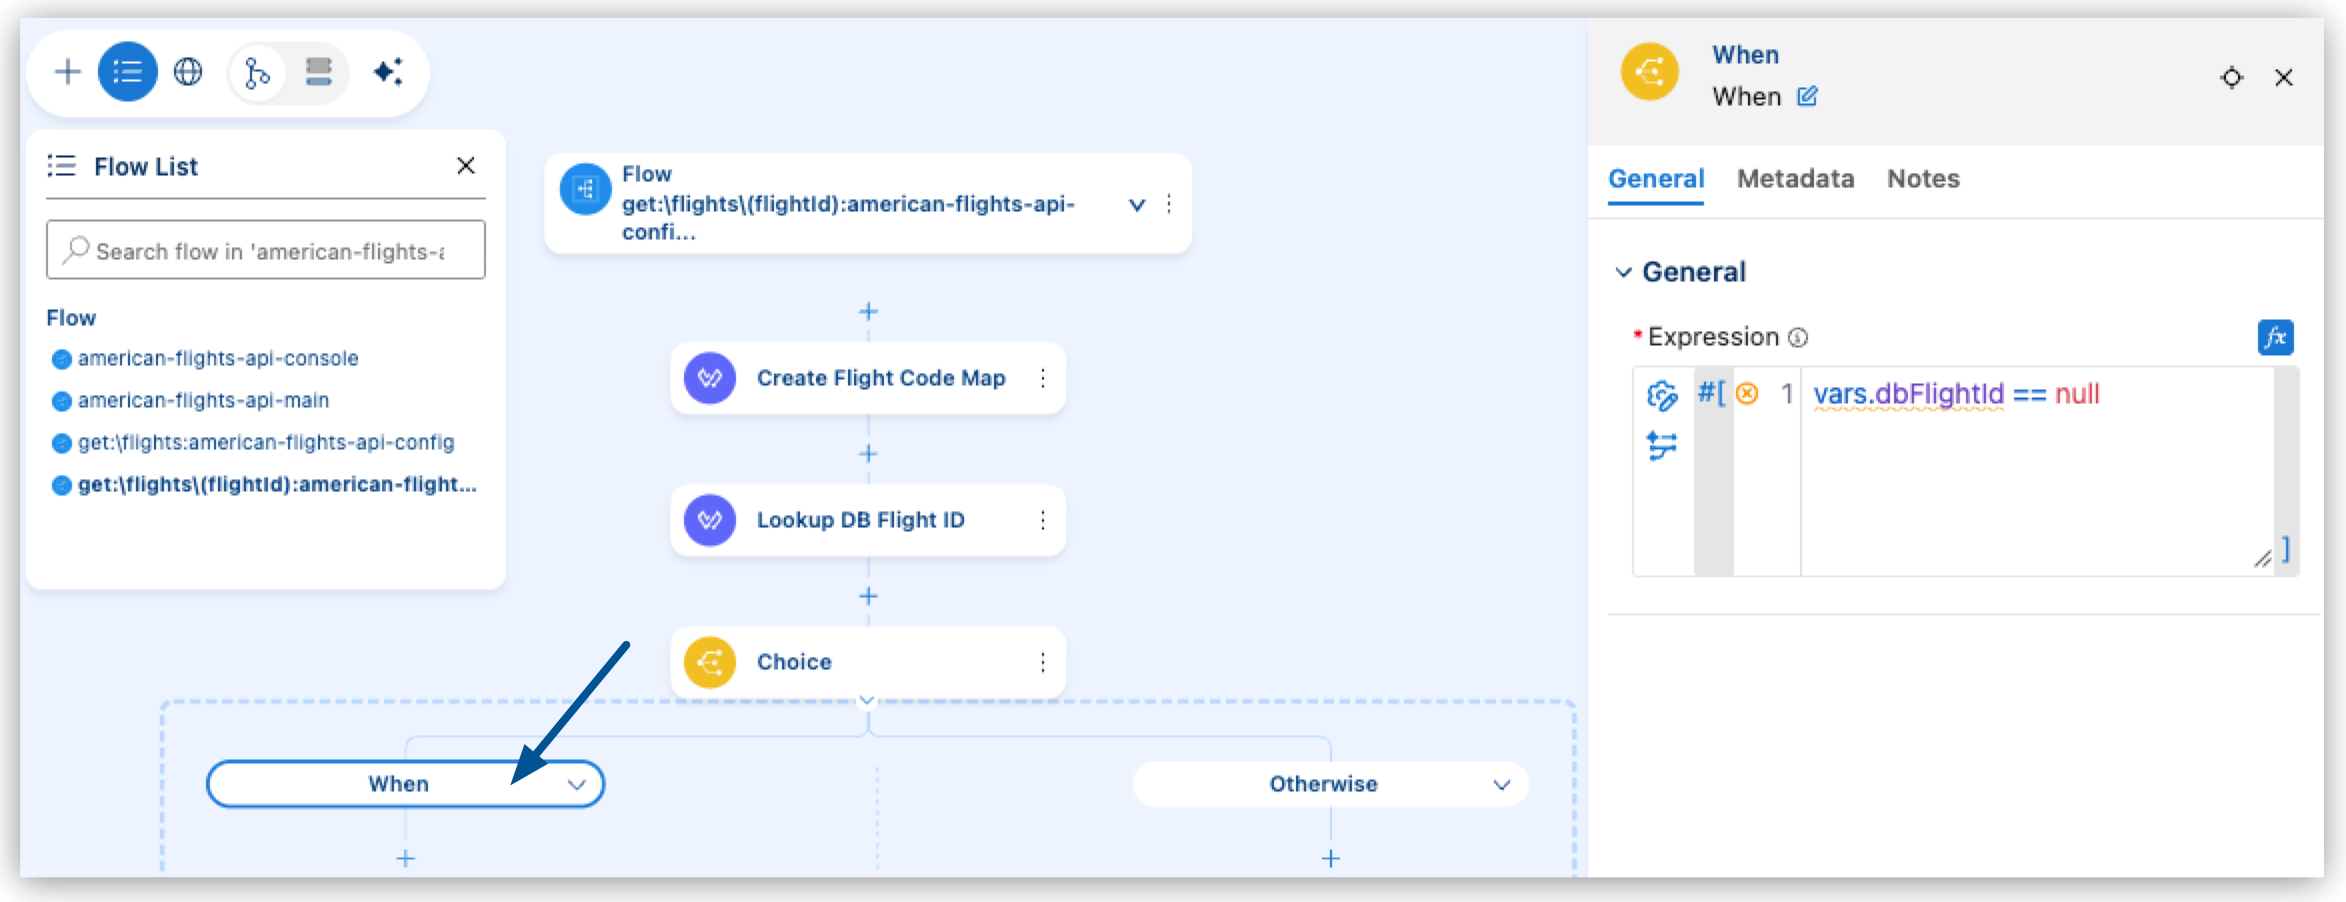
-
In the When properties panel, under Expression, add this condition to check if the flight code wasn’t found:
#[vars.dbFlightId == null]
This expression evaluates to true when the flight code doesn’t exist in the mapping.
Raise an Error for Unknown Flight Codes
When a flight code isn’t found, raise a custom error instead of proceeding with the query.
-
Inside the When path (where the condition is true), click Add Component (+) and select Core Processors > Error Handling > Raise Error.
-
In the Raise Error properties panel, configure:
Field Name Field Value Type
VALIDATION:FLIGHT_NOT_FOUNDDescription
'Flight code ' ++ attributes.uriParams.flightId ++ ' not found in our system'
This creates a custom error type that you handle in the error handler, providing a meaningful message that includes the flight code the user attempted to look up.
Add the Database Query to the Otherwise Path
The database query executes when the flight exists (when vars.dbFlightId is not null).
-
Inside the Otherwise path of the Choice router, click Add Component (+) and select Connectors > Database > Select.
-
Select the component and configure:
Field Name Field Value Name
Flight by IDConnection Config
Config(your MySQL connection)SQL Query Text
SELECT * FROM american WHERE ID = :flightIdInput Parameters
{ 'flightId': vars.dbFlightId }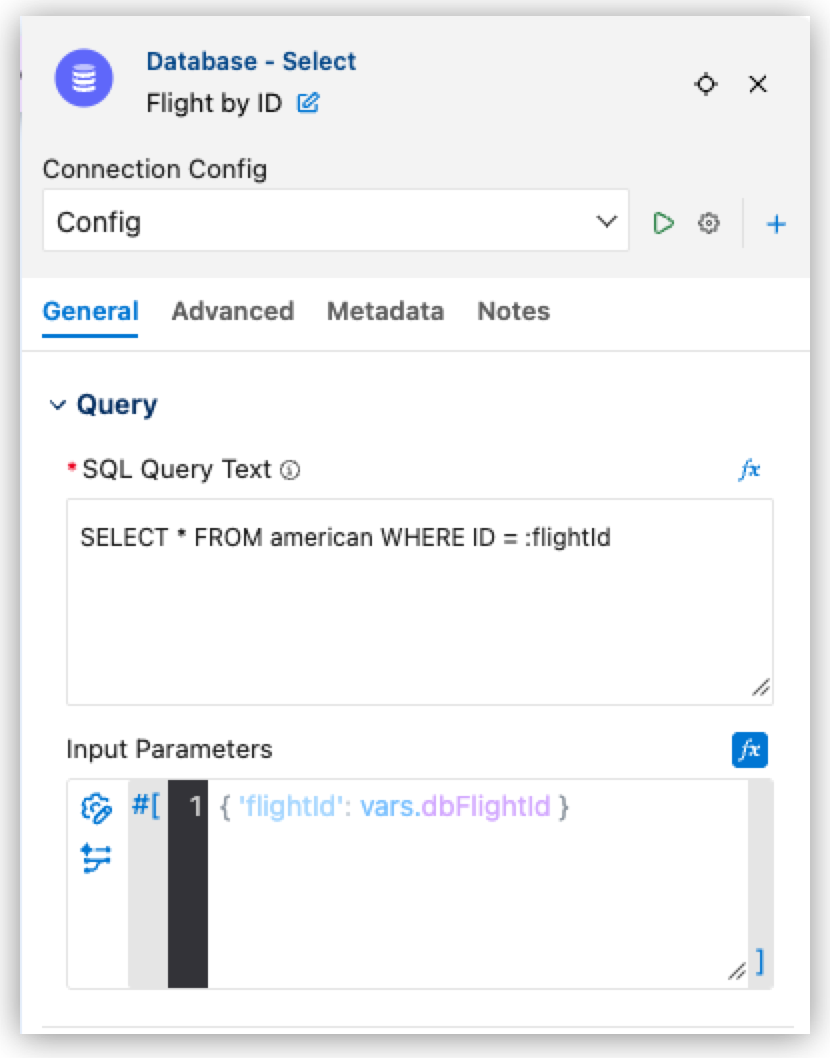
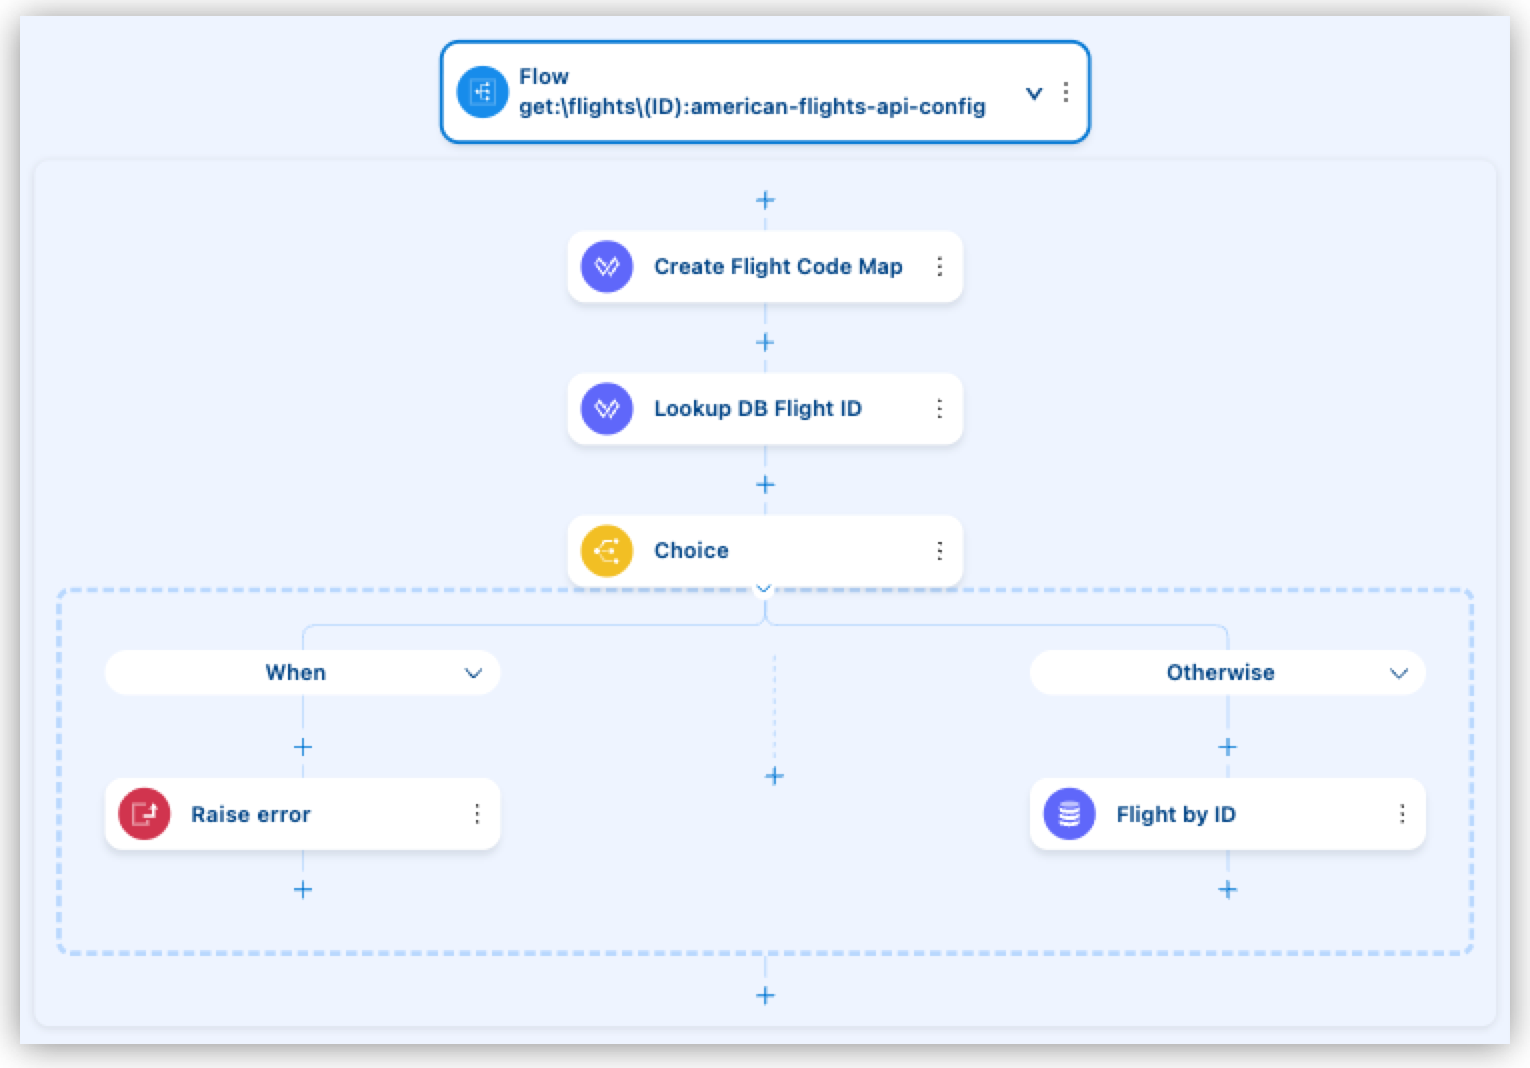
Your flow should now look like this:
Add an Error Handler for Flight Not Found
Now configure the error handler to return a proper 404 response when a flight isn’t found.
-
In the canvas, open the
american-flights-api-mainflow (the main flow with the HTTP listener and error handler). -
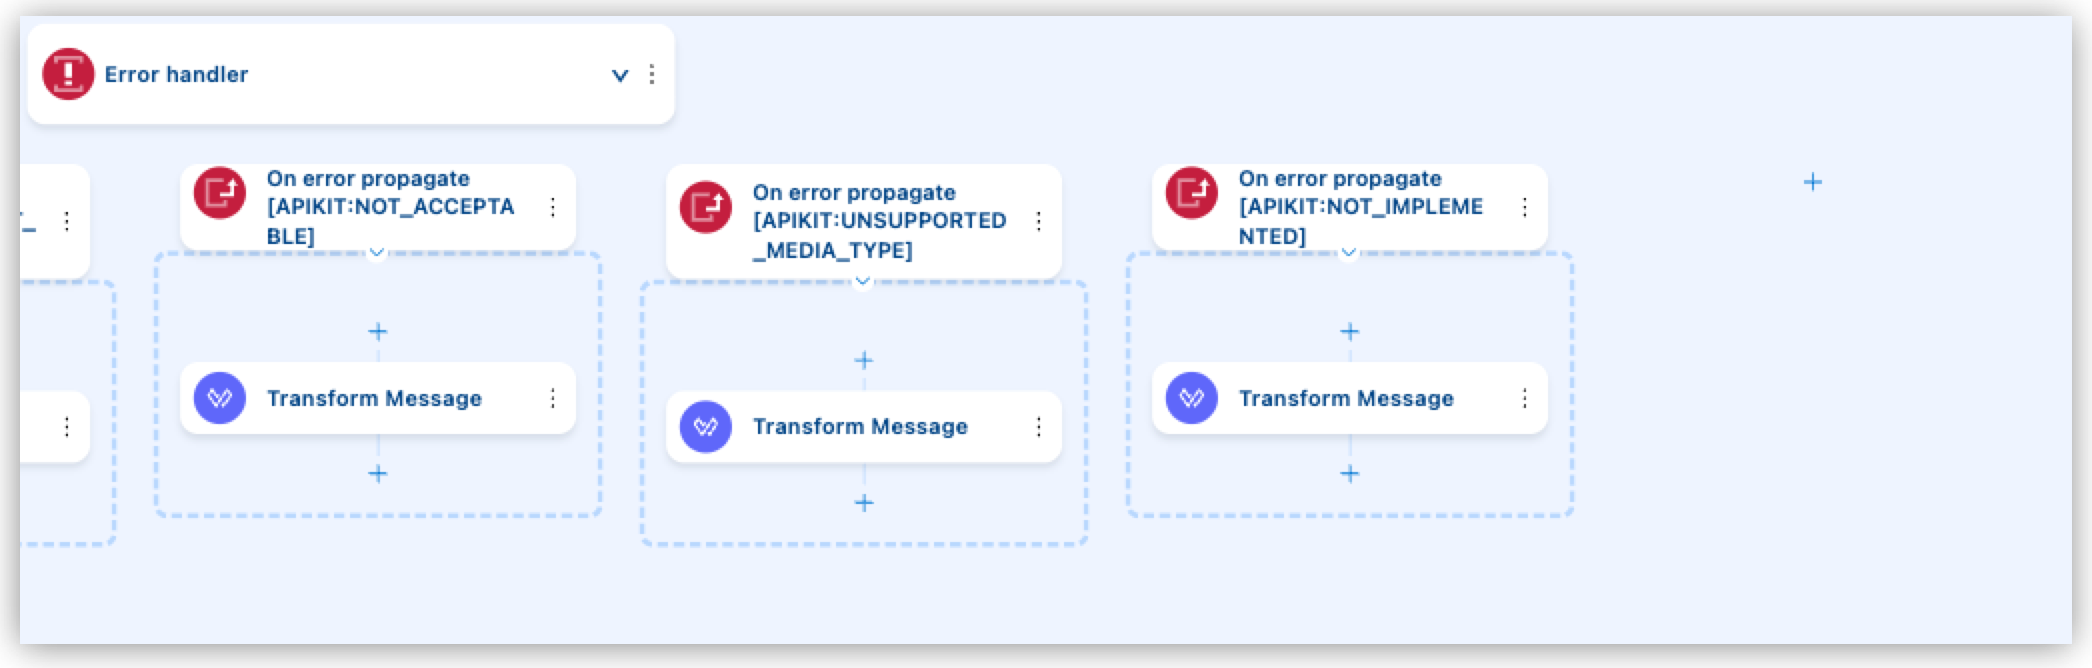
After the last Error Handler, click Add Component (+).
-
Select On Error Propagate.
-
Click the On Error Propagate component to open its properties panel
-
Next to Type click the Text Mode button (
 ) to enable it.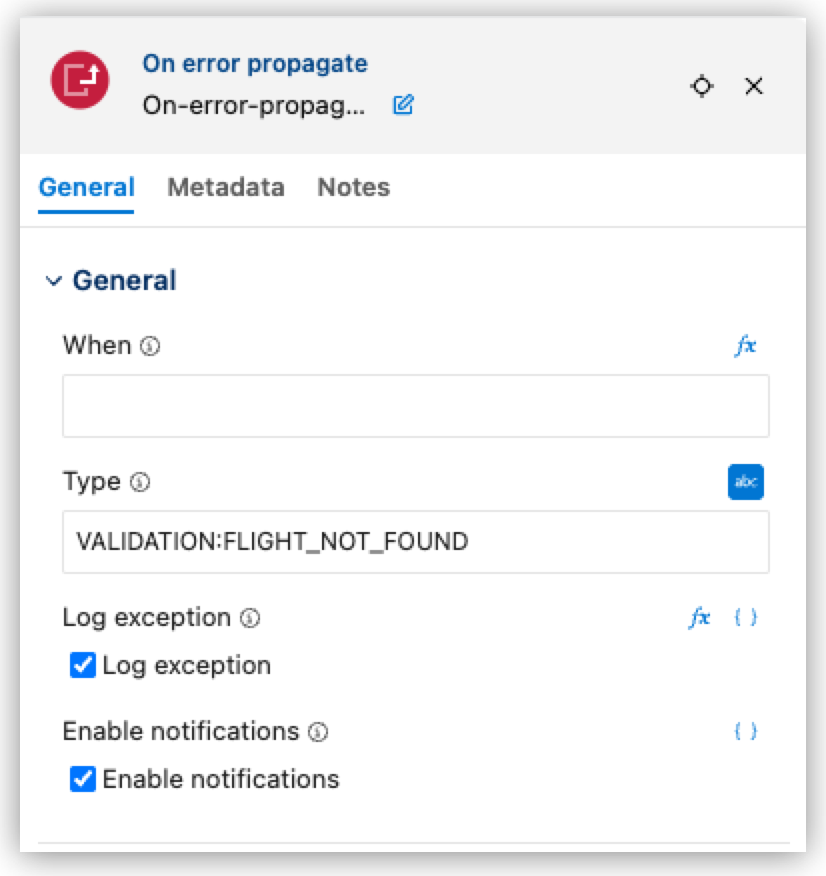
-
In Type, paste
VALIDATION:FLIGHT_NOT_FOUND. -
Inside this error handler, click Add Component (+) and select Core Processors > Components > Logger.
-
Select the Logger and set these properties:
Field Name Field Value Level
WARNMessage
#['Flight not found: ' ++ error.description]This logs details about which flight was requested but not found, helping with debugging and monitoring.
-
After the Logger, click Add Component (+) and add Core Processors > Components > Transform Message.
-
Configure the Transform Message:
-
In the General tab, under Target > Payload, set Source to Inline Script.
-
In the Inline Script field, set:
%dw 2.0
output application/json
---
{
	message: error.description default "Flight not found",
	flightId: attributes.uriParams.flightId
}
-
-
Click +Add and select Variable.
-
Name the variable
httpStatusand set its value to404.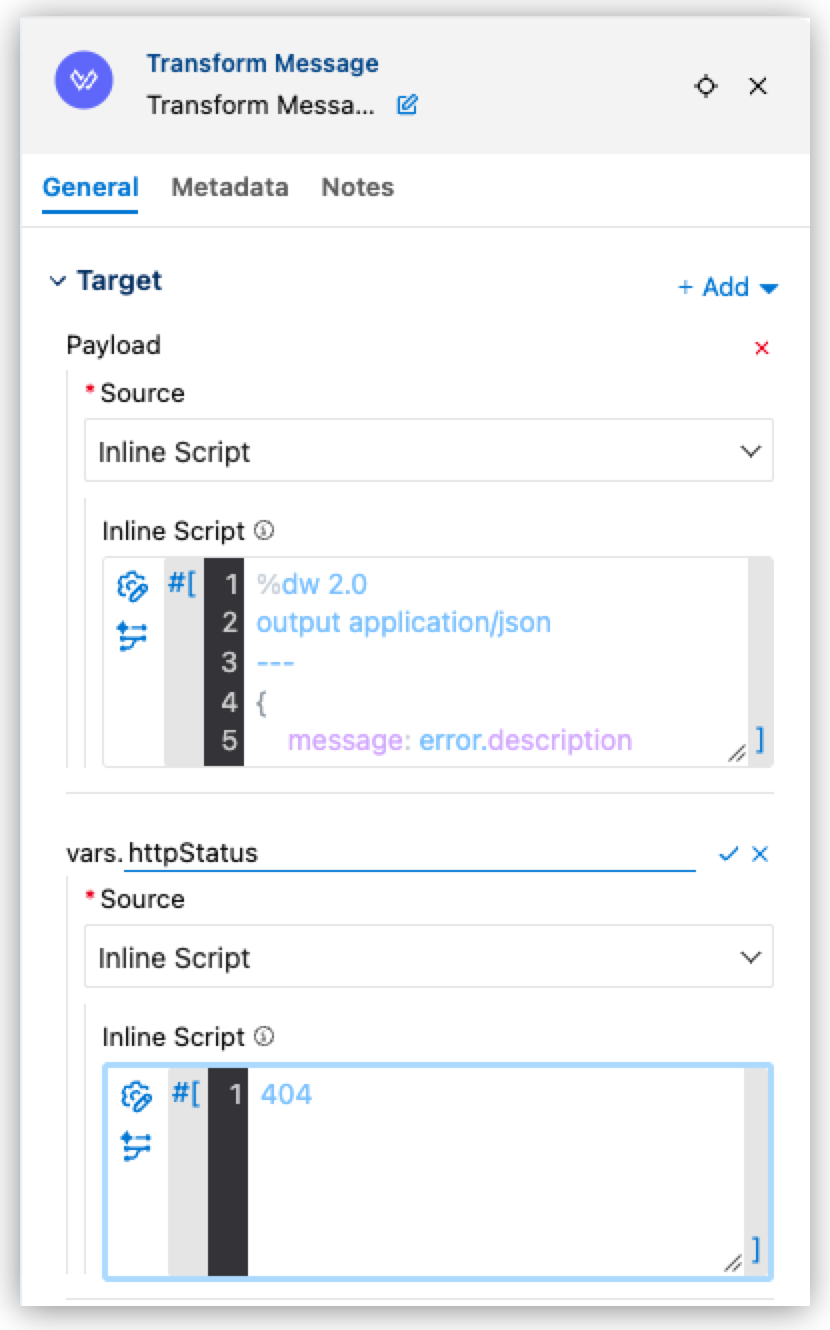
This returns a JSON response with a meaningful error message and the flight ID that was requested, along with a 404 HTTP status code.
Transform Data to Meet the API Contract
When building an API implementation, it’s essential that your responses match the structure defined in your API specification. While the database might store data in one format, your API contract defines how that data should be presented to consumers. DataWeave transformations bridge this gap by mapping database fields to the expected API response format.
In this section, you create a DataWeave transformation that converts database query results into the JSON format specified in your American Flights API contract.
Understand the Data Mapping Challenge
Your MySQL database stores flight information with these fields:
{
	"ID": 1,
	"code1": "rree",
	"code2": "0001",
	"airlineName": "American Airlines",
	"toAirport": "LAX",
	"fromAirport": "MUA",
	"takeOffDate": "2016-01-20",
	"price": 541,
	"planeType": "Boeing 787",
	"seatsAvailable": 0,
	"totalSeats": 200
}
Your API specification defines a different structure for the response:
{
	"ID": 1,
	"code": "AA123",
	"price": 499.99,
	"departureDate": "2024-12-25T10:00:00",
	"origin": "SFO",
	"destination": "LAX",
	"emptySeats": 45,
	"plane": {
		"type": "Boeing 737",
		"totalSeats": 150
	}
}
Notice the transformation challenges:
-
Field name changes: Database fields have different names than API fields:
-
fromAirport→origin -
toAirport→destination -
takeOffDate→departureDate -
seatsAvailable→emptySeats
-
-
Field combination:
code1andcode2need to be combined into a singlecodefield. -
Nested object creation:
planeTypeandtotalSeats(flat fields in the database) must become a nestedplaneobject in the API response. -
Fields to exclude:
airlineNameis in the database but not needed in the API response.
Step 1: Add the Transform Message Component
In your implementation flow get:\flights\(flightId):american-flights-api-config, add a Transform Message component after the Database Select operation.
-
Locate the
get:\flights\(flightId):american-flights-api-configflow in your canvas. -
After the Flight by ID database query, click Add Component (+) and select Core Processors > Components > Transform Message.
-
Click the Transform Message component to open its properties panel.
-
Click Edit name (
), change it to Transform Flight, then click Apply ().
By default, this transform just outputs payload, which passes through the raw database structure without transformation.
Step 2: Define Input Metadata
To help DataWeave understand the structure of your database results, define input metadata.
-
In the project explorer, right-click the
examplesfolder (src/main/resources/examples) and select New File.If the
examplesfolder doesn’t exist, right-click the resources folder (src/main/resources), select New Folder, and name itexamples.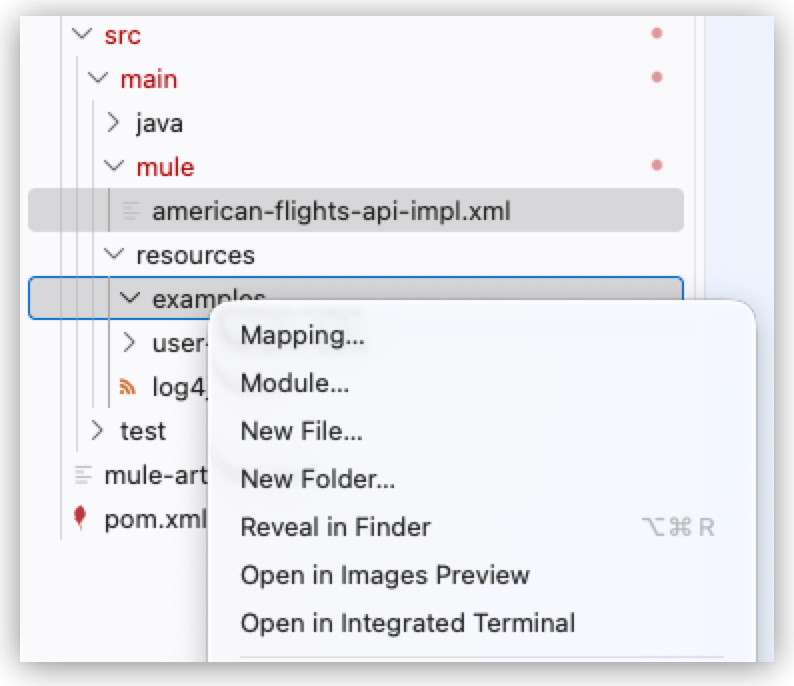
-
Name the file
sample-database-input.json. -
Open the file, populate it with this sample database record, and save the file:
[ { "ID": 1, "code1": "rree", "code2": "0001", "airlineName": "American Airlines", "toAirport": "LAX", "fromAirport": "MUA", "takeOffDate": "2016-01-20", "price": 541, "planeType": "Boeing 787", "seatsAvailable": 0, "totalSeats": 200 } ] -
Open the
get:\flights\(flightId):american-flights-api-configflow in the canvas. -
Click the Transform Flight element you added previously.
-
Click the Metadata tab.
-
Inside Input and next to Payload: Any, click (No metadata selected) > Set custom metadata.
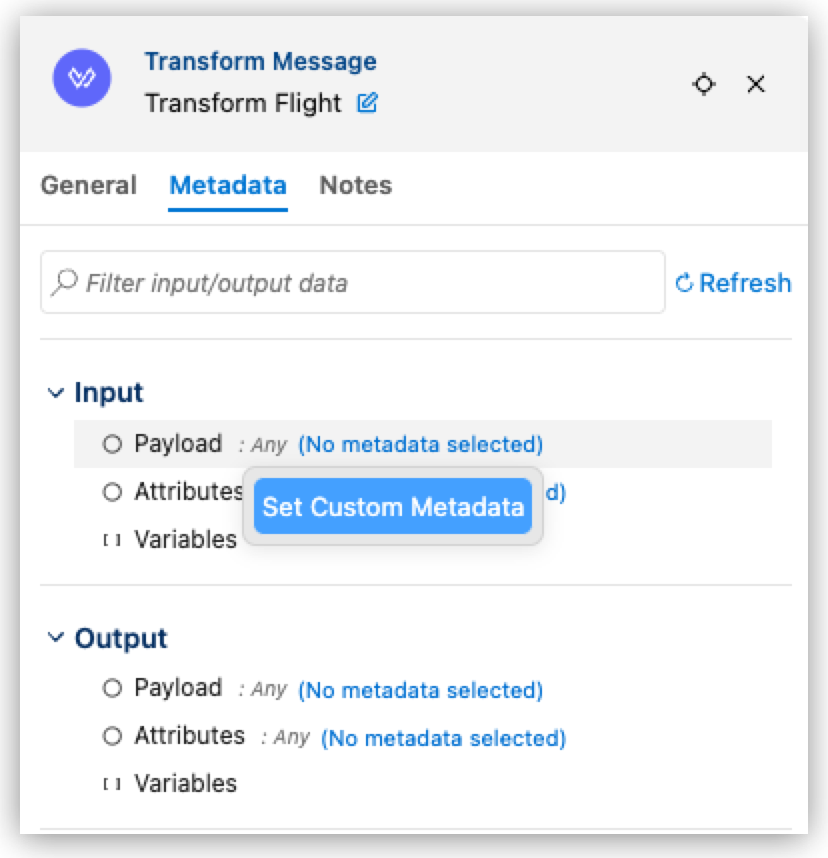
-
In the tab that opens, click Create New.
-
In the Add Custom Metadata dialog, set:
Field Name Field Value Name
DatabaseFlightRecordType
JSON
Source
Example
Example
examples/sample-database-input.json
This is the example file you just created. -
Click Save & Close.
-
Click Apply & Close.
You should now see the input payload structure in the left panel, showing all available database fields.
Step 3: Define Output Metadata
Now define the expected API response format based on your specification.
-
In the project explorer, right-click the
examplesfolder (src/main/resources/examples) and select New File. -
Name the file
sample-flight-response.json. -
Open the file, populate it with this sample API response (from your API spec), and save the file:
{ "ID": 1, "code": "AA123", "price": 499.99, "departureDate": "2024-12-25T10:00:00", "origin": "SFO", "destination": "LAX", "emptySeats": 45, "plane": { "type": "Boeing 737", "totalSeats": 150 } } -
Open the
get:\flights\(flightId):american-flights-api-configflow in the canvas. -
Click the Transform Flight element you added previously.
-
Click the Metadata tab.
-
Inside Output and next to Payload: Any, click (No metadata selected) > Set custom metadata.
-
In the tab that opens, click Create New.
-
In the Add Custom Metadata dialog, set:
Field Name Field Value Name
FlightResponseType
JSON
Source
Example
Example
examples/sample-flight-response.json
This is the example file you just created. -
Click Save & Close.
-
Click Apply & Close.
The output panel now shows the expected response structure with the nested plane object.
Step 4: Create the Field Mappings
With both input and output metadata defined, you can now create the transformation using DataWeave’s mapping features.
-
Use MuleSoft Vibes
-
Write the DataWeave Script Manually
-
Open MuleSoft Vibes.
-
Send this message:
In the get:\flights\(flightId):american-flights-api-config flow, open the Transform Flight component and add a transformation that maps the input metadata with the output metadata. For code, use code1 ++ code2.If you used a different flow or component name, ensure you specify it in the message so MuleSoft Vibes knows exactly which flow and components to modify. -
Wait until MuleSoft Vibes completes the task before making further changes.
After MuleSoft Vibes finishes adding the transformation, confirm that the DataWeave script is similar to this:
%dw 2.0
output application/json
---
{
	ID: payload[0].ID,
	code: payload[0].code1 ++ payload[0].code2,
	price: payload[0].price,
	departureDate: payload[0].takeOffDate,
	origin: payload[0].fromAirport,
	destination: payload[0].toAirport,
	emptySeats: payload[0].seatsAvailable,
	plane: {
		"type": payload[0].planeType,
		totalSeats: payload[0].totalSeats
	}
}
You can write the complete DataWeave script in the Script view:
-
Click the Script tab in the Transform Message component.
-
Replace the current content with:
%dw 2.0
output application/json
---
{
	ID: payload[0].ID,
	code: payload[0].code1 ++ payload[0].code2,
	price: payload[0].price,
	departureDate: payload[0].takeOffDate,
	origin: payload[0].fromAirport,
	destination: payload[0].toAirport,
	emptySeats: payload[0].seatsAvailable,
	plane: {
		"type": payload[0].planeType,
		totalSeats: payload[0].totalSeats
	}
}
Explanation:
-
code: payload[0].code1 ++ payload[0].code2— concatenatescode1andcode2into a singlecodefield. -
departureDate: payload[0].takeOffDate— renames the field from database to API format. -
origin: payload[0].fromAirport— mapsfromAirporttoorigin. -
destination: payload[0].toAirport— mapstoAirporttodestination. -
emptySeats: payload[0].seatsAvailable— renamesseatsAvailabletoemptySeats. -
plane: { … }— creates a nested object from flat database fields. -
output application/json— specifies the output format.